¶ Synopsis
This guide describes a Widget to replicate what the development-only PrintString node does. In other words, it prints text to the screen. This can be very useful when debugging mods.
¶ What is a Widget?
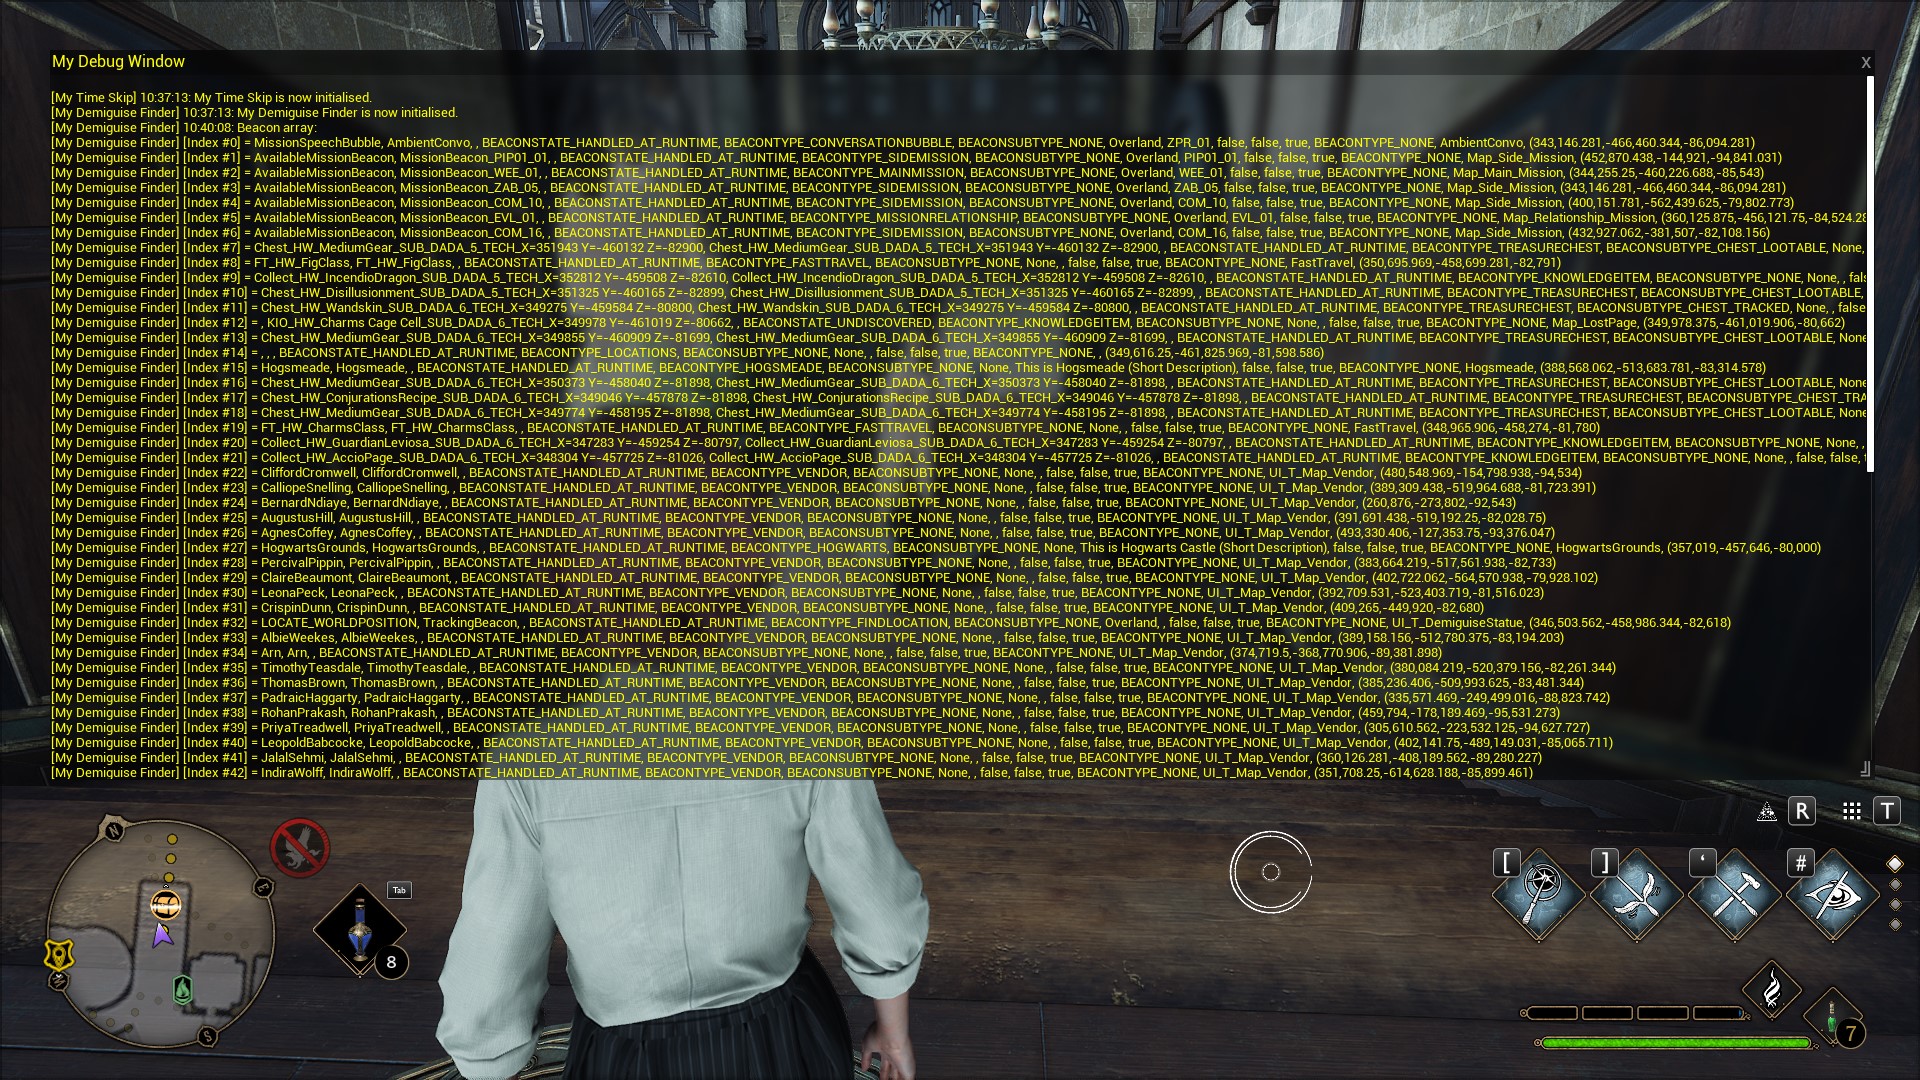
A Widget is something that puts stuff on the screen. It's as simple as that. To give you an idea what I mean, here's the Debug Widget in action:
¶ This is not the Widget you were expecting…
Regular readers will know that I included a Debug Widget in the previous tutorial (regarding the MyDemiguiseFinder mod), but said I'd describe how it worked in this one. I'm actually not going to do that. I'm going to describe how a better Debug Widget works. The one I included with MyDemiguiseFinder was a brute-force caveman solution that I came up with because I couldn't see an easier way to do it. The obvious way would have been to use a Multi-line Editable Text Box but I couldn't find any Blueprint Nodes to change the text inside one of those so I assumed it couldn't be done. It turns out I just didn't look hard enough. (Sometimes the Level Blueprint search utility can be a little tricky to master.) I subsequently discovered a Debug Widget by Narknon on the Hogwarts Legacy Modding Discord which more-or-less did exactly what I wanted. Even better, it did it in a way that was far superior to the solution I came up with. In particular, it handles scrolling for you, and allows you to reposition and/or resize the debug window real-time.
You can find Narknon's original Widget here, but I will be using a tailored version in this tutorial so you don't need to download that one.
Download an updated version of
MyDemiguiseFinderhere andMyDebugWidgethere.
¶ Cooking and Usage
Please note that:
- The mod and the widget should be cooked with different pakchunks.
- You can then publish your mod on Nexus without the widget.
- The widget should not be loaded into the
Blueprint Apparate Modloader. Your game will get stuck when you fast-travel if you do. This is because allLevelsget unloaded and re-loaded when you fast-travel. When the game tries to load yourWidgetas aLevelit will wait forever for theLevelto fire up… because the widget doesn't contain aLevel. - If you follow the structure I've used in this version of
MyDemiguiseFinderyou'll be able to use the sameWidgetfor all your mods - they can all write to the sameWidget!!! - You can also type notes into the
Widgetyourself, if you want to annotate the debug info, or cut-and-paste the contents into a file.
Yes, you're right. That is genius!
¶ Prerequisites
All the usual prerequisites apply at this point. I won't keep repeating them. But if you're a beginner and you haven't read the previous tutorials you should. You'll struggle to follow this one if you don't.
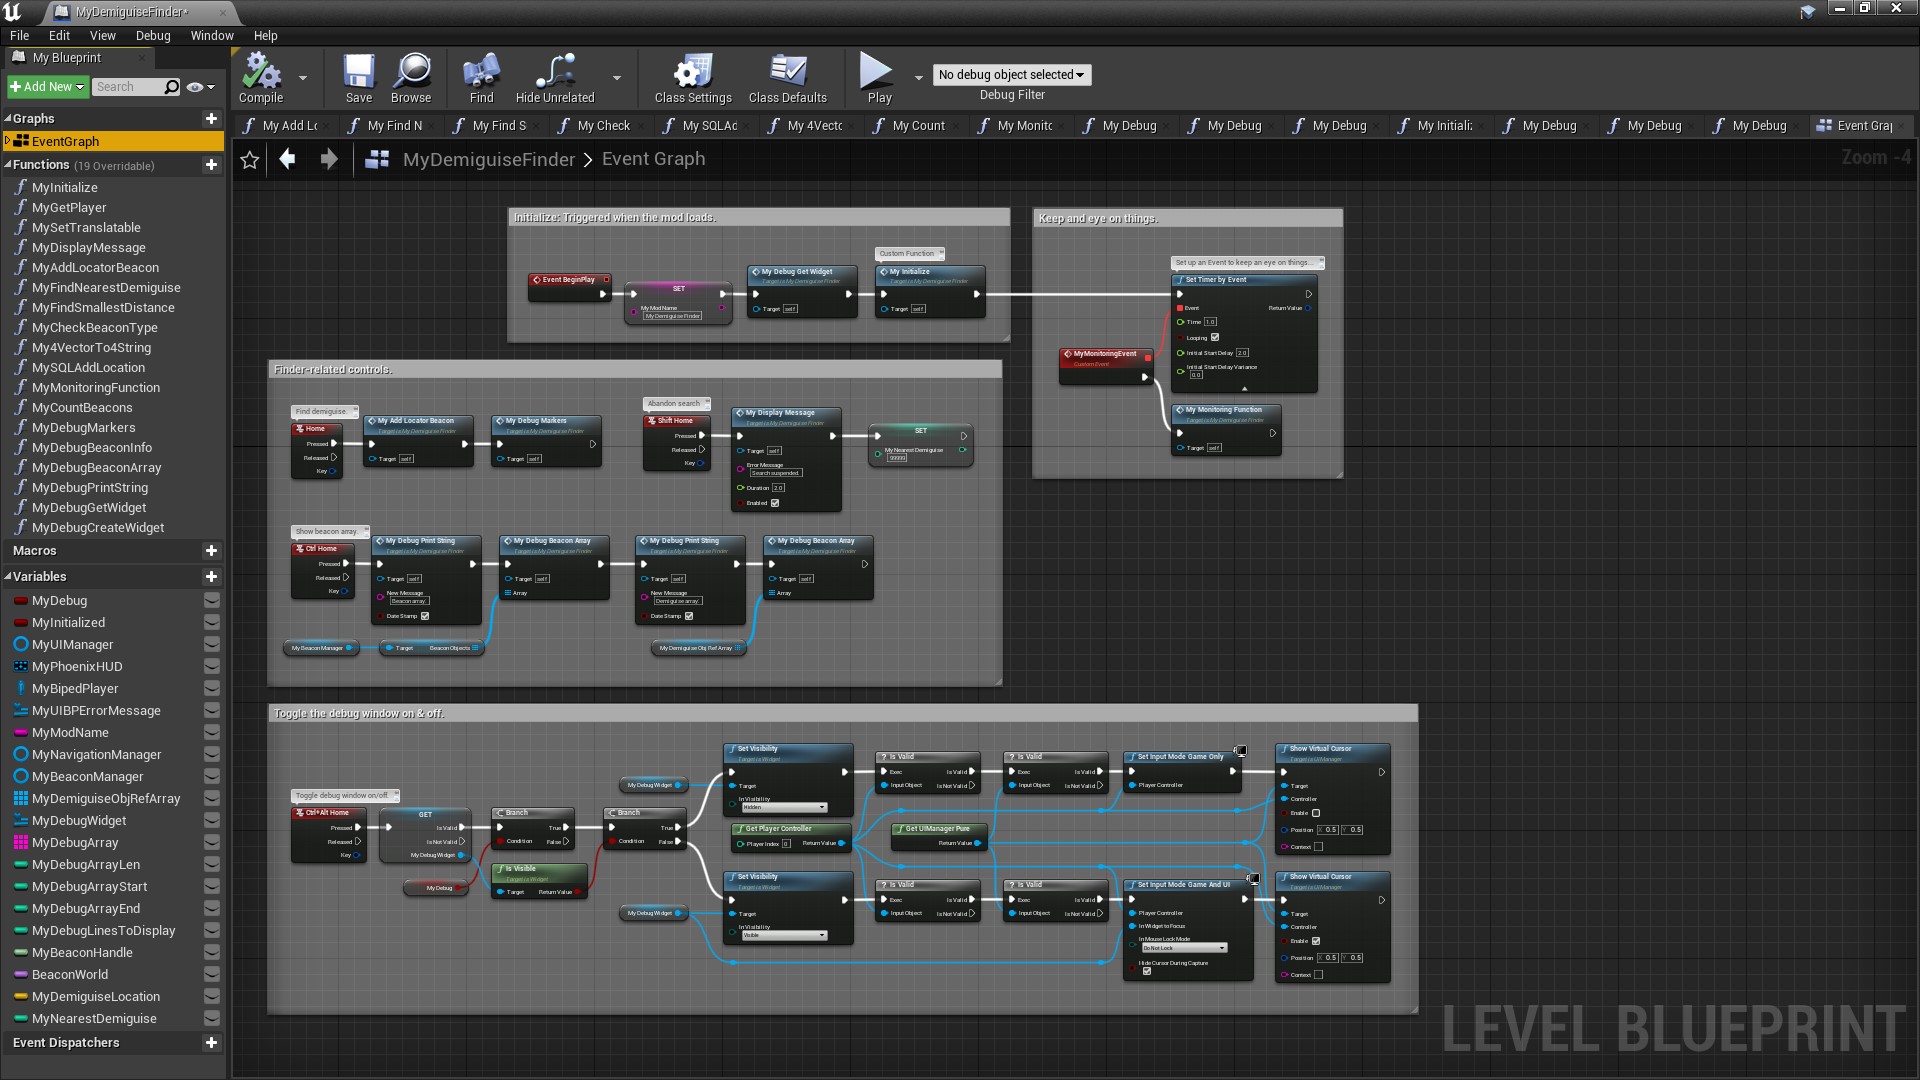
¶ Event Graph
The Event Graph looks quite different to the previous version of MyDemiguiseFinder. I was able to remove all the key-bindings related to scrolling, because that's all handled by the Widget now. Here's how it breaks down:
- Everything related to the
Debug Widgetis namedMyDebug-something to keep them distinct from everything else. Event BeginPlayis triggered when the mod loads. It sets up the name of the mod in aStringVariablecalledMyModName. This is an improvement which I forgot to mentioned in the last tutorial. Whenever you create a new mod you can simply copy an old one, change this variable, and you're good to go with all your usualFunctionsandEventsalready in place. ThisVariableis also used to indicate which mod a particularDebugmessage came from. Since we're planning to use the sameWidgetfor all our mods, this will be important.- Next
MyDebugGetWidgetis called to set up theDebug Widget. This happens beforeInitializeis called becauseInitializeuses theDebug Widgetto report any errors. - You'll notice lots of
MyDebugPrintStringnodes. These print aStringto theDebug Widget. You'll also see some others likeMyDebugMarkersandMyDebugBeaconArray. These are customFunctionsI've created to display the contents of some internalArrays. We'll cover these in more detail later. - At the bottom you'll see the block entitled
Toggle the Debug Window On and Off. This looks quite complicated, but it's really not.Ctrl-Alt-Homeis the key combination I chose to call theEventthat makes theDebug Widgetappear and disappear, but you can choose something else if you like. TheEventworks like this:
- It
Gets theVariableMyDebugWidget. I declared thisVariableto be ofClassMyDebugWidgetwhen I created it. This is aClassthat will become available once theWidgetis created in (or loaded into) yourCustomContentfolder. The node thatGets it also checks thatMyDebugWidgetisValid. If it's not thenMyDebugGetWidgetfailed to set-up theDebug Widget(probably because theWidgetfiles are missing) so theWidgetdoesn't exist. In which case there's nothing to do and theEventends. - NOTE: To convert a normal
GetNodeinto aValidated Getsimply right-click on theGetNodeand selectConvert to Validated Get. - If the
MyDebugVariableisTRUEand theWidgetisVisiblethen it's madeInvisible. And vice-versa. TheInput Modeis also set up to allow/disallow the user to use theCursorand theCursoris madeVisibleorInvisible.
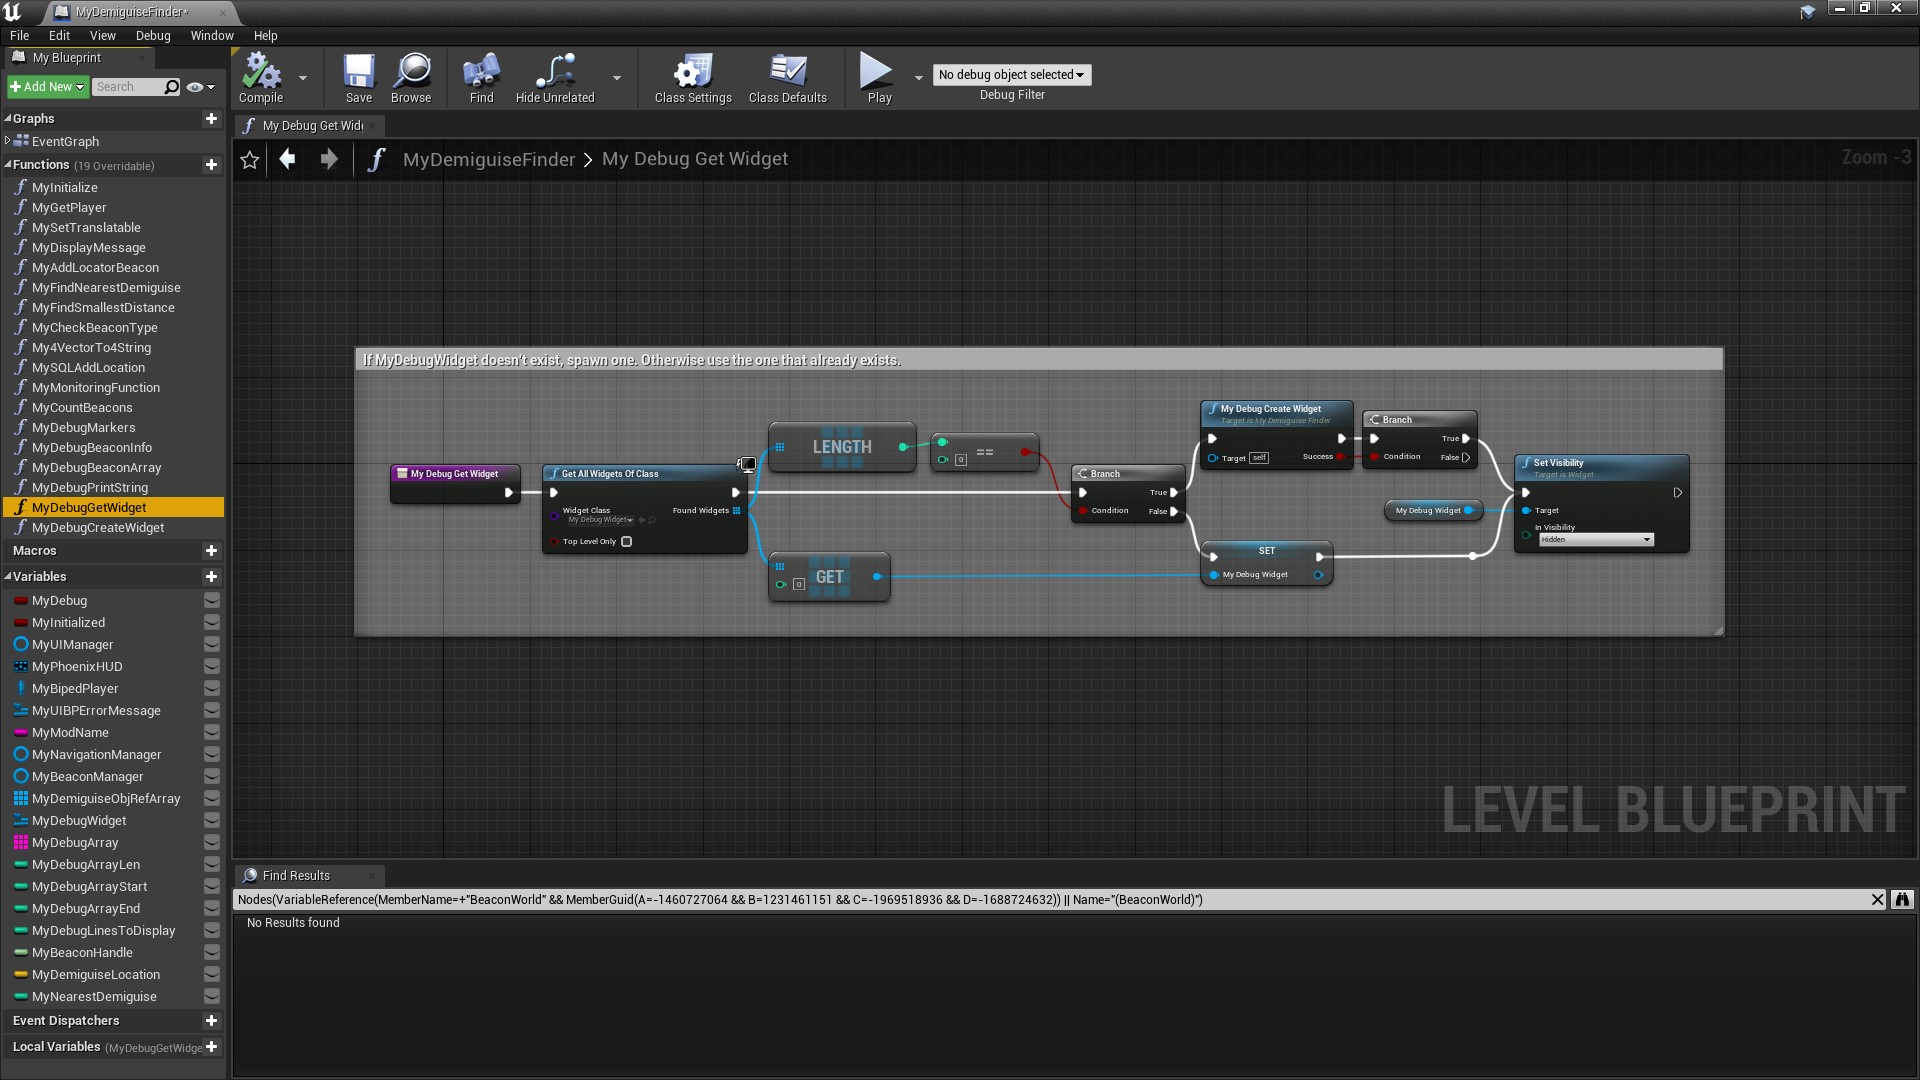
¶ MyDebugGetWidget
This Function spawns a Widget called MyDebugWidget (if one doesn't already exist) otherwise it just sets Variable MyDebugWidget to point to the Widget that's already been spawned (presumably by another one of your mods).
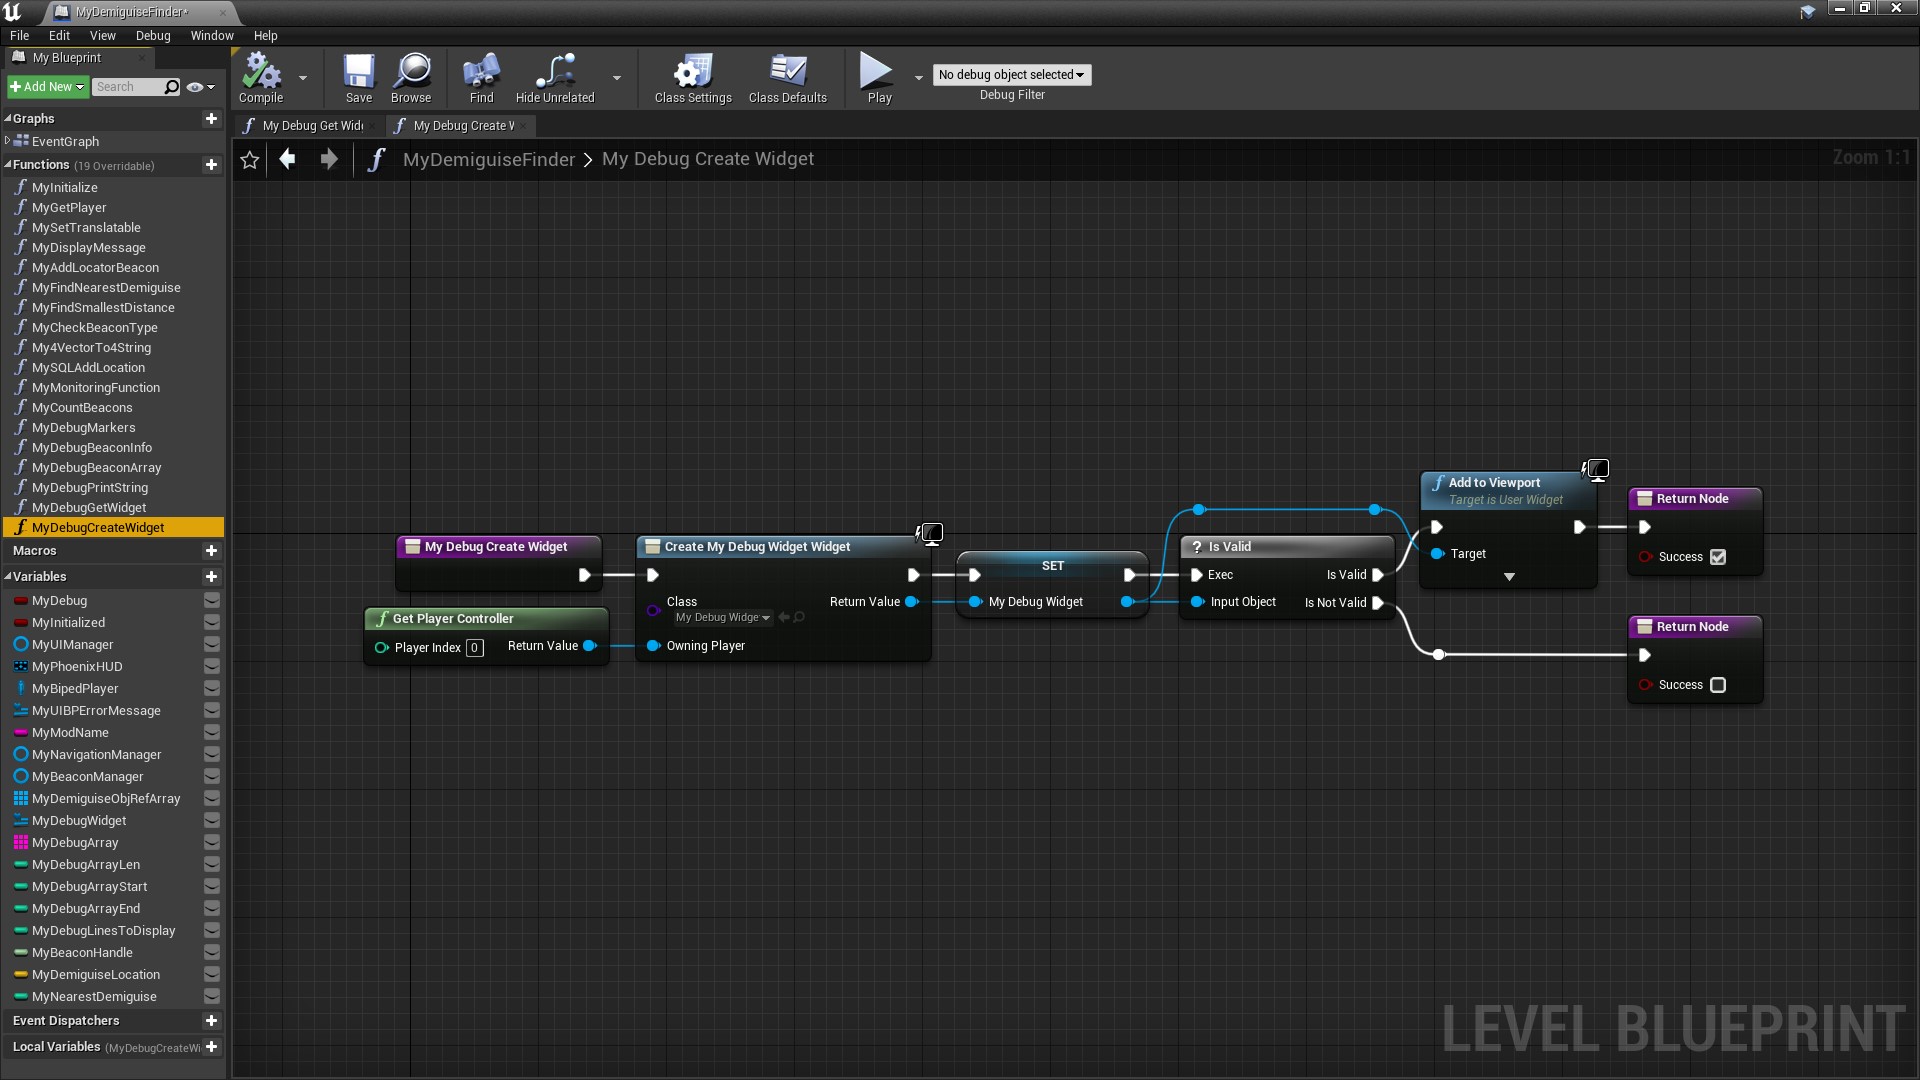
¶ MyDebugCreateWidget
This Function actually does the spawning. If it succeeds it adds the Widget to the Viewport (i.e. screen).
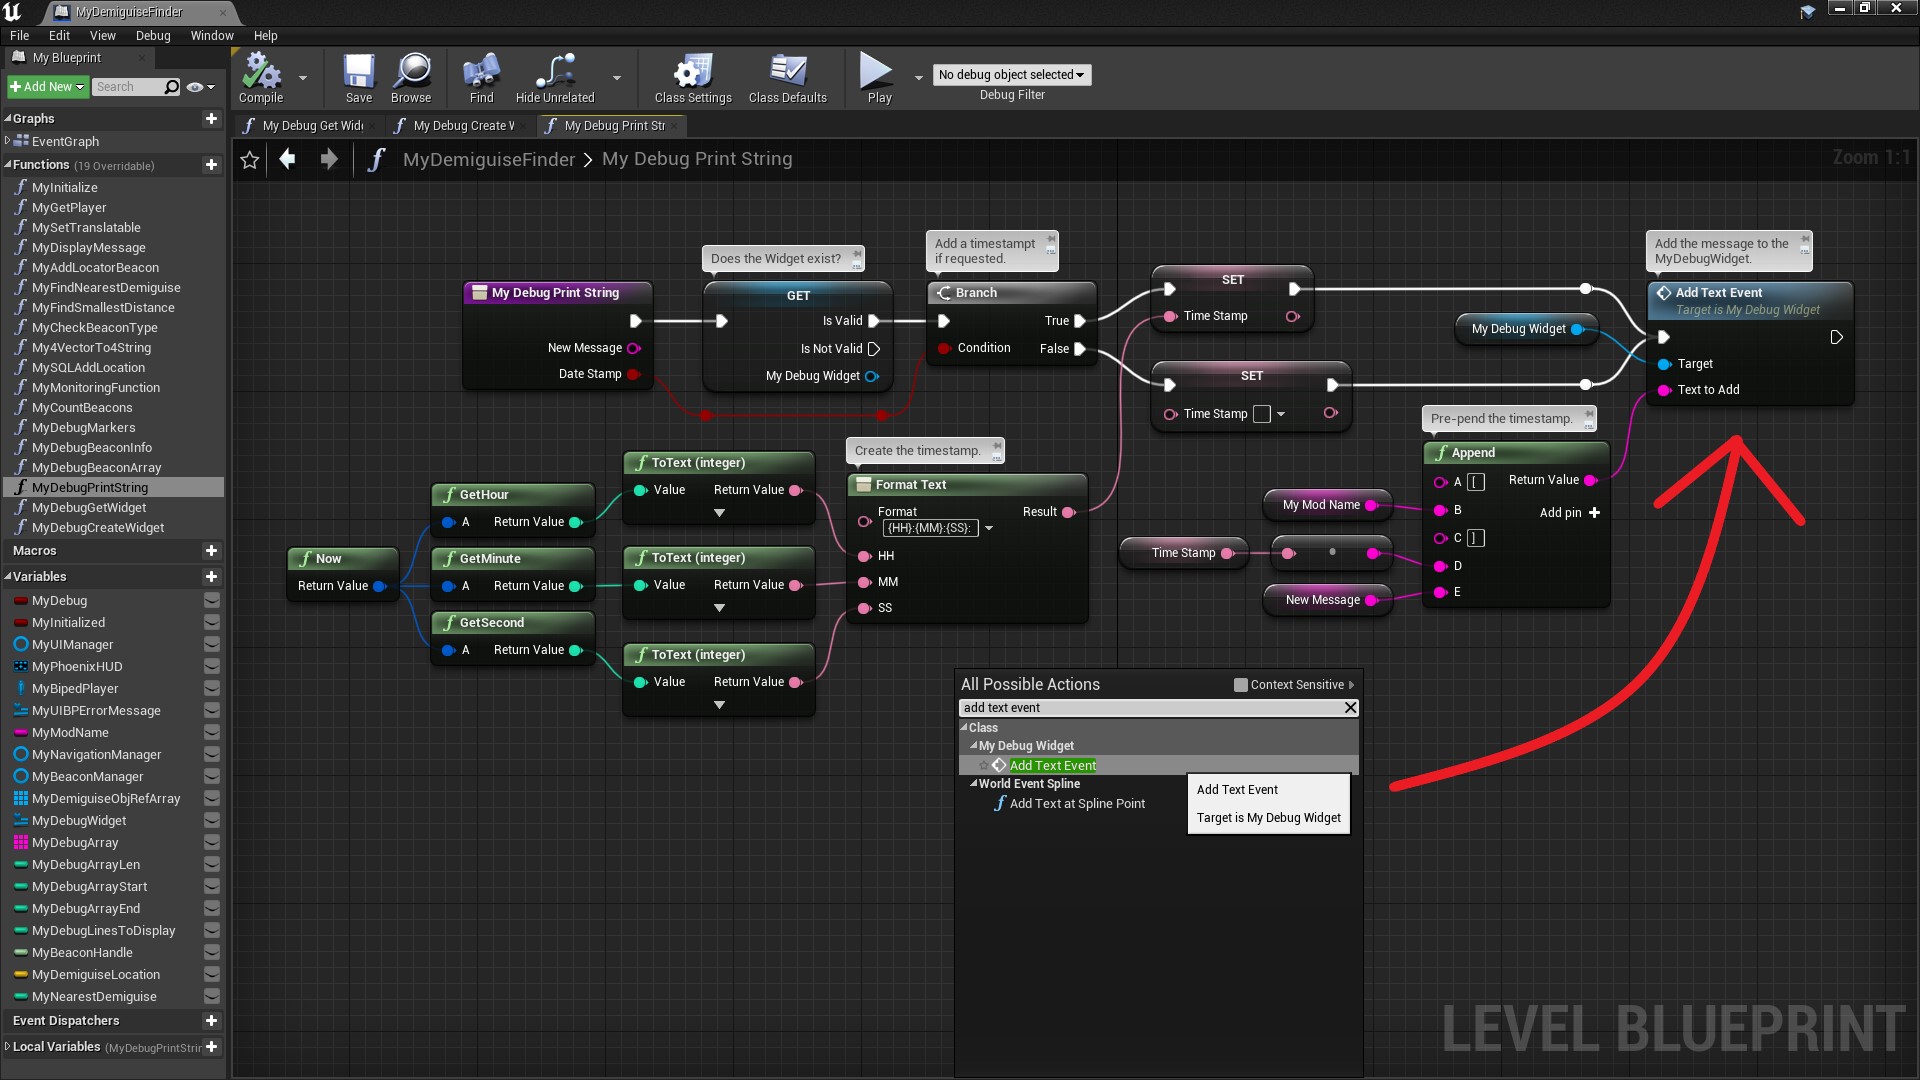
¶ MyDebugPrintString
Most of this Function is actually dedicated to creating a timestamp. The business of adding the String to the DebugWidget is handled by that final node. Note that the Target is MyDebugWidget, meaning that this Node is actually calling a Event inside MyDebugWidget not an Event inside this mod. To add a Node like this you need to search for the name and then select the one that's listed underneath the Heading that corresponds to the Asset in which that Function resides (as shown in the screenshot). You may need to untick Context Sensitive before it will appear.
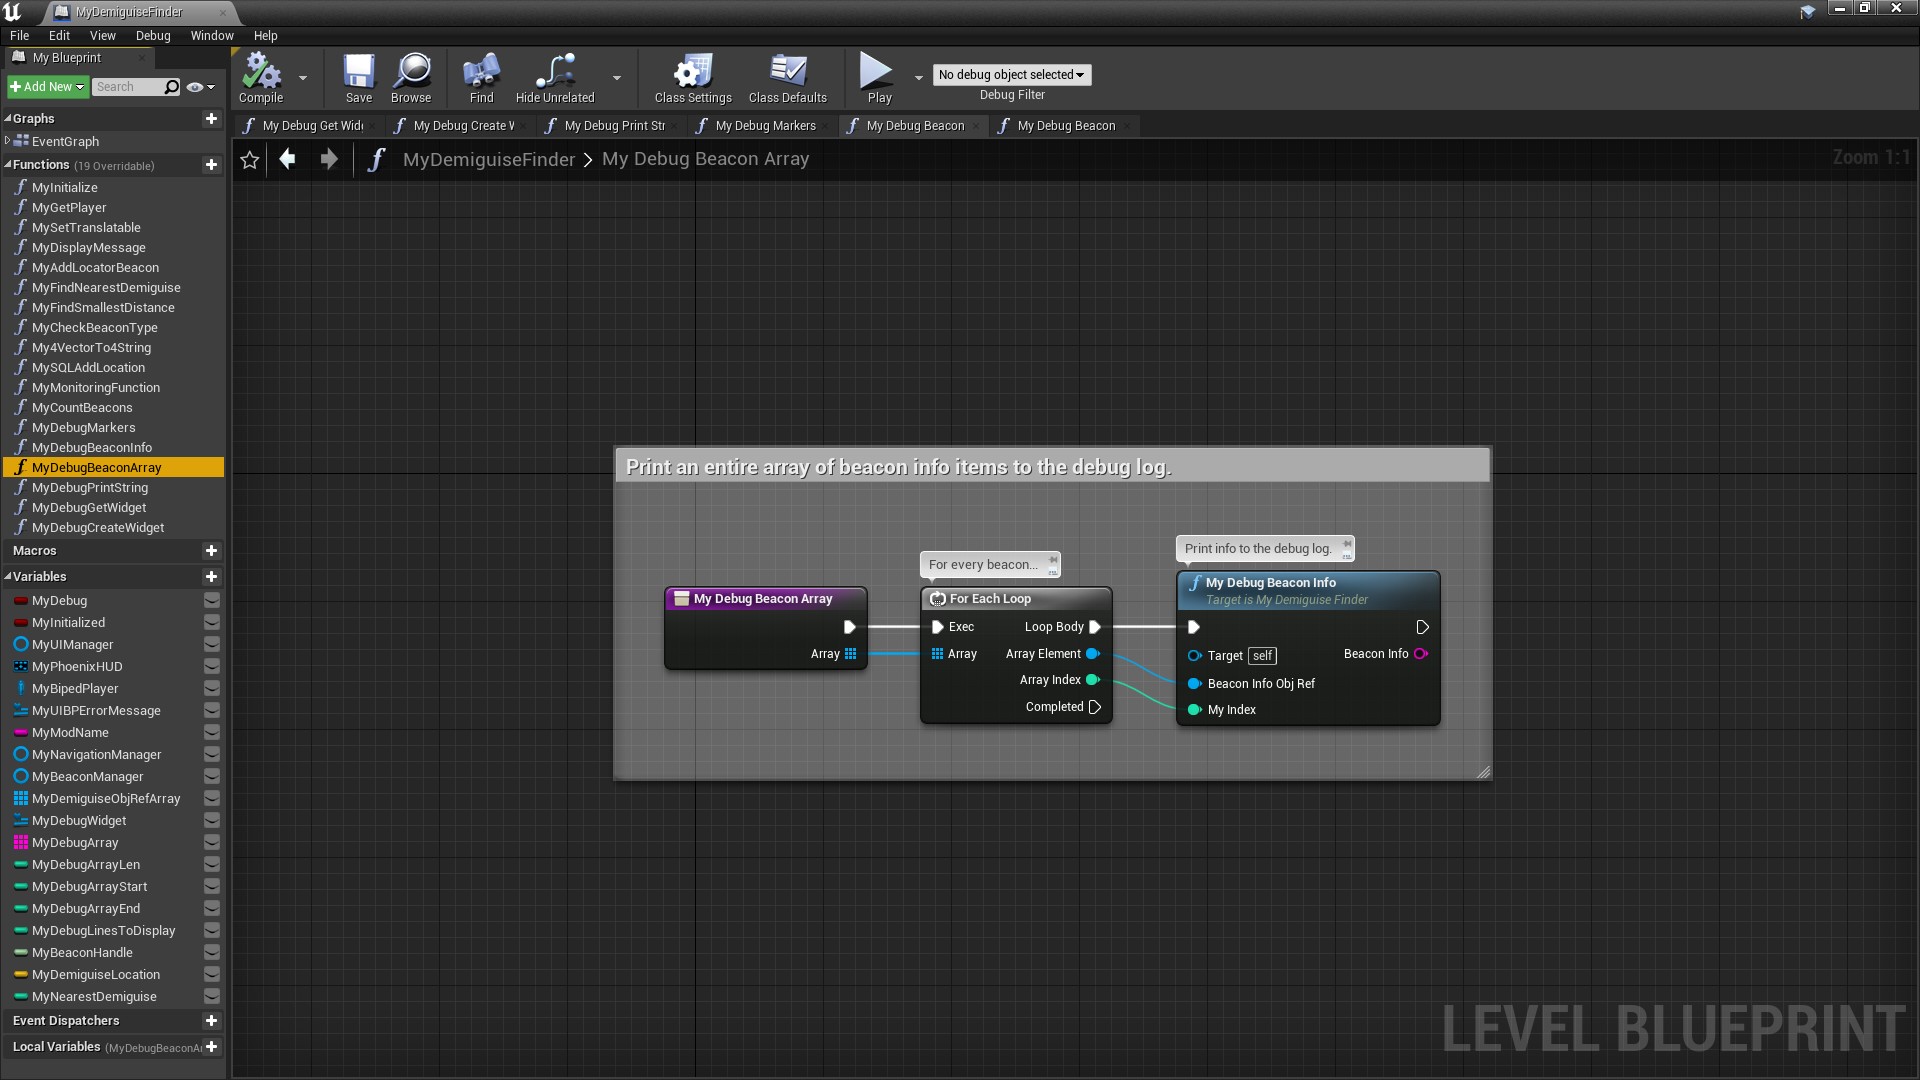
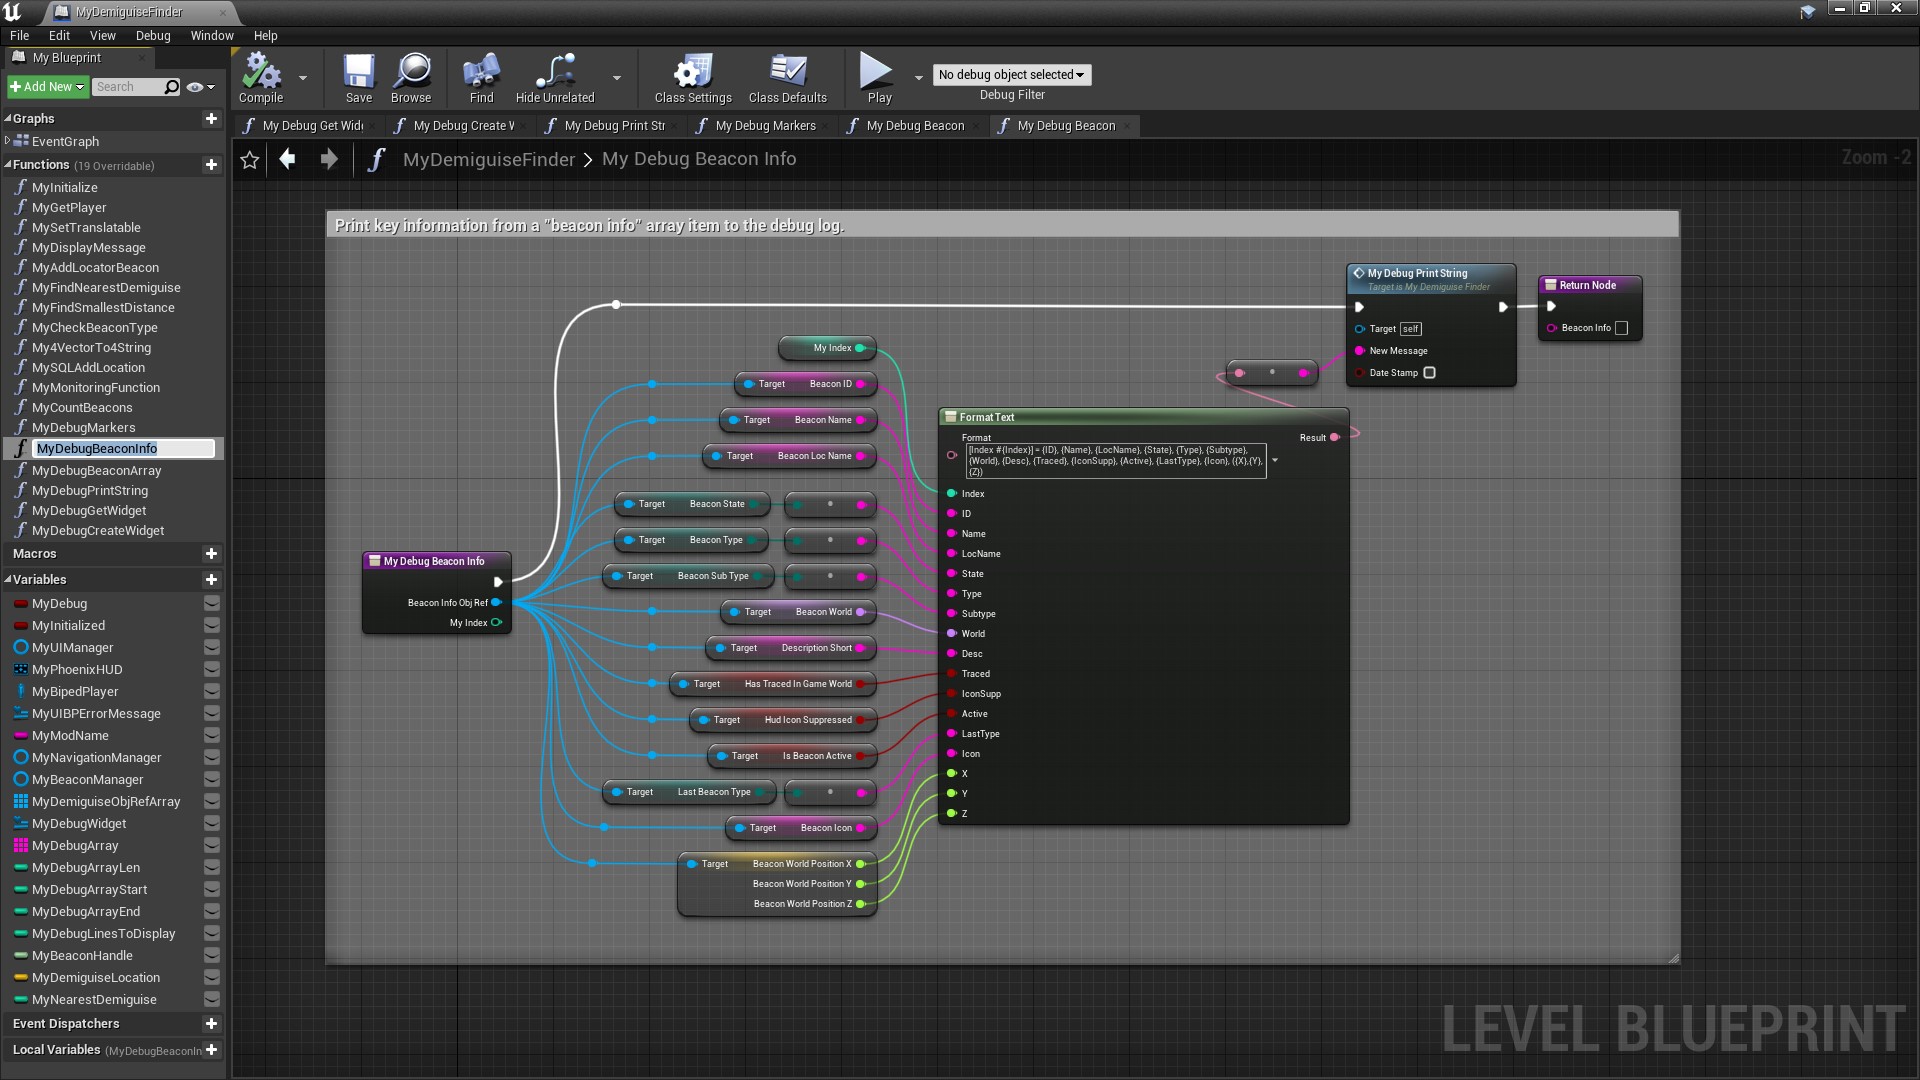
¶ MyDebugBeaconArray and MyDebugBeaconInfo
There's an array inside the game called Beacon Info Array. I wanted to know what was inside that Array. This is how I found out.
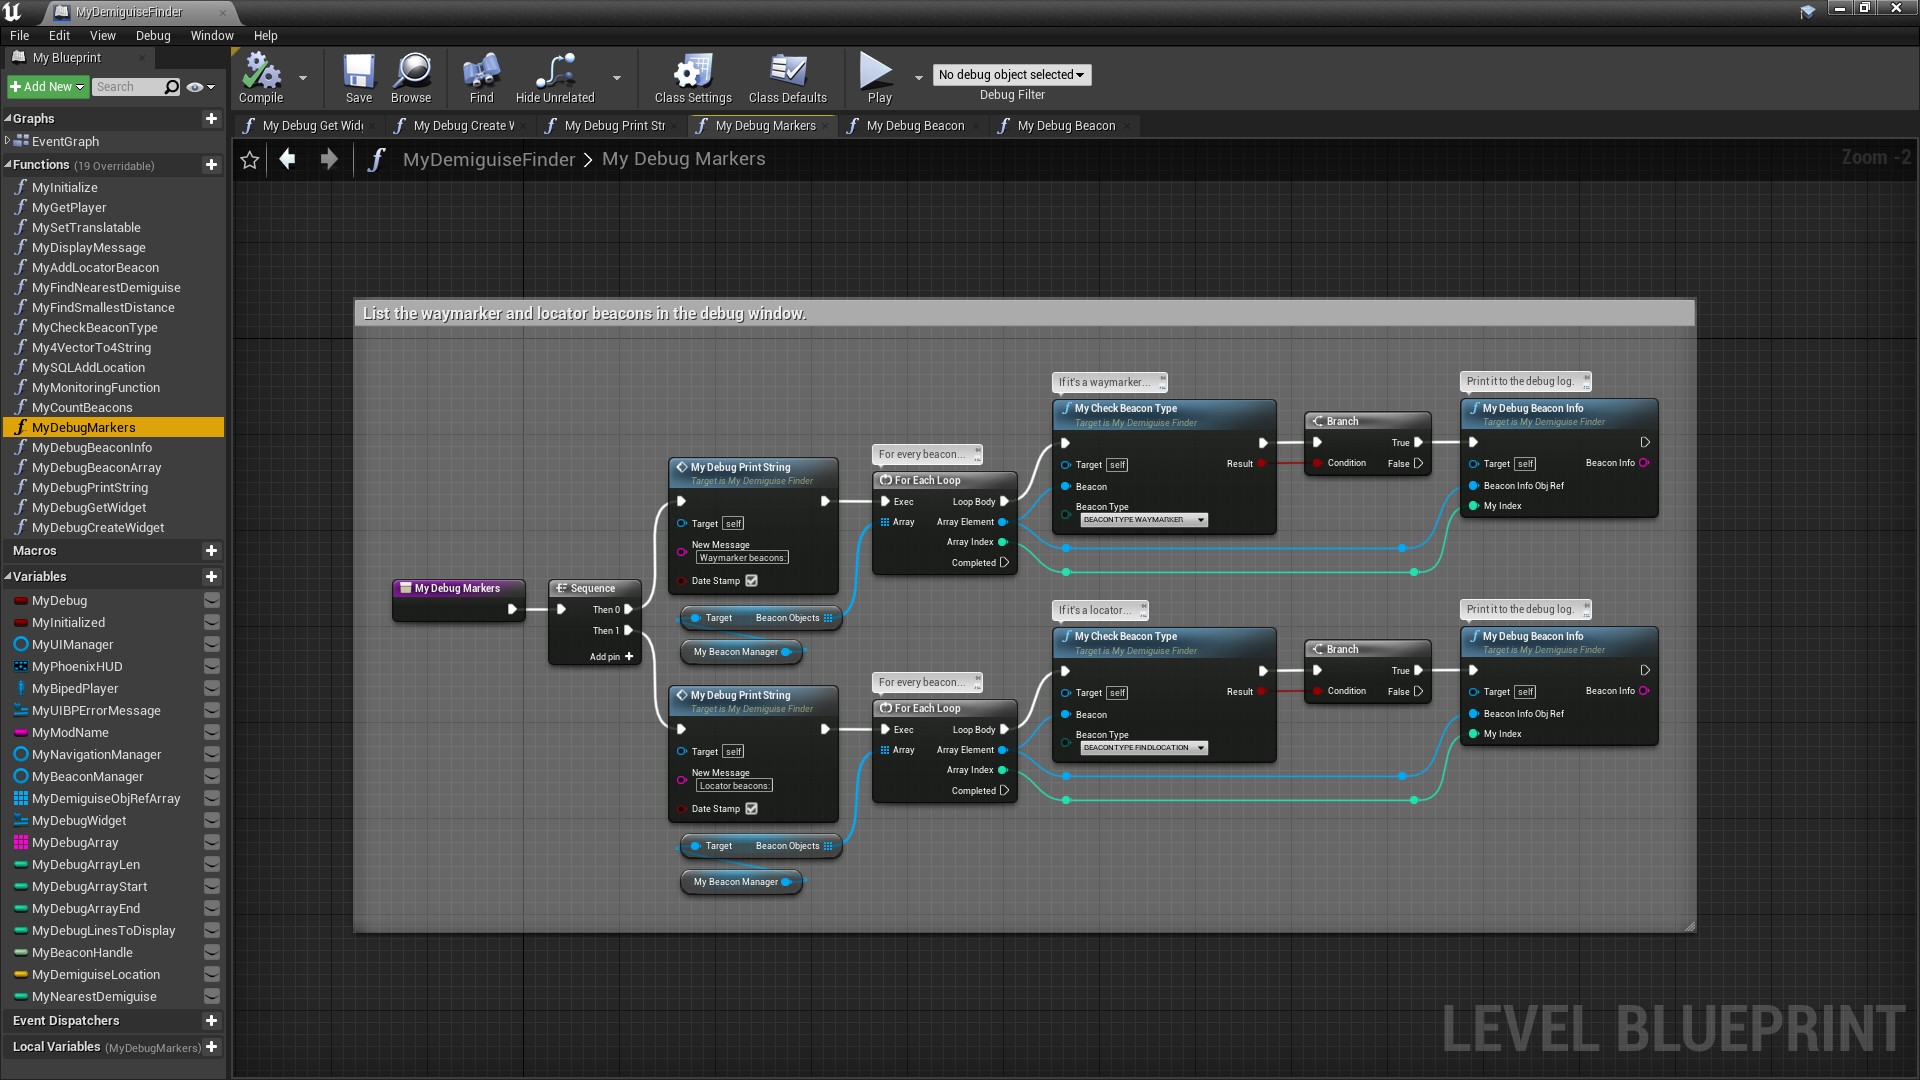
¶ MyDebugMarkers
And this is how I printed out just the Waymarker and Locator Beacons: I looped through all the Beacons and printed out the ones I wanted.
¶ MyDebugWidget - Designer
Now we'll move on to discussing the actual Widget.
I'm not going to go into much detail about how to create this. By now you should be familiar enough with the Editor that you can figure it out, and there's lots of info online. But to summarise…
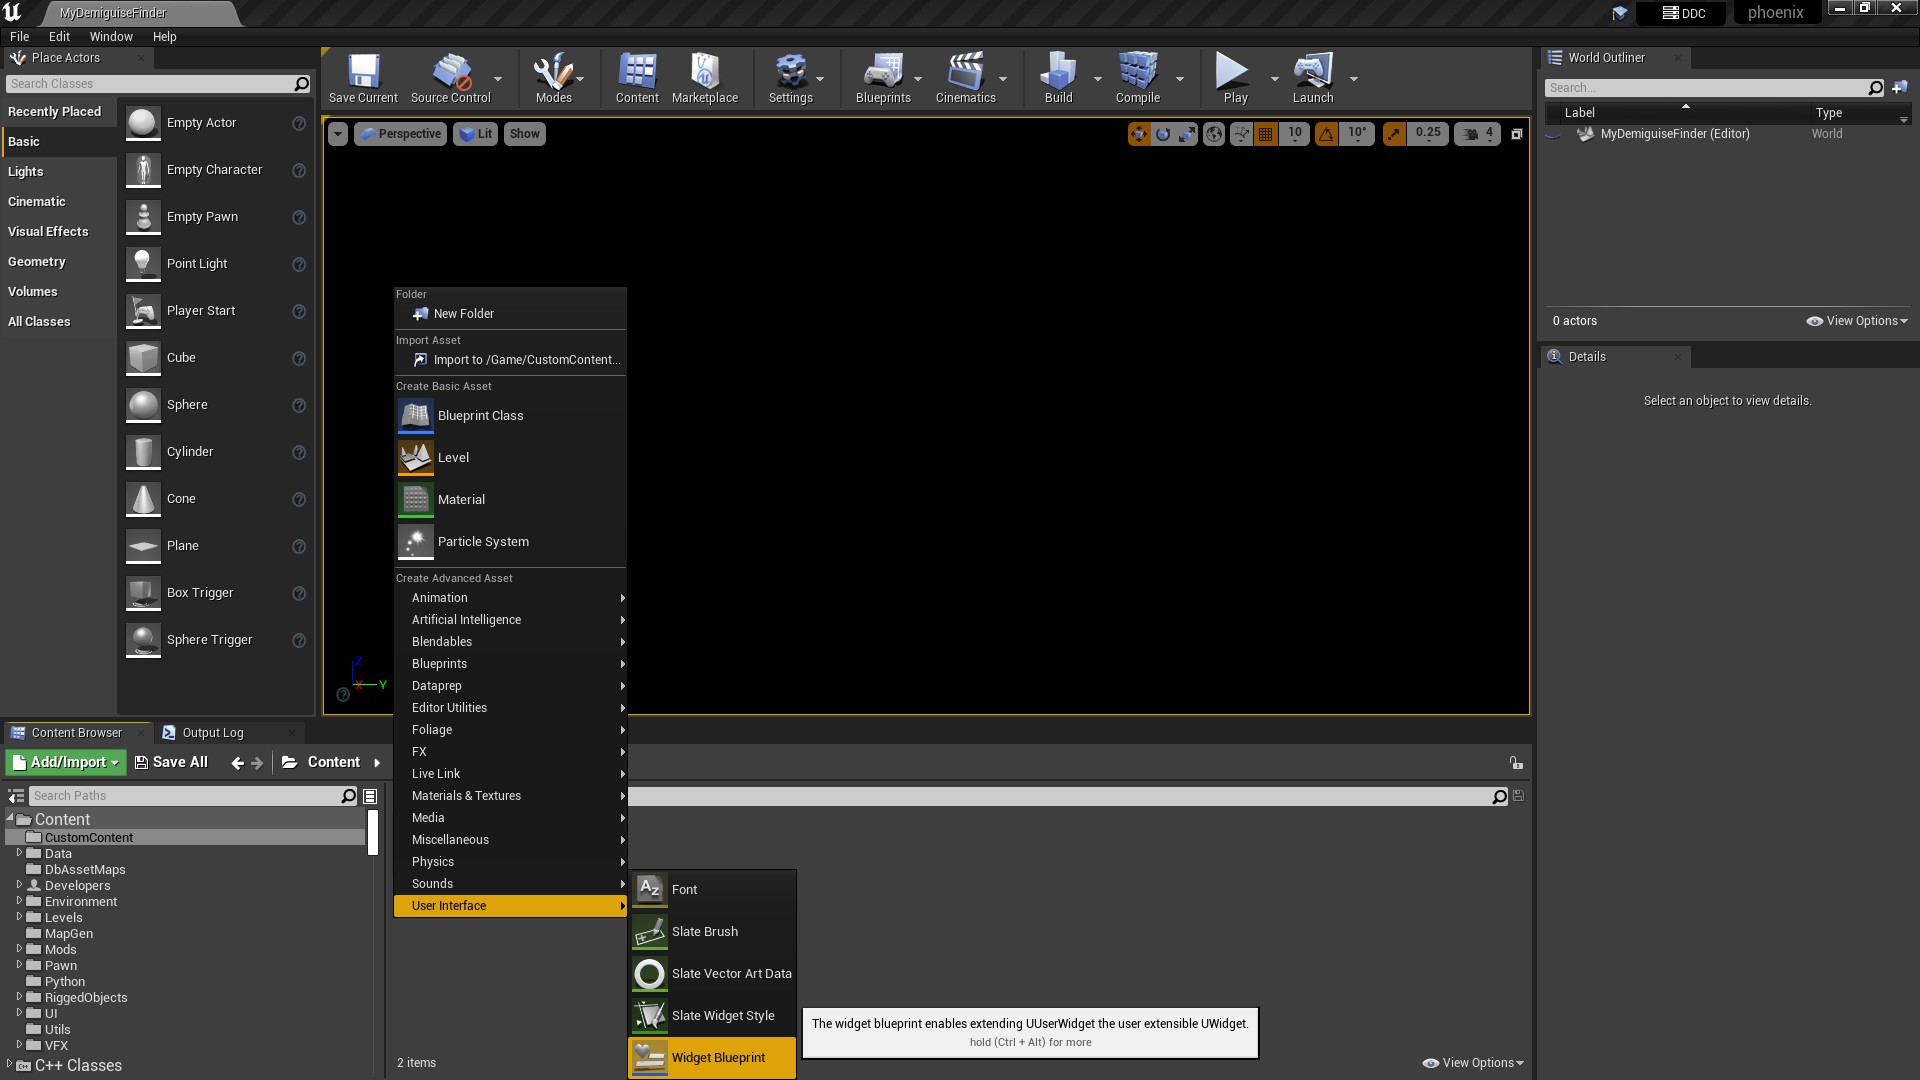
In your CustomContent Folder right-click and select User Interface > Widget Blueprint:
Then:
- In the
Designersearch for the items you want (top left arrow) and drag them down to theHierarchysection below. - The
Hierarchyorder is important - it determines what goes in front of what, and what properties get inherited. - Start with a
Canvas(if there isn't one already present) and add stuff to it. There are lots of tutorials on YouTube about this. - Look at the ones in
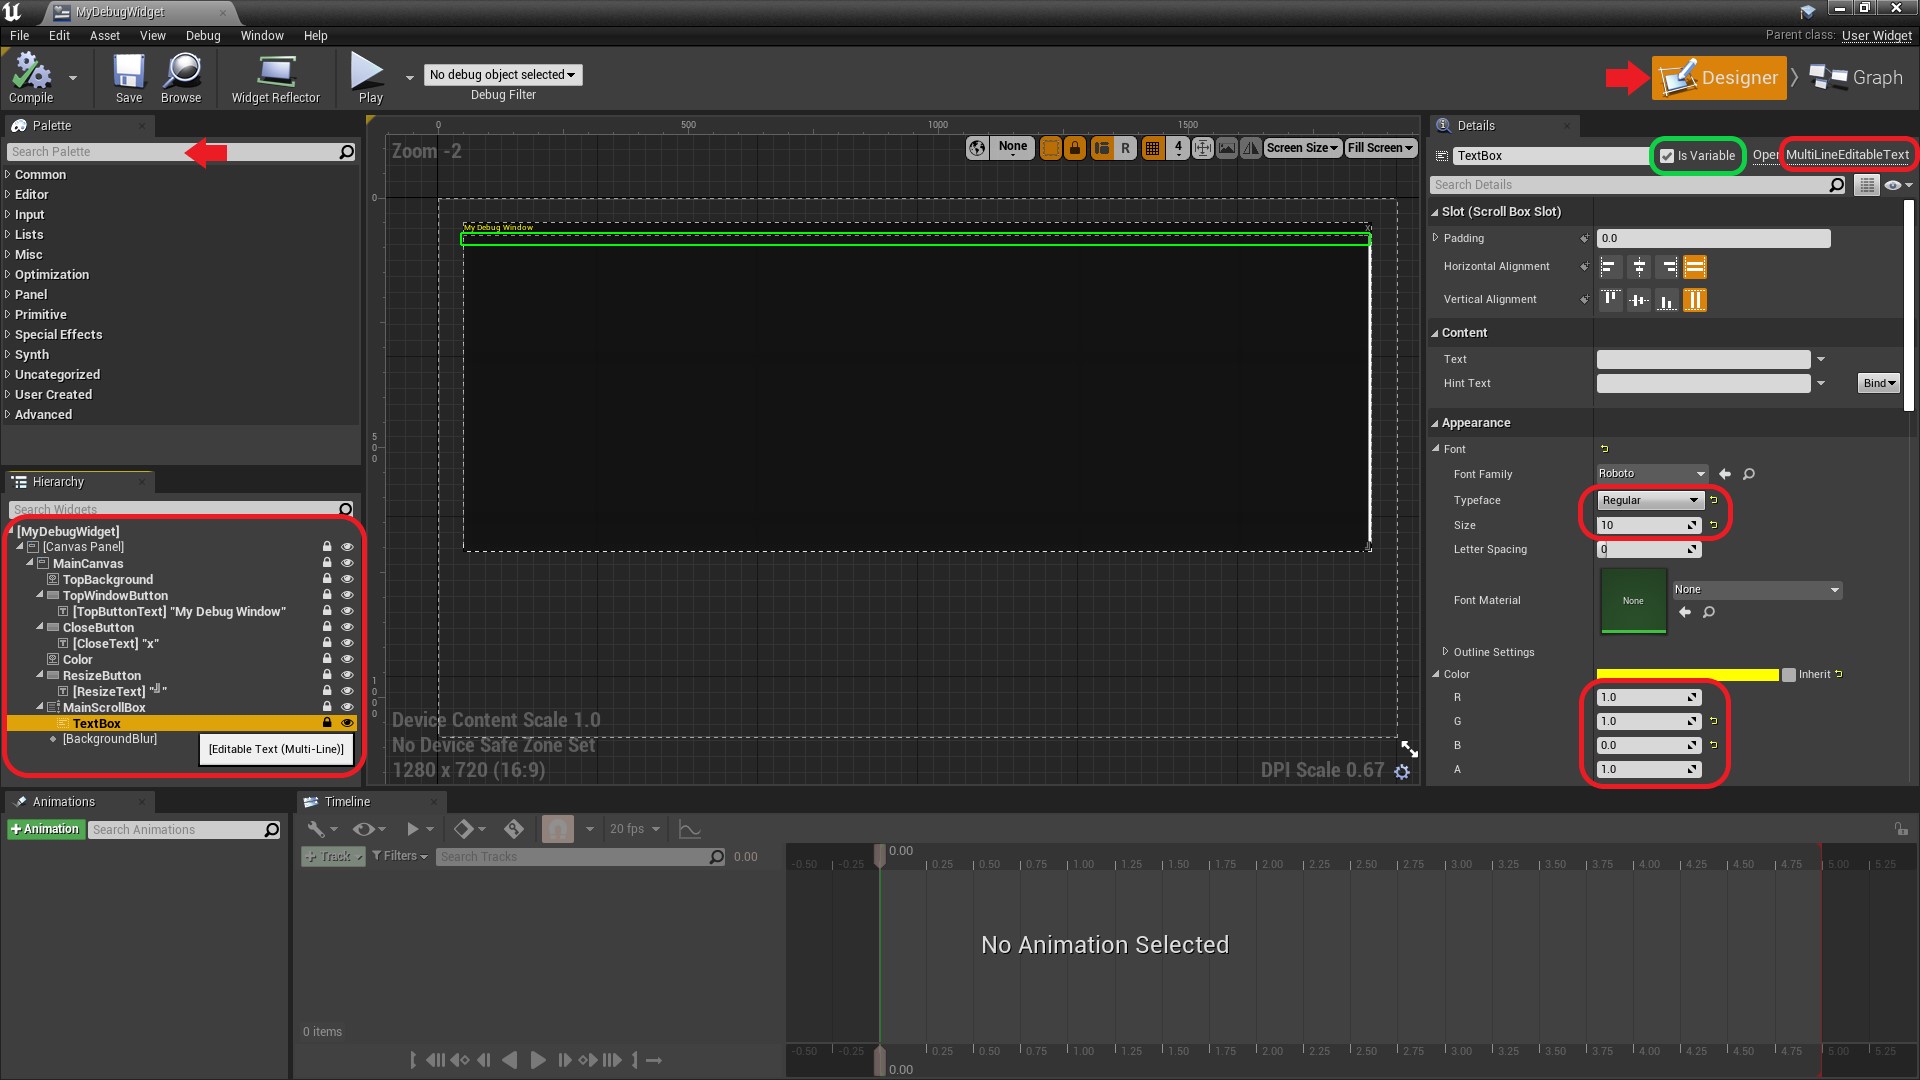
MyDebugWidgetfor clues about what's what. The type of each item is show in the top right (top right box). - Rename each item as you like and then edit the details on the right.
- In this case I changed the
Fontin theTextBoxfromBoldtoRegularandSizefrom16to10. I also changed theFontcolour toYellowwith OpacityAof1.0. - For the
ButtonText(like thextop right) I used an OpacityAof0.5. - One final note, but this is important - make sure you tick the
Is Variablebox in the top right (circled in green). This will give us access to those elements in theWidget'sGraphsection (where we addEventsandFunctions).
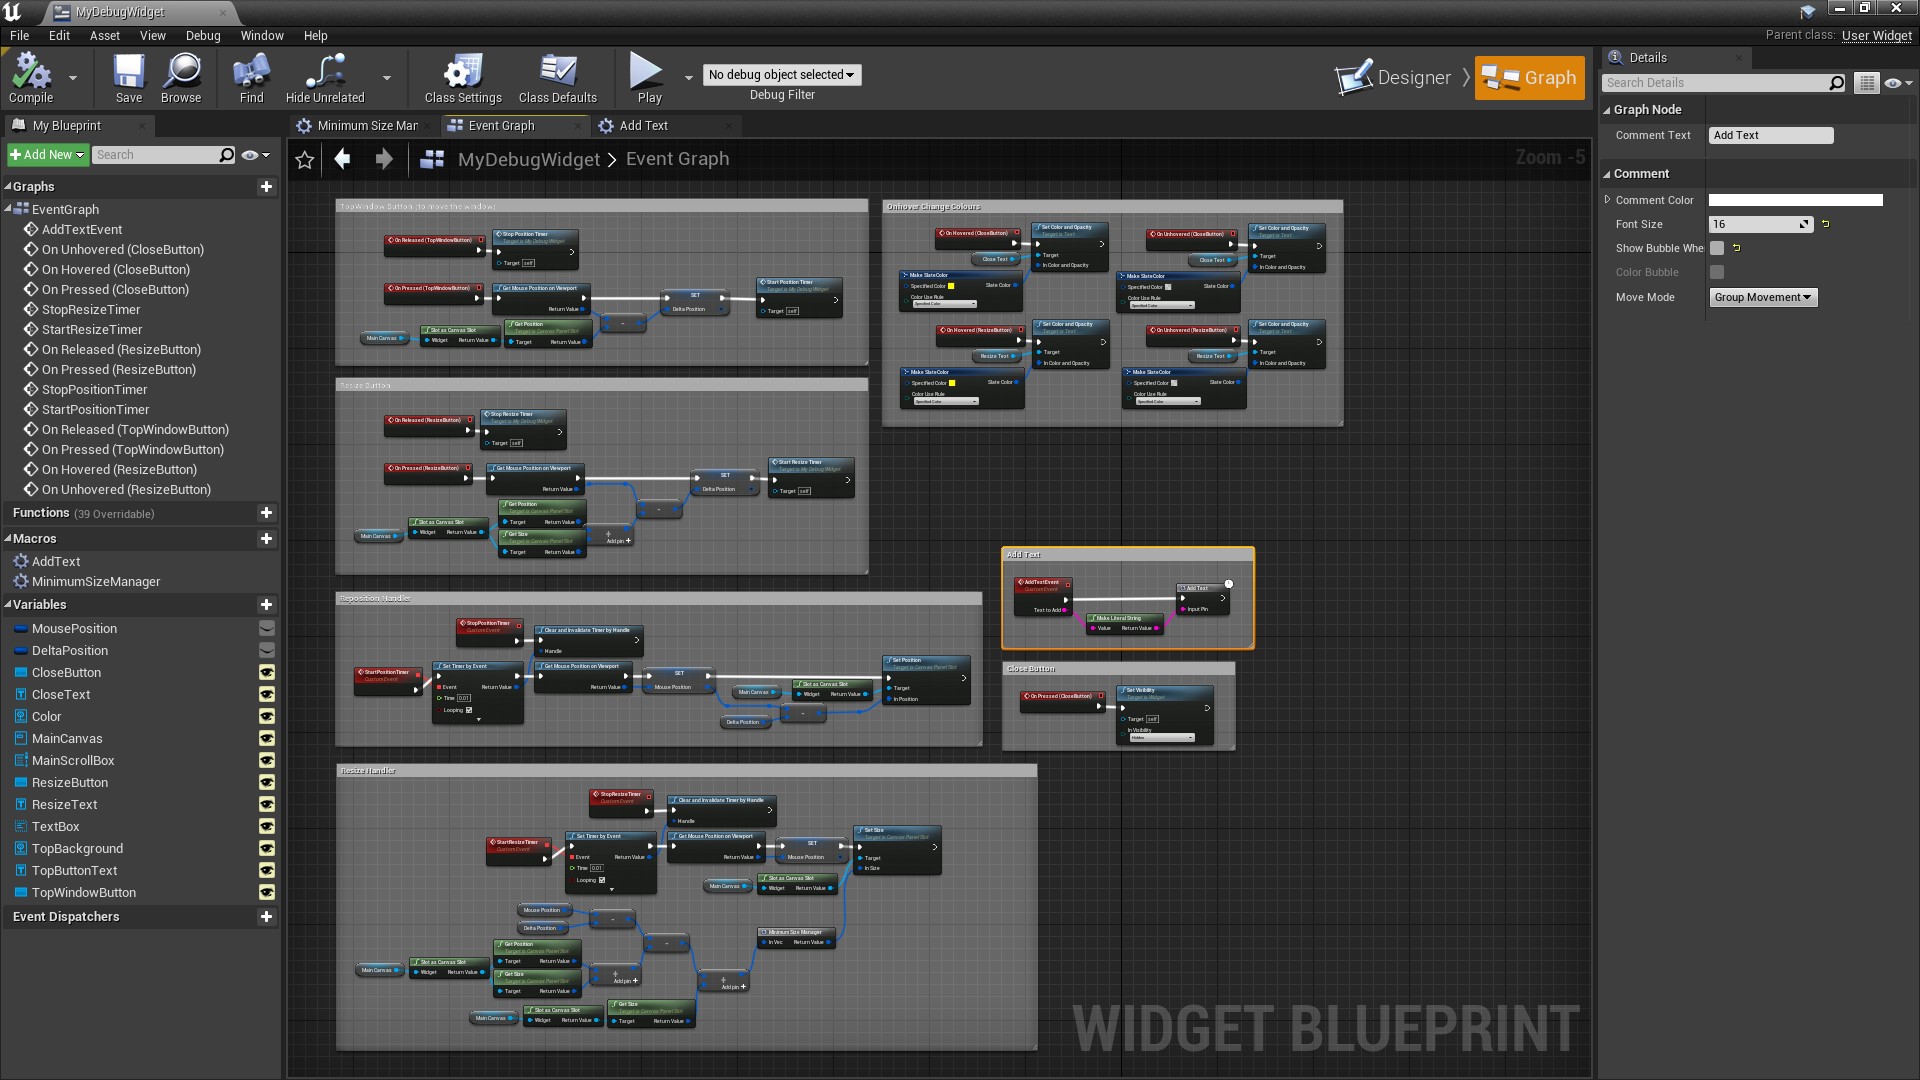
¶ MyDebugWidget - Event Graph
There are seven sections to the Event Graph. Again I won't go into details (you can find lots of info online) but in summary:
- The four comment-outlined boxes on the left handle moving and resizing the
Debug Widget. - The box top-right changes the colour of the control
Buttons(to yellow) when your mouse hovers over them. - To add
Eventslike those, select an object in theHierarchythen scroll to the bottom of theDetailswindow. You'll find a load ofGreen Buttonsyou can click to addEvents. - The
Add Textcomment box contains anAddTextEventwhich actually adds text to theDebug Widgetby calling theAddTextMacro. (Don't worry about what aMacrois right now. We'll discuss it at a later date. Like aFunctionor anEventaMacrocan be called to do stuff. And like those it has its strengths and weaknesses.) - Don't forget that the
AddTextEventis what was called byMyDebugPrintStringin our mod. So this is how text gets from our mod to this widget. - The
Close Buttonbox just makes theDebug WidgetInvisiblewhen the user clicks on thex.
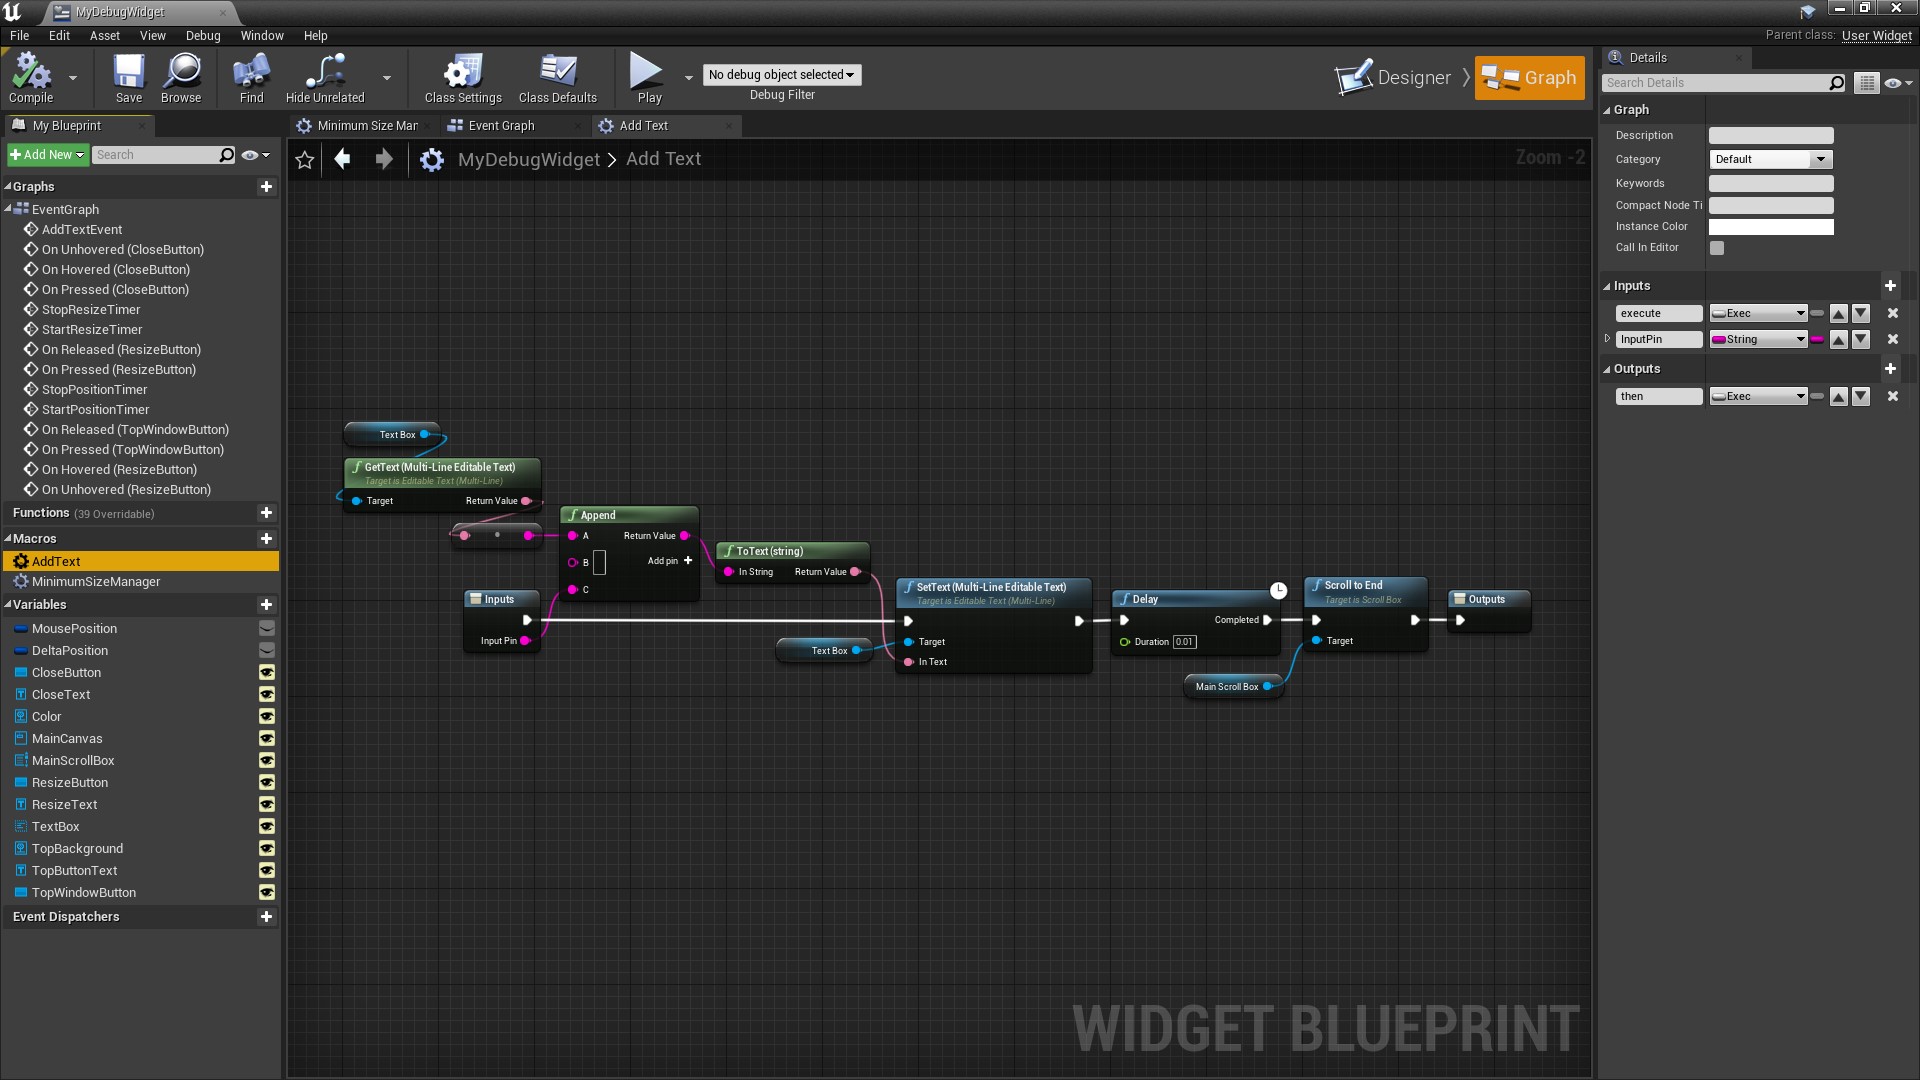
¶ MyDebugWidget - AddText Macro
The AddText Macro actually adds text to the Debug Widget, as follows:
- Get the current text using
GetText (Multi-Line Editable Text). Appenda newline to it (which you produce by hittingSHIFT-Enterin the little box besideAppendInputB).Appendwhatever text was provided as anInput.- Replace the current text using
SetText (Multi-Line Editable Text). Delay(i.e. wait) for 0.01 seconds, to be sure that completed.- Scroll to the end using
Scroll to Endwith theScroll Box(in which theMulti-Line Editable Text Boxresides) as theTarget.
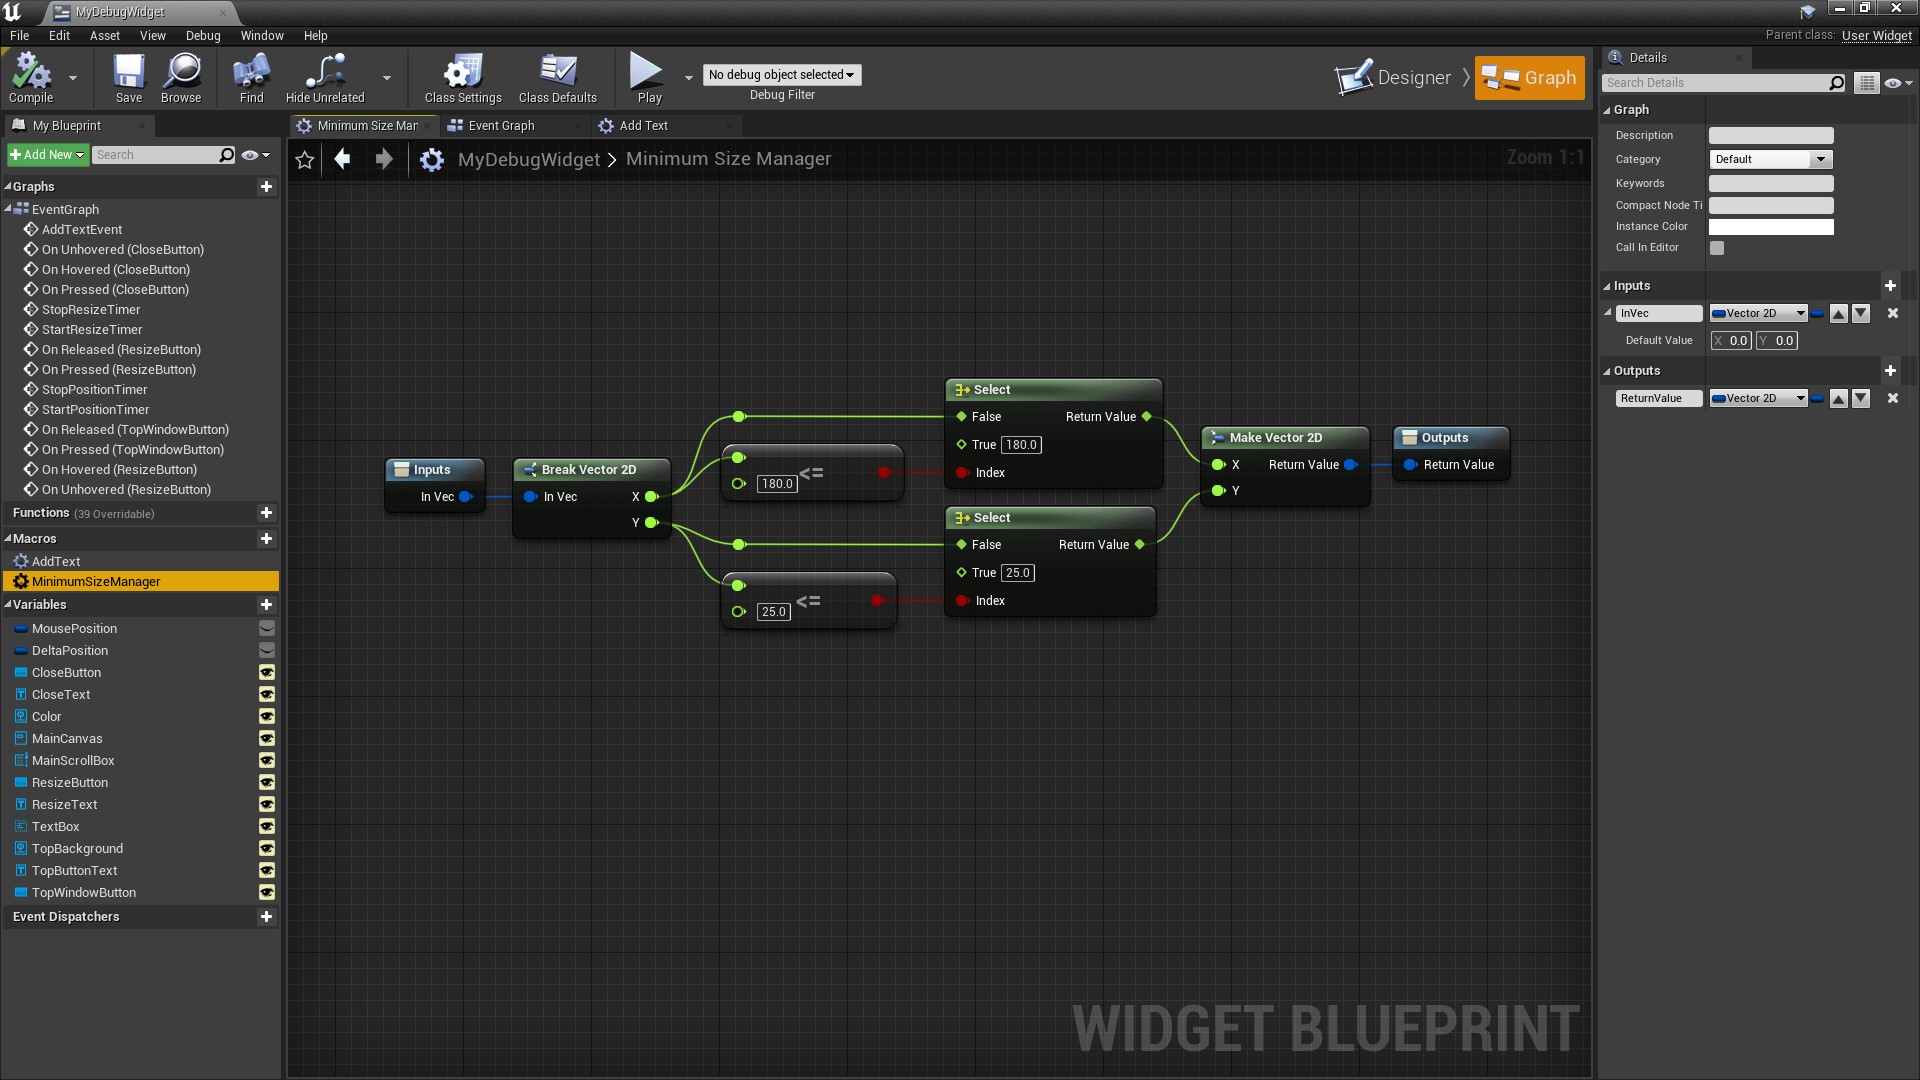
¶ MyDebugWidget - MinimumSizeManager Macro
This Macro just prevents the user from making the Debug Widget too small:
¶ Final Thoughts
That's it! As usual, the actual “meat” of the thing is quite limited. Most of the work went into setting up the supporting infrastructure.
In case you missed it, the Debug Widget works like this:
- The
MyDebugPrintStringFunctioninside our mod callsAddTextEventinside theWidget, with the text we want to print as the input. AddTextEventcalls theAddTextMacrowith the same input.- The
AddTextMacrogets the existing text, adds a newline, adds the new text, and updates theWidget.
Simple.
The great thing about this is that because the text is stored inside the Widget (rather than inside an Array inside our mod, like it was with my original version of MyDebugWidget) and it's updated via a Macro inside the Widget, any number of mods can send text to the widget and it will simply store them all in one place!
¶ Acknowledgements
Many thanks to Narknon, who created the original PrintDebugWidget (upon which my version MyDebugWidget is based). I say “based”… but it's 95% Narknon's widget with 5% cosmetic changes by me… so I claim no credit for it, but I accept all the blame if I broke something. I also accept the blame if anyone dislikes the way I lay out my Blueprints. That's all me. Narknon does theirs differently. (In my defence, I have to pack as much as I can into a single screenshot. That's not why I do it, admittedly. I do it because I like this compact format. But screenshots are my excuse for sticking with it.)