¶ Synopsis
This tutorial will walk you through the process of copying your favourite player gear to a named NPC.
It will work even if that gear has been modded… thus allowing you to apply your favourite gear mod to a named NPC!
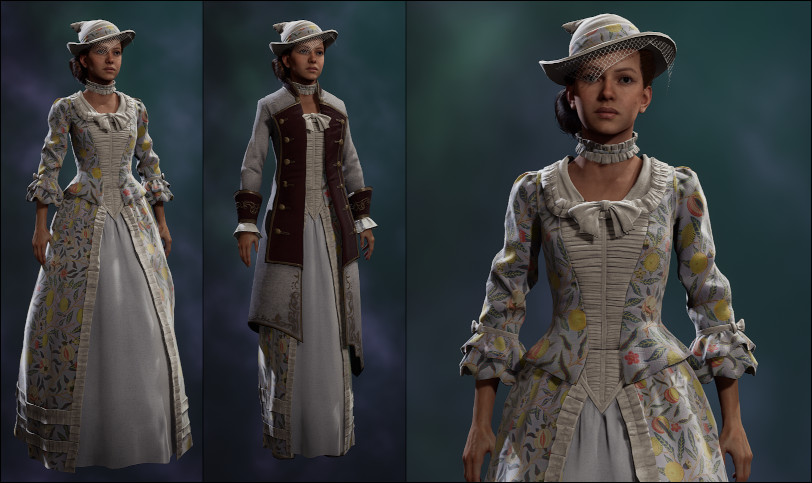
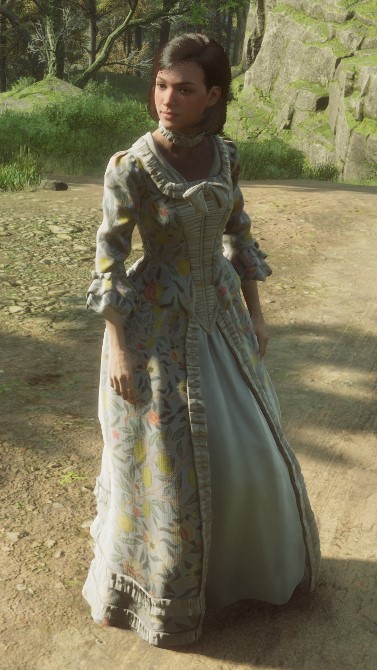
As an example, we're going to transfer the “18th Century Spring Gown” by Aryksa to Poppy Sweeting:
¶ Prerequisites
To make changes to an NPC's appearance we need to edit the Data Asset (or DA for short) for that NPC. We can view the existing DA (which resides inside the game files) using Fmodel , but we can't edit it because it's been "cooked" (i.e. turned into byte code). To change it we need to recreate the DA using JSON2DA and then edit our copy. That process is described in the JSON2DA User Guide. I'm therefore going to assume that you've read that and:
- Installed the Custom Engine,
PhoenixUProj. - Installed
FModel. - Installed
JSON2DA. - Used
JSON2DAto create theDAfor the NPC that you want to edit.
¶ Examine the NPC's Data Asset
In the JSON2DA User Guide we saw how to create a DA using JSON2DA. Let's take a look at the one we created for Poppy.
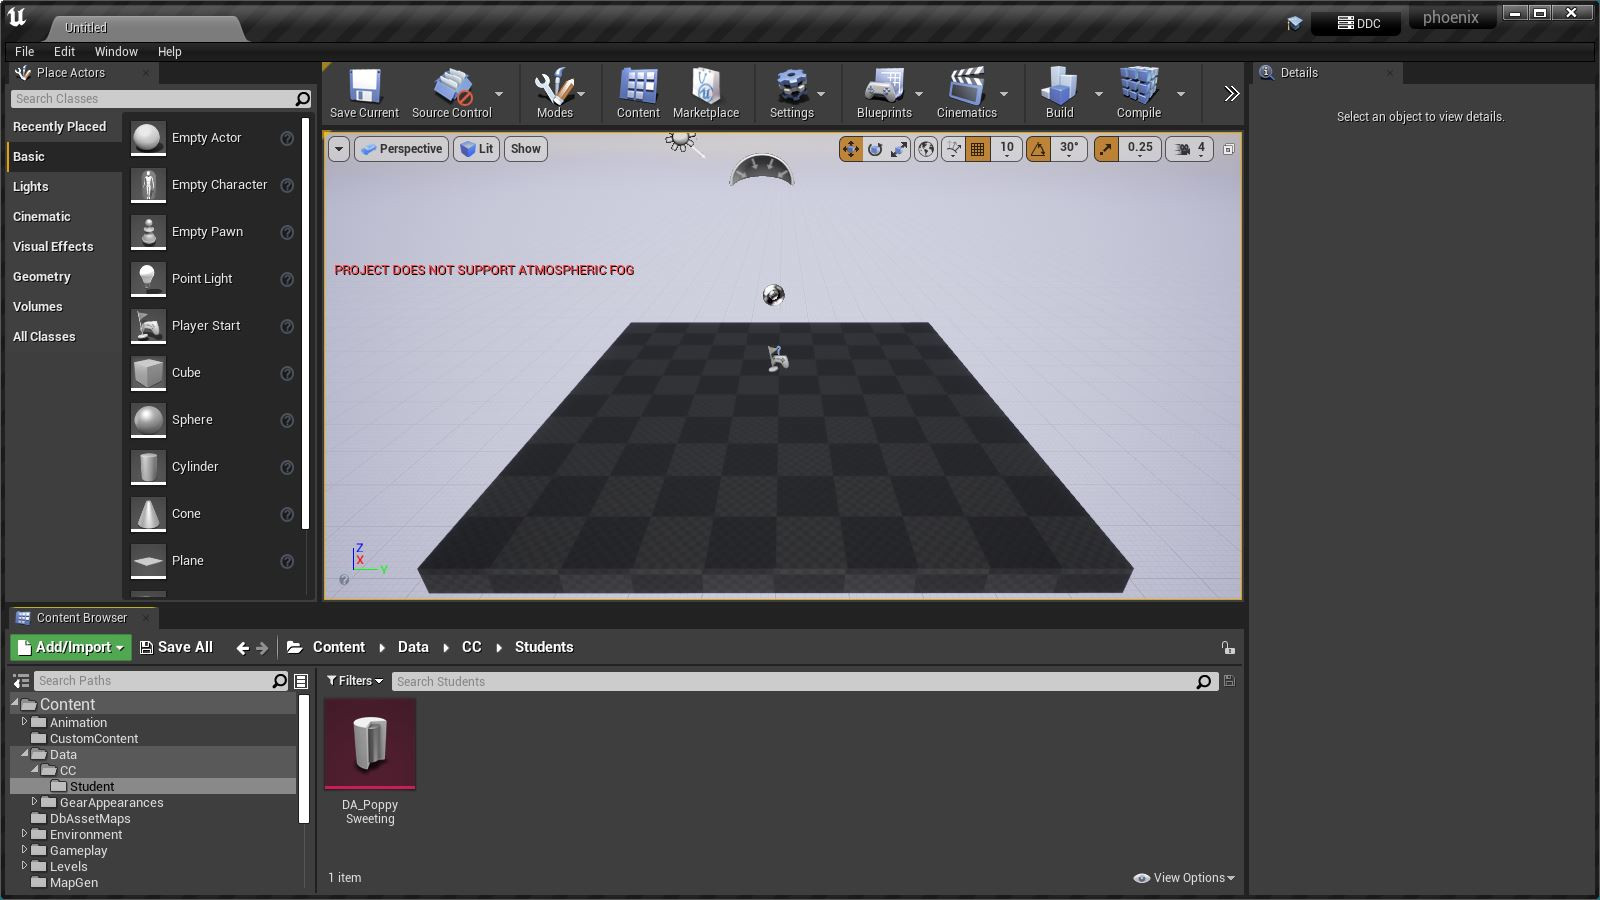
- Open the Custom Engine by double-clicking
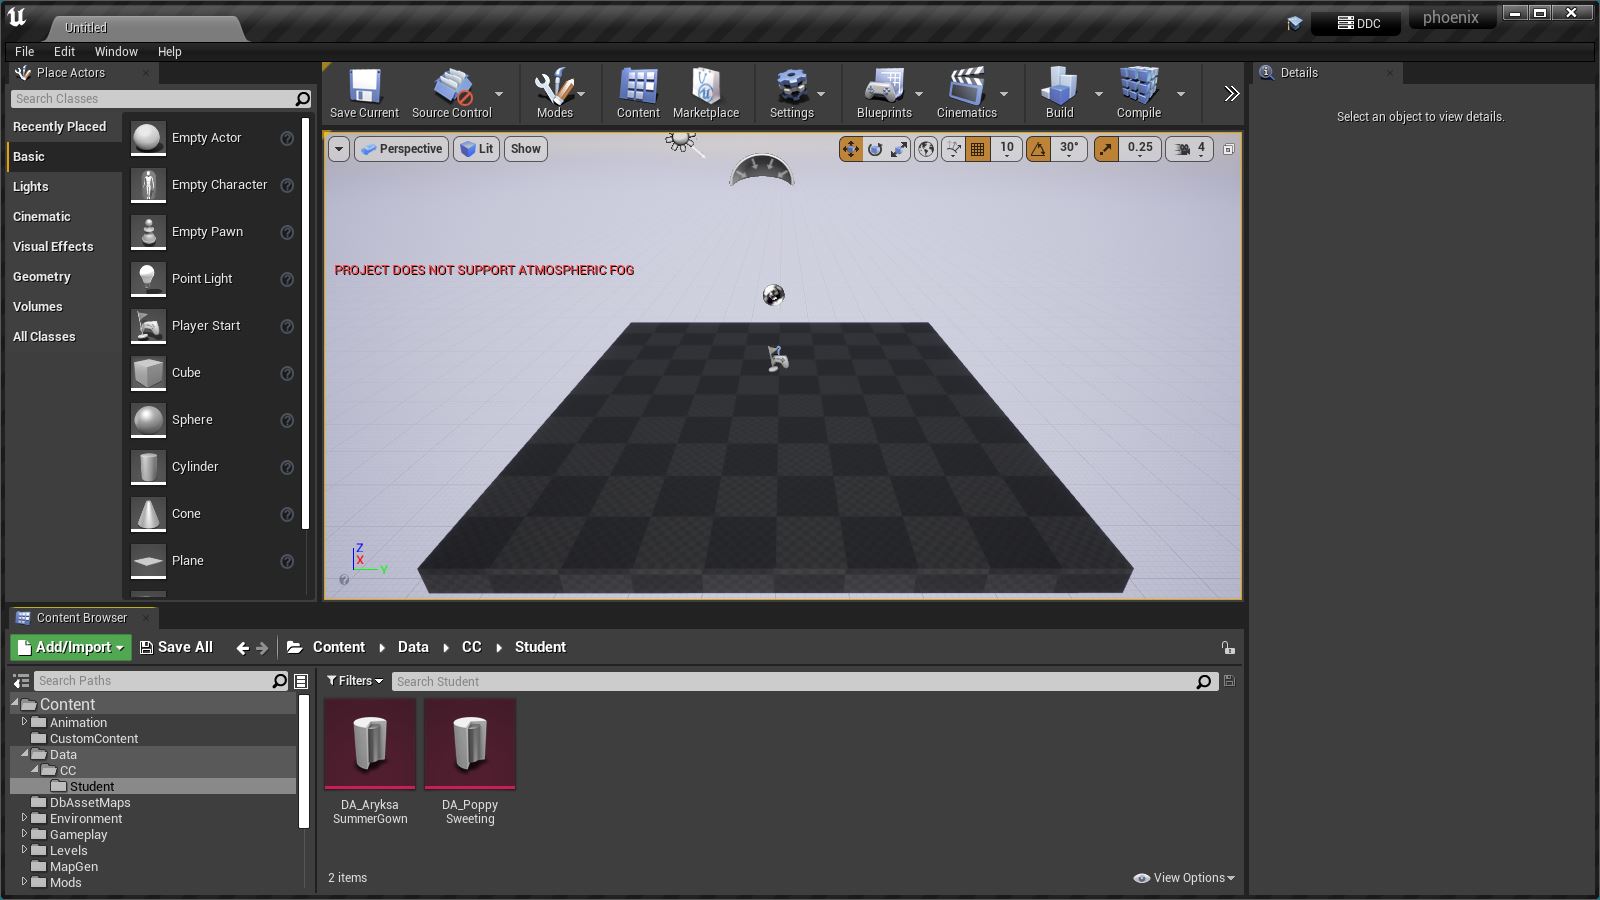
phoenix.uproject. - In the Content Browser, navigate to the folder
Content\Data\CC\Student:
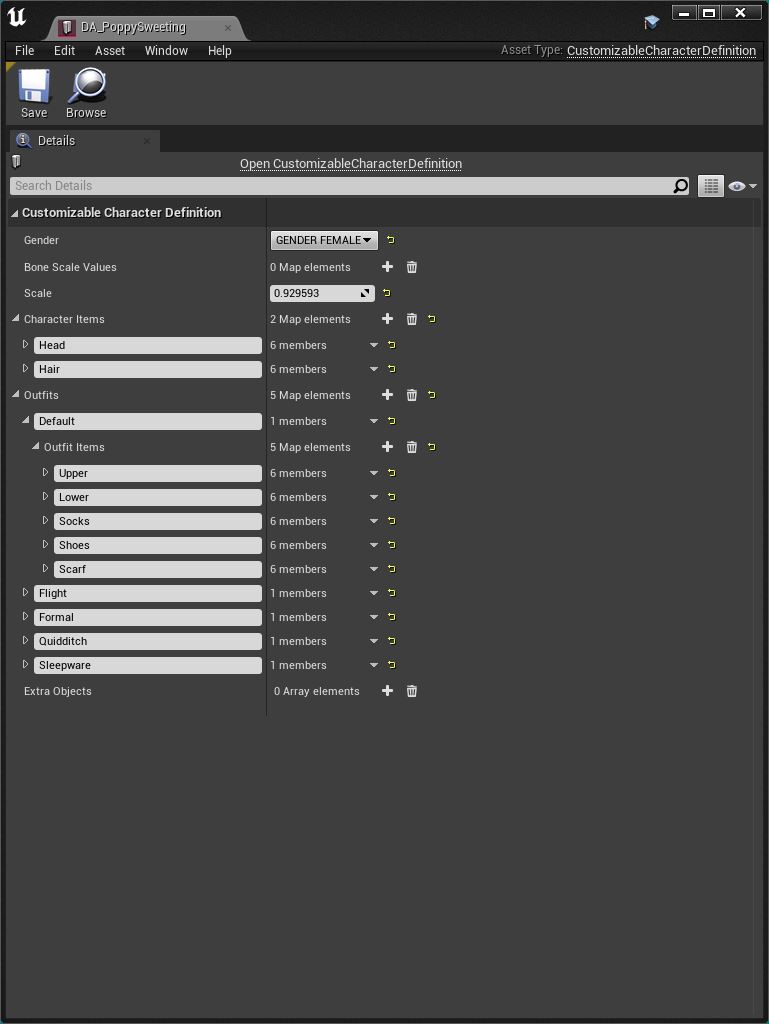
- Double click on
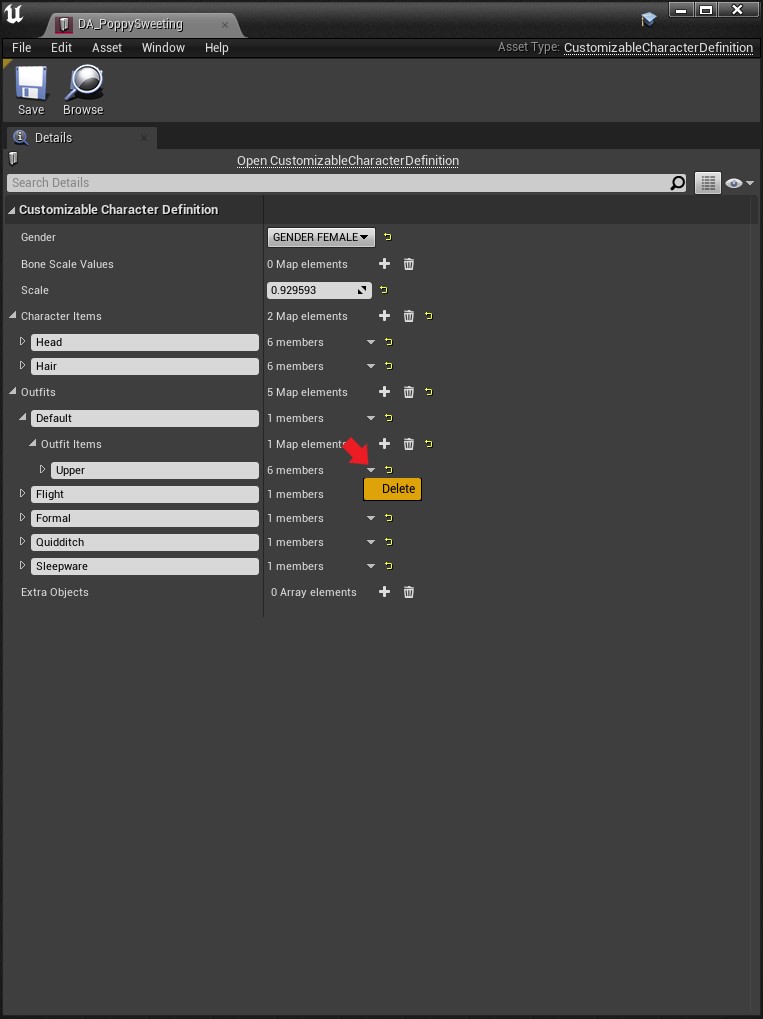
DA_PoppySweetingand expand theOutfits>Default>Outfit Items>Uppersection:
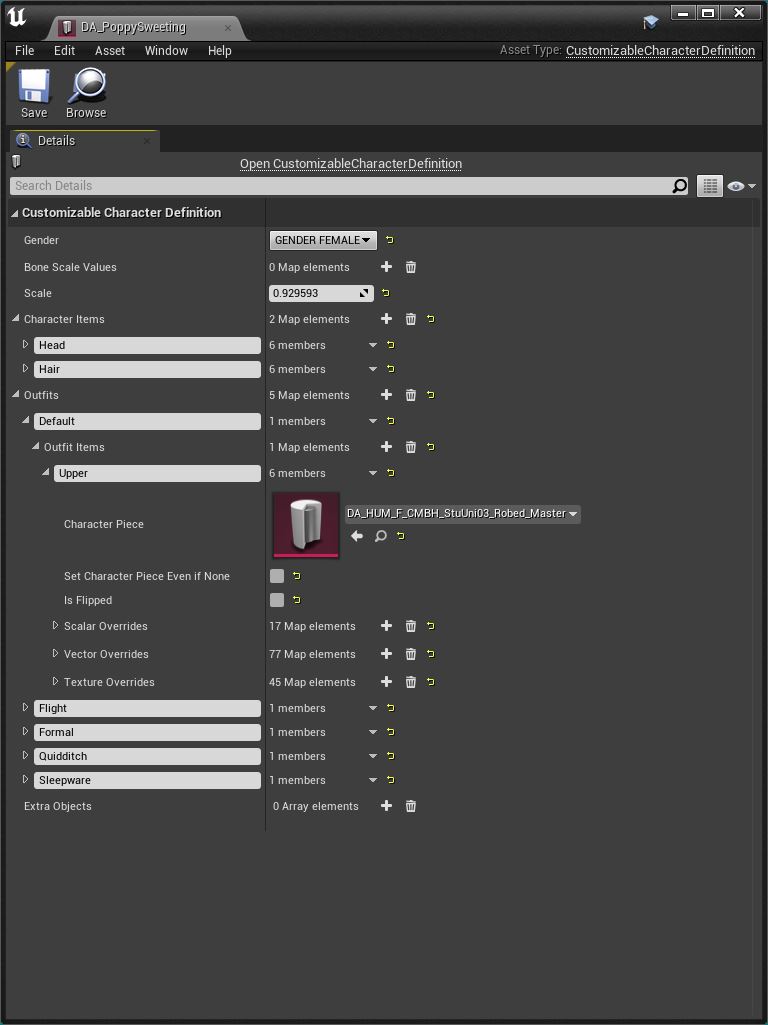
- Here we can see that the
UpperCharacter Pieceis defined asDA_HUM_F_CMBH_StuUni03_Robed_Master. - There is no
LowerCharacter Pieceso this item must be full-length. - There are also no
ShoesorSocksso this item must include them. - The other
Outfits(Flight,Formal,QuidditchandSleepware) always seem to be blank so may not be used by the game.
¶ Examine the Mod
If we want to apply a modded item like Aryksa's Spring Gown we need to know what we're dealing with.
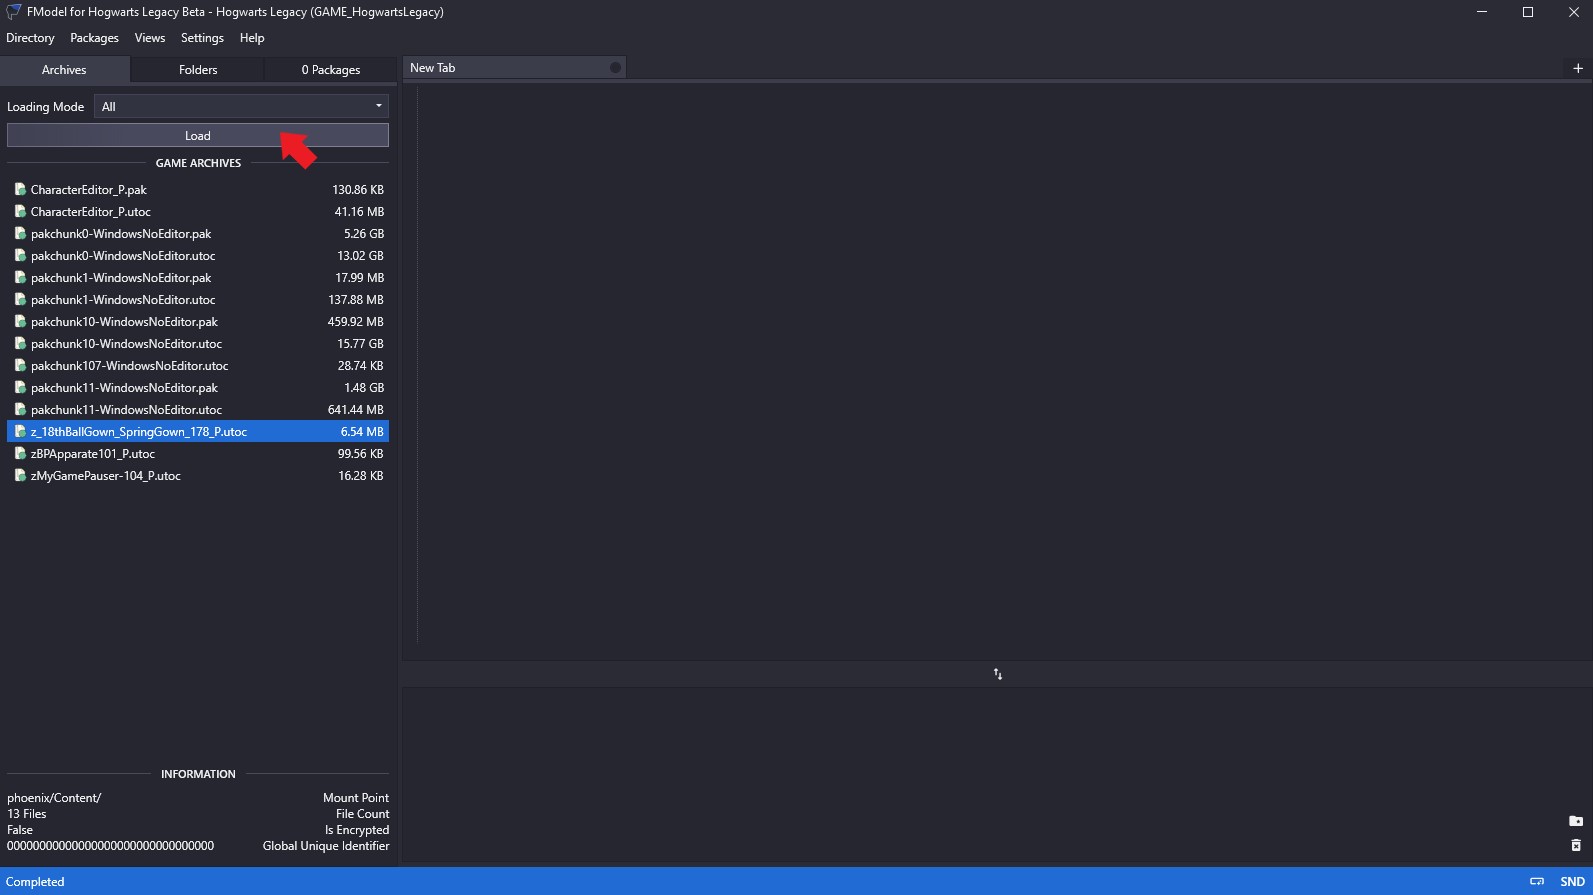
Open FModel and change Loading Mode to Single:
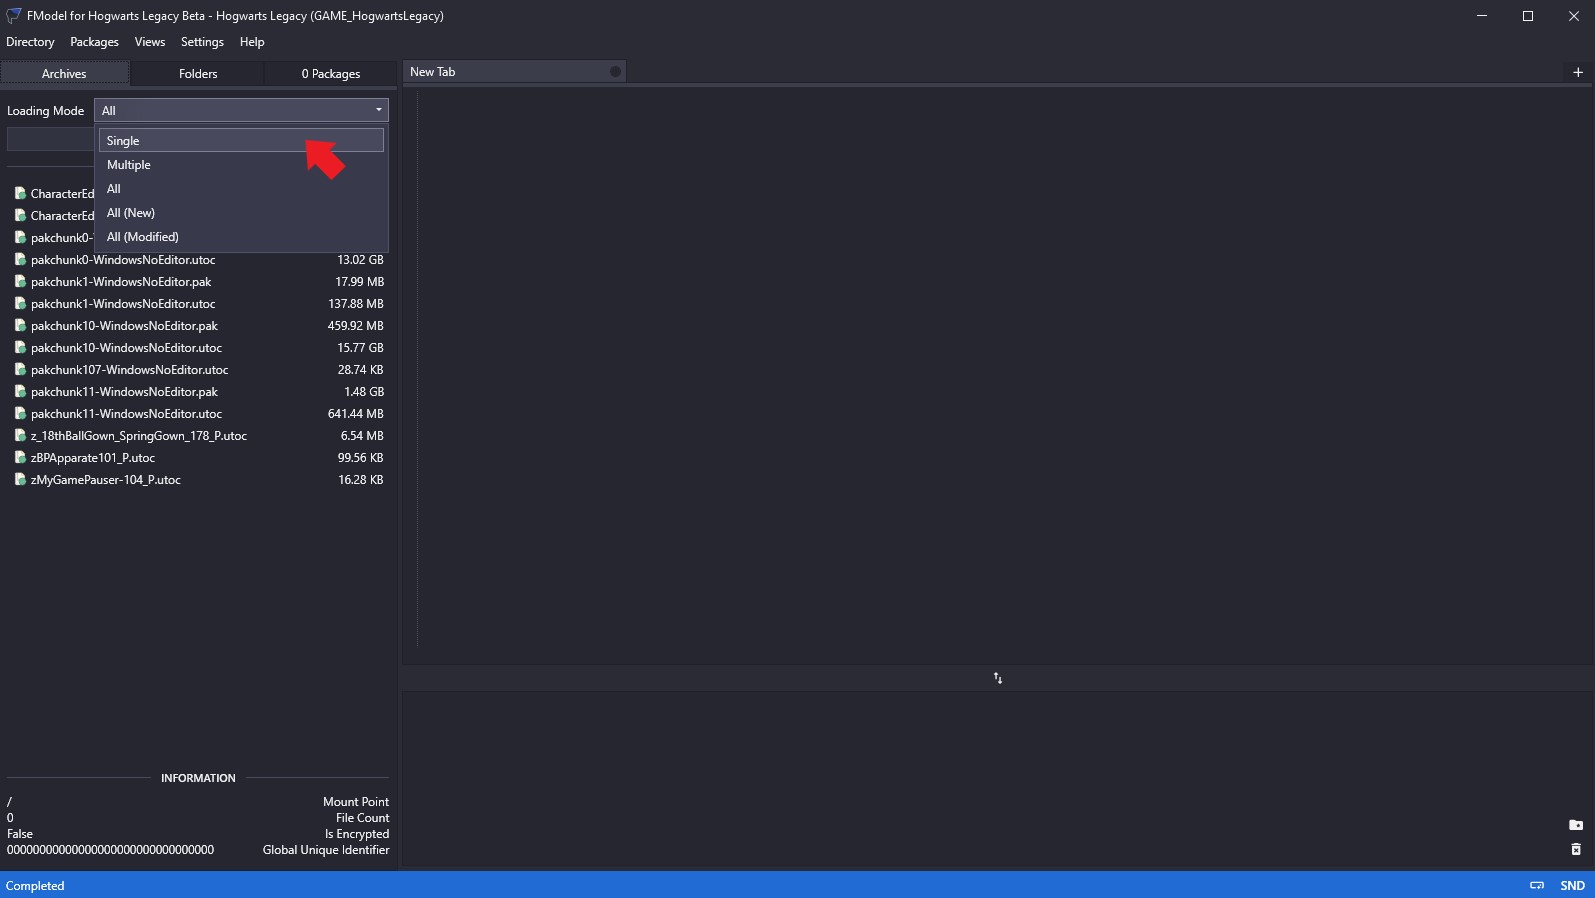
Now select the mod you want to examine (for the purposes of this example, that would be z_18thBallGown_SpringGown178_P.utoc) and hit Load:
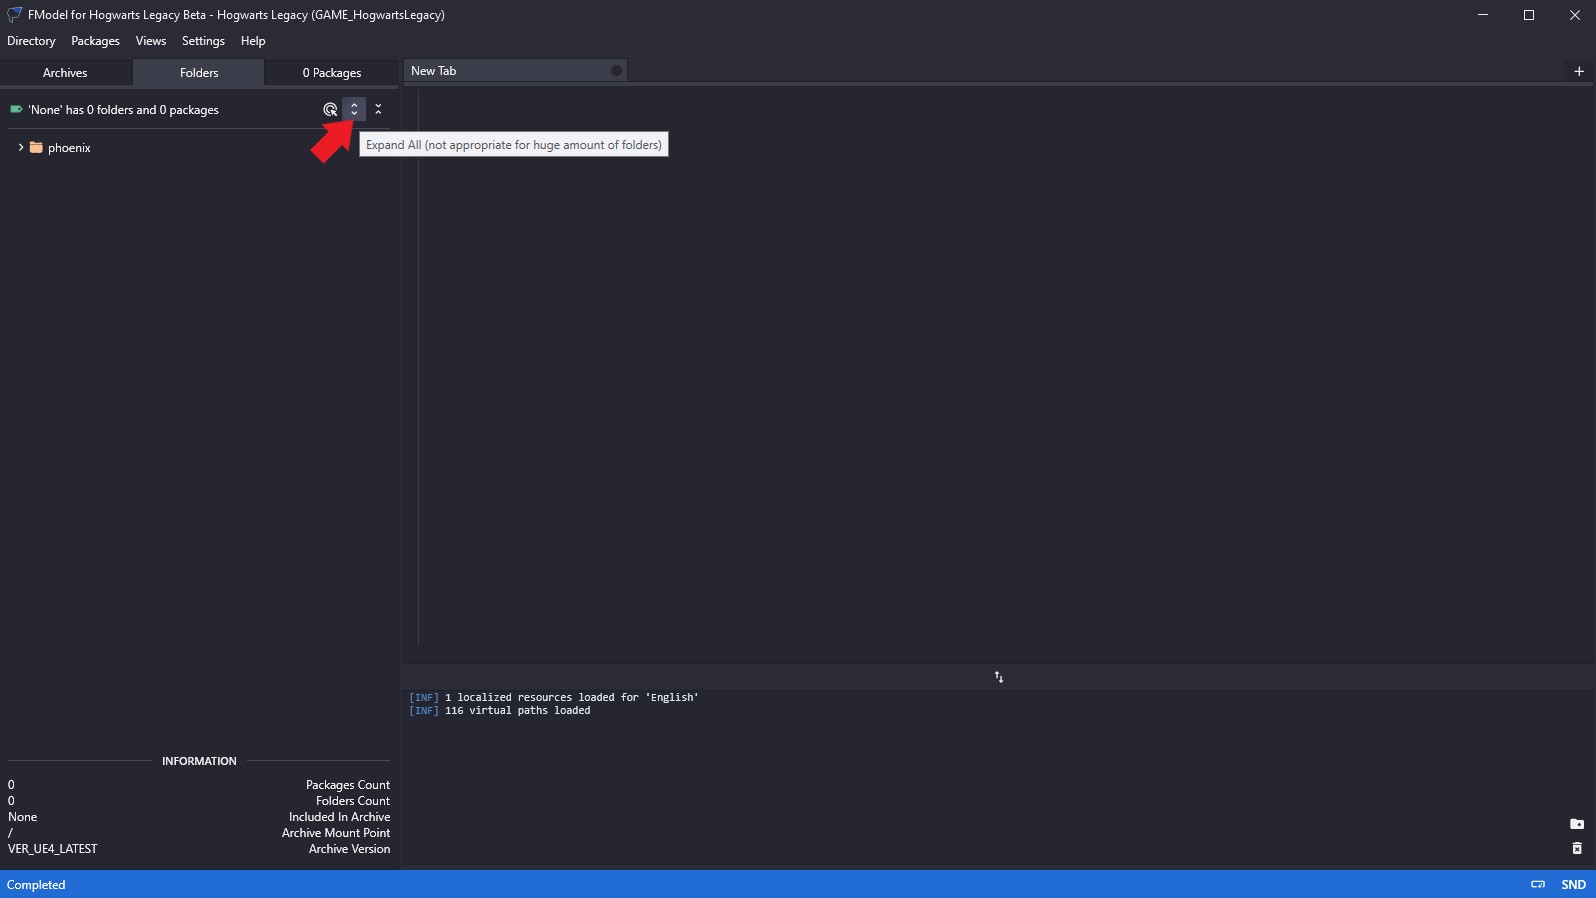
After a few seconds you'll see something like the image below. When you do, press the Expand All button:
You'll now see the contents of the mod:
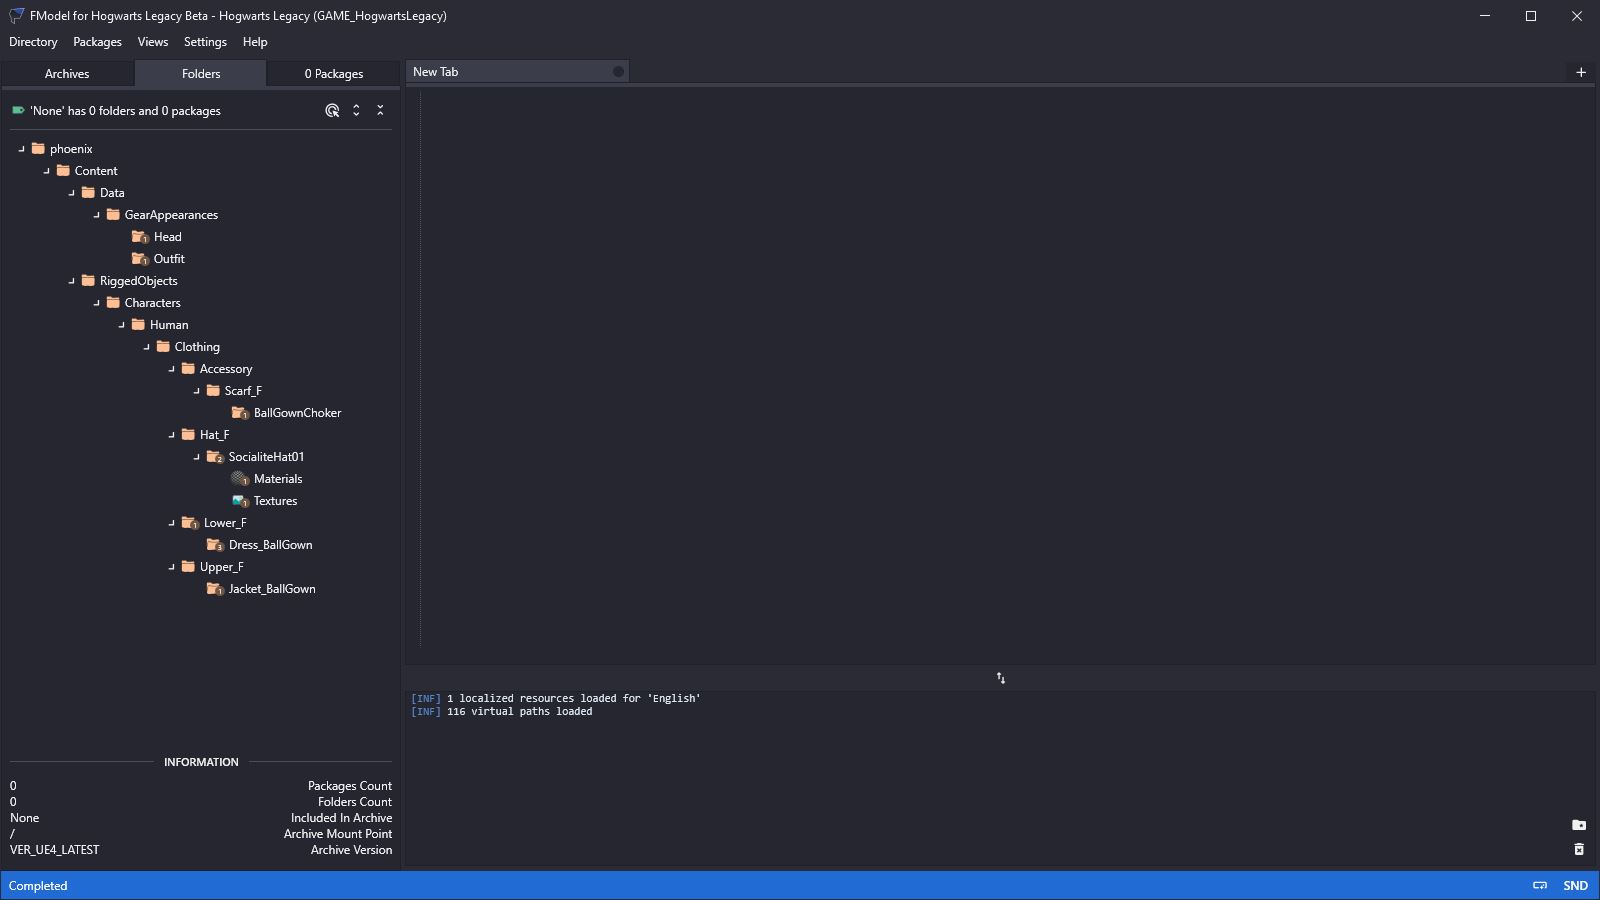
The folders with little numbers on them have actual assets inside. All the other folders are empty. Things to note:
- There are two important sub-folders:
Data\GearAppearancesandRiggedObjects\Characters\Human\Clothing. RiggedObjectscontains the individualCharacterPieceDA's, plus theMeshes,MaterialsandTextureswhich define each item of clothing in the mod.GearAppearancescontains higher levelGearAppearanceItemDefinitionDA's which combineCharacterPiecesinto a complete outfit.
There are two GearAppearances in this particular mod. Double click each one and you'll discover:
- A
HeadDAcalledDA_GA_Head_022_F. - An
OutfitDAcalledDA_GA_Outfit_113_F.
These names are important. They tell us that this mod replaces:
Headitem#22(the “Nomad Hat”).Outfititem#113(the "Bubotuber Harvesting Attire").
Double click each of those DA's and you'll see in the JSON information that:
DA_GA_Head_022_Fcontains: a single “Outfit Item” - aHat.DA_GA_Outfit_113_Fcontains:Upper,Lower,Socks,Shoes, and aScarf(though it's actually a choker).
So what does all of this mean?
- The first thing to notice is that Poppy's
DAonly containsCharacterPieces, it does not contain anyGearAppearances. - For the purposes of modding an NPC, we're only interested in the
CharacterPieces.
¶ Similar Procedure for Game Assets
What if we wanted Poppy to wear an item of clothing from the game (rather than a mod) like the one that Aryksa's mod replaced - the “Bubotuber Harvesting Attire”. How would we achieve that?
Well, we need to look at the “Bubotuber Harvesting Attire” DA and see what we're dealing with.
But which DA is that? There's no easy way to figure it out, so I dumped the game's MAIN-enUS.bin file and stripped out all the appearance descriptions. You'll find a csv file of them below. Download that.
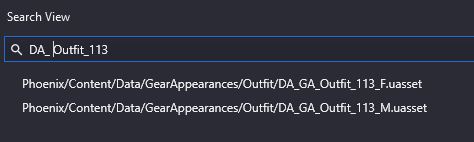
Now search for “Bubotuber”:
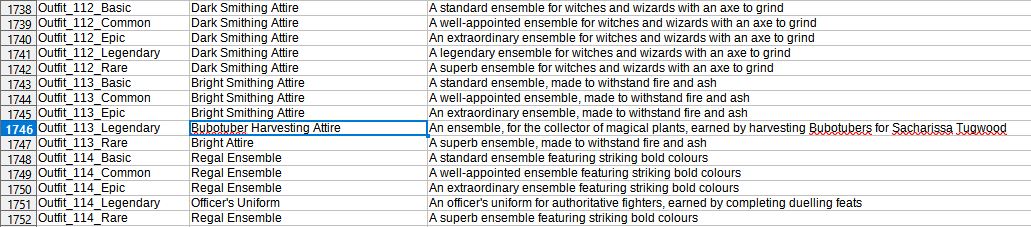
We can see that the “Bubotuber Harvesting Attire” is Outfit_113 (ignore the Legendary bit).
If we search for a DA with that in the name, using FModel, we find:
Poppy is female so the top one (ending with _F) is the one we're after. Full name: DA_GA_Outfit_113_F. If we open it up we find:
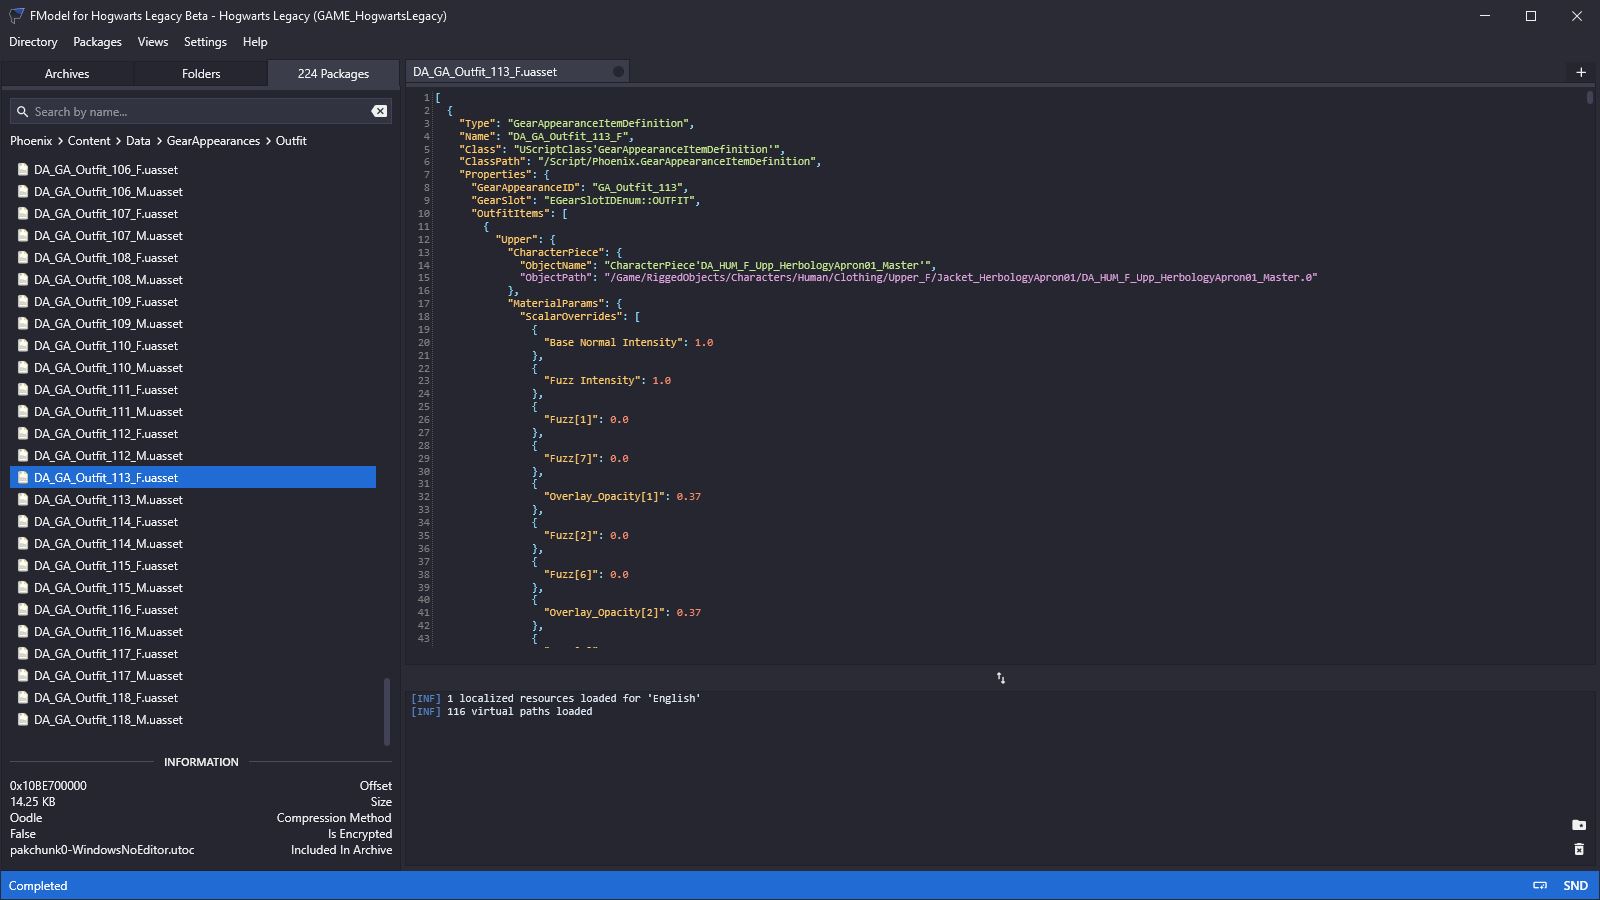
So it's a GearAppearanceItemDefinition DA containing an Upper CharacterPiece and (further down) a Lower, and Shoes. That's all.
¶ Review
In terms of CharacterPieces:
- Poppy's
DAcontains only one clothing-relatedCharacterPiece: anUpper. - The Bubotuber
DAcontains three:Upper,Lower, andShoes. - Aryksa's mod
DAcontains five:Upper,Lower,Socks,Shoes, and aScarf.
So:
- If we want Poppy to wear the Bubotuber outfit we need to copy the
Upper,Lower, andShoesfrom the game'sDA_GA_Outfit_113_FtoDA_PoppySweeting. - If we want Poppy to wear Aryksa's Spring Gown we need to copy the
Upper,Lower,Socks,Shoes, and aScarffrom Aryksa's moddedDA_GA_Outfit_113_FtoDA_PoppySweeting.
The process is the same, but the details are different.
Aryksa's Spring Gown is much nicer than the Bubotuber outfit so I'm going to proceed with that in this example.
¶ Copying Character Pieces
To copy the CharacterPieces from Aryksa's modded DA we need to recreate that DA. Please refer to the JSON2DA User Guide for instructions on how to do that. It doesn't matter what you call this new DA. We're not going to pak it. We're just going to copy the CharacterPiece information from it. The CharacterPieces themselves will be Dummy Assets created by JSON2DA, but they might be accompanied by a load of Scalar and Vector Overrides which we definitely don't want to enter by hand! Let's call the modded DA something like… DA_AryksaSummerGown. Once you've created it, you should have:
Double click one, then the other. Both should appear as tabs in a new window but you can drag them apart:
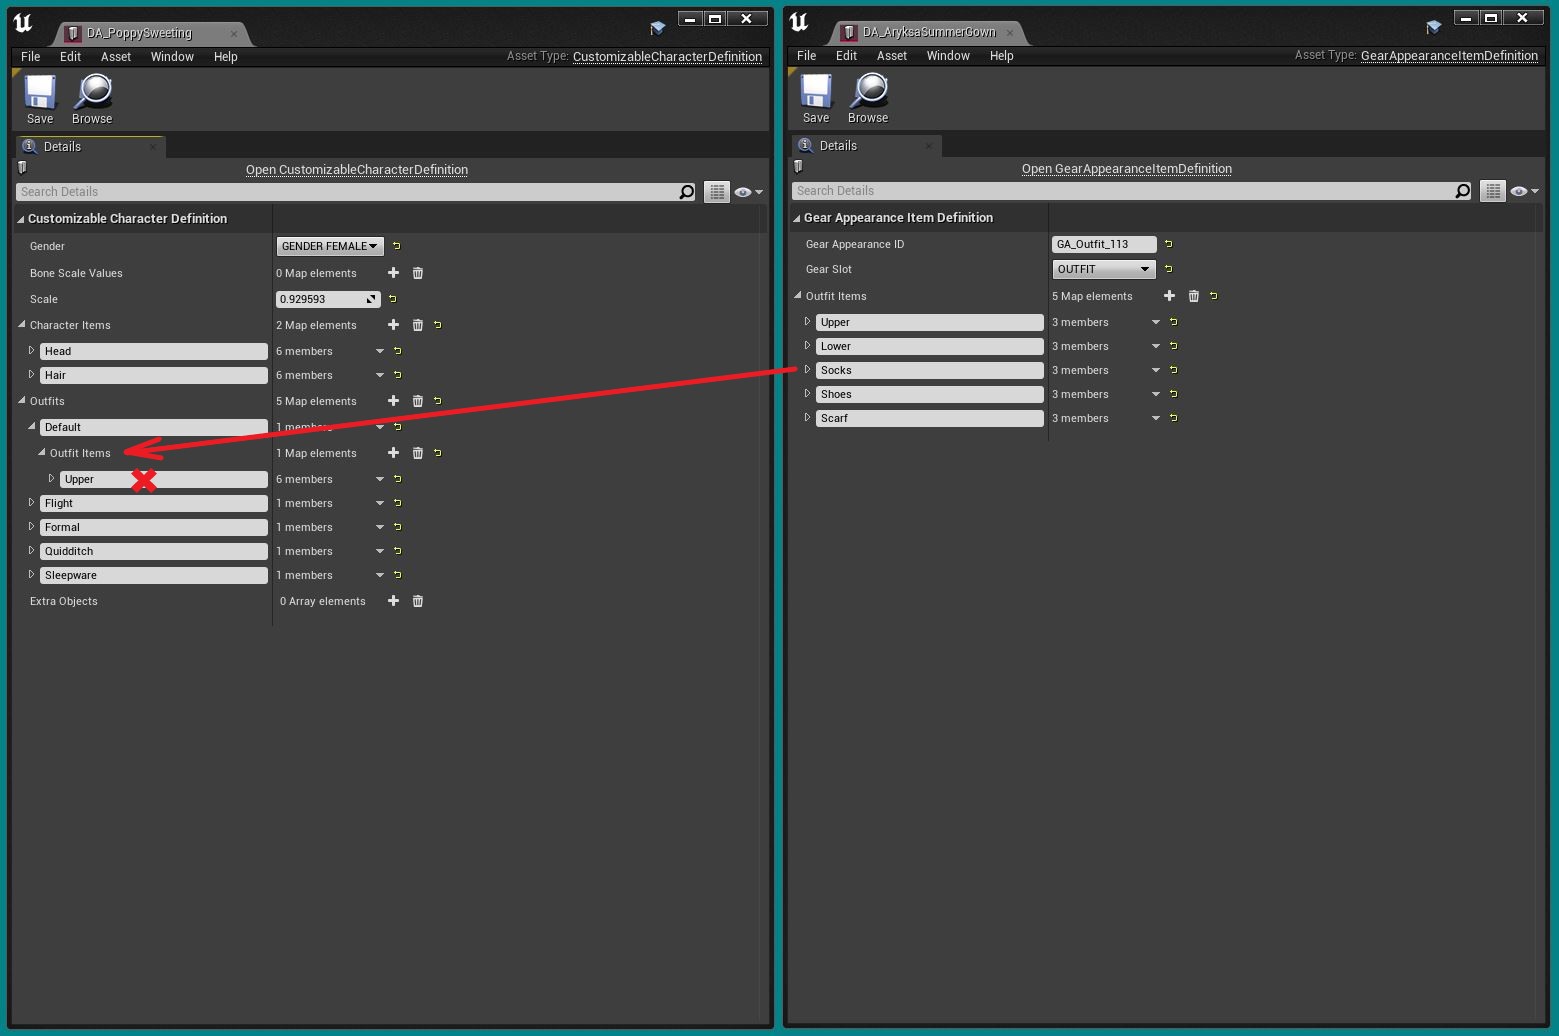
As indicated above, we need to delete the existing Upper CharacterPiece and then copy all five CharacterPieces from the mod to our Poppy DA:
- First click the down arrow on
Upperand selectDelete:
- The click the
+on theOutfit Itemsline to add a newItem:

- This will give us a new item called
Nonewith 6 empty “members”:
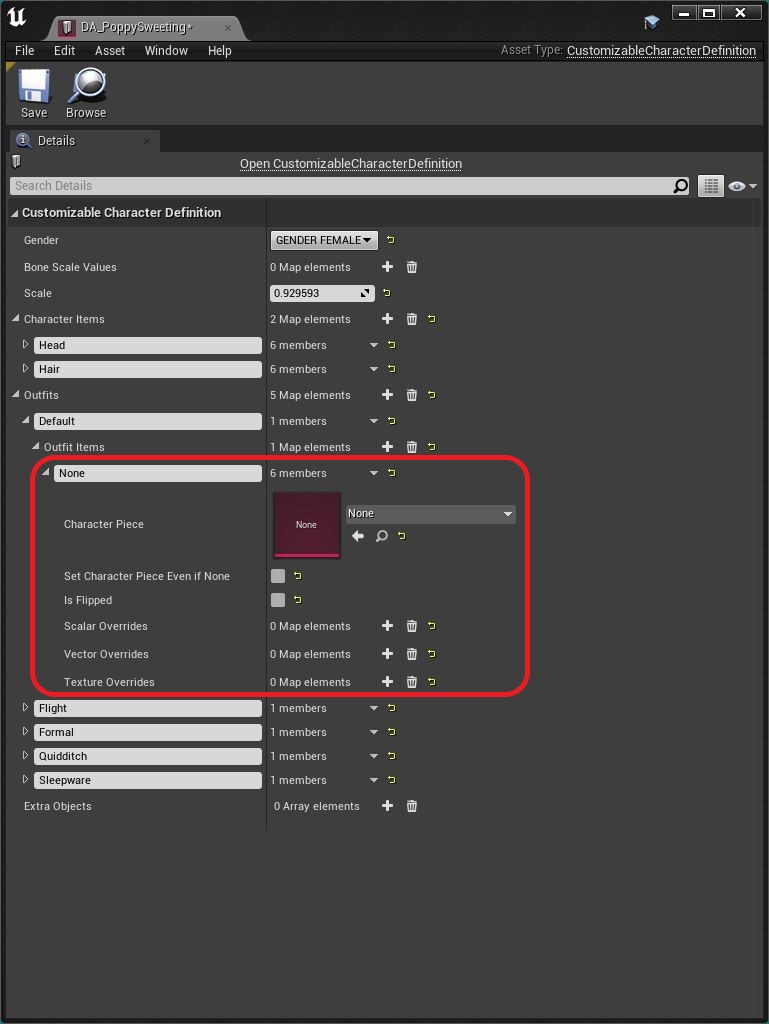
Unfortunately, that's bad news, because the Upper item in the mod only has 3 members, which means we can't copy & paste the whole Upper item. We'll need to copy and paste each member one at a time. Still, it's not the end of the world.
Why are they different? Because we're copying from a GearAppearanceItemDefinition to a CustomizableCharacterDefinition. They're similar but not identical.
Let's copy the CharacterPiece first then do the Scalar Overrides, Vector Overrides and Texture Overrides:
- Right click on the
CharacterPiecein the mod and selectCopy:
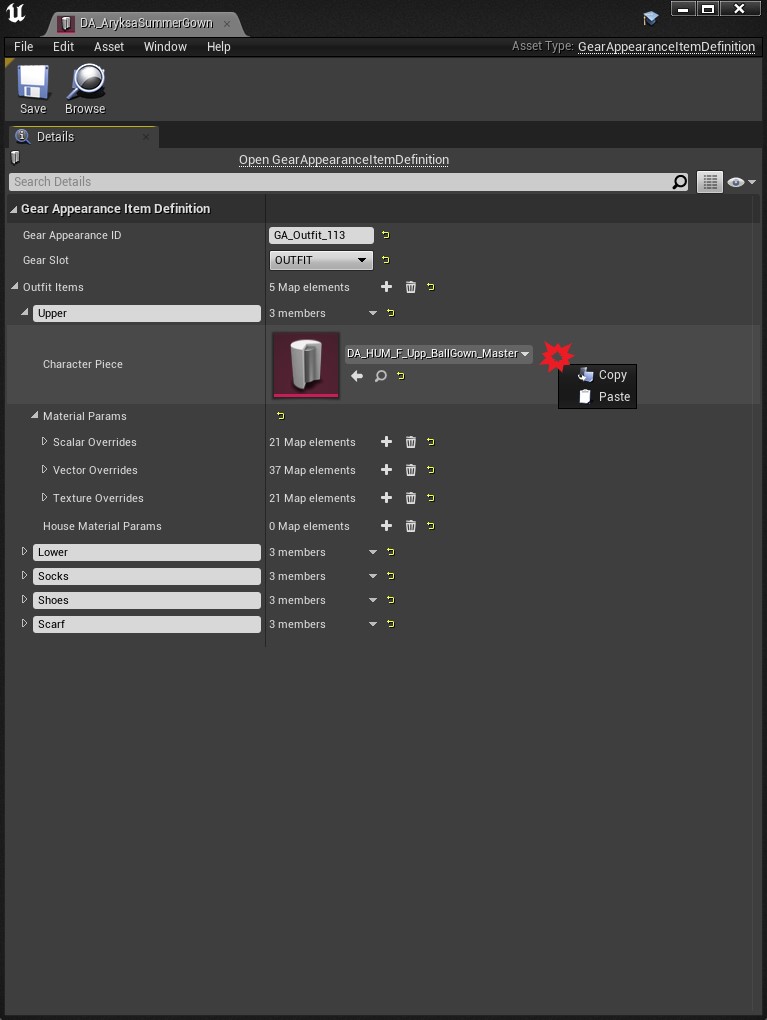
- Then paste it on the
CharacterPieceline of the PoppyDA:

- Then do the
Scalar Overrides,Vector OverridesandTexture Overrides. - Finally, change the name from
NonetoUpper:
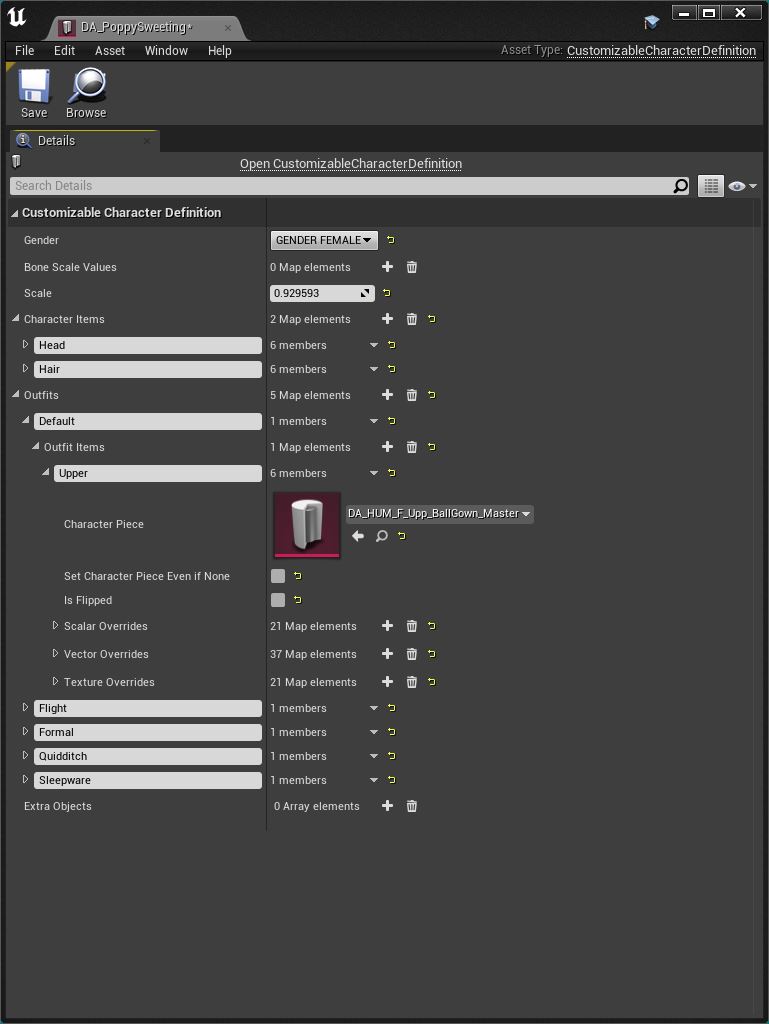
Okay, that's the Upper done. Now we just need to repeat that process for the Lower, Socks, Shoes, and Scarf until we have this:
Hit Save, because you're done! 🙂
¶ Cook the Mod
Proceed as follows:
- Go back to our
DA_PoppySweetingData Assetin theData\CC\Studentfolder. - Right click it and select
Asset Actions>Assign to Chunk:
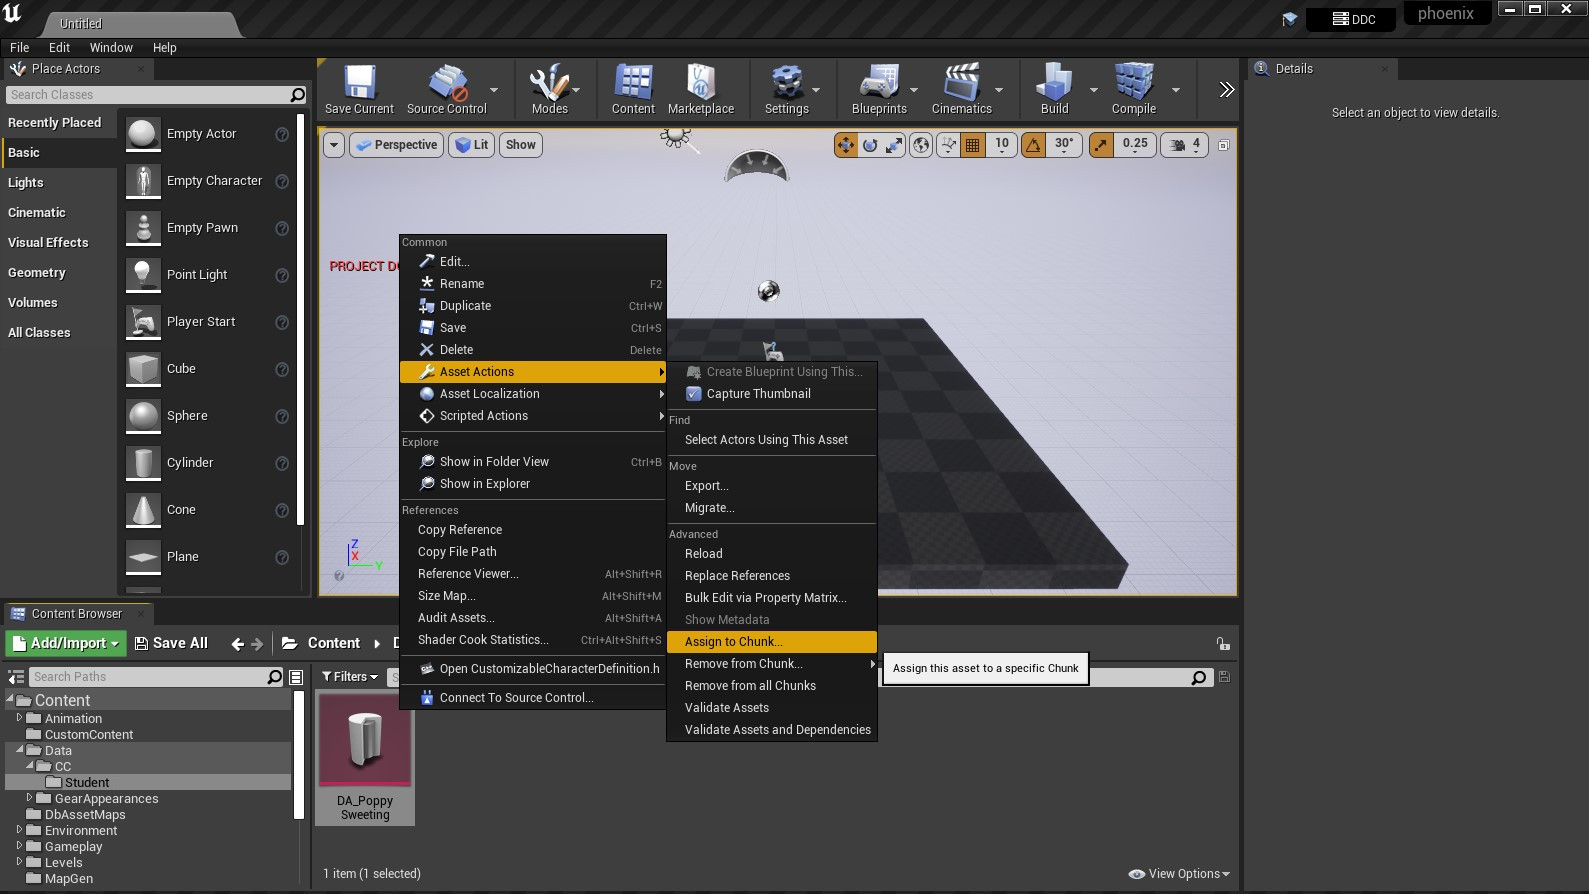
- In the little window that appears, type a number and hit
OK. The number can be anything between 20 and 9999, so I'll choose 2222. - It's best to stick to the range 400 to 4000 because a lot of pakchunk numbers below 400 are already in use, and above 4000 takes longer to cook.
- Mods with the same pakchunk are incompatible so try to avoid choosing something someone else might have used.
- Unfortunately there's no database of used pakchunks, so you just have to guess.
- NOTE: If you ever move or rename an asset (or any of its parent folders) the pakchunk info will be wiped, so you'll need to set it again.
- Now select
File>Package Project>Windows (64 bit):
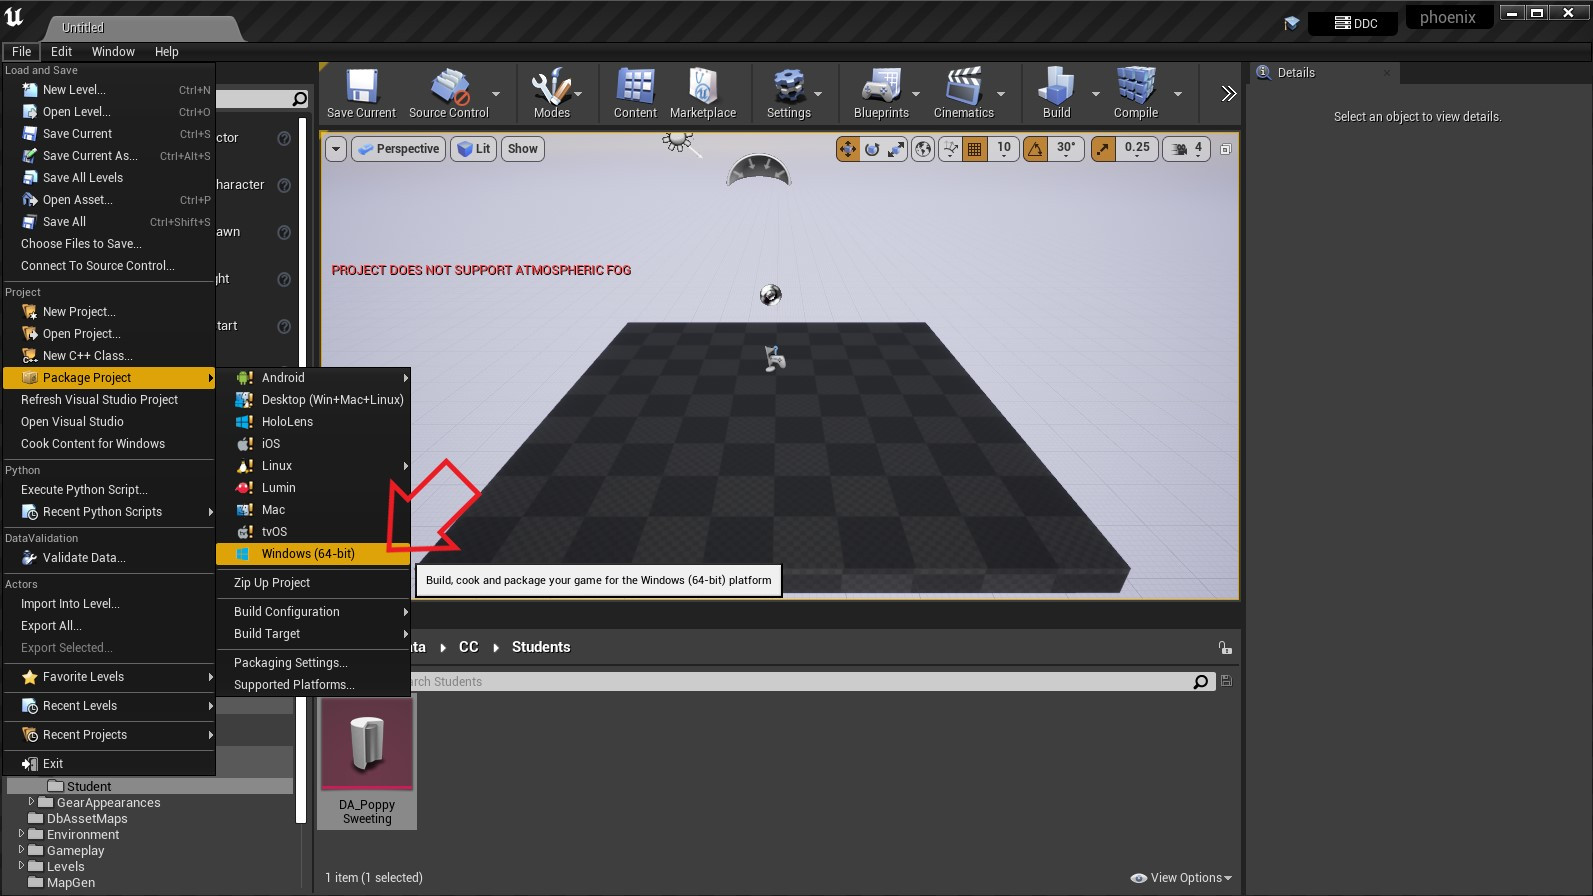
- A window will appear asking where you want to save your cooked project. Choose anywhere. It doesn't matter. Then the cook will start:
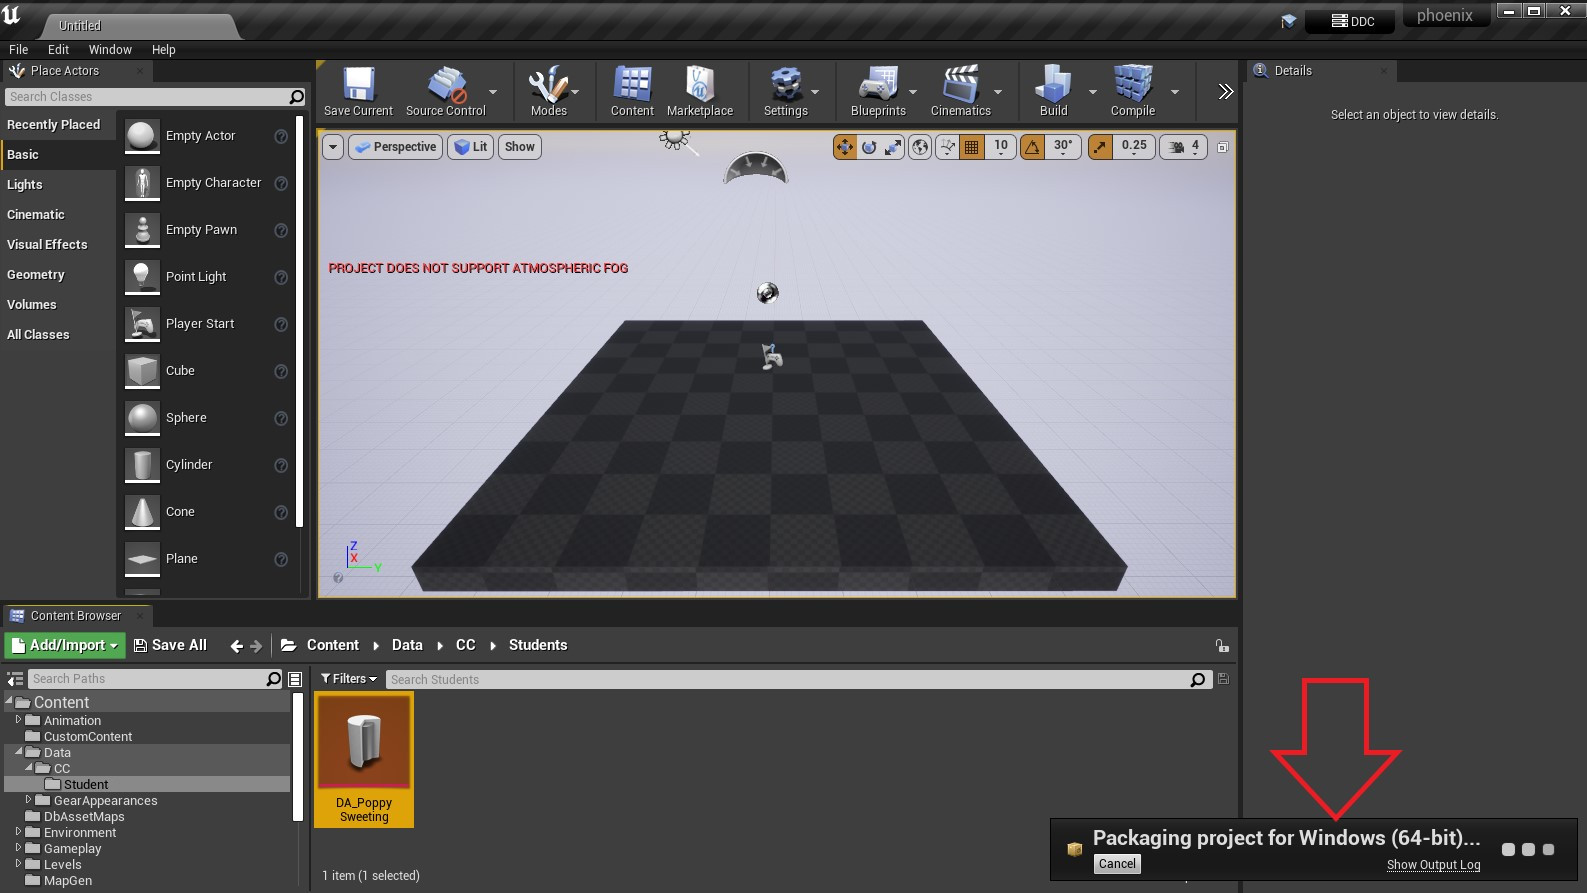
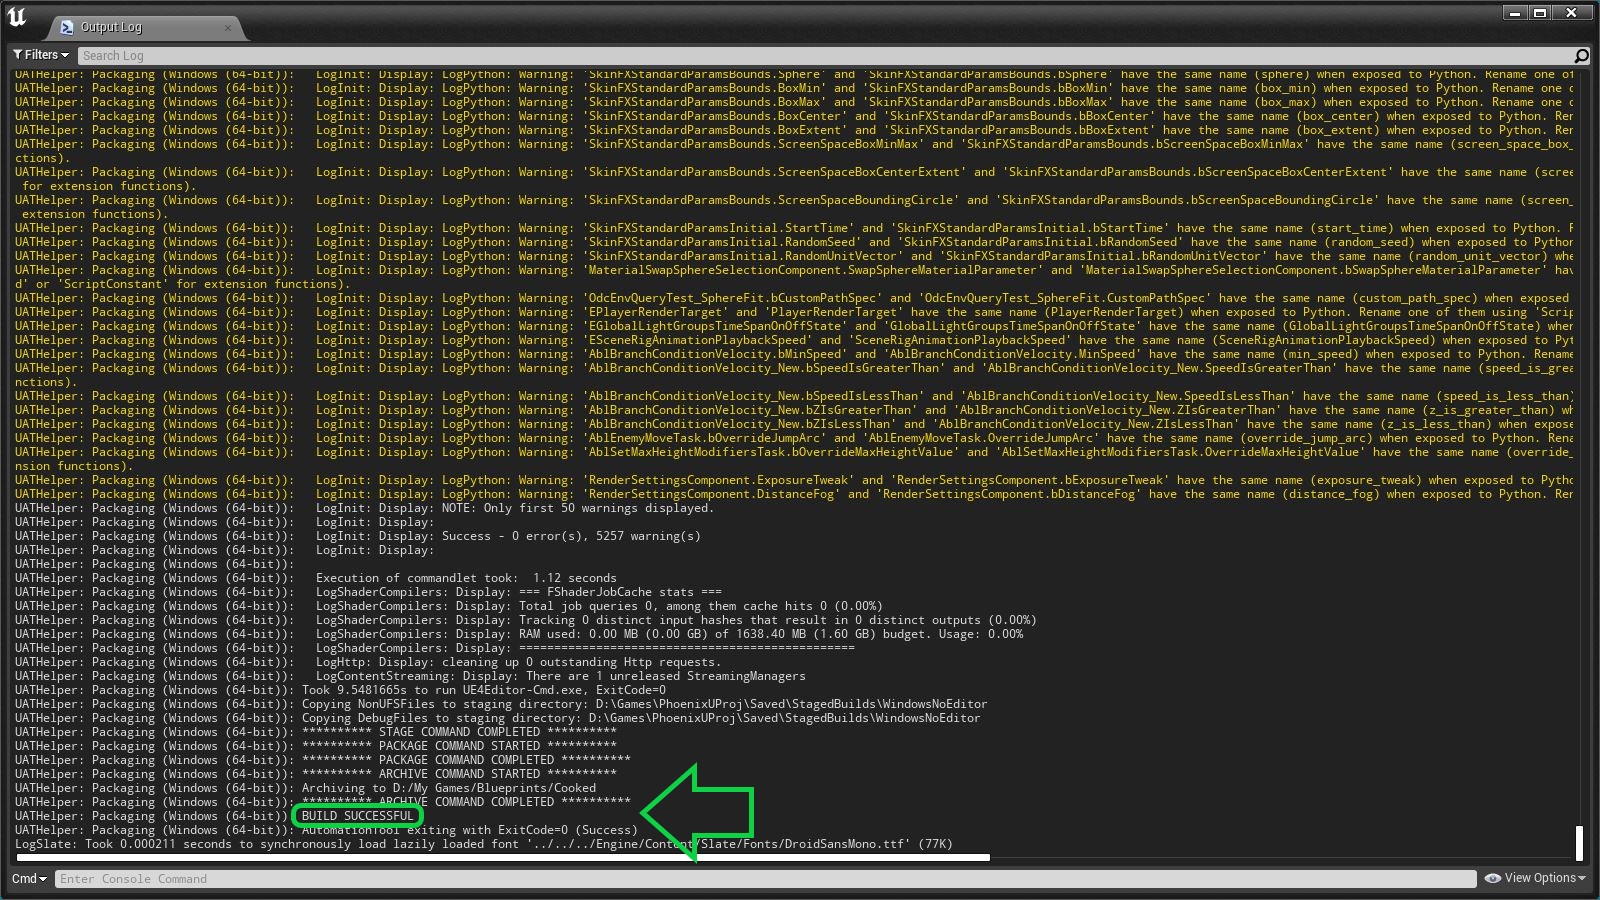
- Click on
Show Output Logto see the output (be patient - it can take a while to appear). There will be literally thousands of warnings (about 5000, in fact). Ignore them. It's normal. - But note that the cook will take a lot longer if you have the
Output Logvisible. - When it's done you will hopefully see this:
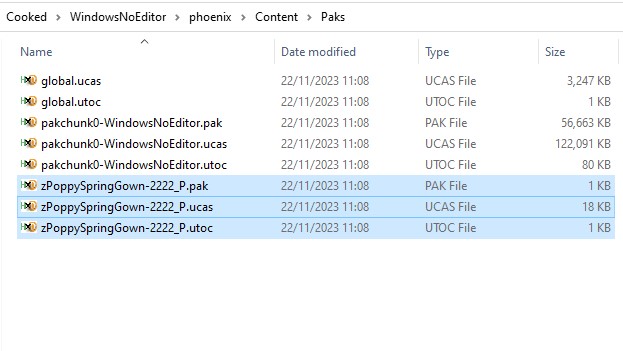
- In Windows Explorer. go to the folder you selected for your cooked mod. Inside you should find a folder called
WindowsNoEditor. - Navigate to the sub-folder
WindowsNoEditor\phoenix\Content\Paks(ignore everything else along the way) and you should find:
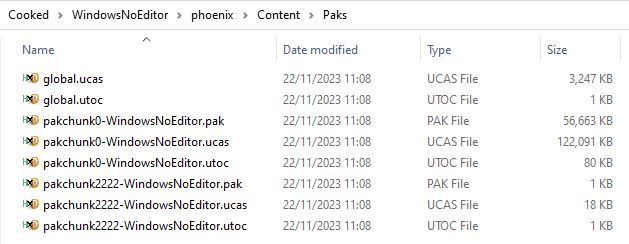
- The three files with your chosen pakchunk number in the name (in my case
pakchunk2222-WindowsNoEditor.*) are your mod. Everything else is junk. - Select all three, then right click and select
Rename:
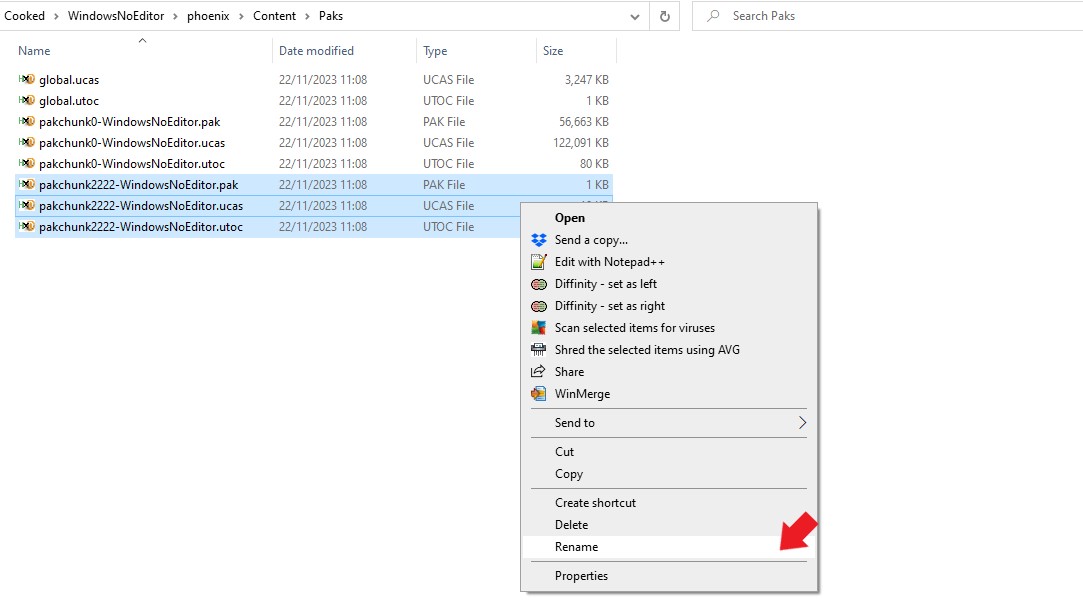
- Type a name that begins with a
zand ends with_P. I'm going to usezPoppySpringGown-2222_P:
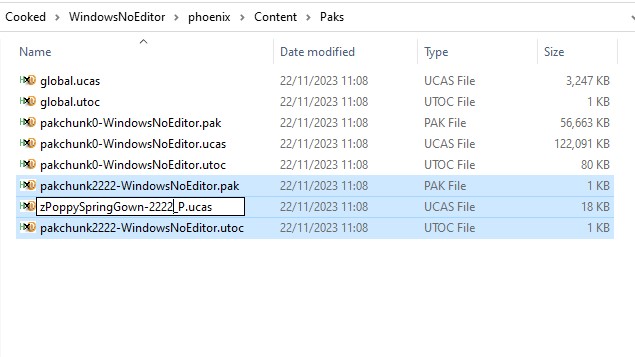
- When you hit return all three files will be renamed:
- That renaming step is VERY IMPORTANT !
Data Assetmods WILL NOT WORK unless you name them like this!- Now copy and paste those three files from this folder to your
~modsfolder. This will install your mod. - That's it! Let's see how it looks!
¶ See How it Looks In-Game
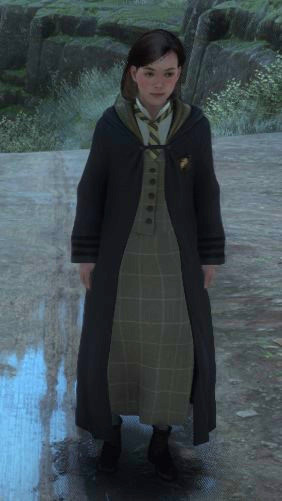
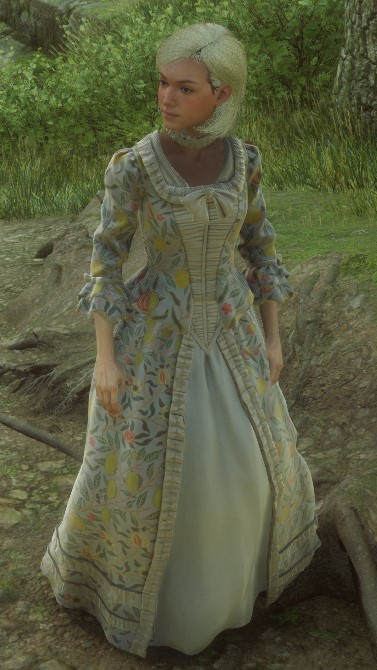
Start up Hogwarts Legacy and find Poppy. This is how Poppy looked originally versus now:
 |
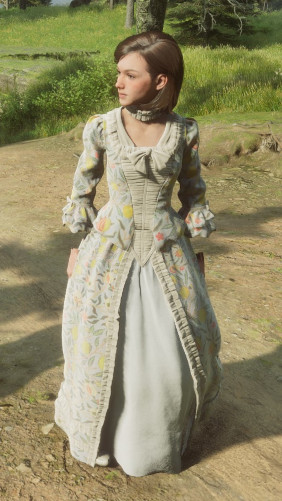 |
Looks brilliant! 🤩Apart from one tiny tiny little thing… hardly worth mentioning really… I mean it's just a detail… but SHE HAS NO FOREARMS!!! 😱
¶ Crisis Meeting
Okay, this is a problem. You remember in the JSON2DA User Guide when we had a look at Poppy's head Skeletal Mesh… and discovered that there were hands included? Well, that has come back to bite us. Poppy's hands were designed for her long-sleeved outfit. Now that we've replaced her long-sleeve with a mid-length sleeve we've revealed parts of her arm for which there is no mesh. There are three obvious options for how to solve this:
- Put a long-sleeve robe over the dress. (But that defeats the whole point of wearing the dress.)
- Replace Poppy's head with a head that has longer arms. (But then it wouldn't be Poppy any more.)
- Edit Poppy's head mesh in Blender to remove the hands, then add arms to the
DA.
Options 1 & 2 are rubbish, so it has to be option 3. Unfortunately my Blender skills are non-existent. But I happen to know that there is a head replacement mod on Nexus (here) to allow the player to look like Poppy. Because the player's hands are separate, the creator of that mod must have removed the hands. So they've done the work for me! All I have to do is install that mod, then replace Poppy's default head with the head from that mod. Simple! 😁
¶ Crisis Averted
The Poppy mod replaces what they call “Female Head #5” with Poppy's head … but which Head DA is that? The answer can be found in ll500's Face Mod Guide (which lists the Skeletal Meshes not the DA's, but we just need to replace SK_ with DA_ to get the DA name):
| AVA_YF_Head_Emily/ SK_Young_F_Head_Emily_Master |
AVA_YF_Head_SC_LH/ SK_YF_Head_SC_LH_Master |
AVA_YF_Head_Andrews/ SK_YF_Head_ScanAndrews_Master |
AVA_YF_Head_CN/ SK_YF_Head_SC_CN_Master |
AVA_YF_Head_African/ SK_YF_Head_ScanAfrican_Master |
| AVA_YF_Head_SC_SE/ SK_YF_Head_SC_SE_Master |
AVA_YF_Head_Hispanic/ SK_YF_Head_Hispanic_Master |
AVA_YF_Head_SC_RC/ SK_YF_Head_SC_RC_Master |
AVA_YF_Head_Maria/ SK_YF_Head_ScanMaria_Master |
AVA_YF_Head_Asian/ SK_YF_Head_ScanAsian_Master |
| AVA_YF_Head_SC_JY/ SK_YF_Head_SC_JY_Master |
AVA_YF_Head_SC_DK/ SK_YF_Head_SC_DK_Master |
AVA_YF_Head_Indian/ SK_YF_Head_ScanIndian_Master |
AVA_YF_Head_Amita/ SK_YF_Head_Amita_Master |
AVA_YF_Head_SC_CM/ SK_YF_Head_SC_CM_Master |
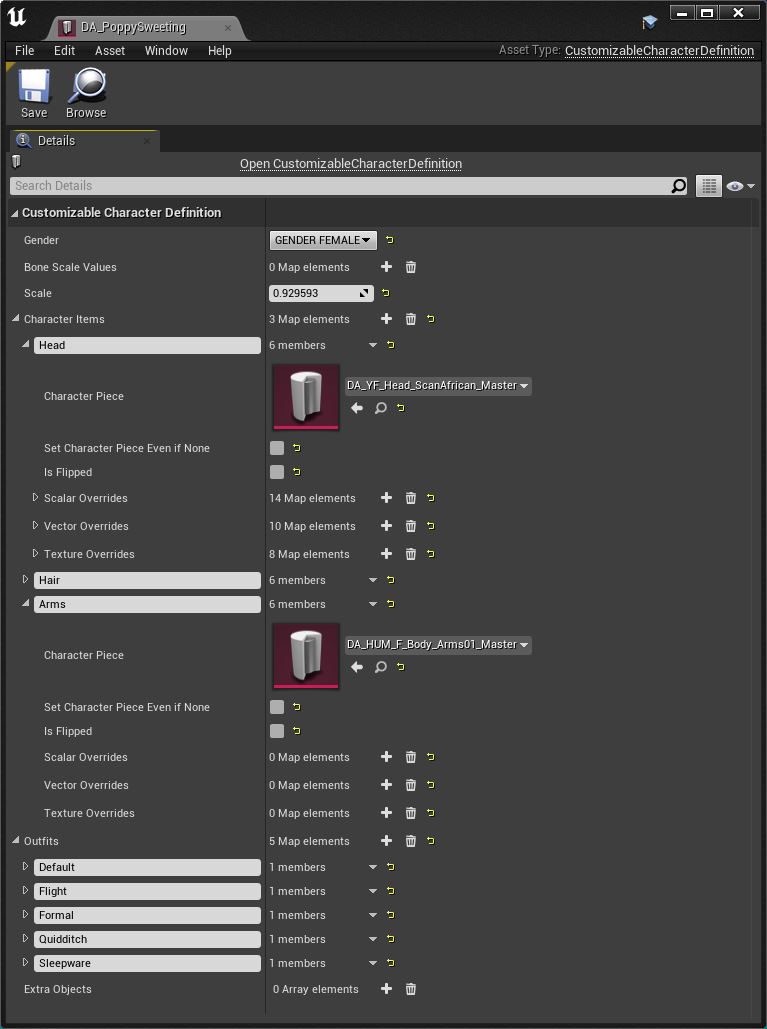
So “Female Head #5” is DA_YF_Head_ScanAfrican_Master in the Content\RiggedObjects\Characters\Human\Heads\AVA_YF_Head_African folder.
Next I need to add an Arms Character Piece. A quick search in Fmodel reveals that there is in fact only one to choose from, Content/RiggedObjects/Characters/Human/Body/Arms_F/Arms01/DA_HUM_F_Body_Arms01_Master, so that was easy.
Here is the final DA:
And here's the final result… with her usual hair, and then with dyed blonde hair (brown eyes, dark roots & eyebrows), and then with natural blonde hair (blue eyes, blonde roots & eyebrows):
 |
 |
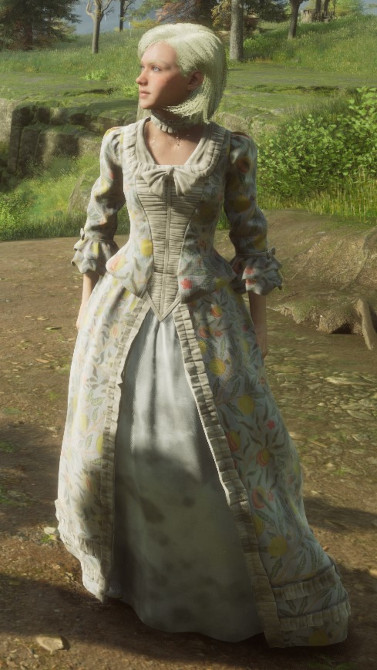 |
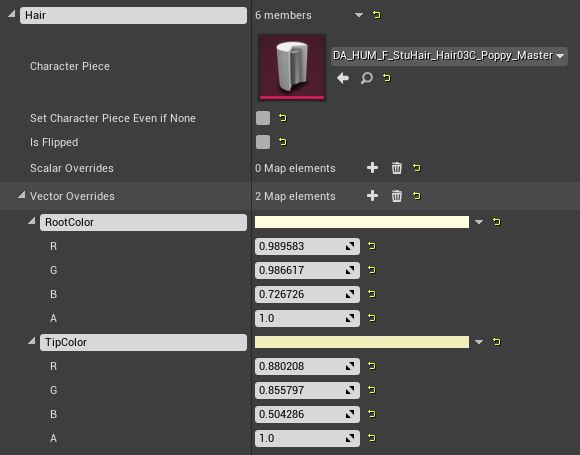
Here are the Hair Vector Overrides for the dyed blonde look:
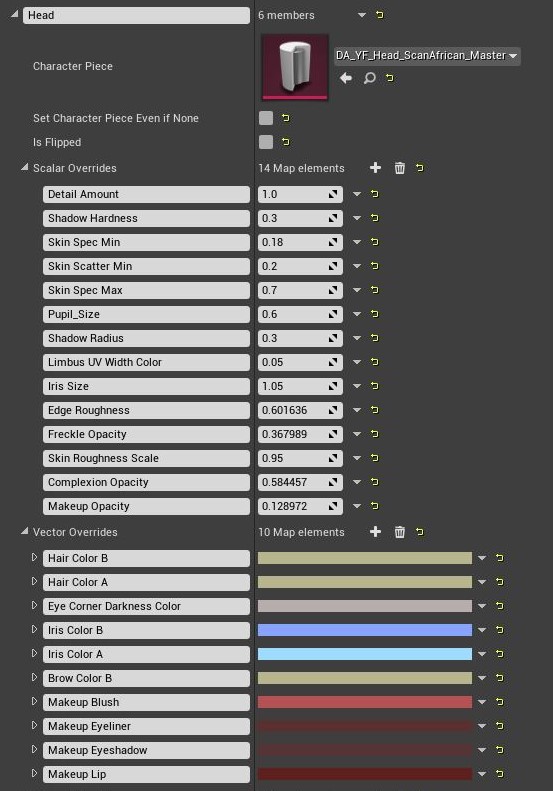
And here are the Head Overrides for the natural blonde look:
¶ Addendum1: Removing the Hands
I had a go at removing the hands from Poppy's Head mesh in Blender and got it to work. The hard part was exporting the mesh to Blender and then re-importing it, but if you follow ll500's Face Mod Guide very very carefully you should be fine.
The actual deleting was done in Blender by:
- Selecting the mesh in the hierarchy on the right (the one with the inverted green triangle).
- Selecting
Edit Mode. - Pressing
zthen4to enableWireframe Mode. The mesh should be black. - Pressing
ALT-zto enableX-raymode. This will ensure that vertices are selected whether they're visible or not. - Dragging to select the hand meshes (they will turn orange).
- Pressing
xordeletethen selectingVertices.
¶ Addendum 2: Matching chest colour to face colour
There's something odd about the colour of Poppy's chest: it doesn't match her face. I think that's built into the Head Texture Overrides because her chest is supposed to be hidden underneath clothing. If I delete those Texture Overrides it looks much better (but still not perfect). However, I am reliably informed (by user sebominis) that this can be solved by exporting the face texture as a png file, editing that in a photo editor (like Photoshop or Gimp) to make the chest colour match the face colour, then dragging & dropping that edited png into the correct folder of the Custom Engine's Content Browser to create a texture .uasset file, and giving that texture .uasset the same pakchunk as your mod.
¶ Final Thoughts
That turned out to be a bit more convoluted than I'd hoped, but we got there. If you're thinking of doing something similar, pay particular attention to the arms. It would be easiest to just swap short-sleeved gear with short-sleeve gear, mid-length with mid-length, and long-sleeve with long-sleeve. But if you don't want to do that, have a plan for how you'll replace the arms.