¶ Blueprint Basics
So what are blueprints anyway? Blueprints are a visual node-based scripting language that is unique to Unreal Engine. They are -- more or less -- an abstraction framework built on top of the C++ Programming Language. With blueprints, you can design complex interactions for game behavior without ever needing to write a single line of code. In fact, designing blueprint scripts feel more like designing a flow chart than traditional text-based code editing.
Consider the two examples below for a Blueprint and LUA script that both define logic for:
- Playing a sound and adding 100,000 Koupons 5 seconds after the game starts.
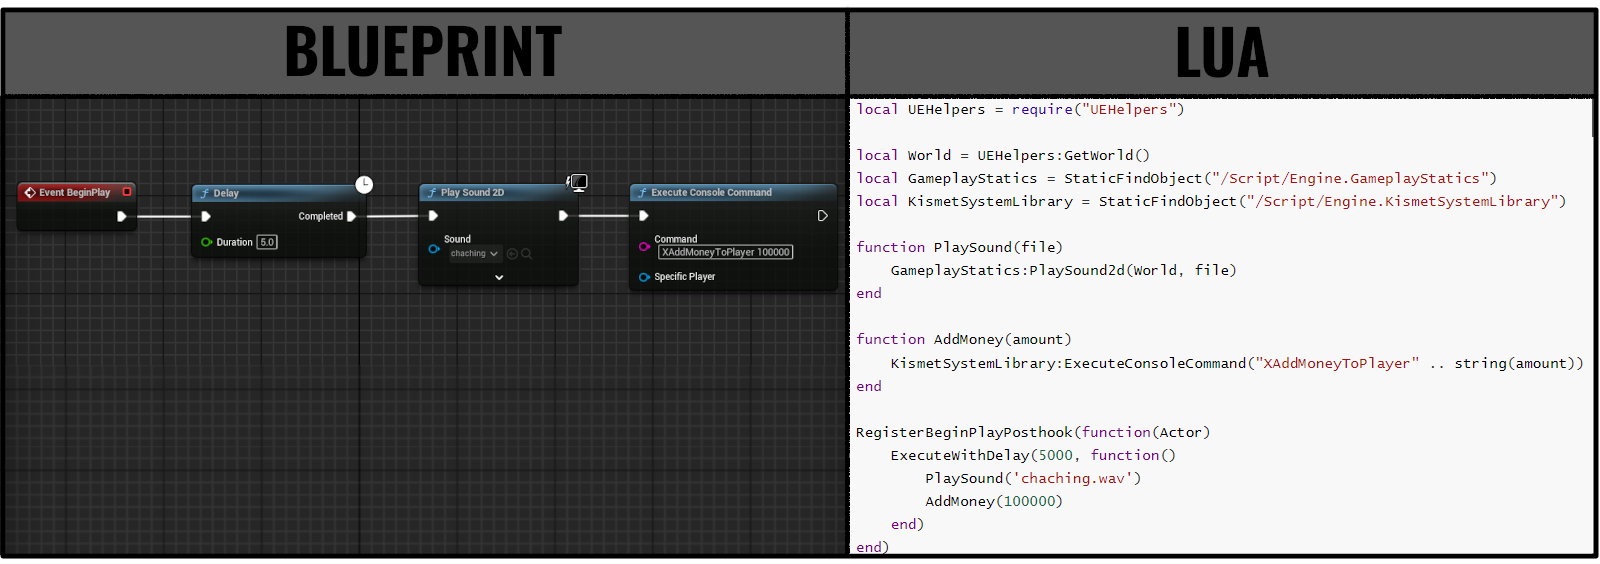
I am willing to bet that you found one of the above examples easier to read than the other.
¶ Nodes
What are Nodes?
A node is a blueprint object that performs a unique function.
Every node will have at least one Pin which is a connection point that can be attached to another node.
Pins on the left side of the node will be Input Pins, while pins on the right will be output pins.
Lets take a look at the 4 blueprint nodes in the above example one by one.
¶ Event BeginPlay
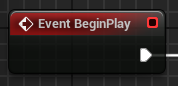
This node is an Event Node which is a triggered start for the execution of a script. Events listen for certain conditions to indicate that they should start executution for whatever nodes are connected through it's execution output pin.
Event nodes will typically have a red colored header and contain only one output pin.
Event BeginPlay will notify any connected nodes to start executing once the Blueprint Asset that contains it is loaded into the game.
¶ Delay
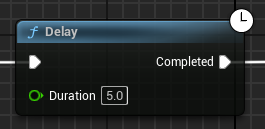
This node is a function node which defines 2 input pins and 1 output pin.
- Input Pins
- Exec (In) -- connection to another node that will notify this node when it is appropriate for it to start executing.
- Duration -- the number of seconds to wait until sending an execute signal to the node which is connected to this node's Completed pin.
- Output Pins
- Completed -- Exec (out) pin which will be connected to another node which should start executing when the delay duration has completed.
A Delay node simply pauses the execution of the script for the set Duration in seconds and subsequently notifies the next node to start execututing afterwards.
¶ Play Sound 2D
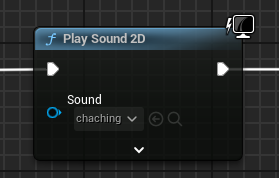
This node is also a function node which defines multiple input pins and 1 output pin.
Although we can only see the ExecIn and Sound pins by default, notice there is a downward chevron icon at the bottom of this node. If you click on that you will see some normally hidden input pins which can modify how the sound plays.
- Input Pins
- Exec (In) -- connection to another node that will notify this node when it is appropriate for it to start executing.
- Sound -- indicates the actual sound file (.wav) that we want to play when this node is executed.
- Output Pins
- Exec (Out) -- connection to another node which should start executing after the sound is played.
The Play Sound 2D node simply plays a .wav file.
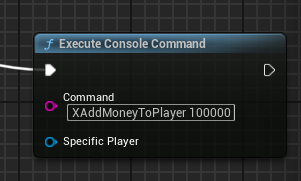
¶ Execute Console Command
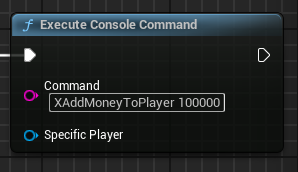
This is another function node which defines 3 input pins and 1 output pin.
- Input Pins
- Exec (In) -- connection to another node that will notify this node when it is appropriate for it to start executing.
- Command -- The string (collection of letters, numbers, spaces, etc) representation of a command which we can enter into the game console and execute while the game is running.
- Specific Player -- Used to specify which player this command should be ran for. Not relevant in single player games.
- Output Pins
- Exec (Out) -- connection to another node which should start executing after the console command is executed.
The Execute Console Command node emulates opening the in-game console (F10 (UETools) or ~ (SimpleModLoader)). Then typing the Command and susequently pressing the ENTER key.
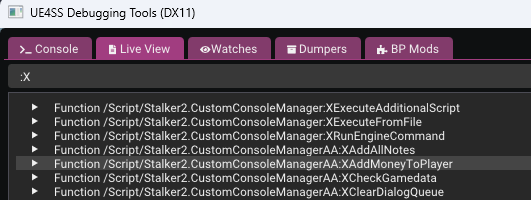
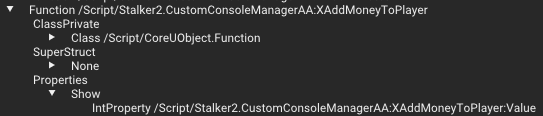
If you are curious about the console commands available you can use the UE4SS Debugging Tools' Live View tab to search for all available console commands by searching for
:X(colon X):
Sure enough we see the command we are using is the 5th result shown.If we click on that result to expand its details and then also expand Properties.Show we can see that this command expects to be provided with 1 property which will represent the value for money which we want to add to the player.
As a programmer by profession, I would be lying if I said that I accepted and took to Blueprints right away. My initial impression was that blueprint scripting looked too much like playing with legos whereas I wanted to write "serious" game code. In my modding exploits prior to S.T.A.L.K.E.R. 2, I had the ability to leverage blueprints but would instead opt for C++ or LUA which aligned more with what I was used to.
I am now kicking myself for not learning Blueprint Scripting sooner. Blueprints offer many advantages over text-based coding which make designing and debugging much faster and more fluid.
Advantages:
- Easier to read and follow logical flow of actions within the script
- Most of your code can be tested immediately in a virtual world within the Unreal Engine Editor
- Writen within the Unreal Engine Editor with no external IDE required
- Datatype matching is enforced while designing
- Contextual hinting is very well designed and useful
- Visual feedback on logical flow and errors even before compiling (cooking) your scripts
¶ Blueprint Mod Setup
This section assumes you have already set up the Unreal Engine Editor and created a new project as described in the Unreal Editor Setup guide.
Below are the steps you would take to create the initial structure which will be the starting point for any blueprint mod you create:
- Open Unreal Engine
- Open your Stalker2 project
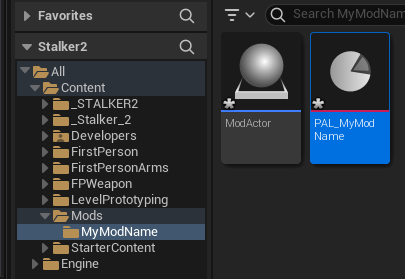
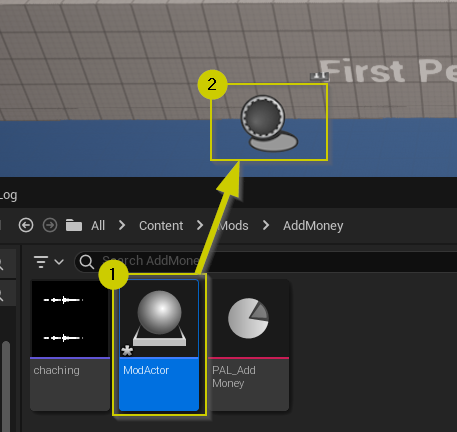
- In the Content Browser Section, Create a new folder under All/Content called Mods
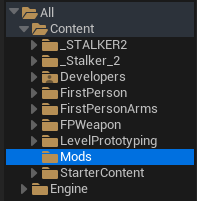
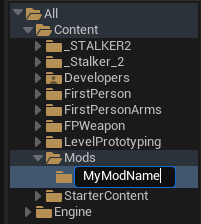
- Create a new folder under All/Content/Mods which will be the name of your mod
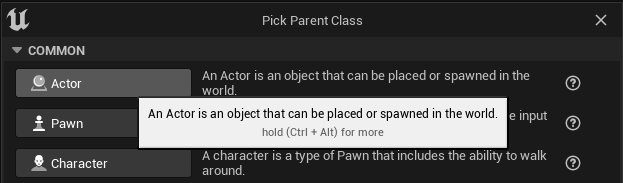
- With your MyModName folder highlighted, Right-click within the content browser area to the right of where you created the folder, and select Blueprint Class

- Select the Actor option in the pop-up window
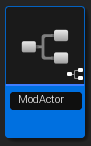
- Name your new BlueprintActor class "ModActor"
Q: Why ModActor? Couldn't I name it something else?
A: Yes, but in order for your mod to work with Vortex, UE4SS and BPLoader you are required to make the name of the primary BlueprintActor object for your mod "ModActor". This asset is what those mod loaders will look for and load automatically.
if you name it anything else then your mod would only work with Simple ModLoader
- Right-click on any empty space to the right of your ModActor object, then hover over Miscellaneous and then select Data Asset.
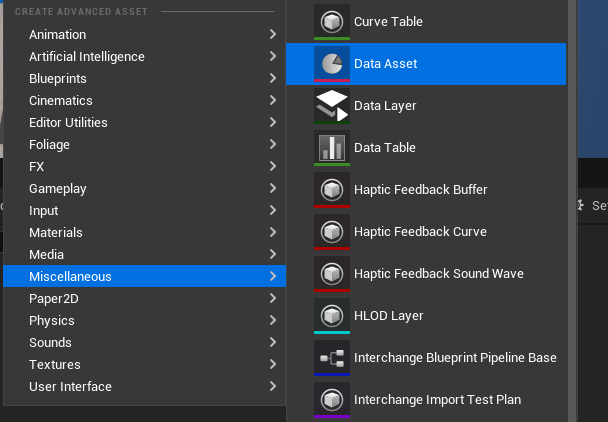
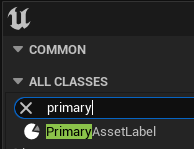
- Type in "Primary" in the search window then select PrimaryAssetLabel from the class options.
- Click Select
- Rename your primary asset label object. I suggest using the pattern "PAL_ModName" as shown below:
You will often find unreal objects in-game that are prefaced with an acronym that infers what type of object this is. This is not required by the Unreal Engine, nor is it enforced but it is good to know when you are data-mining and hunting for a specific type of asset. Knowing what these conventions are will help you use search tools efficiently.
Some prefix examples are as follows:
Prefix Asset Type S.T.A.L.K.E.R. 2 Example Description BP_*Blueprint BP_AI_HUMANBlueprint Class for all humanoid characters in S.T.A.L.K.E.R. 2 SM_*Static Mesh SM_foo_sausage_01Static Mesh (3D Model) of a sausage T_*Texture T_foo_sausage_01_DTexture (picture/UVMap) which is wrapped around the previous static mesh in order to make it look like a sausage.
- Double-Click on the PrimaryAssetLabel you just created and make the following changes:
- Priority: set to anything higher than 1
- Chunk ID: set to any number between 1000 and 9999 (make sure this is unique from any other primary asset label you may have created for any other mods.
- Cook Rule: set to Always Cook
- Label Assets in My Directory: set to Enabled

- Click the Save icon in the upper-left and then close the window for your PrimaryAssetLabel.
- Press CTRL+SHIFT+S to save both your BlueprintActor and PrimaryAssetLabel Assets.
You have now setup the basic structure for a Blueprint mod and are ready to start writing blueprint scripts, add unique assets or anything else you wish to be a part of your mod.
When you create your second mod, you can skip step 3 as you would just use the All/Content/Mods folder you have already created for this project.
¶ Creating the AddMoney Mod
So lets actually create and test the blueprint script used as an example at the start of this document.
- Play a sound and add 100,000 Koupons 5 seconds after the game starts.
This section assumes you have followed all the previous sections of this document and have:
- Downloaded and setup the Unreal Engine Editor
- setup a Stalker2 Project
- setup you Mods folder within the Project
- Open your Stalker2 project in the Unreal Editor
- Follow steps 4 - 14 from the previous section (Blueprint Mod Setup) and call your mod folder
AddMoneyif you want to mirror me exactly.
You could choose any name you want but keep that in mind for whenever I reference
AddMoneyyou will have to use your mod name instead if you picked something different.
- Download the following sound file from freesound.org or optionally use your own .wav file if you prefer.
- Open the folder that contains either the downloaded .wav file or the alternate .wav file you want to use, and then drag it into the content browser for you mod folder.
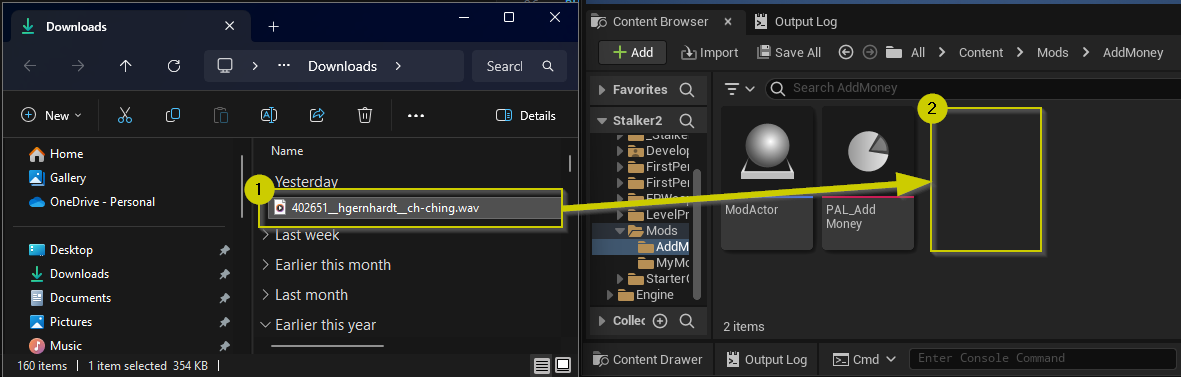
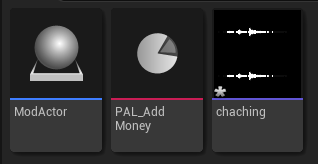
- Select (click) the sound file and press F2 to rename it. Rename it to
chaching
- Press CTRL+SHIFT+S to save all unsaved assets.
- Double-click on
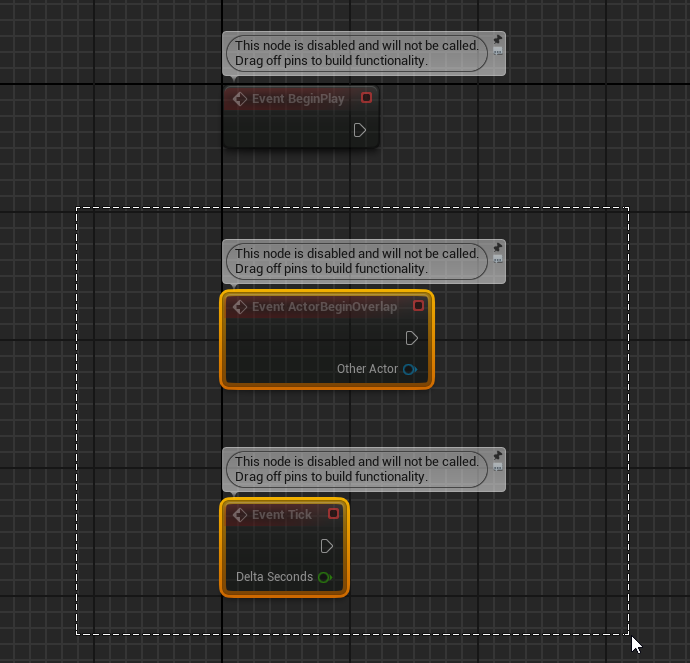
ModActorto open it up in an edit window. - Switch to the Blueprint Graph Editor by selecting the EventGraph tab towards the top of the screen.

- Highlight the lower two event nodes and press the DELETE key to remove them. We will only be using the EventBeginPlay node for this example.
- Press and hold the left-mouse button on the ExecOut pin for Event BeginPlay and move your cursor a bit to the right and release the left-mouse button.
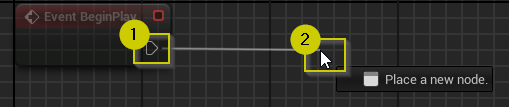
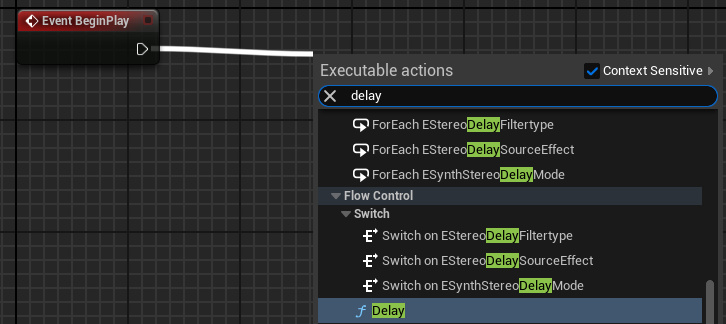
- In the pop-up display for executable options, type in
Delaythen select theDelayoption
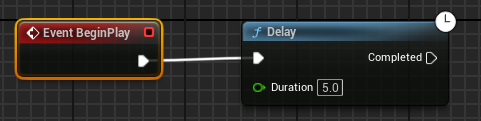
- Within the Delay node, click inside of the textbox which contains
0.2and change its value to '5.0' -- which will change the delay from 1/5th of a second to 5 seconds.
- Drag off of the
Completedpin from the Delay node, release the mous button and type inPlaythen select thePlay Sound 2Doption.

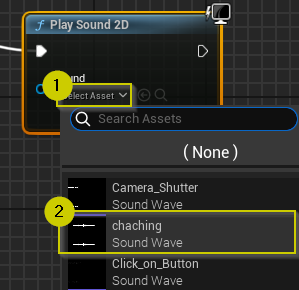
- In the PlaySound2D node, click Select Asset and select the
chachingasset which is the wav file we imported in step 4.
- Drag off of the ExecOut pin from Play Sound 2D, then type
executeand select theExecute Console Commandoption.
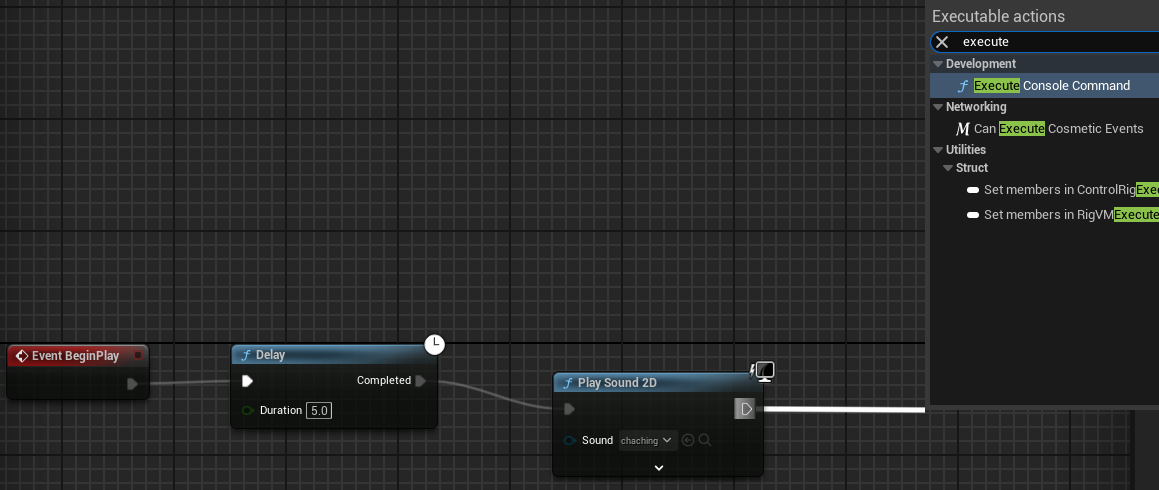
- Click in the Command parameter's textfield and type in
XAddMoneyToPlayer 100000
Blueprint Editor Shortcuts
Here are a few helpful shortcuts and commands to make navigating around the Graph Editor easier:
Action Shortcut Description Pan Left Mouse Button Pan (move screen) around the graph window Straighten Q With multiple nodes selected, this will align them to straighten out the exec pin connections Add Comment C With multiple nodes highlighted, this command will add a comment block which also serves to visually distinguish parts of your script easier. Undo CTRL+Z Undo last change Redo CTRL+Y Redo last change Delete DELETE delete or remove nodes, links and other graph objects
¶ Testing the AddMoney Mod
Now we have a completed creating the blueprint script for this mod. Currently we assume it will work but we do not know for sure. With Blueprints there are two ways to test mods:
- In-Editor Testing
- In-Game Testing
¶ In-Editor Testing
So you have probably spent a few hours or so looking at the First Person Template test level if you followed my recommendations on setting up your project.
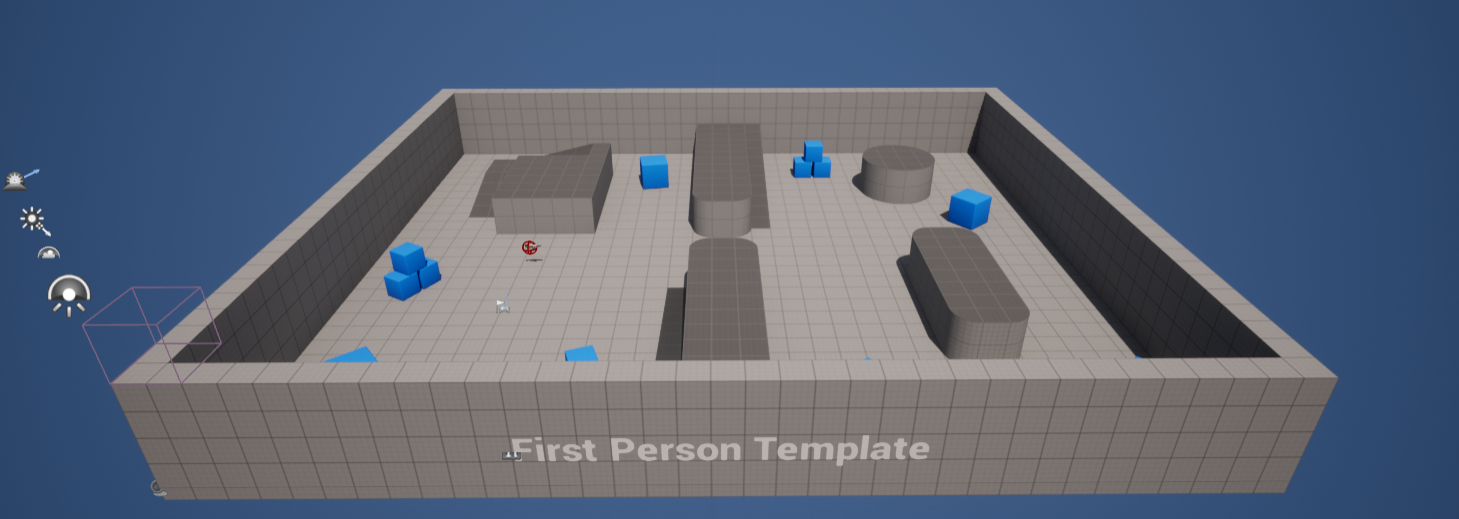
None of the assets that make up that template will be included as part of our mod but it comes in handy when we need to start doing testing for simple interactions and Unreal Engine universal assets.
Go ahead and press the Play button above the level viewport.

This mode is called the Play-In-Editor or PIE for short.
If you selected the First Person Template when you created your Stalker2 project you will have a small area where you can move around and interact with a test world.
We can use this world to test our blueprint scripts before we compile, package and test in-game as it is much faster to test in the PIE than it is to repackage the mod and start Stalker2 again.
It is important to know that only nodes which do not target any stalker2 specific code or assets will be testable in PIE. It can sometimes be difficult to understand what is Unreal Engine Specific and what is Stalker2 Specific but you start to realize the differences after playing around with Blueprints for a while.
We will use our AddMoney Mod's blueprint as an example because it has 4 nodes and all but one of them will be fully testable in the PIE mode.
Some of you may have realized that when you entered the PIE mode that you did not hear your sound file play, even if you waited for 5 seconds before exiting. This is because we have not yet introduced our ModActor BlueprintActor Asset into the game world.
If a BlueprintActor is not present in the game world or level, it's Event BeginPlay will never be called. To fix this we can just drag our ModActor Asset into the level and dropping it anywhere you like. It's location doesnt matter becuase it has no visual representation within the game nor does it physically interact with any Actors or Pawns.
Now when you press the PIE Play button again and wait 5 seconds you should hear your sound file play.
Purpose of Blueprint Mod Loaders
What we just did -- draging our ModActor asset into the game world -- is the entire purpose of Blueprint Mod Loaders. Since our blueprint mods have no native way to force themselves into the game world within a shipped game, we need to have a ModLoader do that for us.Vortex and UE4SS do this by looking looking for a subfolder within
Stalker2/content/modswhich is the same name as a*.pakfile withinStalker2/content/paks/LogicMods. If it finds one and it contains an asset calledModActor(verbatim) then it places that asset into the world so it can run its Events -- such as Event BeginPlay -- and whatever else is coded into the mod.SimpleModLoader does something similar but you have to tell it exactly what the path to the mod's primary blueprint asset is using the
mod add <path>command in the console window.
So we can now see that the Event BeginPlay, Delay and PlaySound2D nodes are working . . . but what about the ExecuteConsoleCommand Node?
Well the XAddMoneyToPlayer console command is something that is specific to Stalker2. That command means nothing to the native Unreal Engine. In fact, if press the play button again and then open up the Output log (bottom left of the editor window)
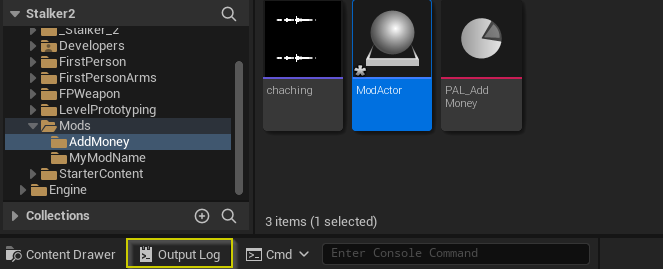
After 5 seconds when the Delay node is complete we should see that our Blueprint Script attempted to call the console command but it was not recognized.
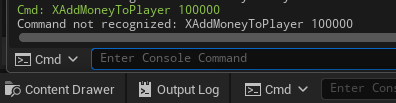
This is actually expected behavior because XAddMoneyToPlayer is only defined and usable in-game. The fact that our Blueprint tried to run the command at all means that our mod is working as intended.
¶ Completing the AddMoney Mod
So now that we have tested our mod in the Editor, we can compile, package and test in the actual game.
- Make sure all assets are saved and that we see All Saved in the lower-Right of the editor window

If it shows something like # unsaved then click on that area and select Save All - click Platforms → Windows → Package Project at the upper-middle section of the editor.
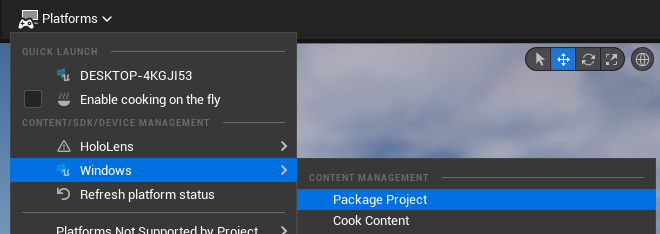
If you did not enable "cook everything in content directory" in your project settings and/or you did not set "Always cook" as the Cook Rule in your Mods PrimaryAssetLabel you may need to run Platforms → Windows → cook content prior to packaging your mod.
- Click Select Folder in the Package Project target directory pop-up window.
- You will see a Packaging Complete indicator in the lower-right of your editor when the packaging is complete. Note that this can take a very long time the first time that you package your project.

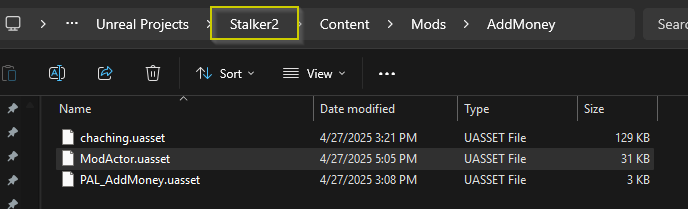
This means that your .pak, .utoc, .ucas files are ready to be moved to stalker2 and tested. - Go to your UE project's root folder -- you can get there indirectly by right-clicking on your ModActor Asset, selecting Show In Explorer and then clicking on Stalker2 in the upper folder breadcrumb view:
- From your Stalker2 Project Root directory, navigate to Windows → Stalker2 → Content → Paks
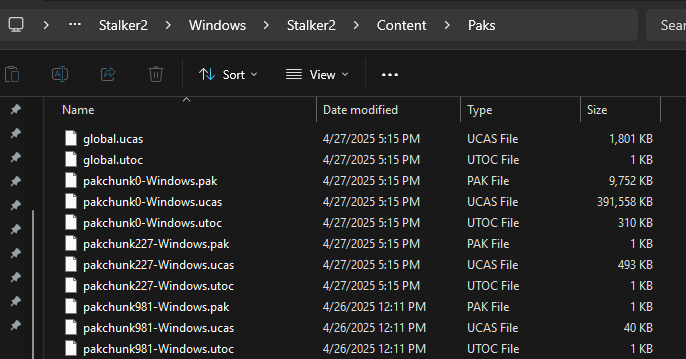
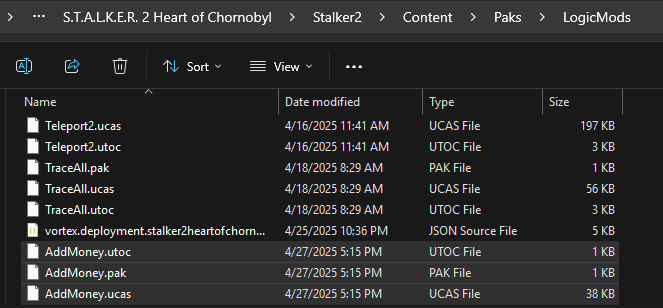
- Copy the 3 files that begin with
pakchunk####where####is the Chunk ID you set in your mod's PrimaryAssetLabel. In my case it was 4444. - Paste these 3 files into your game's Stalker2/Content/Paks/LogicMods folder.
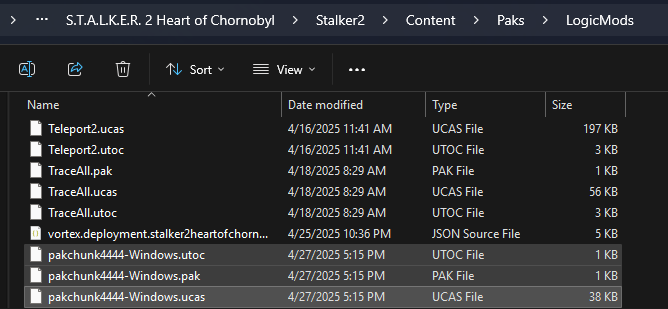
- select all 3 files and then press the F2 button which will rename all 3 at once.
- Type in the name of the mod folder that you created under All/Content/Mods in the Content Browser within the Unreal Editor and then press ENTER. If you mirrored these steps exactly it should be
AddMoney.
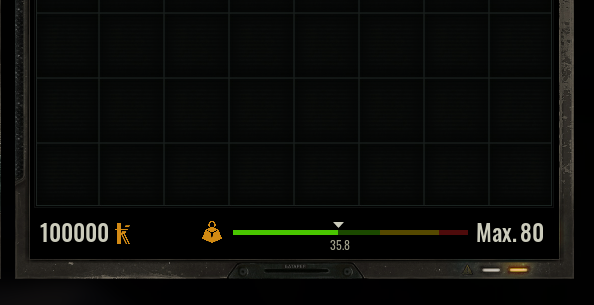
You are now ready to open the game and test if the mod works. You should hear a sound and then have 100,000 Koupons added. You can further test by doing a quicksave (F5) and quickload (F8) which should play the sound again and add an additional 100,000 Koupons.