¶ Introduction
Welcome to this guide on creating new missions for Hogwarts Legacy. This tutorial assumes you have an advanced understanding of Blueprint and SQL modding.
For beginners, I highly recommend starting with the excellent tutorial series here.
This guide will not cover the basics.
¶ Requirements
To follow this tutorial, you will need:
- Unreal Engine 4.27 by Narkon: PhoenixUProjGuide
- An SQL editor with a dump of the game database: DBeaver
- FModel
¶ Overview
In this tutorial, we will create a basic side mission. The player will go on a quest to find a dark wizard obsessed with lanterns, ending in a battle to complete the mission.
¶ History of mission creation research
At the very beginning of modding Hogwarts Legacy, some research on how to create missions was started but unfortunately, it didn't progress very far.
Early on, Ejektaflex created documentation about the mission steps, which you can find here.
And that's pretty much it.
¶ Create an empty mission shell using the db
Hogwarts Legacy is a game that handle a lot of gameplay features via the sqlite database.
To create a new mission, we need to edit the game db (PhoenixShipData.sqlite).
Mission mechanisms are managed by two very important tables : MissionDefinition and MissionSteps.
¶ Mission Definition table
Adding an entry to this table is the first step to create a mission.
Like the name suggest it will define your mission by creating an unique identifier and setting up some information.
First let's insert a new entry :
INSERT INTO MissionDefinition (MissionID,ParentMissionID,MissionLineID,MissionTitleTextKey,MissionSummaryTextKey,MissionLevel,SuggestedMissionLevel,MissionPrereqLockID1,MissionPrereqLockID2,ProgressLockID,AchievementID,KnowledgeSubject,Discoverable,DisableAbandonment,ProcessDuringExclusiveMissions,AlwaysReset,CompleteChildrenWhenDone,MissionAvailableTextKey,MissionActiveTextKey,Version) VALUES
 ('WikiTutorial',NULL,'Side','My mission title','My mission description','0','0',NULL,NULL,NULL,NULL,'MissionSide',1,0,0,0,0,'Default1','Default2',1);
Your mission id is something you will have to use a lot so name it wisely.
It's a good practice to name your mission like your mod on Nexus so other modders can find it easily. Try to avoid using confusing name somewhat close to vanilla features of the game.
MissionID : unique mission identifier
MissionTitleTextKey : The displayed name of your mission (will need to be translated)
MissionSummaryTextKey : The summary of your mission displayed in the quest journal (will need to be translated)
MissionLineID : The type of your mission decide how it's displayed on the quest journal
There is a lot of other columns you can play with but we will only cover how to create a basic mission.
Mission Steps table
Adding a Mission Definition entry do nothing on it's own. You need to use Mission Steps to define what the mission is doing.
The game will play the step in the order you enter them.
A mission step is composed of a task type, the task parameters and its position in the mission sequence.
Nothing better than an example, let's create the first steps for our lantern wizard mission :
INSERT INTO MissionSteps (MissionID,Step,TaskTypeID,Flags,StepNickname,GotoStepNickname,Keyword1,Keyword2,Keyword3,Keyword4,Keyword5,Keyword6,Keyword7,Keyword8,Keyword9,Keyword10,Keyword11,StepJournalTextKey,StepObjectiveTextKey,StepFailTextKey,StepFailWarning,TaskUID) VALUES
('WikiTutorial',0.1,'EvalMissionAccepted',128,'PreReq',NULL,'BEA_01',NULL,NULL,NULL,NULL,NULL,NULL,NULL,NULL,NULL,NULL,NULL,NULL,NULL,NULL,975382840),
('WikiTutorial',1.1,'ActivateMission',0,'ActivateQuest',NULL,'Yes','No',NULL,NULL,NULL,NULL,NULL,NULL,NULL,NULL,NULL,NULL,NULL,NULL,NULL,14425417368),
('WikiTutorial',2.1,'EvalProximity',128,'WikiTutorial Proximity',NULL,'Player0','3',NULL,'WikiTutorial_wizard_zone',NULL,NULL,'Radius','15.00','Yes',NULL,NULL,'A dark wizard has escaped find him beware of the lanterns.','Find the dark wizard',NULL,NULL,168544274),
('WikiTutorial',2.2,'EvalAddBeacon',0,'WikiTutorial_Beacon',NULL,'Standard','No',NULL,'WikiTutorial_wizard_zone',NULL,NULL,'5','No','WikiTutorial','Low','5','default9','WikiTutorial text',NULL,NULL,13895226968);
Initially, we have four steps:
Step 0.1 : The mission only activate if you have finished the Beast class mission
Step 1.1 : Mission is activated (this make mission show up in the journal and the player gets a notification a new mission has started)
Step 2.1 : Check if the player in this 15 meters of the location WikiTutorial_wizard_zone
Step 2.2 : Adds a map beacon to guide the player to the location
The Step column describe when the step will be played. The first step must the 0.1.
Steps are played sequentially meaning when 0.1 is finished then 1.1 is played.
But as you can see in step 2.1 and 2.2, steps can be divided in sub-steps that are themselves played synchronously.
Meaning all sub-steps of a step must be finished for the step to end.
In summary, this setup makes the game check if the player is within 15 meters of the location, and until the player reaches that location, a beacon will guide them.
We use that location for our Dark wizard spawn :
INSERT INTO Locations (LocationID,XPos,YPos,ZPos,ZRot,WorldID,TypeID,ParentLocationID,VolumeOriginX,VolumeOriginY,VolumeOriginZ,VolumeExtentX,VolumeExtentY,VolumeExtentZ,VolumeRotX,VolumeRotY,VolumeRotZ,HouseAndGender) VALUES
('WikiTutorial_wizard_zone',383096.531,-489532.125,-89516.227,102.500893,'Hogwarts','MissionEntryPoint',NULL,NULL,NULL,NULL,NULL,NULL,NULL,NULL,NULL,NULL,NULL);

WikiTutorial_wizard_zone location
If you run your game with this sql, it will play like this :
https://www.youtube.com/watch?v=lgybOZJSa7U
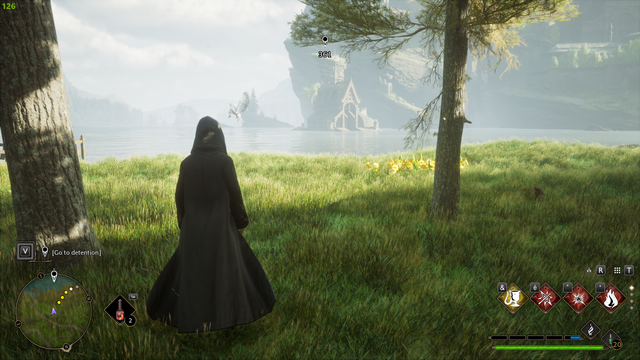
As you can see, our mission starts right after loading the game and ends when we get within 15 meters of our location.
¶ Mission Task Types table
With just six SQL statements, we have created an empty mission with a simple player goal.
This highlights the beauty of the SQL mission system in Hogwarts Legacy: it requires very little effort to create a mission shell.
This works because as you've seen each mission steps has a task type to execute a basic function. So you can create powerful task combinations to achieve what you want.
There are 155 task types. This tutorial will cover the most important ones, but you can achieve a lot with the full range of available task types.
These tasks can do things like change the time of day, stop time, change seasons, alter student schedules, add items to the inventory, reset missions, and more.
Be sure to explore all the tasks available !
Note : In the dev db of the game, the MissionTaskType table has another column with developer comments. This is very useful for understanding how each task works.
All Task have a unique behavior and sometimes do not work by themselves without another task. This is undocumented, so you'll have to discover how they work on your own.
It is helpful to look at how vanilla missions are constructed and how mission steps have been used by the game developers.
¶ Level Blueprint Loading
To continue our mission we need to spawn our enemy and perhaps some lanterns for the plot.
Using MissionSteps for this is not possible as they are designed only for basic utility functions.
Everything that require heavy lifting needs to be done by Blueprints.
That is where the most useful of tasks comes in : LoadMissionSublevel
That task allows you to load level in the game. Yes any LEVEL even your custom ones.
This also allow to load your mod without a mod loader ! You read it right no mod loader is required, the game will just load by itself your custom level.
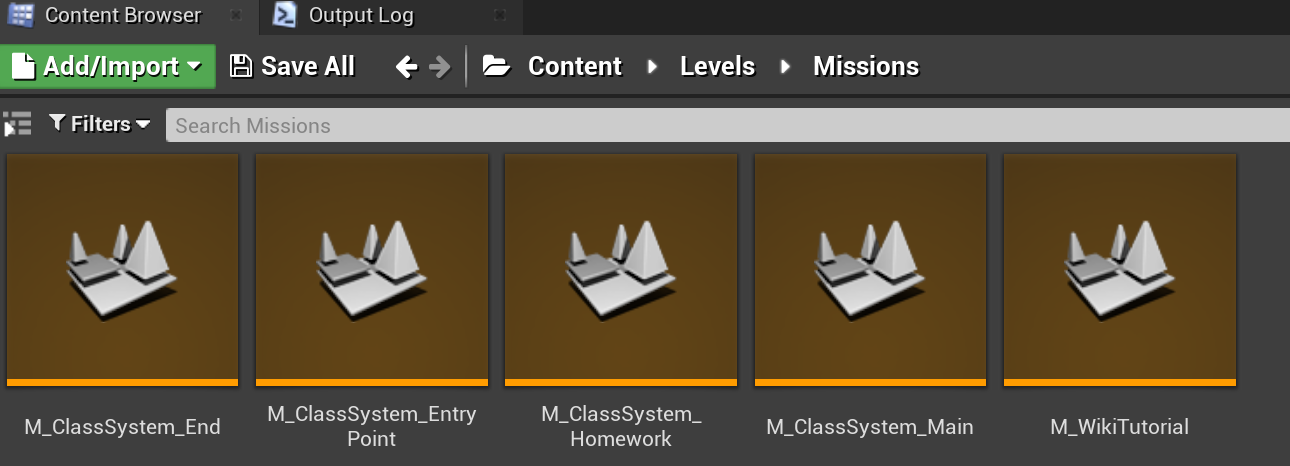
It has only one requirement the level must be placed in : /Content/Levels/Missions/
The level name must follow that naming convention : M_{MissionId}
First let's add a new step to our mission :
INSERT INTO MissionSteps (MissionID,Step,TaskTypeID,Flags,StepNickname,GotoStepNickname,Keyword1,Keyword2,Keyword3,Keyword4,Keyword5,Keyword6,Keyword7,Keyword8,Keyword9,Keyword10,Keyword11,StepJournalTextKey,StepObjectiveTextKey,StepFailTextKey,StepFailWarning,TaskUID) VALUES
('WikiTutorial',3.1,'LoadMissionSublevel',0,'Load Level WikiTutorial',NULL,'M_WikiTutorial','Overland','No',NULL,NULL,NULL,NULL,NULL,NULL,NULL,NULL,NULL,NULL,NULL,NULL,4641705548);
Next let's create a new level M_WikiTutorial in /Content/Levels/Missions/ :

M_WikiTutorial level
That level obliviously must be packaged.
If we were to display a message in the Begin Play event of our level it would display and the mission would end directly.
However, we don't want the mission to end until our enemy is defeated. We will solve that problem in the next chapter.
¶ Sql - Blueprint communication
Our Blueprint will spawn the enemy and detect when it is defeated, but the SQL will not know this unless we inform it.
To achieve this, we use the task type : EvalBlueprint
INSERT INTO MissionSteps (MissionID,Step,TaskTypeID,Flags,StepNickname,GotoStepNickname,Keyword1,Keyword2,Keyword3,Keyword4,Keyword5,Keyword6,Keyword7,Keyword8,Keyword9,Keyword10,Keyword11,StepJournalTextKey,StepObjectiveTextKey,StepFailTextKey,StepFailWarning,TaskUID) VALUES
('WikiTutorial',4.1,'EvalBlueprint',4,'WikiTutorial_Enemydefeated',NULL,'No','0',NULL,NULL,NULL,NULL,NULL,NULL,NULL,NULL,NULL,'Defeat the enemy',NULL,NULL,NULL,1641071537);This task will stall until it received the event WikiTutorial_Enemydefeated from any blueprint.
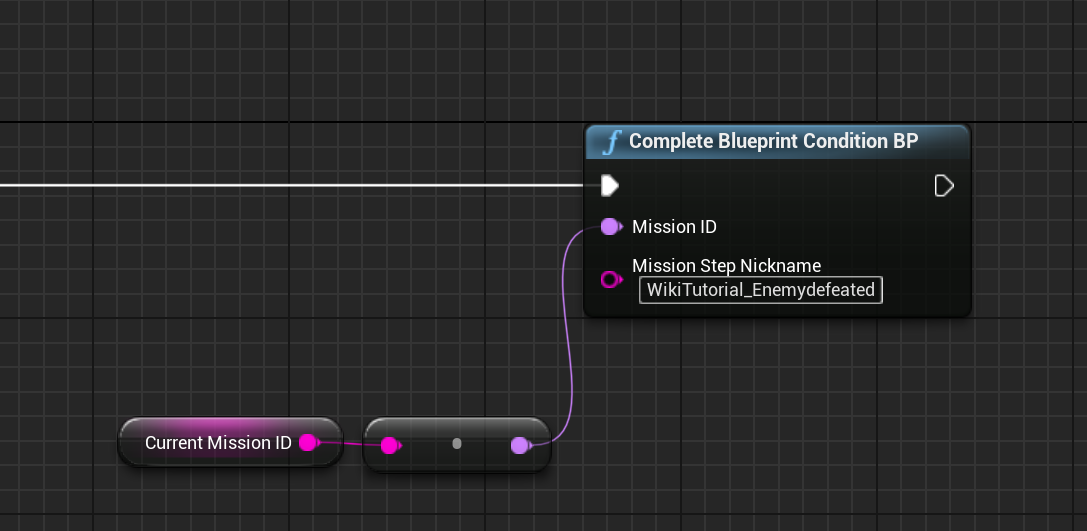
To trigger this event on our blueprint you need to use this node of MissionManager:

The variable Current Mission ID is a created variable that holds the mission id value in our case WikiTutorial .
There are ways to get the current selected mission ID dynamically, but it's not the easiest approach and can be prone to errors. The game developers created a unique level for every mission to avoid this issue.
So, it’s best to follow their example.
We’ve done it!
We have established one-way communication from our Blueprint to the SQL database. Although we haven't covered SQL to Blueprint communication, this is sufficient for our basic example.
Two-way communication will be explained in a future chapter..
¶ Final setup and testing our created mission
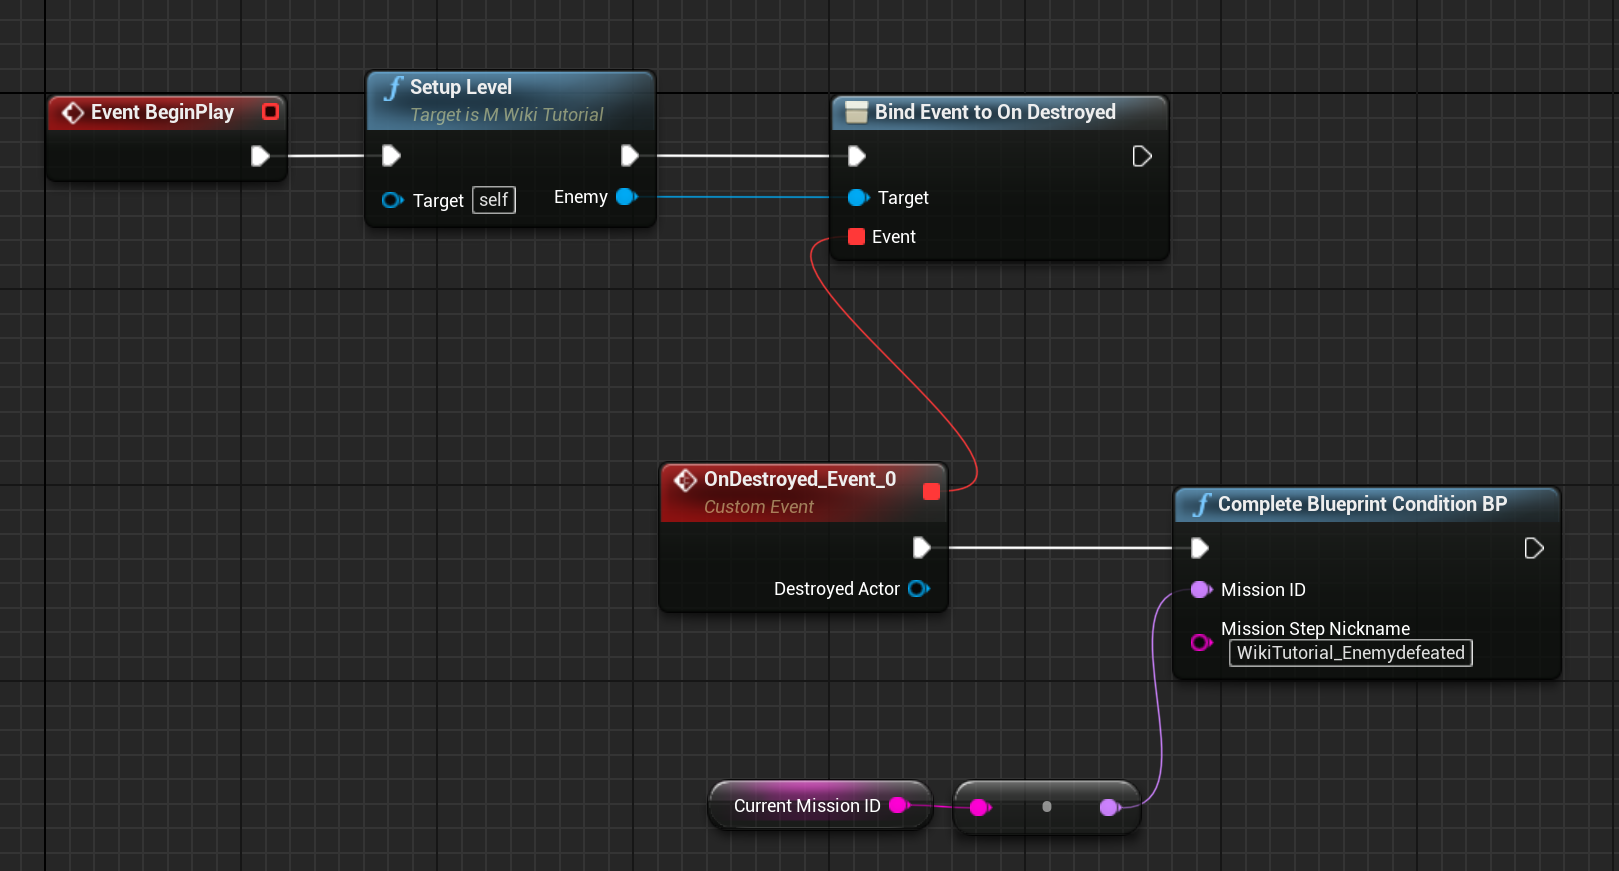
Now all we need to do is spawn our enemy and our lanterns then trigger “Complete Blueprint Condition BP” when the enemy is defeated.
This tutorial does not cover how to spawn enemies, VFX, or static assets, as it is implied you already know how to do this.

Let's check it in game :
https://youtu.be/T3U3_ALWGqw
Our mission is working great !
¶ Mission ending and clean-up
Our mission is almost done we just need to unload our level to free up memory space.
As usual it just require to use another step UnloadMissionSublevel to do this :
INSERT INTO MissionSteps (MissionID,Step,TaskTypeID,Flags,StepNickname,GotoStepNickname,Keyword1,Keyword2,Keyword3,Keyword4,Keyword5,Keyword6,Keyword7,Keyword8,Keyword9,Keyword10,Keyword11,StepJournalTextKey,StepObjectiveTextKey,StepFailTextKey,StepFailWarning,TaskUID) VALUES
('WikiTutorial',5.1,'CompleteMission',0,'QuestComplete',NULL,'No',NULL,NULL,NULL,NULL,NULL,NULL,NULL,NULL,NULL,NULL,NULL,NULL,NULL,NULL,16872645496),
('WikiTutorial',6.1,'UnloadMissionSublevel',0,'Unload Sublevel 1',NULL,'M_WikiTutorial','No',NULL,NULL,NULL,NULL,NULL,NULL,NULL,NULL,NULL,NULL,NULL,NULL,NULL,12008694575);Here we manually end the mission then Unload the level.
¶ Mission state
Mission have an internal state :
- PreActive before the step ActivateMission is called
- Active until the step CompleteMission is called
- PostActive after the step CompleteMission is called
Some step do not work if the mission is not in the correct state be aware of that !
¶ Basic Mission created !
This is where we end our tutorial.
But our Mission has big flaws and is not very polished.
Possible improvements :
- Adding a fade effect to hide the spawning this can be done via task or bp.
- We do not handle what happens if the player just leave and do not fight. We should maybe reset that mission or display a game over screen.
- The same applies to handle save/load. Via task you can stop the game from auto saving and via bp the player from saving and loading a new save.
- A reward for the player could also be a good idea.
- Triggering the mission only at night
- A mission icon and translations are also missing to create a perfect mission.
- Technically we are also kind of locked with our ways of communicating with the sql as we can't send order from our db to the blueprint to execute steps.
These improvements go outside of the scope of this tutorial and will not be detailed here.
Future update of this tutorial will include :
- Two way communication between bp and the db.
- Creating a floating custom mission interactor surrounded by a golden circle, like vanilla mission. Triggering our mission on location proximity is not really a great player experience.
¶ Technical recommendations
1. Mission Steps Usage:
Avoid overloading mission steps with complex logic; utilize Blueprints for maximum flexibility and efficiency. While vanilla missions use mission steps to outline basic logic paths, the bulk of the logic should reside within Blueprints.
2. SQLite Database Limits:
SQLite databases have limits, and these limits can be reached quickly if not managed properly. Every mission step that remains active consumes memory and is saved in the player's save file via the MissionDynamic table.
3. Performance Considerations:
Avoid doing uncontrolled loops with steps, as this can severely impact game performance.
¶ File Packaging Strategy
Ensure modified original game files are packaged separately from your mod files. Avoid packaging original game files that you have modified in the same package as your mod files. This practice prevents conflicts with other mods that might also modify the same files, ensuring compatibility and allowing users to choose which files to keep.