¶ Synopsis
This guide will walk you through the process of creating your first blueprint mod for Hogwarts Legacy. You could consider this to be the “Blueprint 101” course. In time-honoured tradition, this mod will reproduce the blueprint equivalent of the classic “hello world” program.
My plan is for more tutorials to follow this one, each slightly more complex than the previous one. I don't have a specific plan regarding content, but I figure that the easiest way to learn blueprints is to actually play around with them, so we'll just dive right in and see where we end up. I should probably issue a disclaimer at this point: I am not a blueprint expert. In fact I'm a beginner. But as a beginner I'm hopefully well-placed to know what other beginners need to know. These tutorials will basically chart my journey, and perhaps help others who are on the same path. However, if you think you can do a better job (of writing blueprint tutorials) then please do! The more tutorials the better!
In this tutorial I will walk you through the basics of placing and linking the "nodes" that comprise this blueprint mod. In future tutorials I will assume that you've got the hang of that and I'll simply describe how the finished blueprint works.
¶ Prerequisites
Although it's possible to create simple blueprints for Hogwarts Legacy using the standard Unreal Engine Editor ("UE4.27" or “UE4” or just “UE"), you will not get very far before you run into problems. Instead, you need a custom version built specifically for Hogwarts Legacy. Therefore, before we start please do the following:
- Install Narknon's Custom Uproject/Engine by following the detailed instructions here. It looks a bit daunting but just follow the guide step-by-step and don't worry if you have no idea what's going on. I didn't either! This process takes several hours so bear that in mind.
- If you have sufficient disk space make a backup of the Engine (UE4HL) and project (PhoenixUProj) folders. That way, if it all goes wrong later you can recover a working system without reinstalling. [**Note: In principle you can do this using GitHub, but I've never succeeded in doing that.]
- Install the Blueprint Apparate Modloader mod to your Hogwarts Legacy game. We will need it later.
- If you are completely new to blueprints and don't even know what they are, watch a few introductory youtube videos (like this one) but don't worry if they make no sense. It's much easier to learn from examples.
¶ Background
There are six common types of mod for Hogwarts Legacy:
- Mesh replacement mods. These replace an existing game mesh (a wand, an item of clothing, a face, a skin texture, etc) with a different one. Anyone interested in this type of mod should check out the asset replacement wiki and ll500's excellent face, hair and clothing guide. These mods must be assigned a pakchunk and “cooked” by UE4.27 or PhoenixUProj before the game will recognise them.
- DataAsset-based Appearance mods. These change the appearance of the player or NPC's by changing the Data Asset(s) that combine the various parts of the character (head/hair/arms/upper clothing/lower clothing/shoes etc) into the overall look. Anyone interested in this type of mod should read the JSON2DA User Guide and the Applying a Gear Mod to an NPC tutorial. These mods must be assigned a pakchunk and “cooked”, but they can only be created by PhoenixUProj.
- Logic mods written in LUA and injected via UE4SS. Anyone interested in this type of mod should check out the examples in the LUA examples wiki.
- Mods that alter the SQL data stored inside the game's
PhoenixShipData.sqlitefile. Since the game can only load one copy of this file, mods which make changes to this file will simply over-write each other. The solution to this problem is to merge these “SQL mods” using the Hogwarts Mod Merger program. Anyone interested in this sort of mod should read the guide on this Nexus page. Note that thePhoenixShipData.sqlitefile has been updated several times since that page was written, so you should extract more recent copy (using FModel) if you intend to edit it. - Mods that alter the SQL data stored in save files and in the game's memory. Back in Feb & March there were several save-game editors that allowed users to alter various things (like character name, gender, house, etc) that were stored in the save file. Unfortunately the format of the save files was changed in spring 2023 so all the save-file editors stopped working. Fortunately, in June 2024 the Hogwarts Legacy Save Tool was created to fix that. See that mod for further information. Alternatively, the excellent Character Editor can make character changes in-game and the truly unique SQL Mod Menu can alter everything else. (The latter is an extremely powerful tool but can be a little tricky to use.)
- Logic mods written using blueprints. These are the most powerful and versatile mods, but also the most difficult to create. They require an understanding of blueprints and quite a lot of trial-and-error to figure out how to get stuff to work the way it should in Hogwarts Legacy. This is what this tutorial (and subsequent tutorials) will be about, because once you've mastered blueprint mods the world is your oyster! Like appearance mods, blueprint mods must be assigned a pakchunk and “cooked” by PhoenixUProj. But they must also be injected into the game using what's called a “Modloader”. UE4SS can act as a modloader but in this tutorial we will use the Blueprint Apparate Modloader, which is somewhat simpler.
¶ Level Blueprints
Blueprint mods can do lots of things. They can be extremely complex or relatively simple. We will start with something relatively simple: for now we will focus on “level blueprints”. These are blueprints which are constructed entirely within a Level Blueprint Map. Don't worry about what that means. All you need to know is that we won't have things like widgets, textures, etc in our mods to begin with. All we will have is events, functions and logic. The whole thing will be enclosed within a single umap file. Again, don't worry if you don't know what that means. It will make more sense once you see it in action.
I recommend constructing the blueprint yourself as we go along, but I'll also upload the finished umap file at the end so you can download it if you get stuck.
¶ Plan the Mod
The first thing we need to do is plan our mod. What is it going to do and what might we need to achieve that? Well, all it's going to do is display the phrase “Hello World” on the screen when we press a button. So we will need something to look out for a keypress, and then we'll need something to display a message on-screen. I happen to know that in order to display something on screen we need to ask for a couple of things from the game - the UI Manager and the Heads-up Display (HUD). Don't worry about that for now, my point is that we need to perform a few initial tasks before we can display anything. In other words we'll need to initialise the mod.
So that's our plan: 1) initialise the mod, 2) look for a key press, and 3) display the phrase “Hello World". Simple. 😊
¶ Open the Custom Project
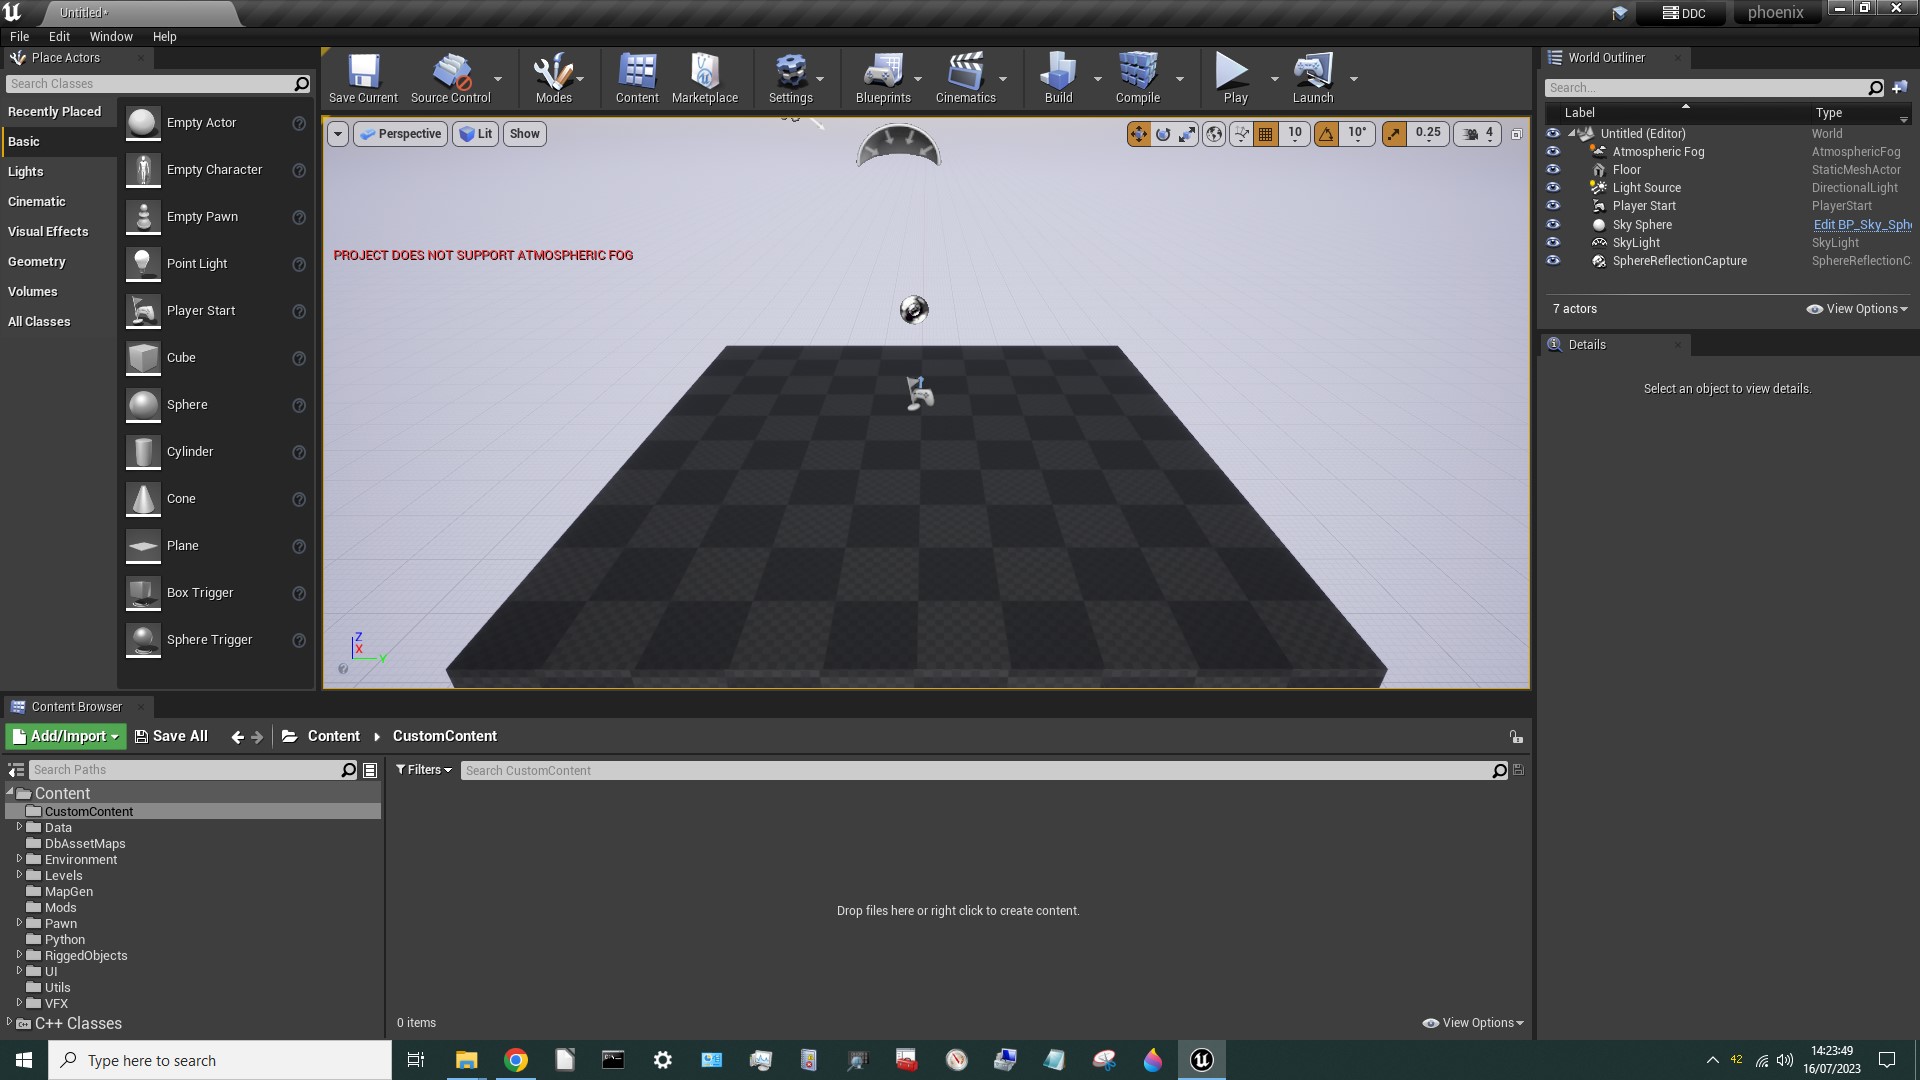
Let's go! Open your Phoenix.UProj by double-clicking phoenix.uproject. It should open with an empty level like this:
¶ Delete the Junk
By default, the Custom Engine is set up with a day-night template. That's what all that stuff in the top right is about:
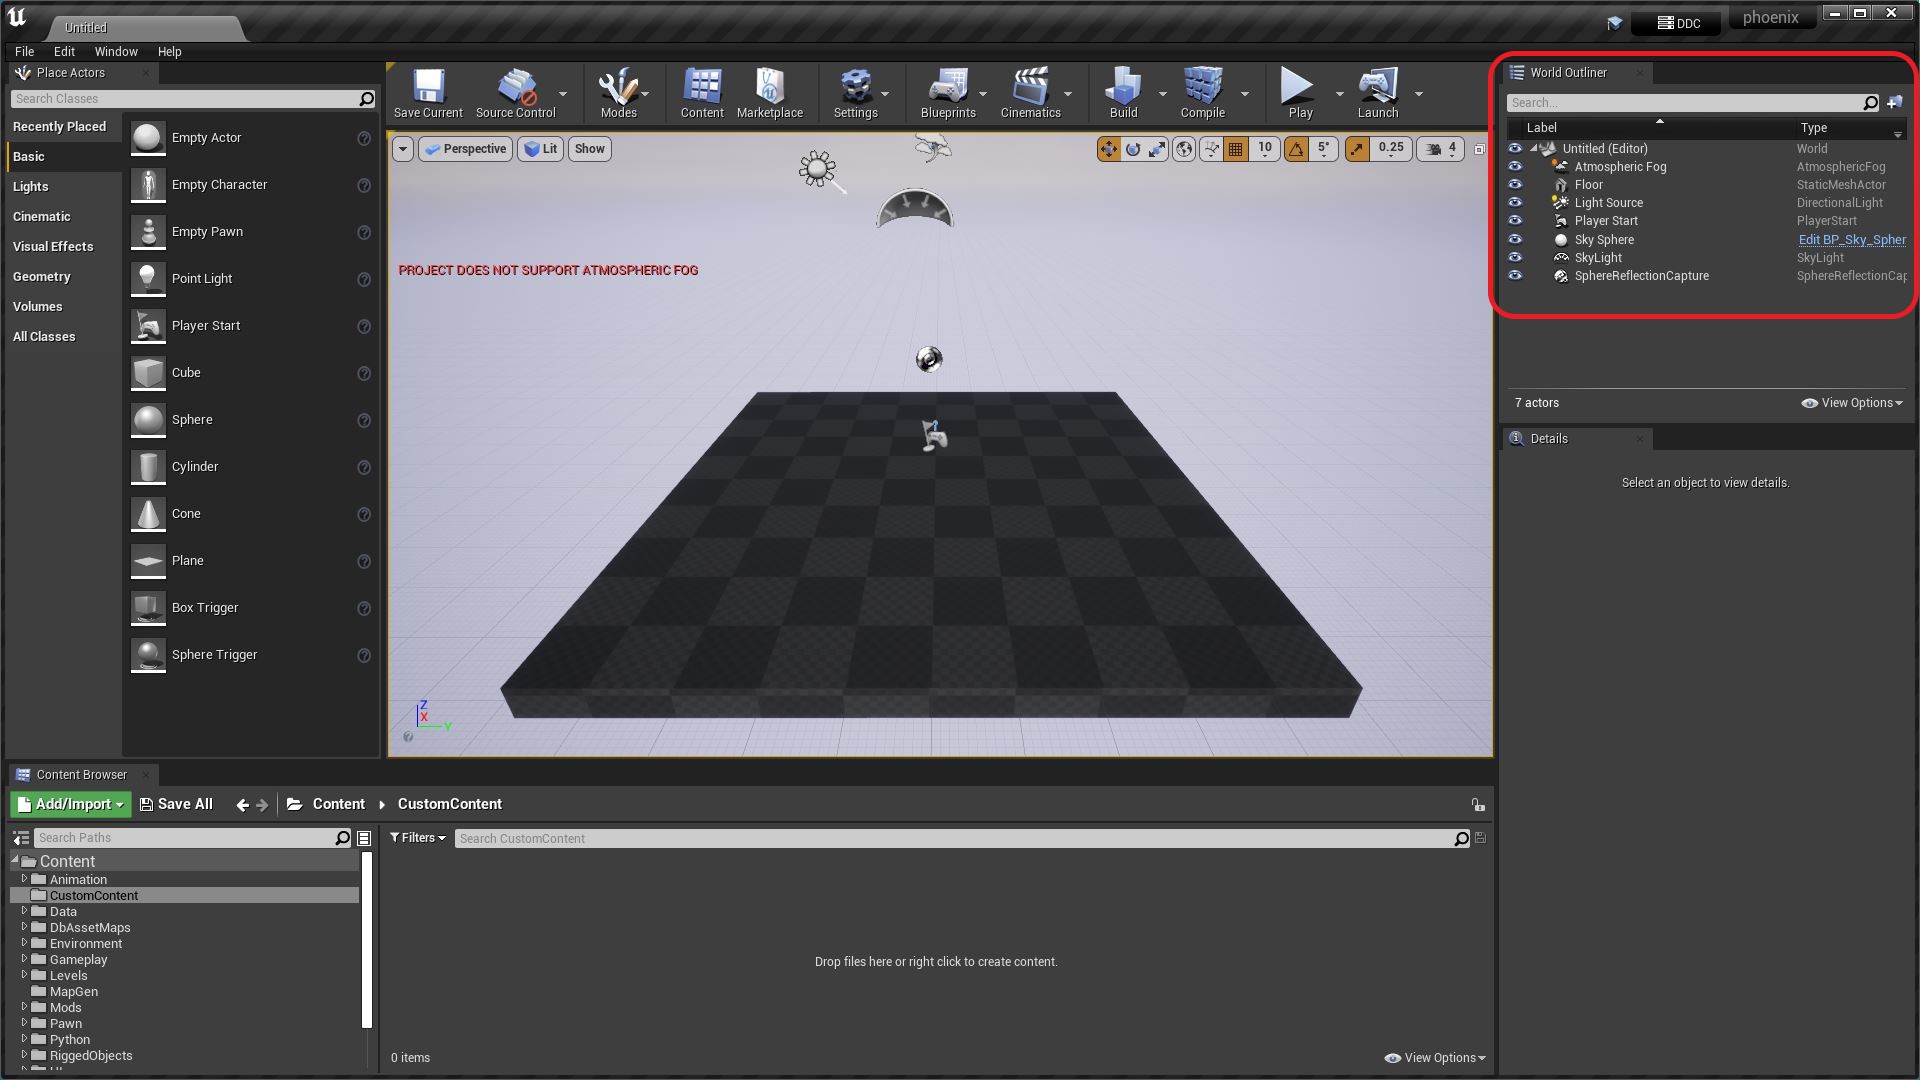
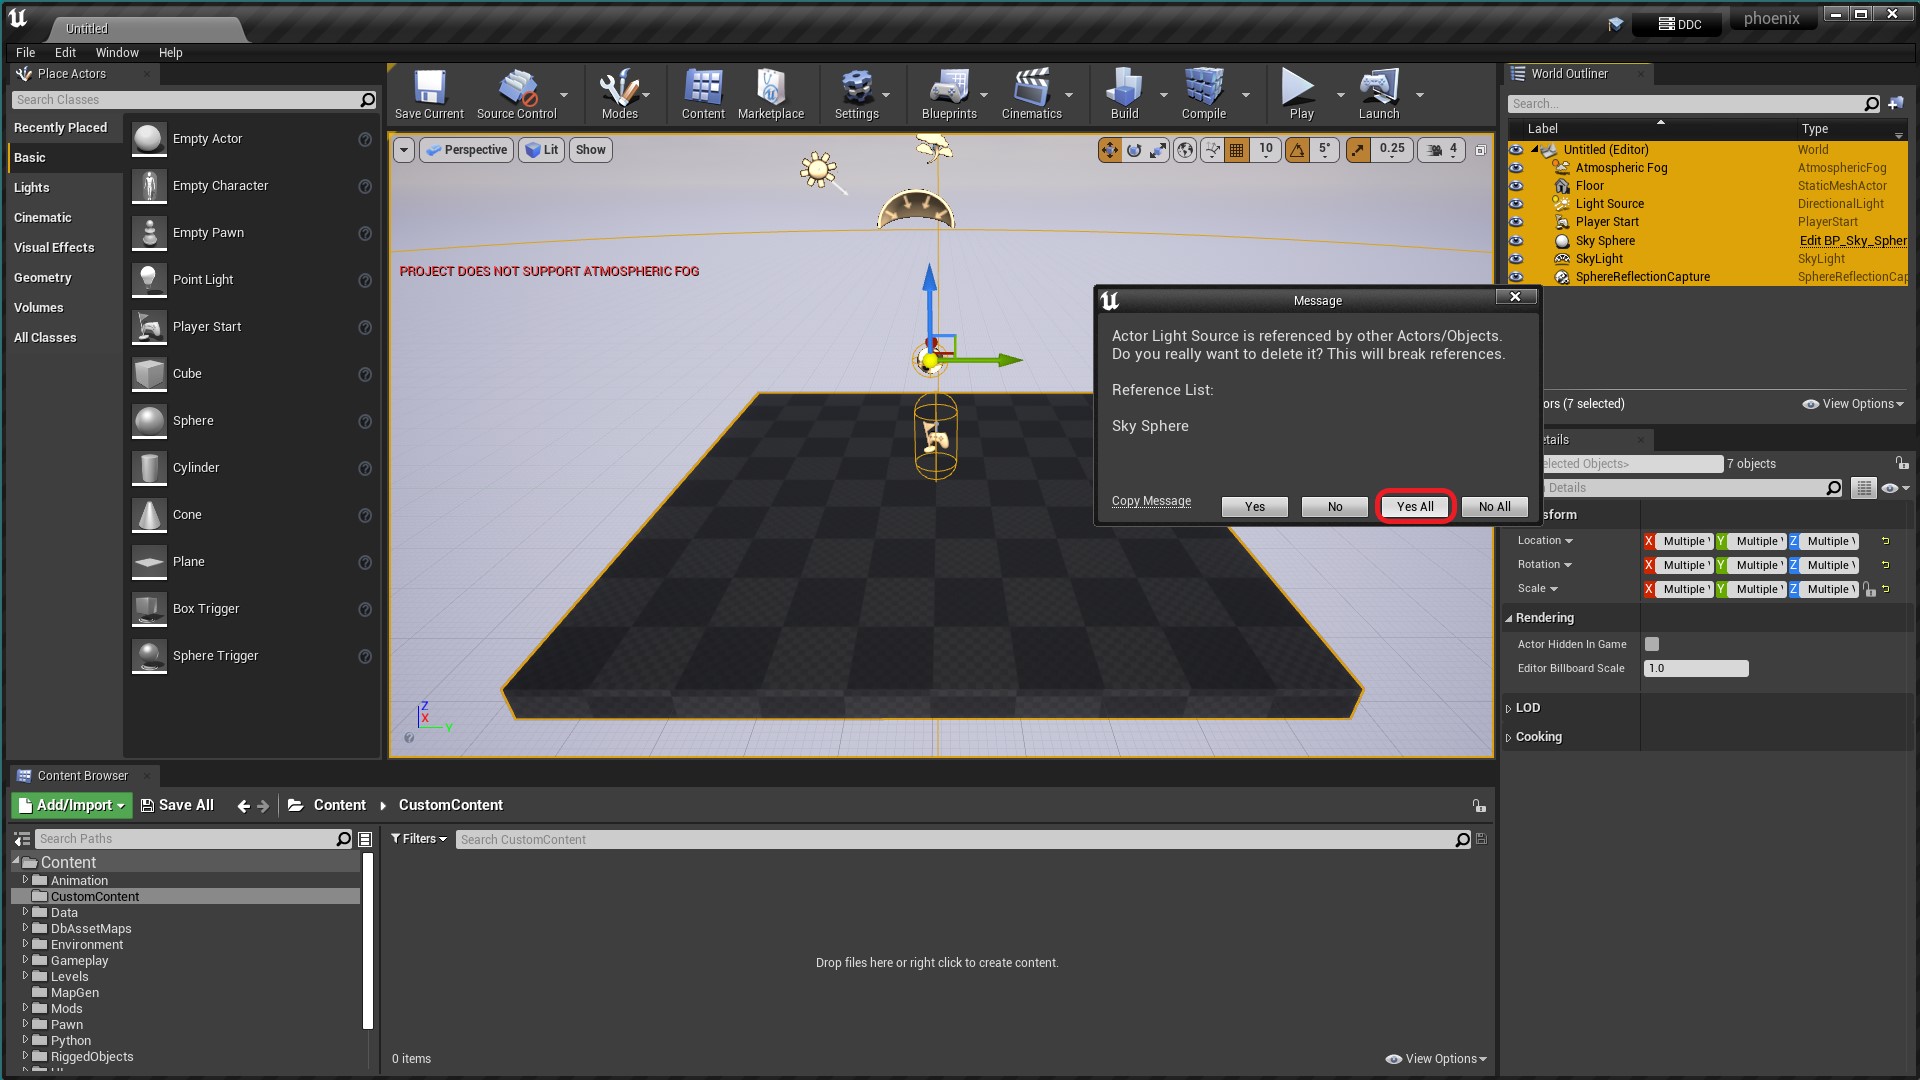
But we don't want any of that stuff. (Hogwarts Legacy already has it.) If we build a mod with that stuff included we'll get a huge black hole appearing in the sky. So select all of it and hit Delete, then Yes All:
¶ Open the Level Blueprint
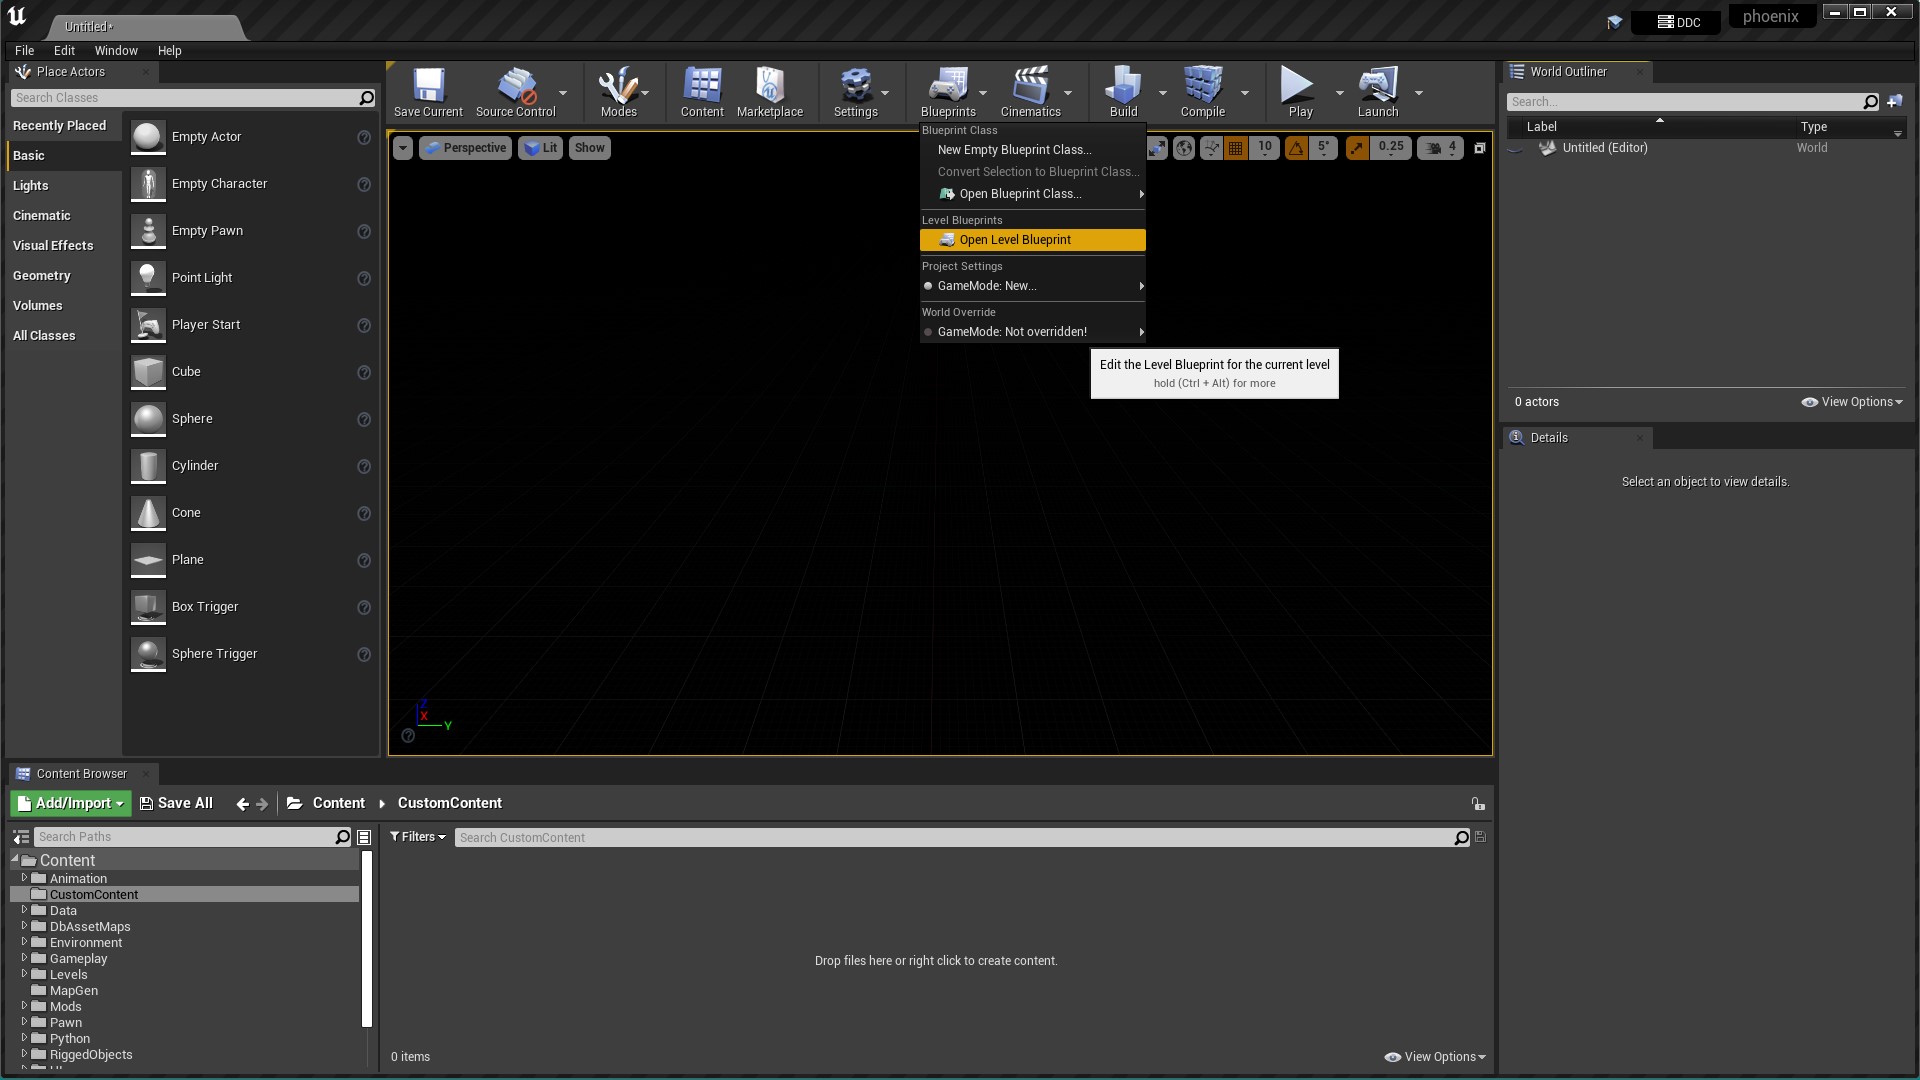
Select Blueprints > Open Level Blueprint
¶ The Event Graph
The Level Blueprint will open on the “Event Graph” for your empty level:
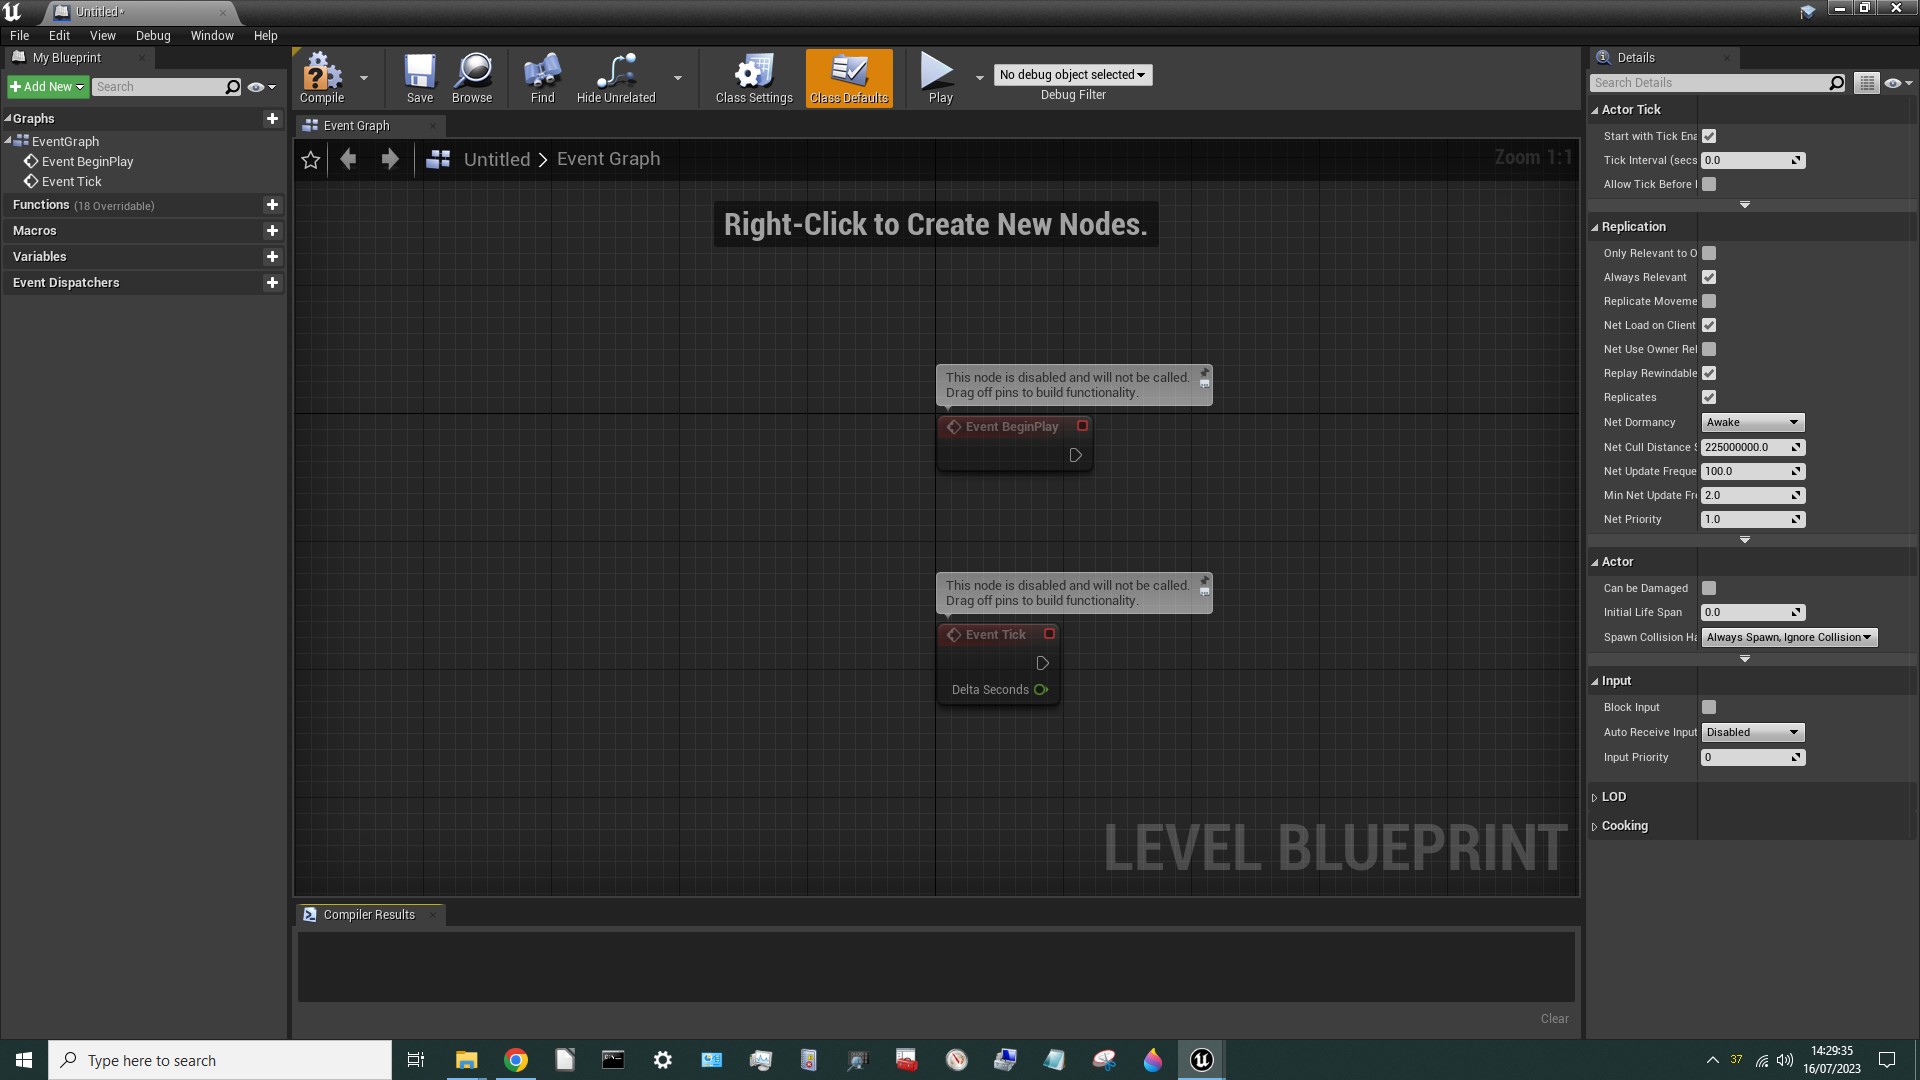
Everything a Level Blueprint does must start with an “event” that triggers it to do something. Two examples are provided (as you can see) though they don't currently do anything. We won't need the second one Event Tick so left-click it and hit Delete to delete it. Event BeginPlay executes when the mod is loaded into the game, so this event is perfect for triggering our initialisation.
Before we start, right-click on the background and drag it to the left to give us a bit more space. Blueprints always execute from left-to-right so we'll need some room for more nodes on the right.
¶ Create a Variable
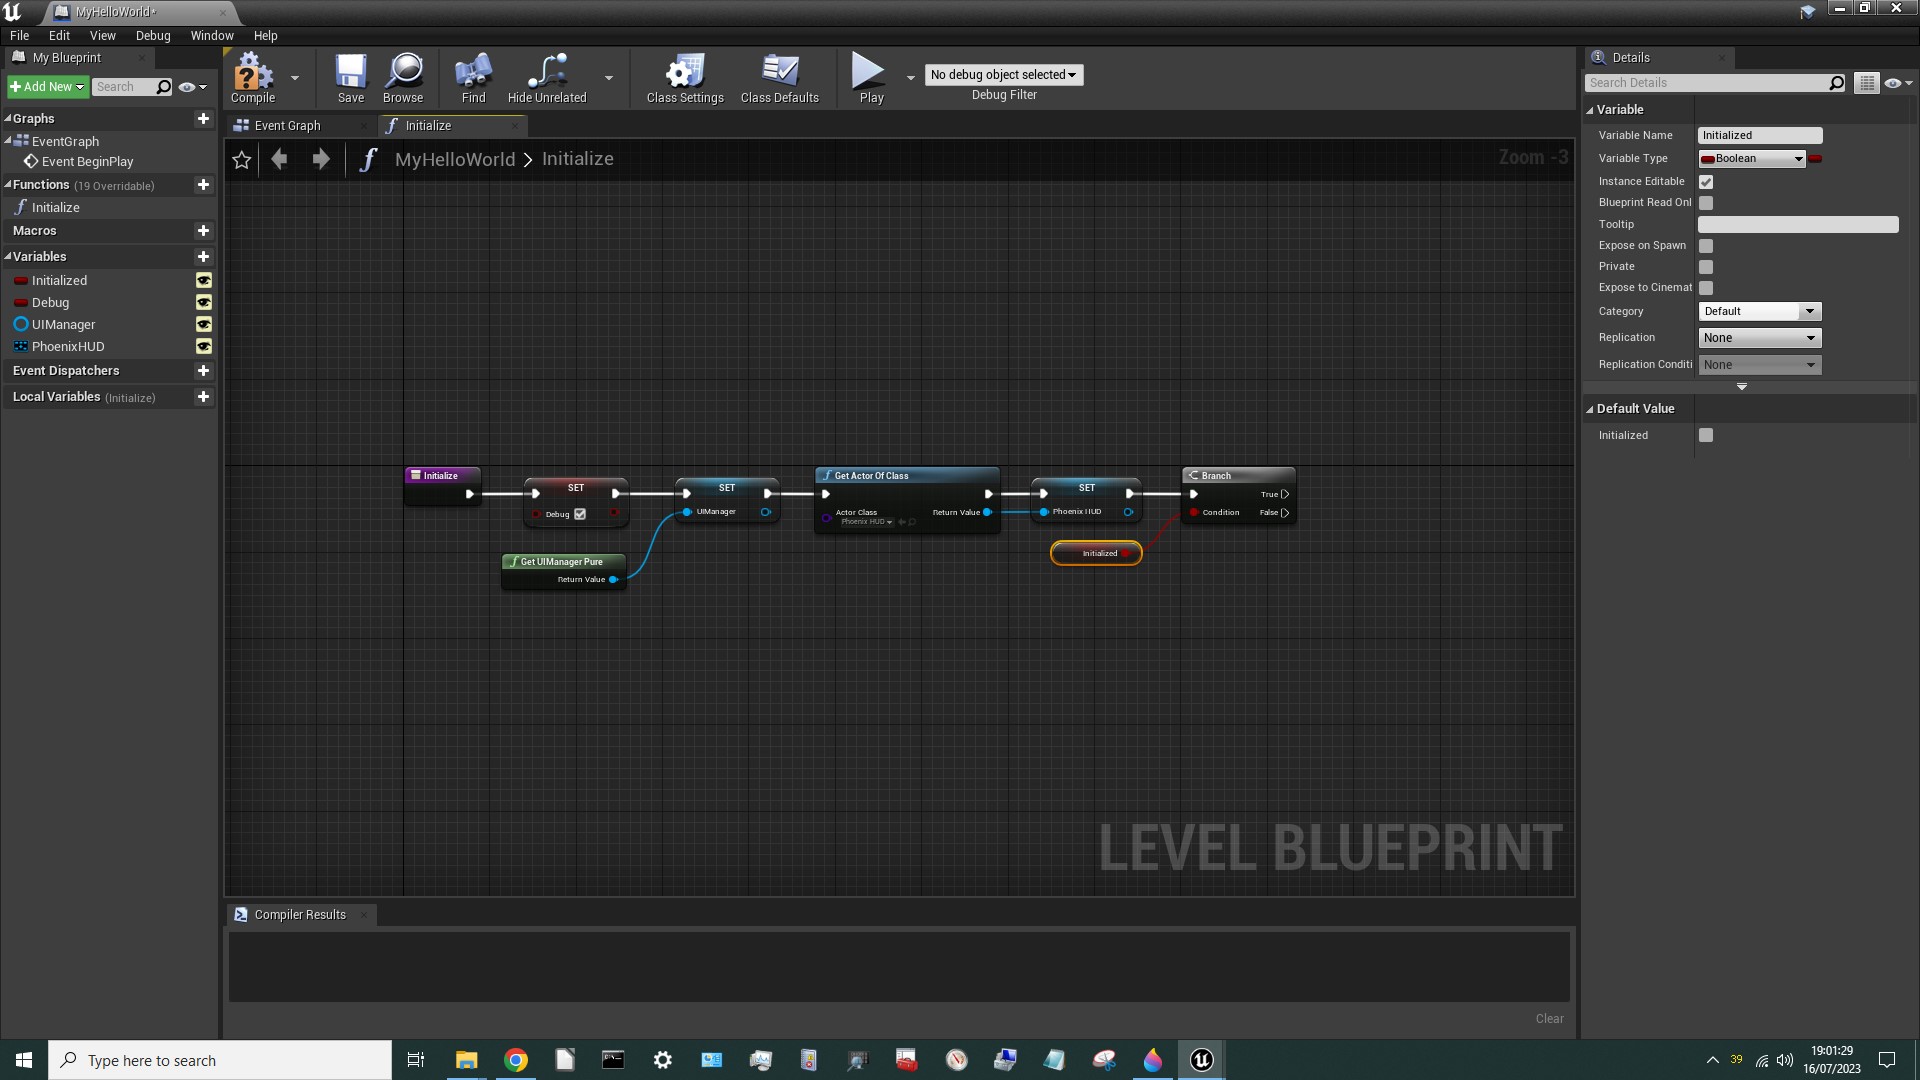
We need to create a variable to remember whether or not we've initialised before. In the top left corner of your screen click Add New > Variable.
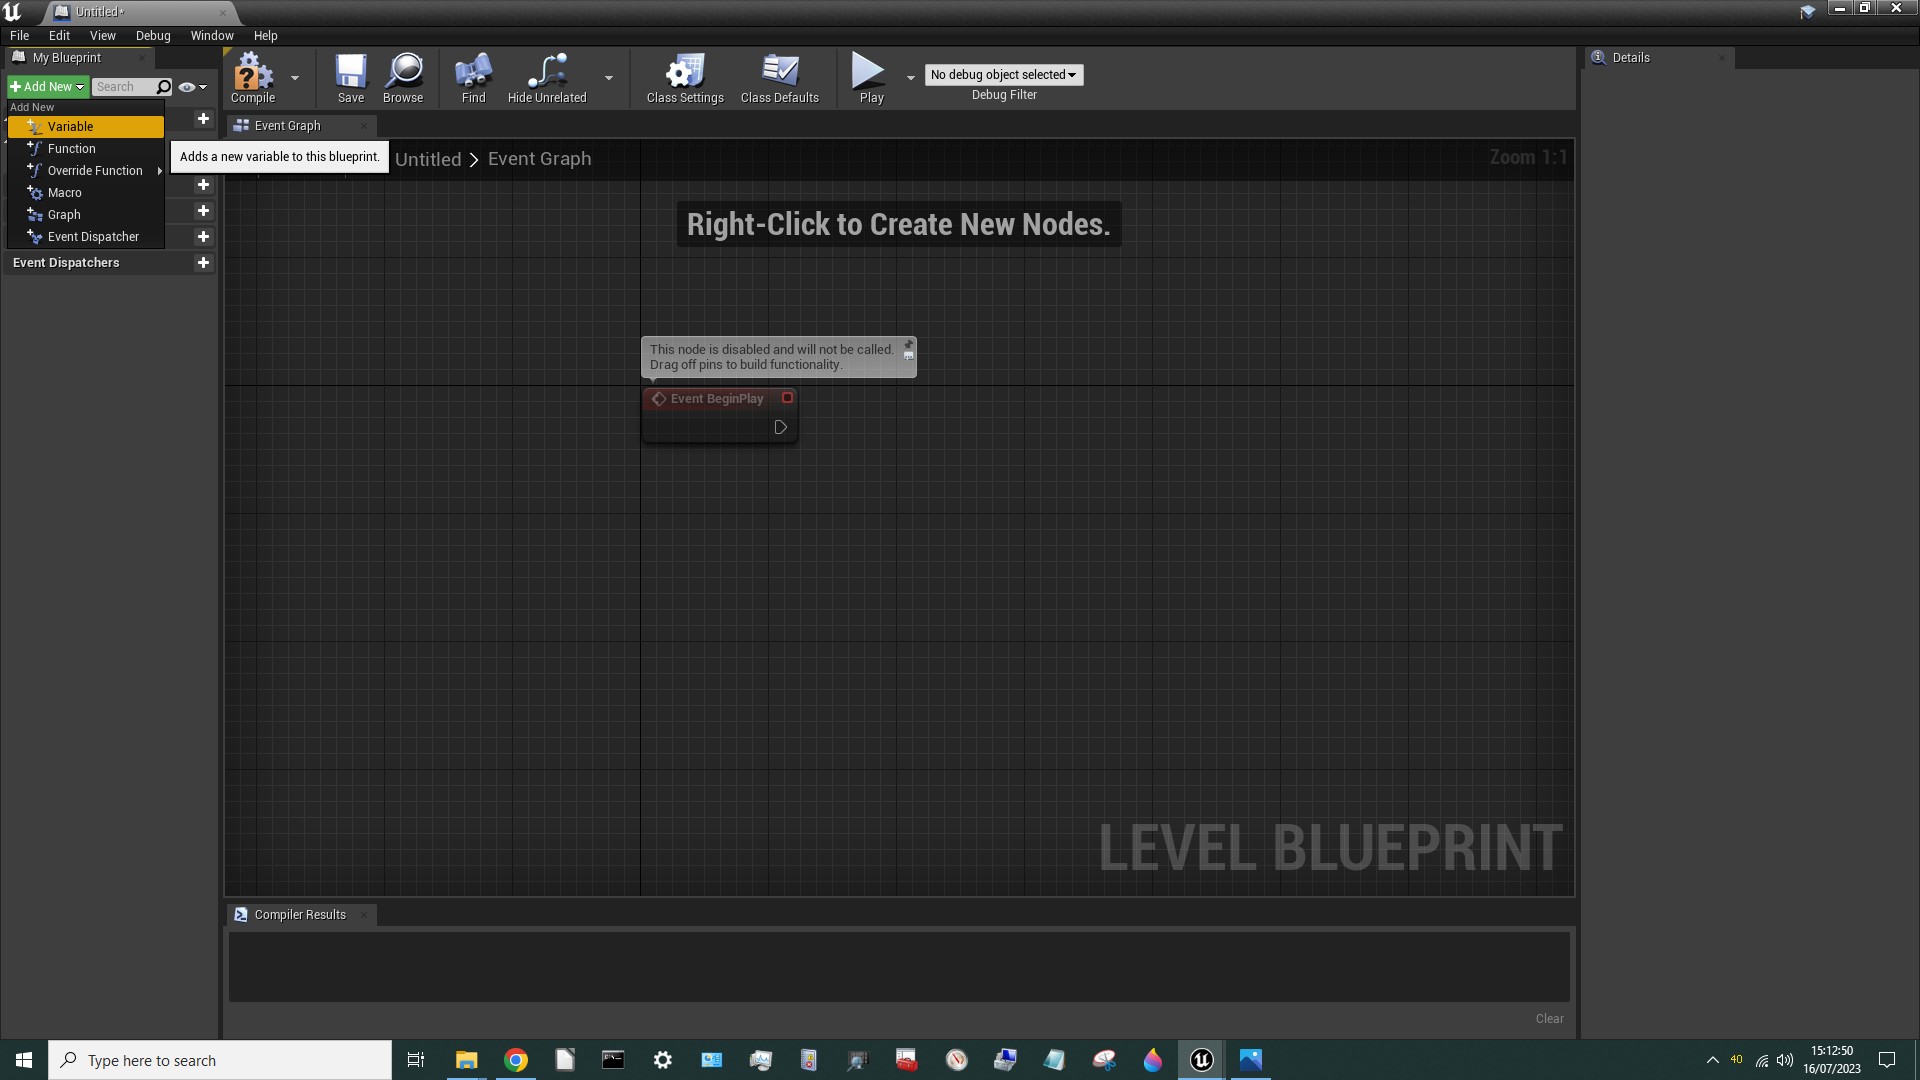
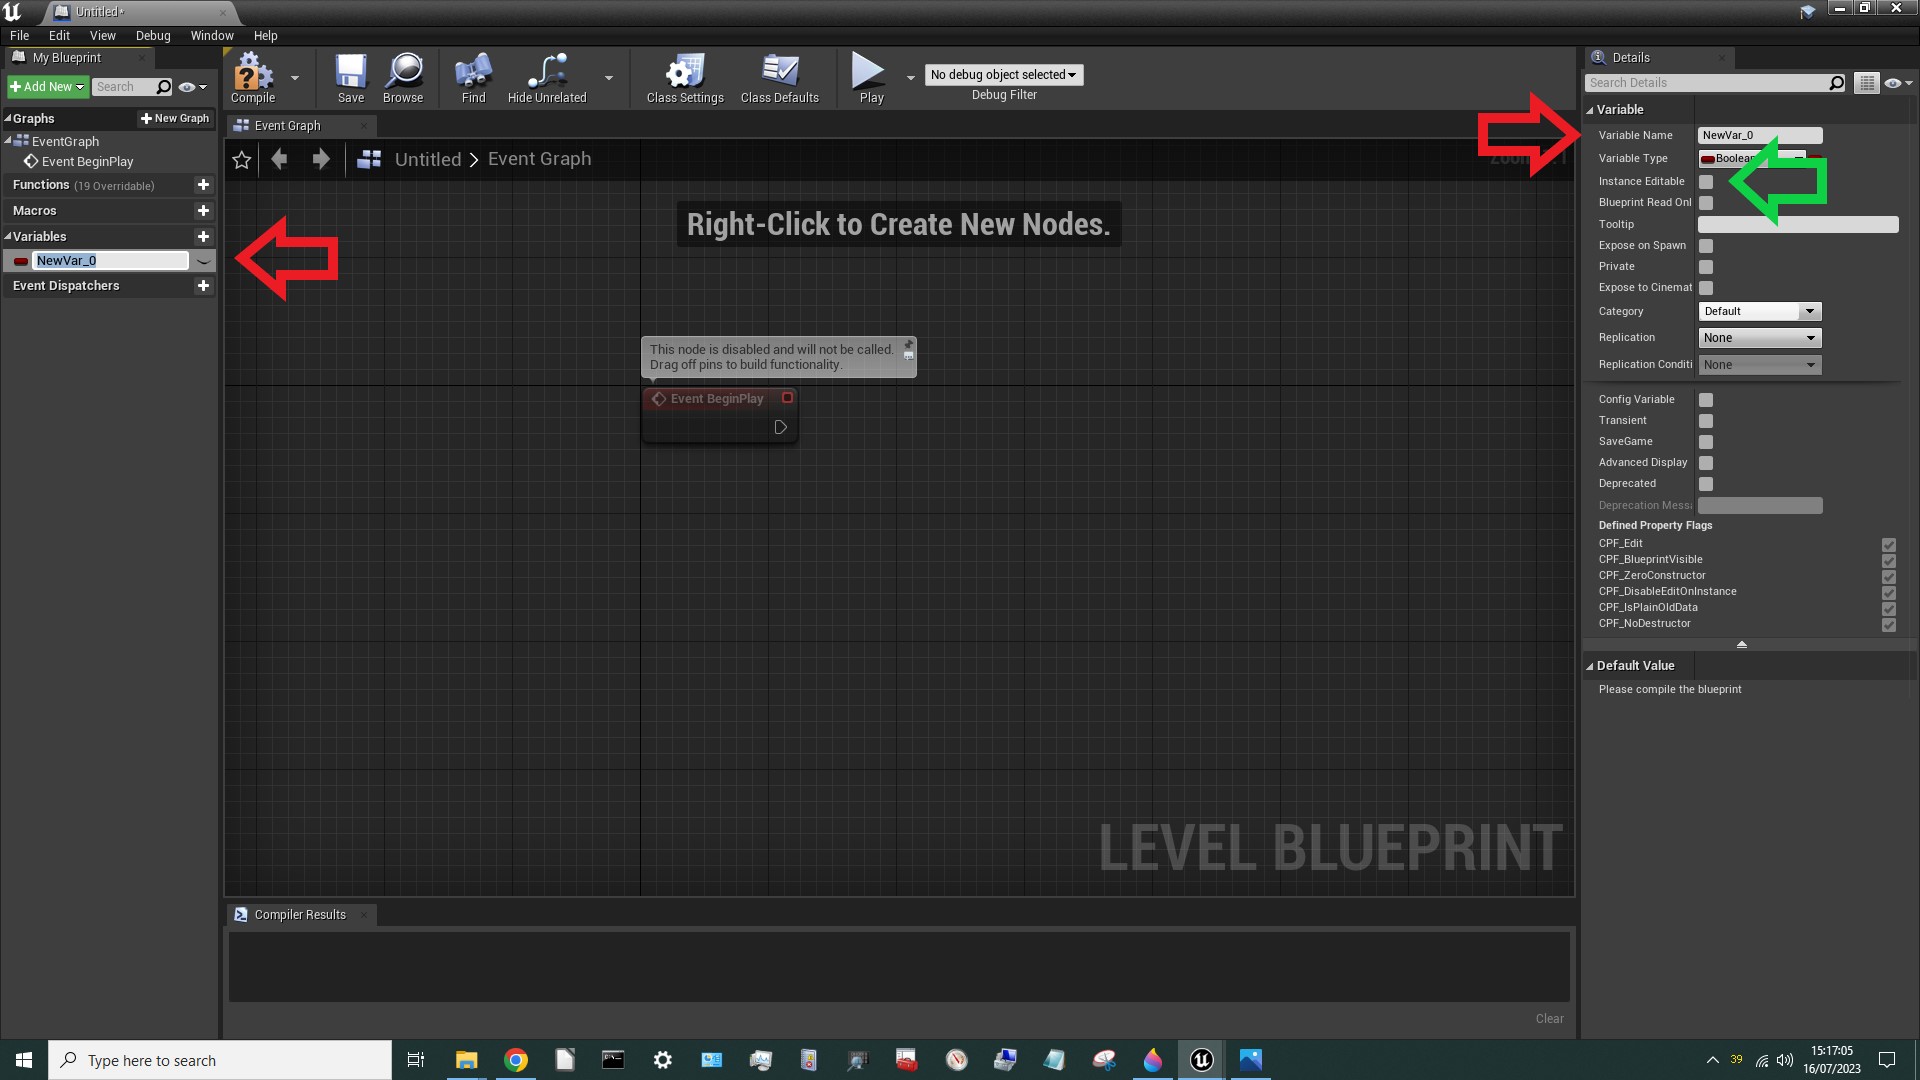
That will create a new variable which is (by default) a boolean (i.e. it can be true or false). In this case that's exactly what we want so we don't need to change it. We do need to change the name though. There are two places you can do it - either top-left or top right (red arrows). Change either one to Initialized and make sure the box marked Instance Editable (green arrow) is unticked. Making a variable "instance editable" just means that each instance of the Level will have its own copy of that variable. We should only ever have one instance but if a second one is created somehow we want it to share the same value for Initialized. [**Note: I will spell “initialised” the British way (with an “s”) in this tutorial's explanation, but the American way (with a “z”) in the blueprint. Whichever spelling you use in the blueprint, make sure you use that spelling throughout! ]
¶ Create a Node
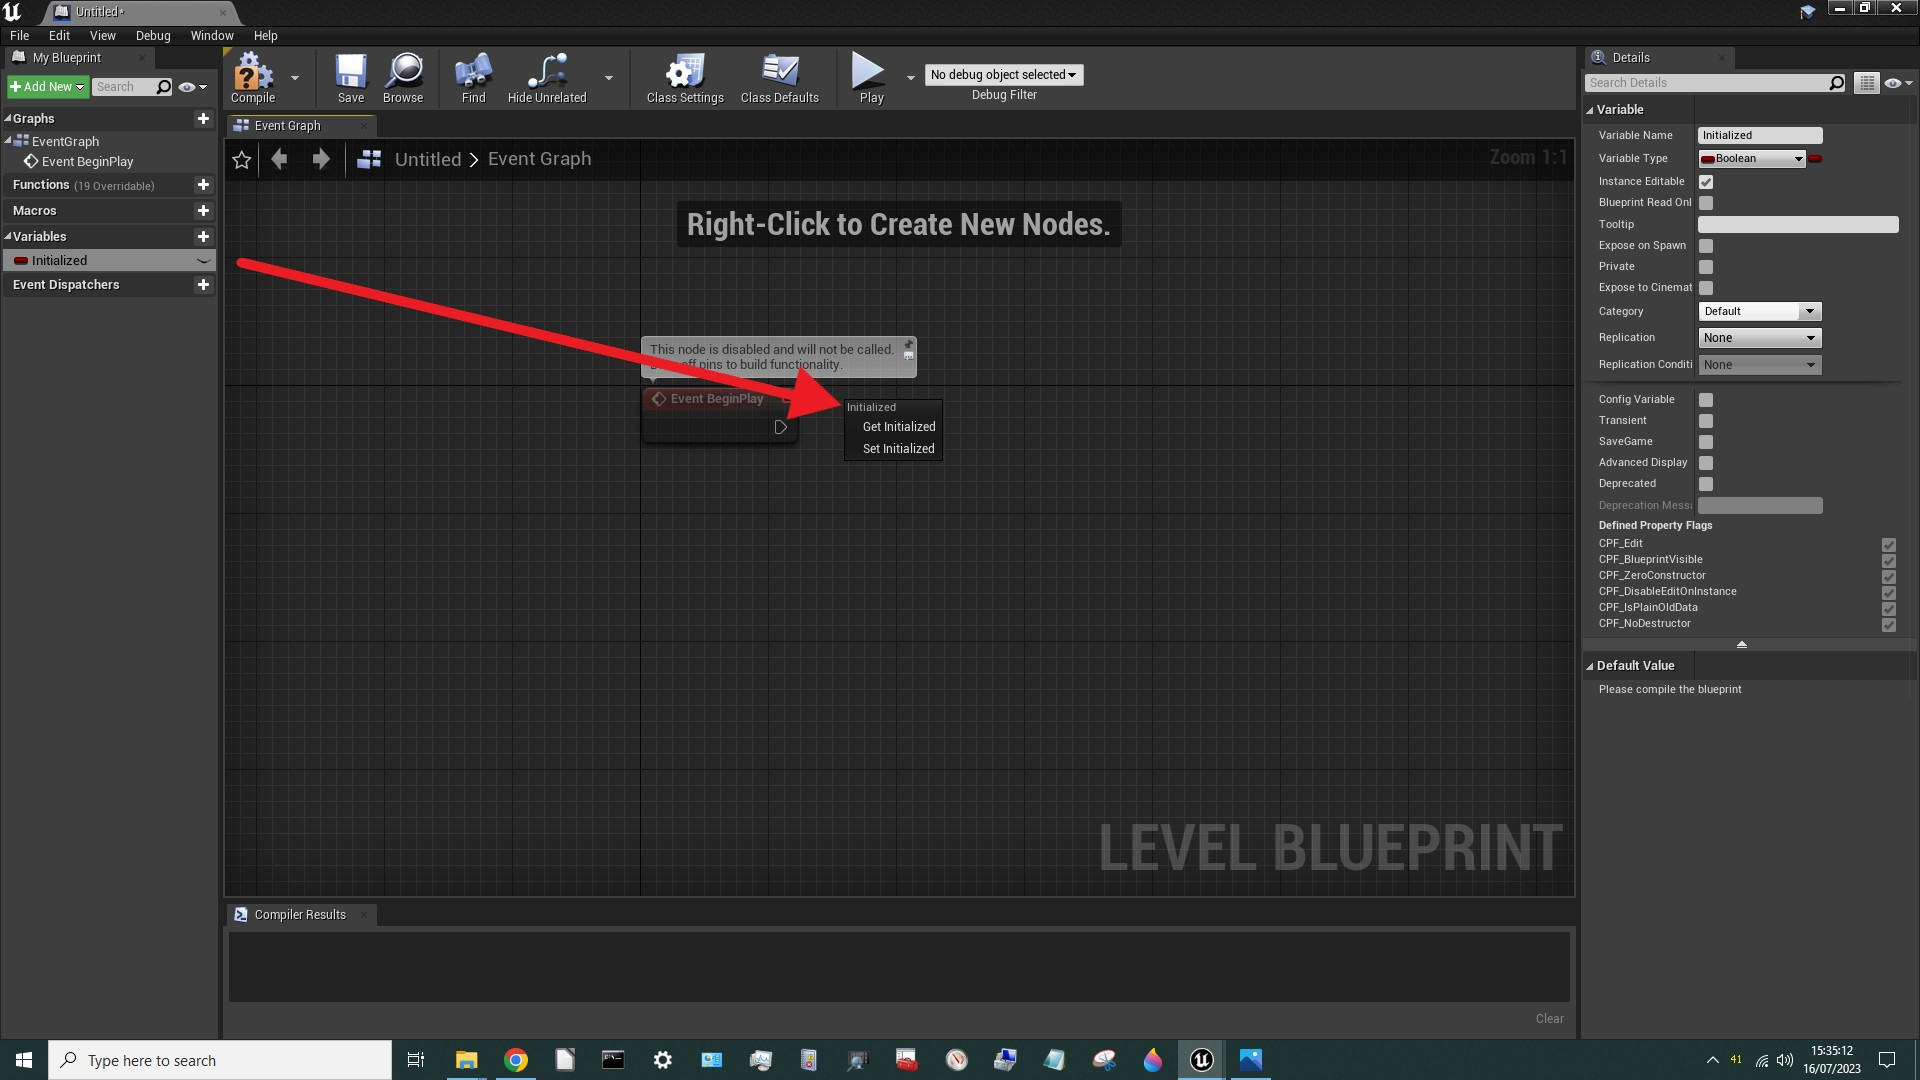
Drag that variable from the left of the screen and drop it just to the right of the Event BeginPlay node. Once you drop it, it will offer you two options: Get Initialized and Set Initialized. Select Set Initialized:
A new node (called Set) will appear. Select the white terminal or “pin” on the Event BeginPlay node and drag across to the white pin on the Set node. The white pins determine the order in which the nodes are executed. In this case execution begins at the Event BeginPlay node and then proceeds across to the Set node where the variable called Initialized is set to FALSE by default.
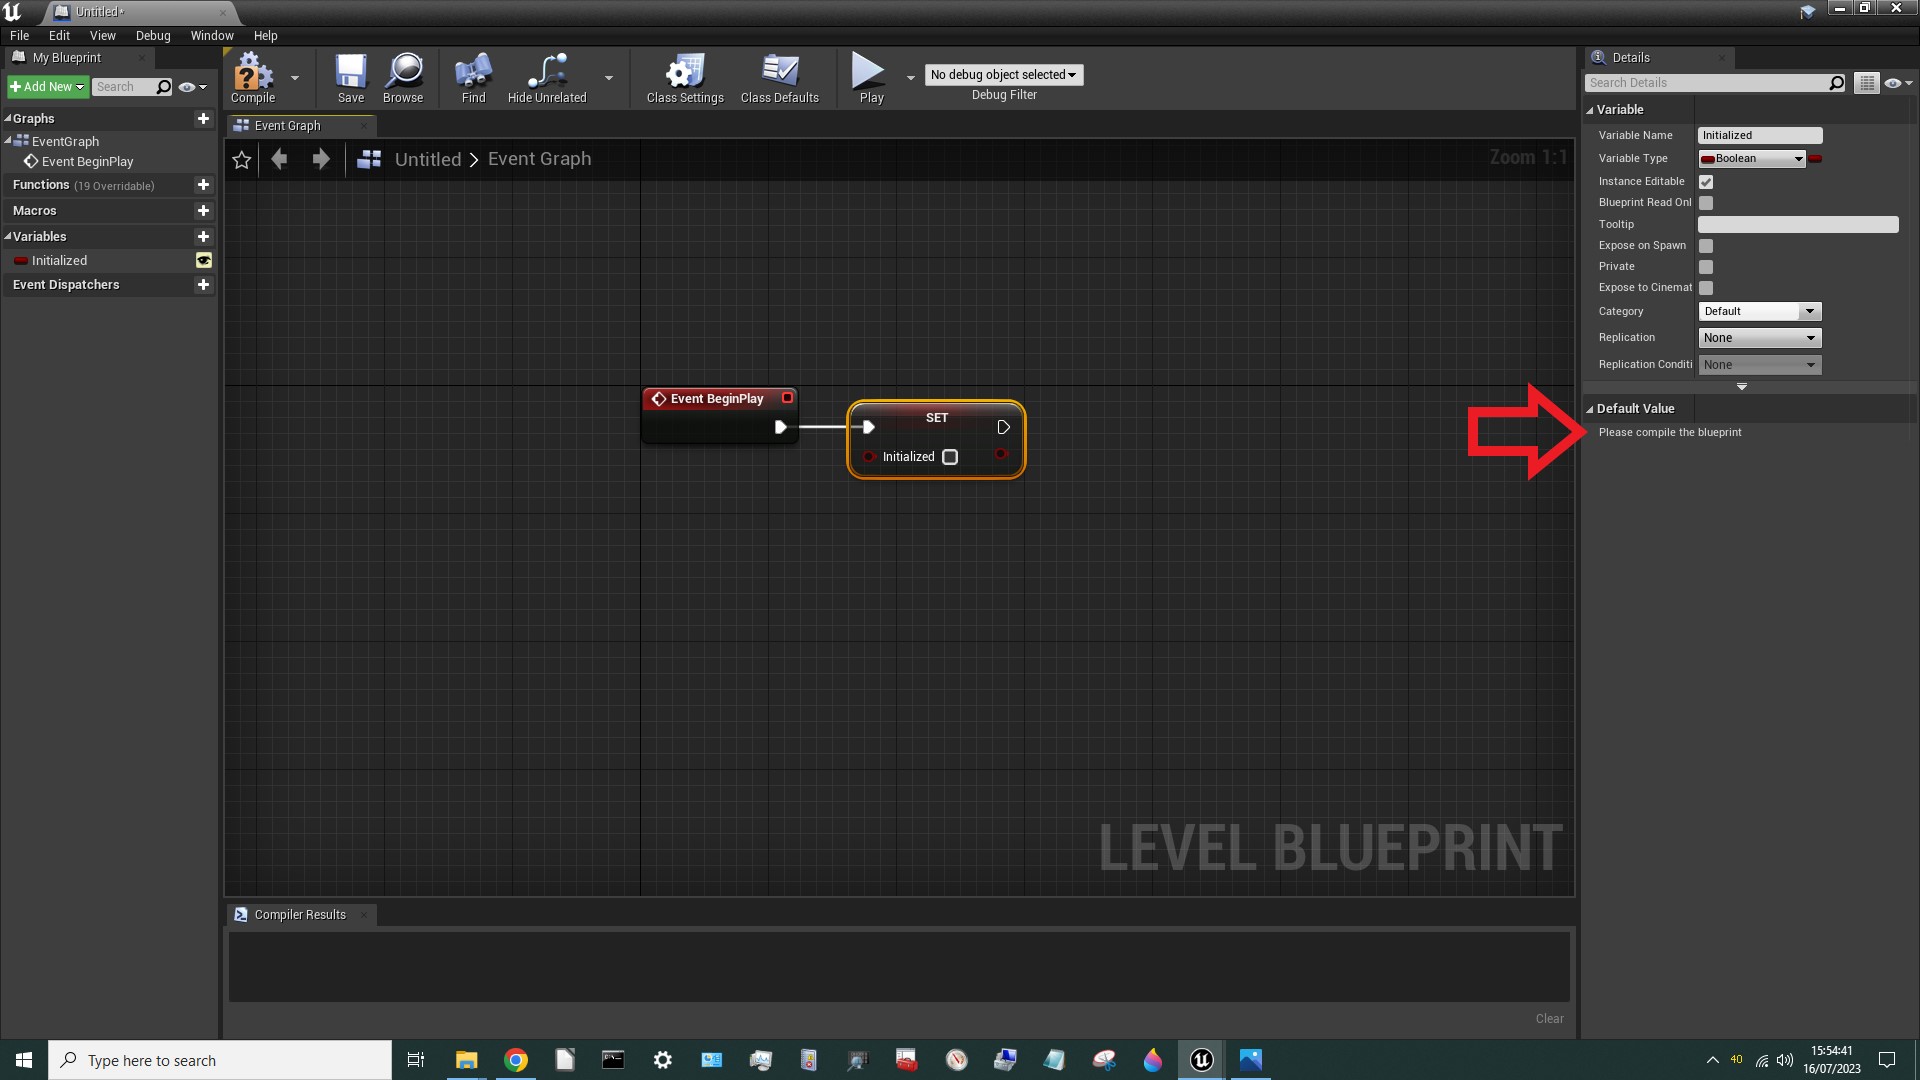
In the bottom left of the Set node it will say Initialized that's the name of the variable being set. To the left of that is a red input pin and to the right is a checkbox. The red pin allows you to set the value of the Initialized variable using the output of some other node. The checkbox allows you to set the default value. We will leave it unchecked because we want the blueprint to know that the mod is not initialised at startup. The red pin on the right is to allow you to use the value of the Initialized variable straight away in another node if you need to. Finally, note the message on the right of the screen (red arrow)! We can't set the default value until we “compile” the Level. So go ahead and hit the Compile button.
¶ Save Our Level (as a umap)
Before we continue we should probably save our Level Blueprint and maybe give it a proper name. Select the CustomContent folder on the left of the Content Browser. (This is important because the Blueprint Apparate Modloader looks for mods in the CustomContent folder. If you save your mod anywhere else the Modloader won't be able to find it.) Then select File > Save, change Untitled to MyHelloWorld and hit Save. If you now hit the X in the top right corner to close the Level Blueprint window you'll return to your project window and you should see a MyHelloWorld icon in your CustomContent folder. If you check that folder in Windows Explorer you'll see that it is in fact a file called MyHelloWorld.umap. That's the Level Blueprint that we're working on. Select Blueprints > Open Level Blueprint to resume editing the Level Blueprint.

¶ Create a Function
Next we want to actually initialise the mod. We could just add a bunch of nodes to the Event Graph (that's what we're looking at right now) but it's neater to create a custom function to do it. In the top left corner click Add New > Function. Change the name to Initialize and right-click on the background to drag the node over to the left of the screen. We'll need plenty of room. You can also use the mouse roller to make the nodes smaller.
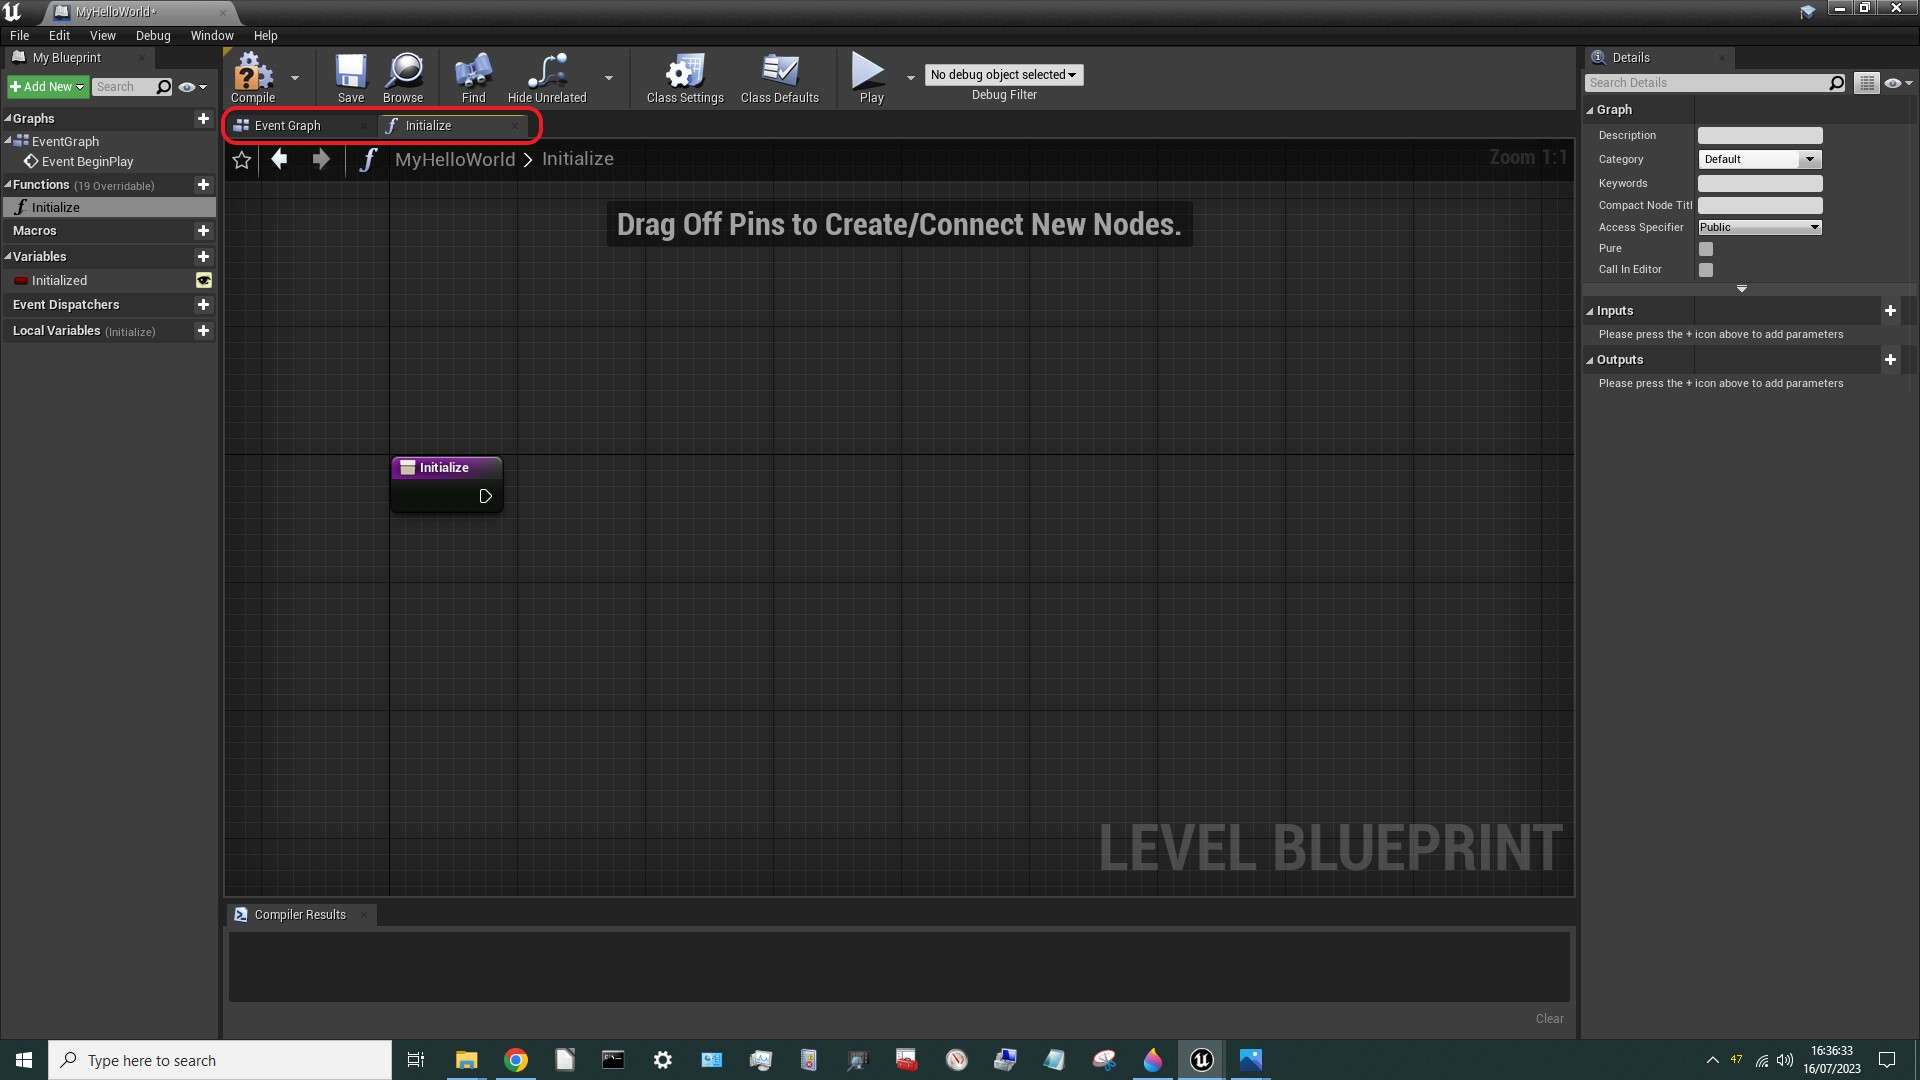
As you can see, our Level Blueprint now has two tabs at the top (marked in red in the image below) but they're both stored within the MyHelloWorld.umap file. Use those tabs to switch back & forth. Our function blueprint has been started off with a purple node called Initialize. That's the name of our custom function. (If our function was called FuzzyDuck that purple node would be called FuzzyDuck.) On the right you can see that our function has no inputs and no outputs. That's fine on this occasion - this function doesn't need any.
¶ Add some Logic
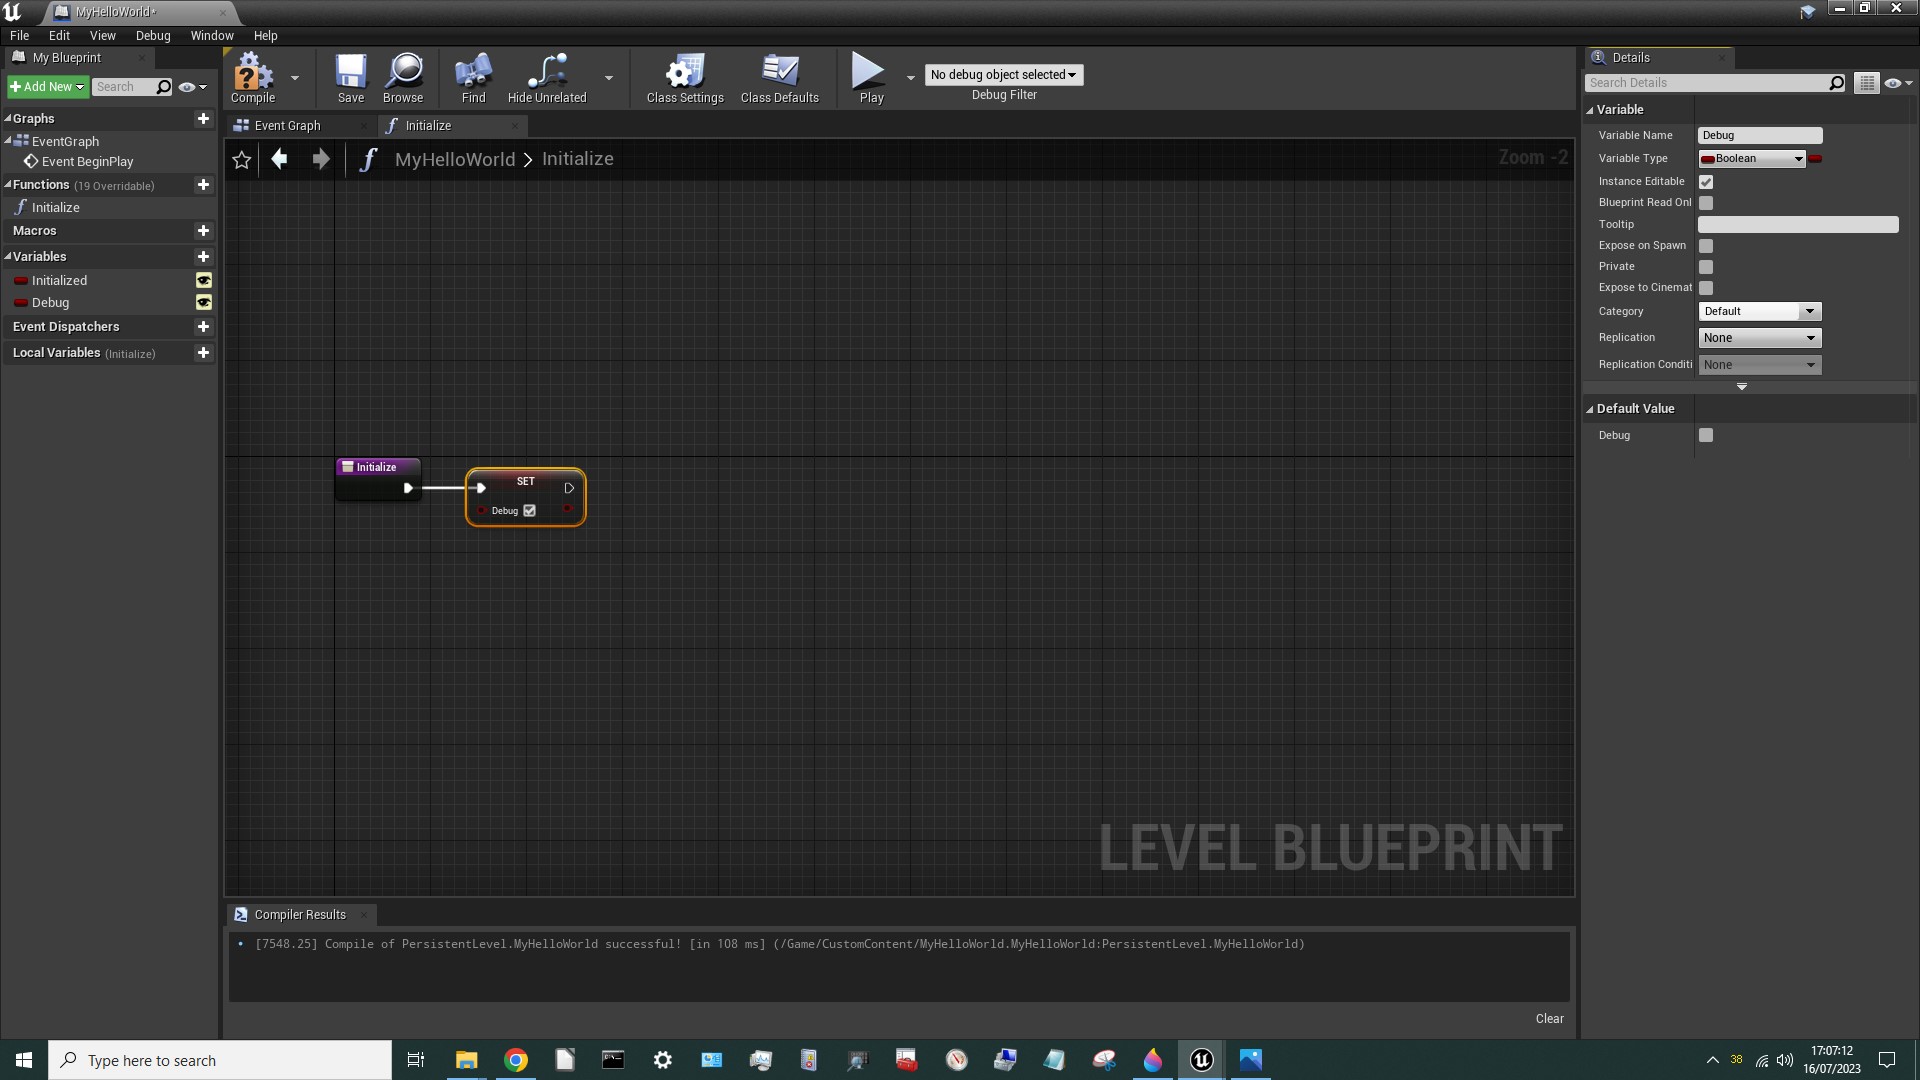
The Initialize function will need to get the UI & the HUD, but I'd also like to display some debug information. This will help us to figure out what's going on if there's a problem. So the first thing I want to do is create a Debug variable which will control whether the debug information is displayed. During development and testing I'll have it set to TRUE. Then when I'm ready to release my awesome mod on Nexus I'll set it to FALSE. Like before, create a new boolean variable, call it Debug , untick instance-editable, drag it onto the Level Map, tick the box to set it to TRUE but not the box to set it to TRUE by default, then connect the white execution pin to the Initialize node. You should now have this:
Next we need to get the UI Manager and store a reference (pointer) to it in a variable (for us to use later). To do that we're going to select the white pin on our Set node, drag it to the right and release it. That will bring up a search box so we can search for the node we want to connect to. In that search window type GetUIManager.
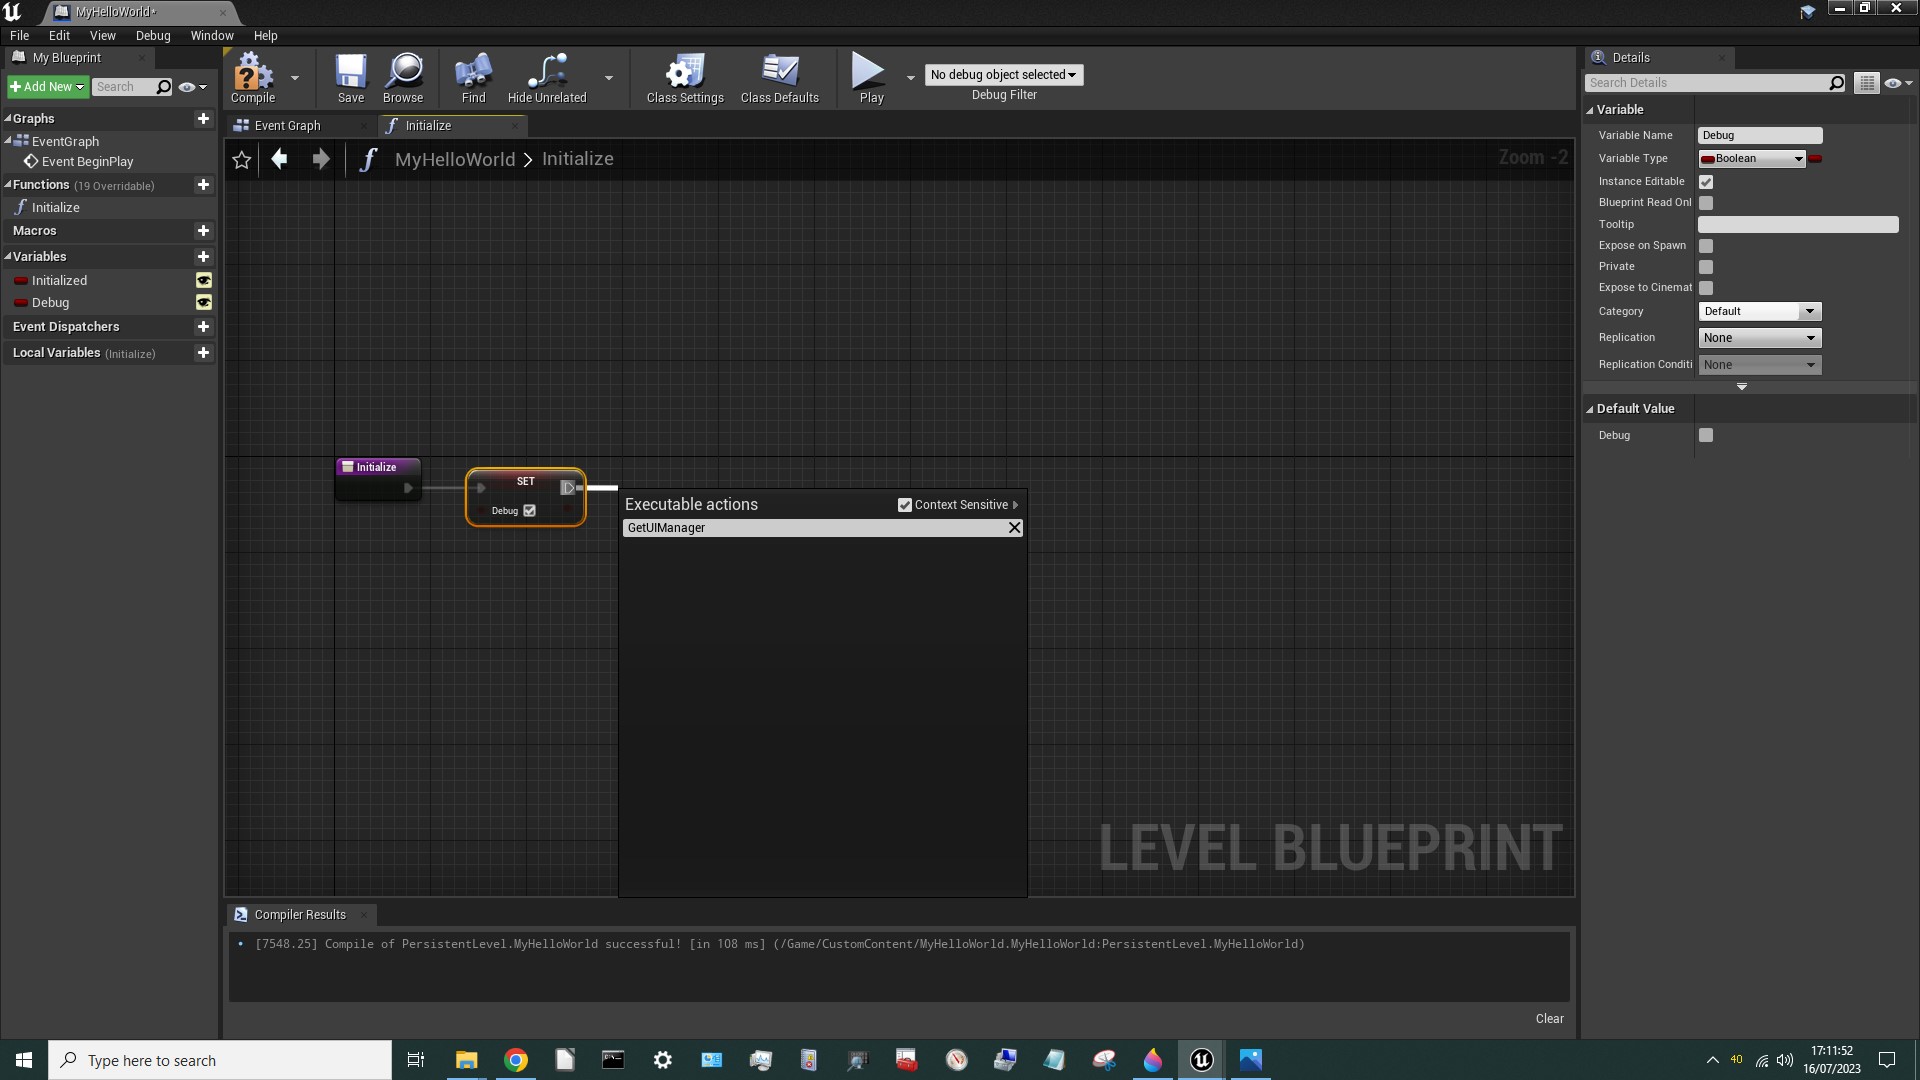
As you can see (above), it doesn't find anything. That's because, by default, it performs a “context sensitive” search. Normally that's exactly what you want. But on this occasion there's nothing to indicate that we might be interested in finding a UIManager next, so nothing comes up. On this occasion we need to untick the Context Sensitive checkbox.
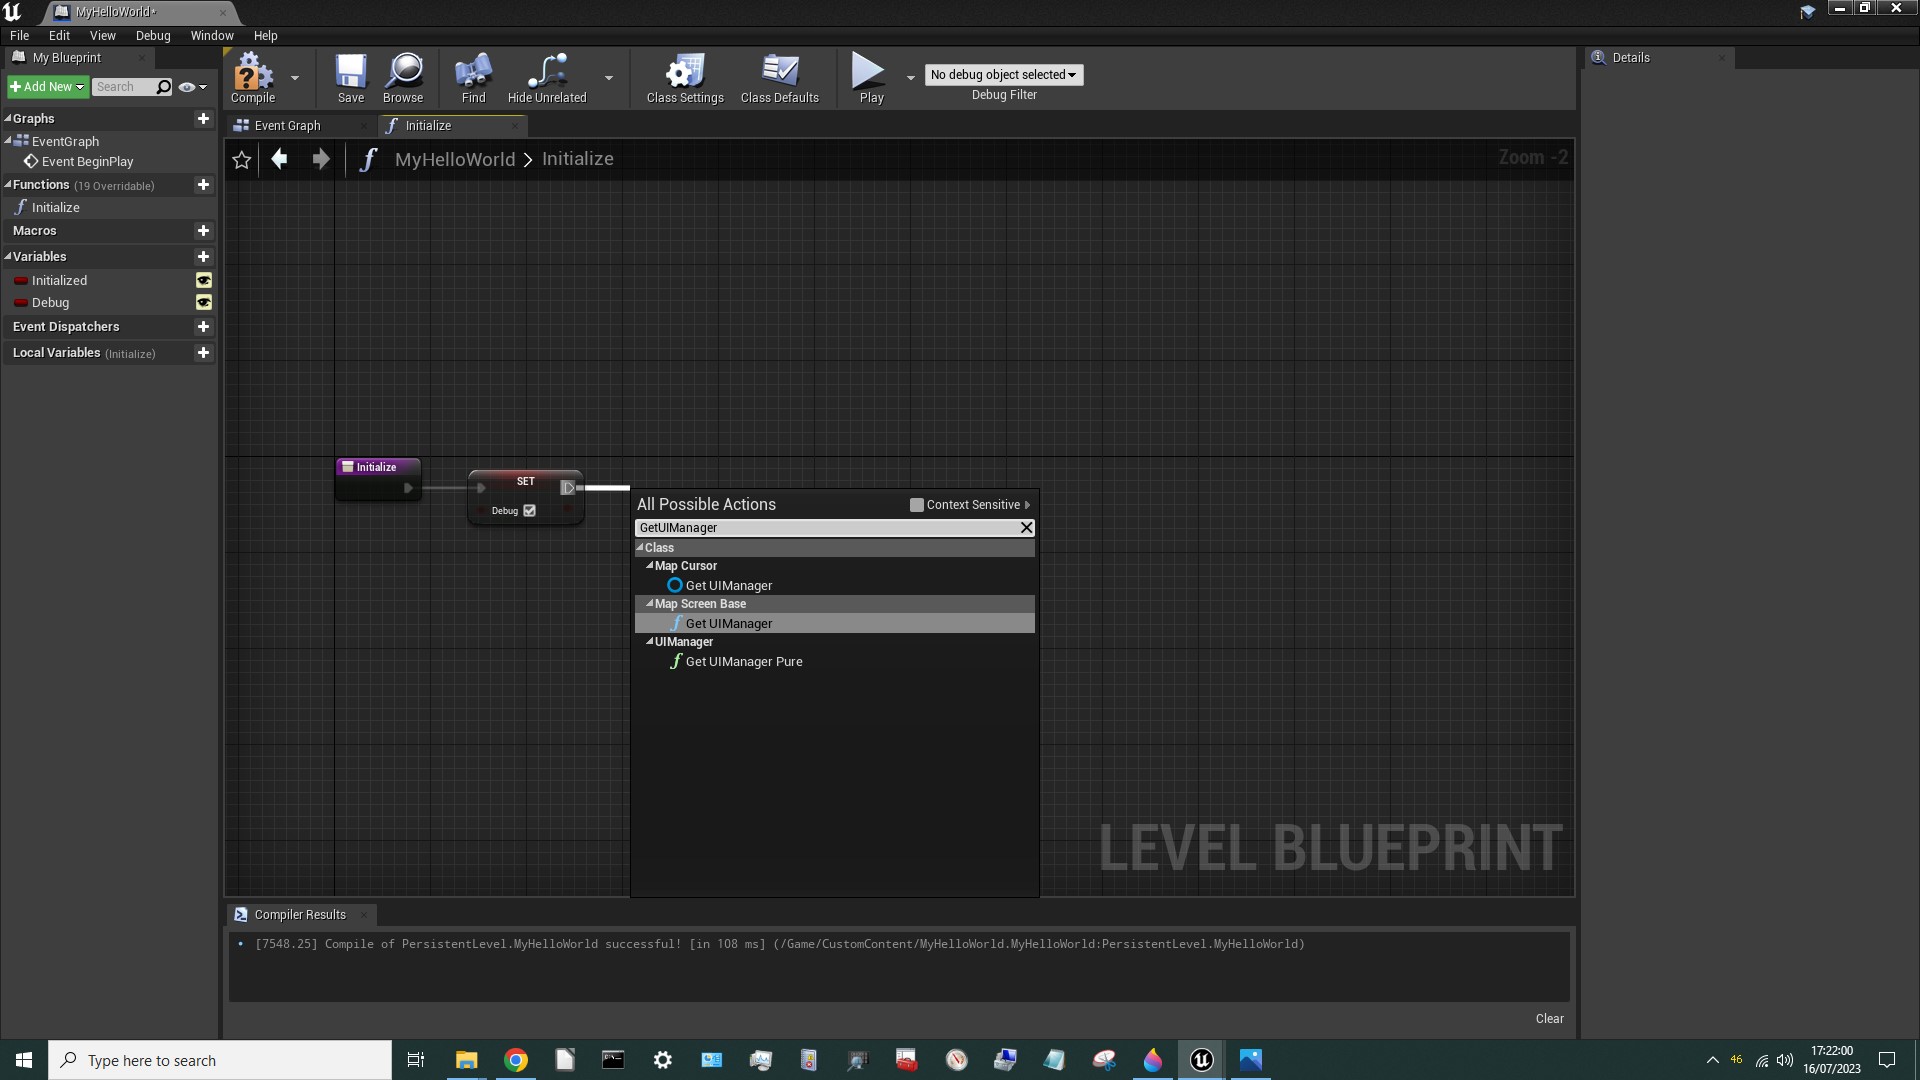
Now it finds three matches. The first two are something to do with the map in the game, but the third looks like what we need, so select that.
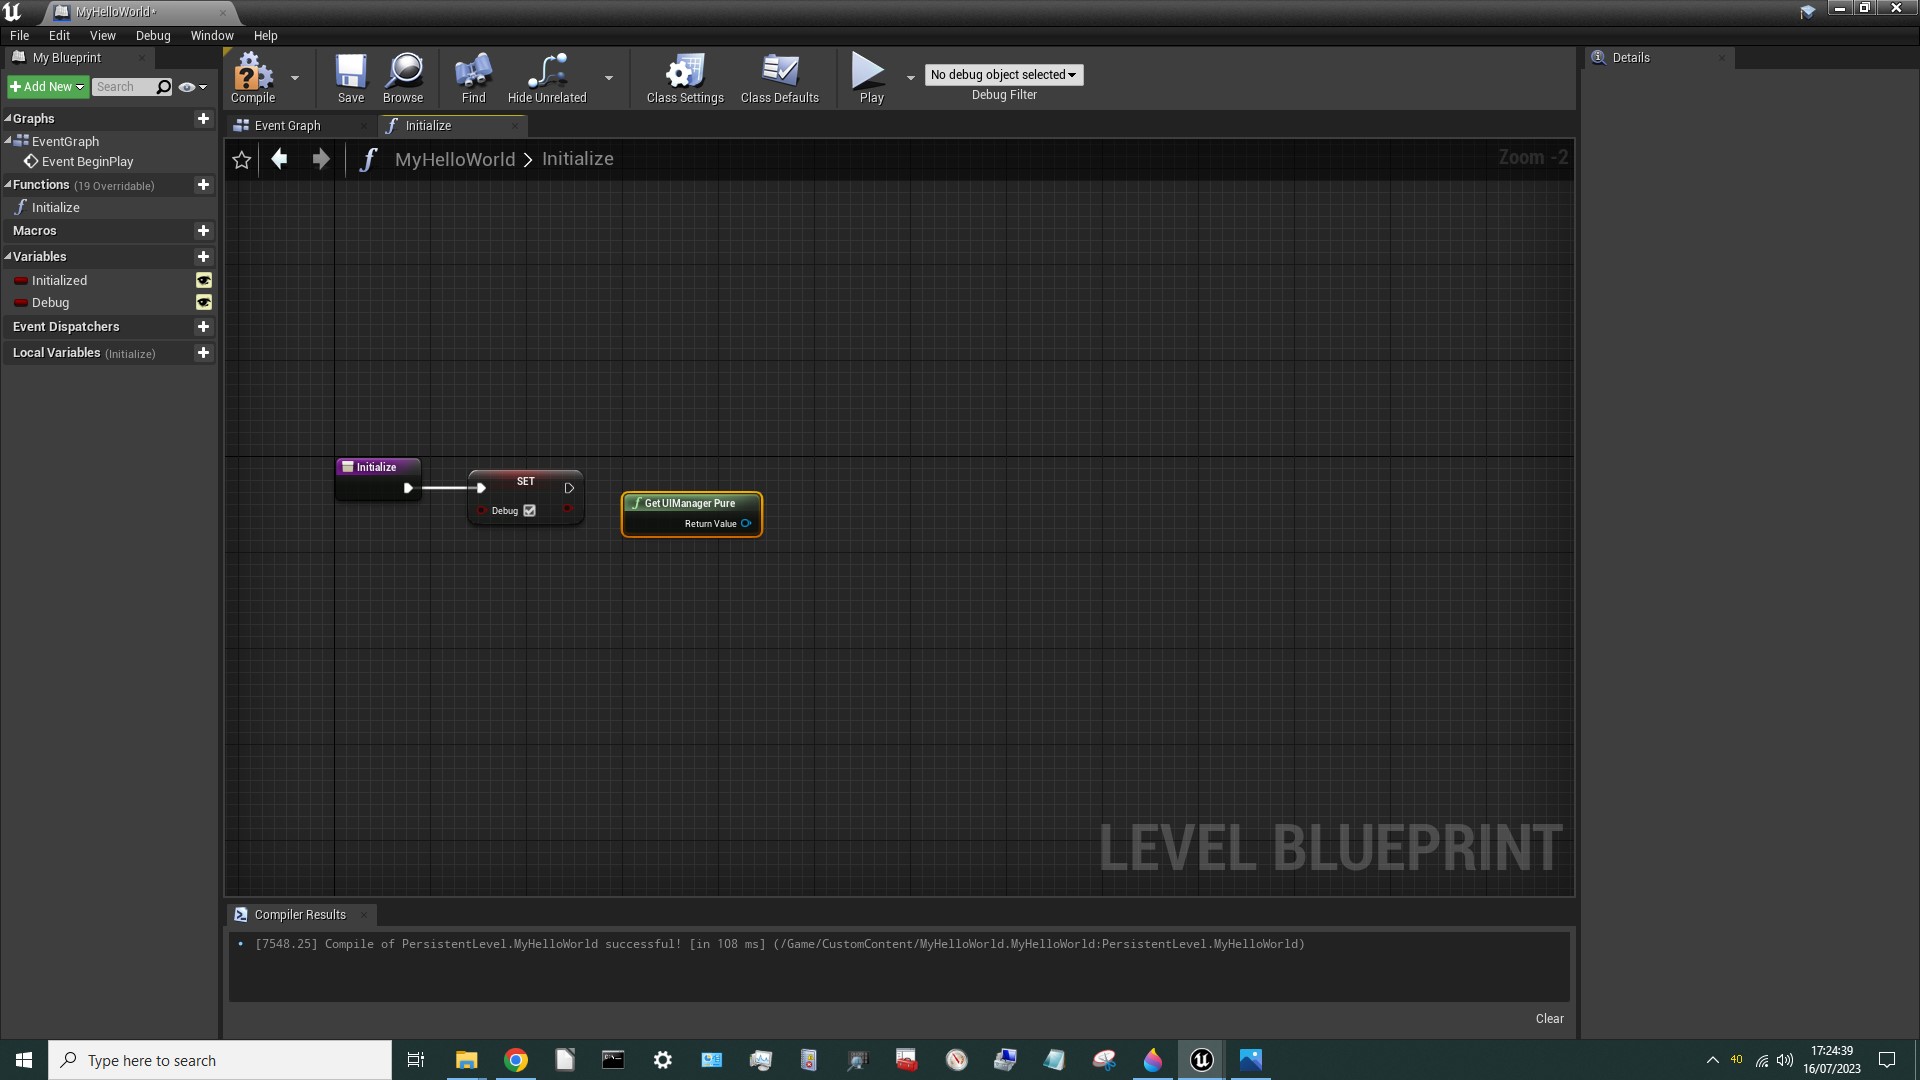
Okay, so that's not quite what we were expecting. We were expecting the new node to be connected to the previous one via a white execution line. But the new node isn't attached. In fact it doesn't even have any white pins. What's going on? Well, this new node is a function that can be executed at any point. It doesn't depend on anything and it doesn't change anything (that's what the “pure” bit means). It doesn't need to happen during the central chain of execution, so Unreal Engine helps you out by allowing you to put it anywhere. So what do we do with this node? Well, we want to store it's output (the UIManager) in a variable so we can use it later, and the node to Set a variable does need to be in the central chain, so we just need to connect a new Set node to the old Set node, like this:

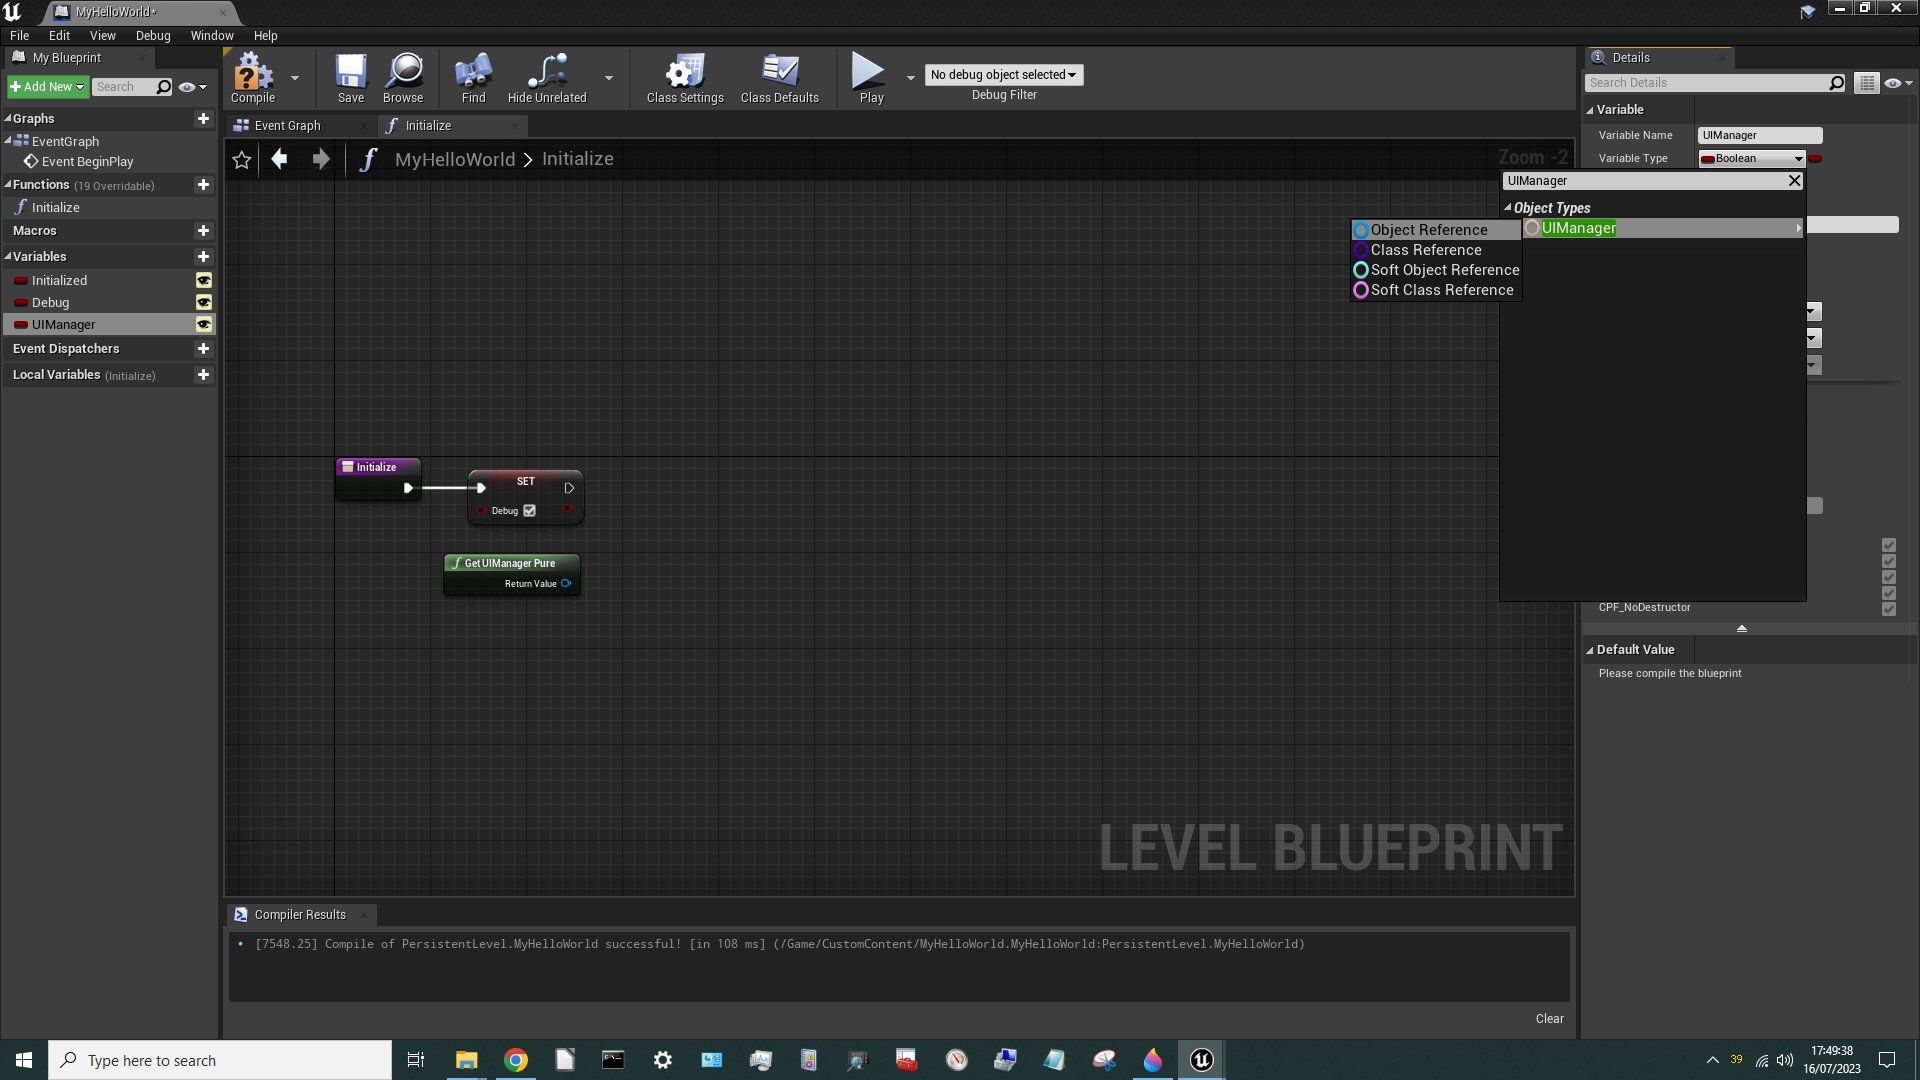
But hold on a minute. Why is this Set node blue when the other one was red? Well, the clue is in the top right corner. Set nodes are red for Boolean variables but blue for variables of type UIManager. Let's back up and I'll walk you through what I did here. We know we want to store a reference (pointer) to the UIManager so we need to create a variable suitable for storing that. So far we've only created boolean variables but now we need something different. Select Add New > Variable as before, change the name to UIManager and untick the Instance Editable tickbox. At this point it's still red because it's still a boolean, so we need to change that. In the top right corner, select Variable Type and a list of variable types will appear. UIManager isn't listed but a lot of stuff is hidden in the collapsed lists at the bottom. Just go to the top line where it says Search and type UIManager. One match will be found, but when you try to select it four options will appear:
Select the top one. Not only does the description sound like what we want, it's the right colour. That's not as daft as it sounds. If you're ever unable to connect two pins together it'll be because they're not the same type of pin. You can only connect pins of the same type. Typically that means the same colour, so white only connects to white, blue only connect to blue, etc. If you're ever unsure about which variable type you need, check the colour! Now we can drag this variable into our Level Blueprint, select Set, and connect it up to the previous Set and Get UIManage Pure nodes, as shown below.
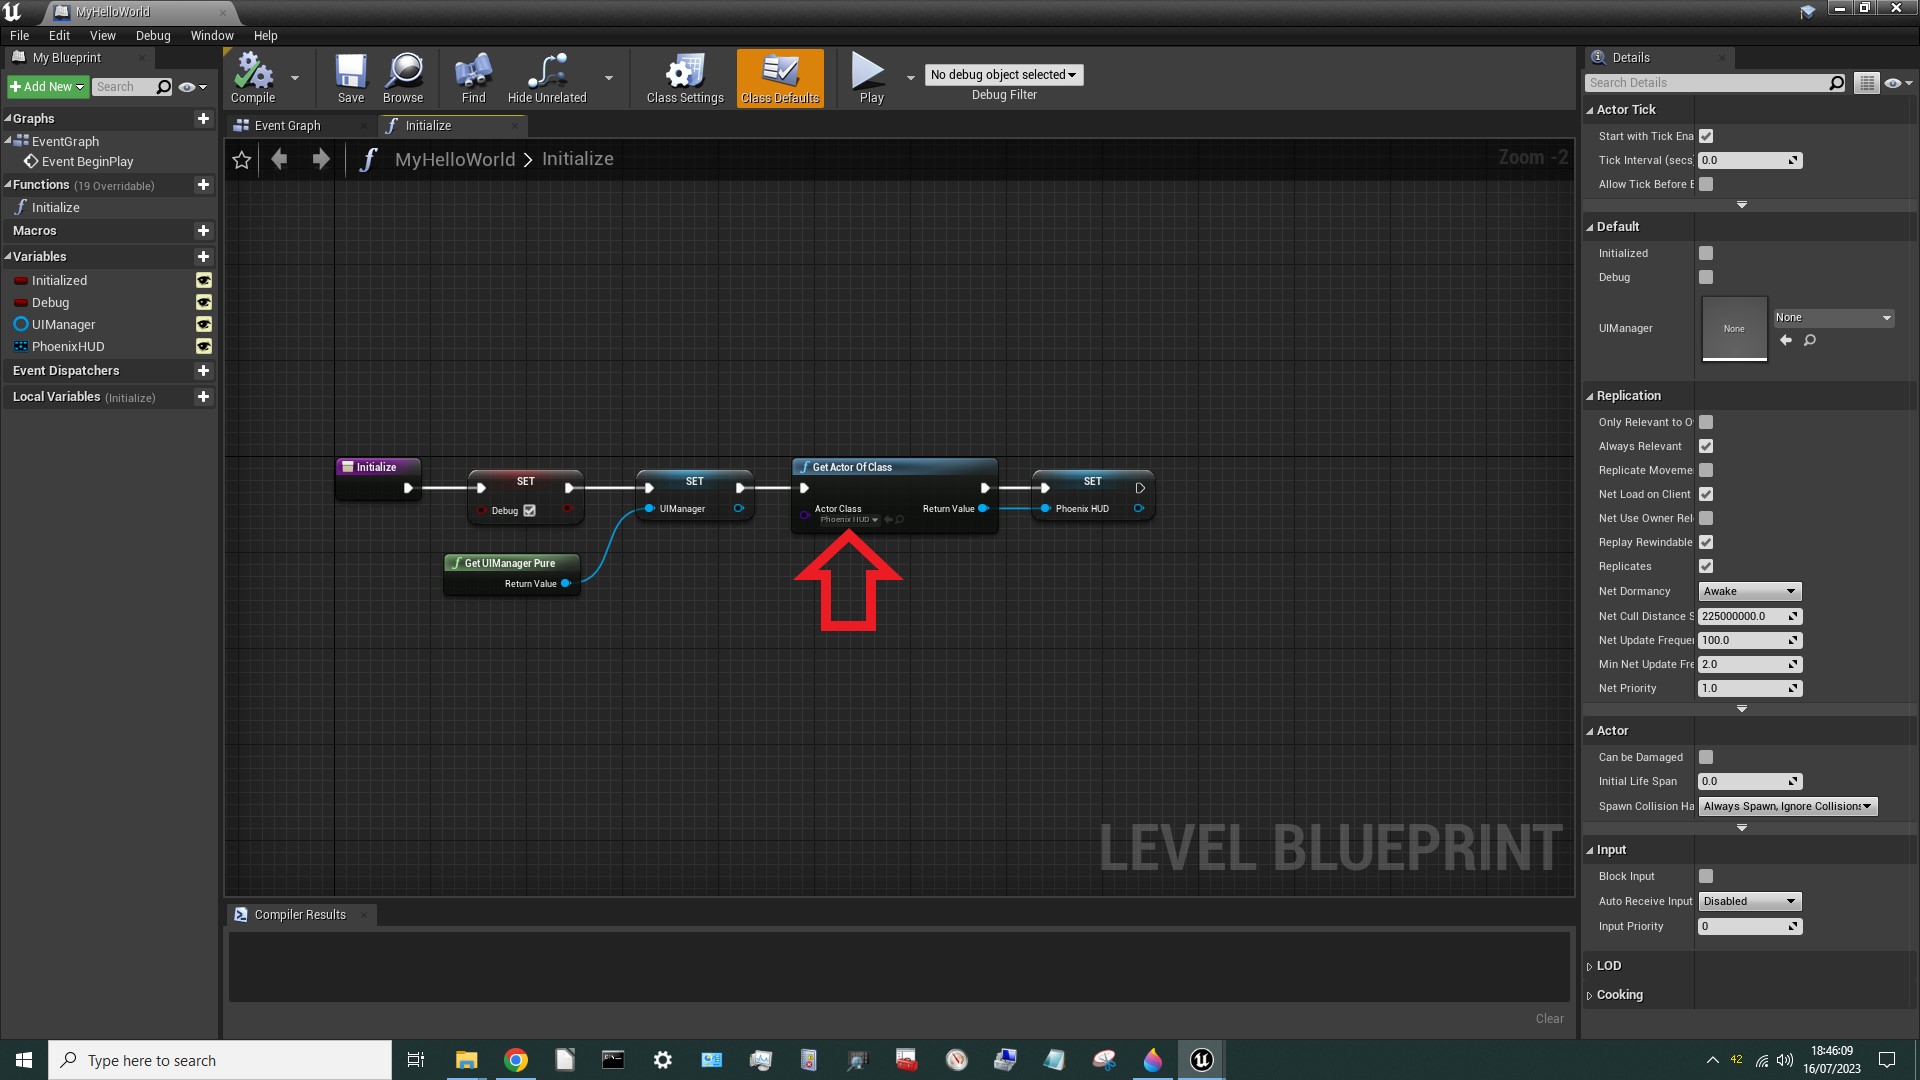
Next we need to get and store a reference to the game HUD. This is where some trial-and-error is required, because there are several options to choose from. More than one of them can probably be made to work, depending on how they're handled. The one below is what a modder called Darkstar came up with. If anyone finds another way let me know! Note the parameter indicated by the red arrow.
Next I want to display some debug information. If the mod is already initialised I want to say so, and if not I want to say not. So we need the execution to go one way if the Initialized variable is TRUE and a different way if it's FALSE. The node that handles that is called a Branch. To insert a branch just drag off the last white pin in the chain and drop it. In the search window type Branch and select the Branch node.

Once the Branch node is in-place, you can drag backwards off the red pin and type Initialized to find the Initialized variable we set up in the Event Graph. Select Get Initialized.
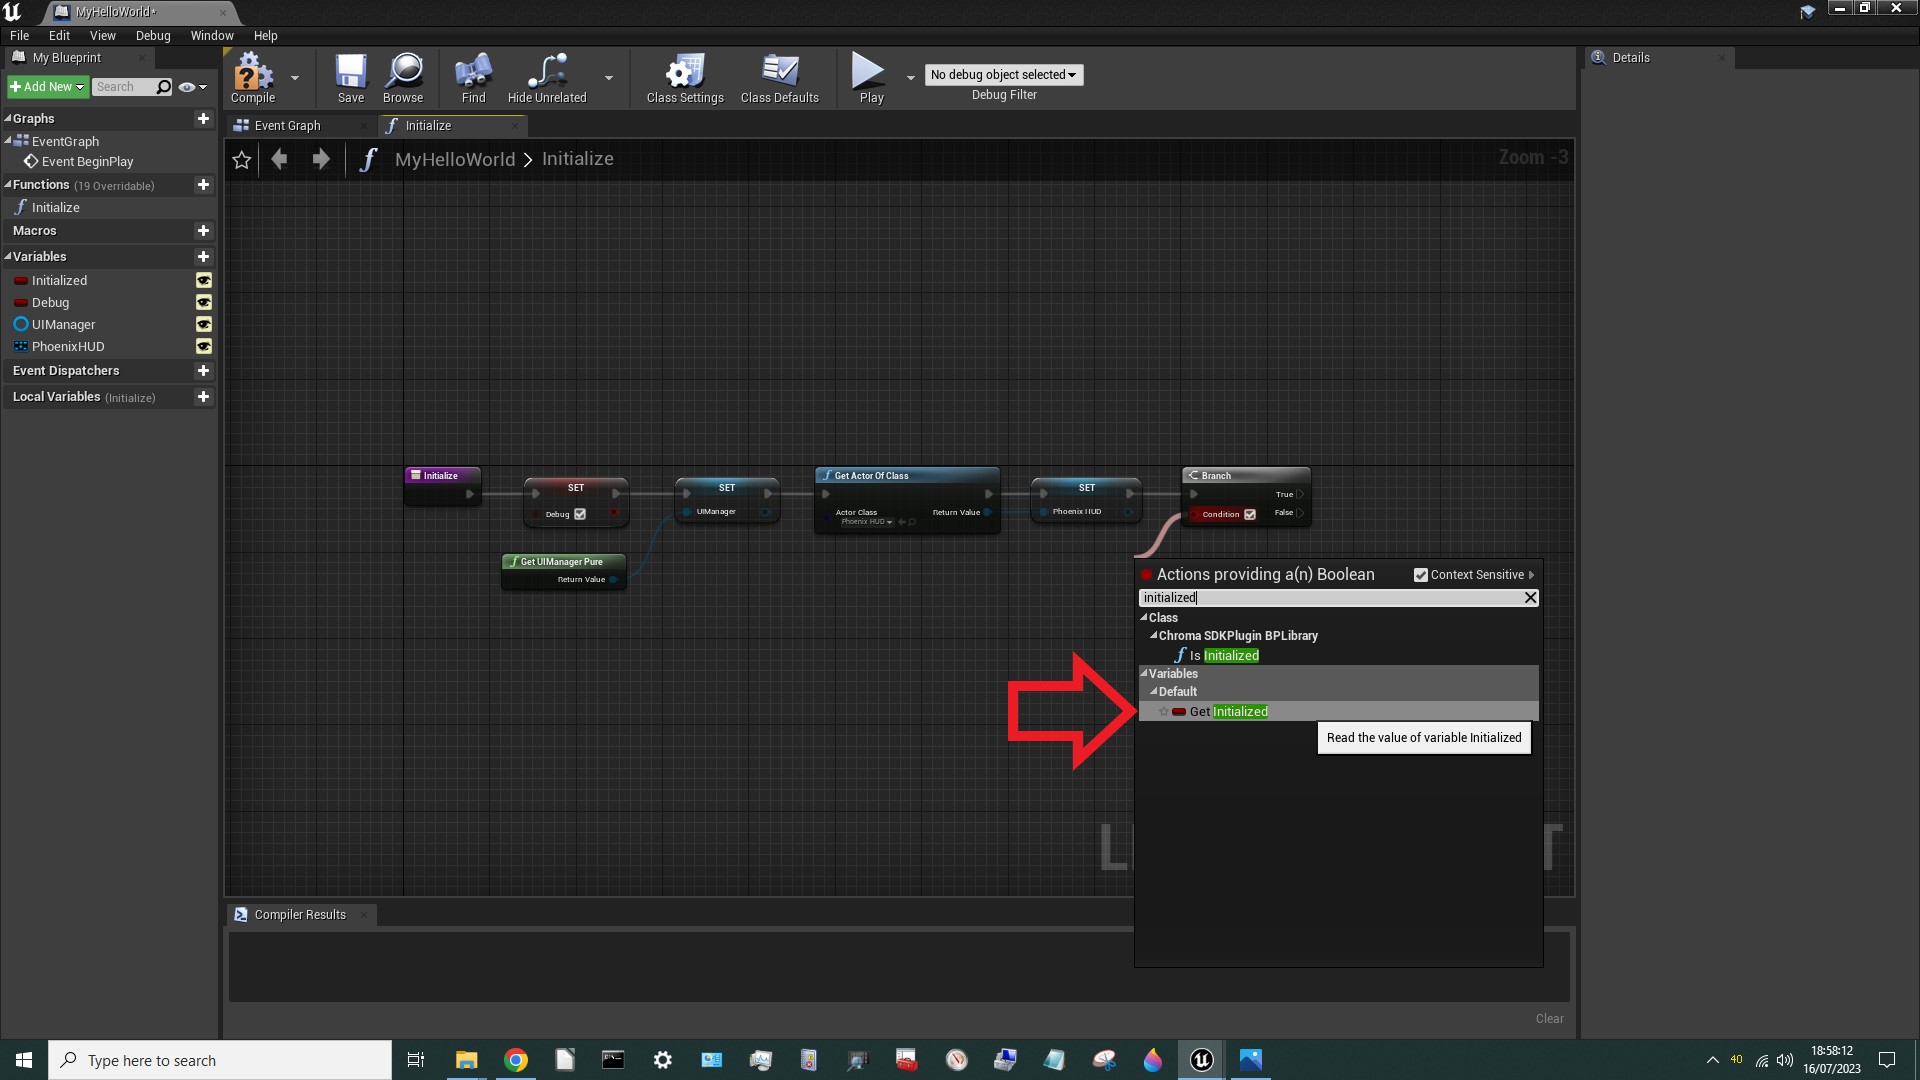
The Initialized variable will now be used to control which way execution goes after the branch. [**Note: Don't confused the Initialized variable with the Debug variable. They're different! ]
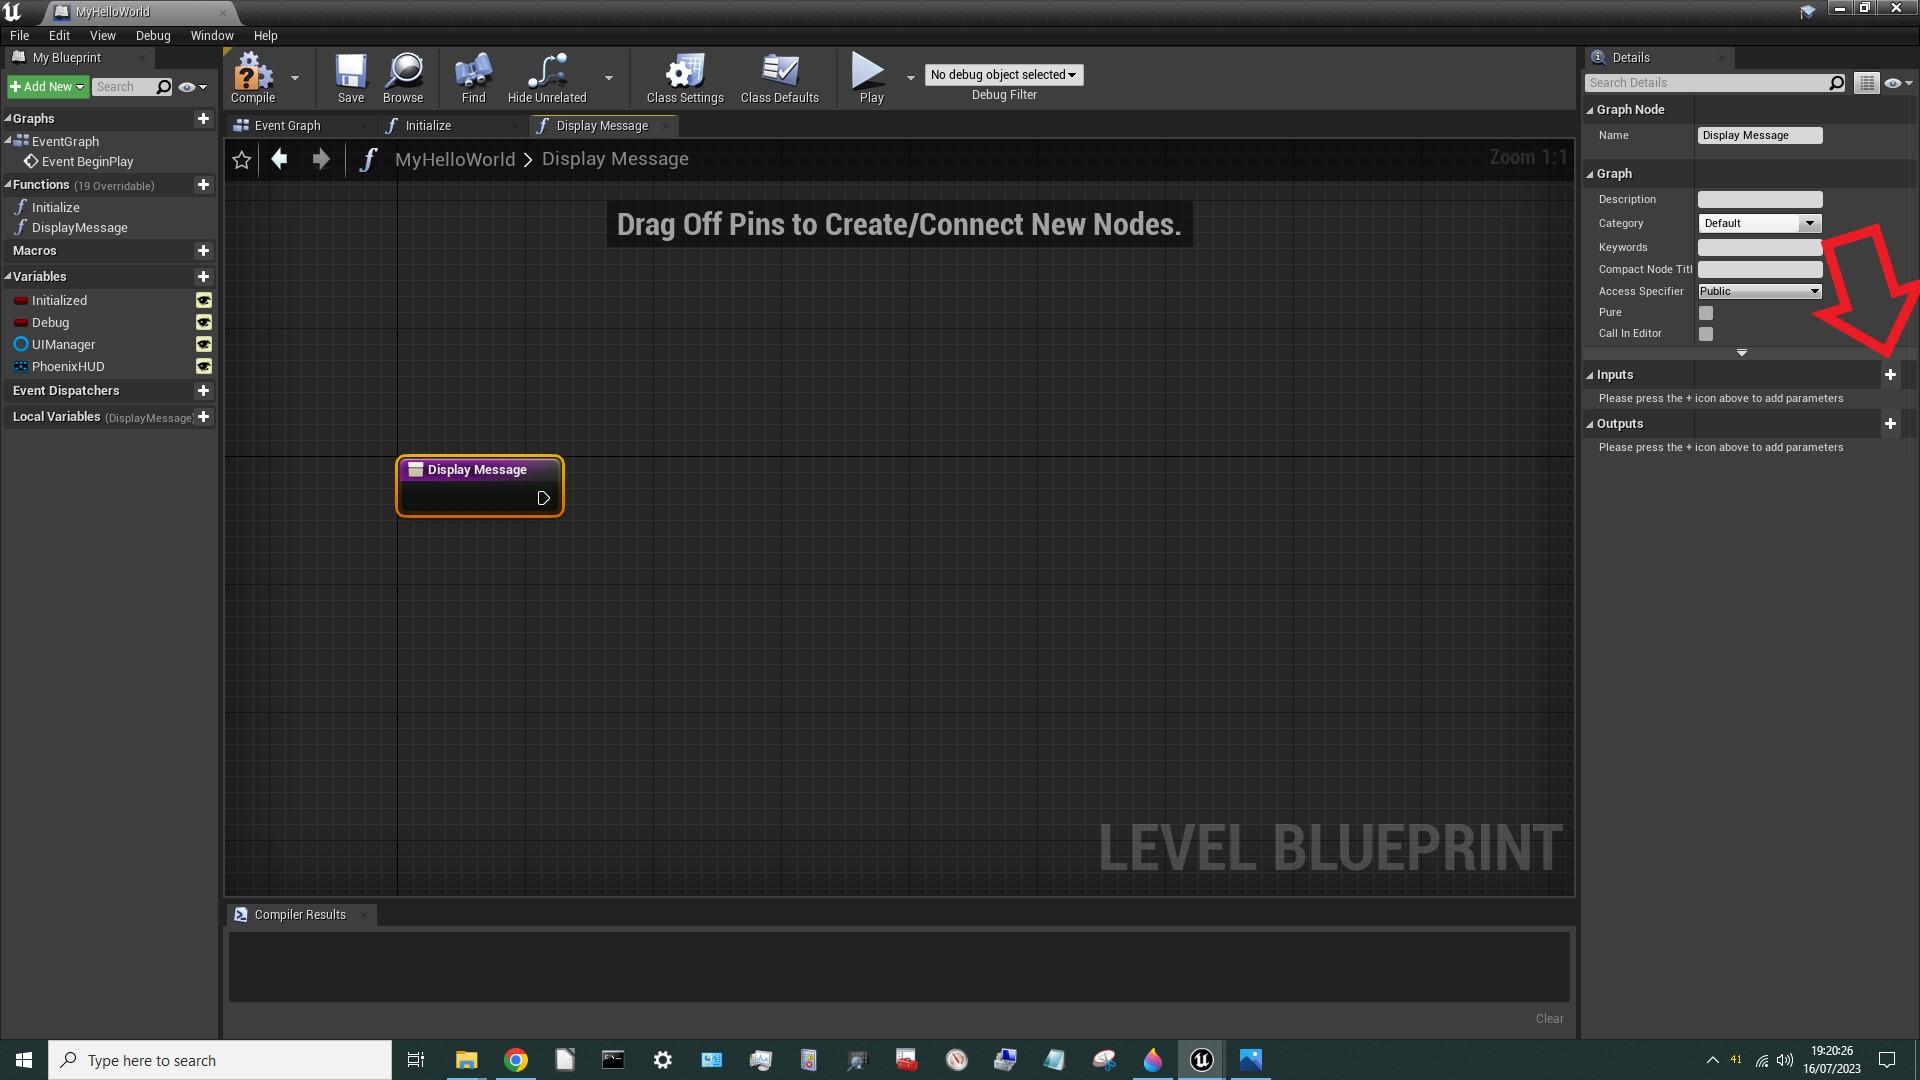
¶ Create a DisplayMessage Function
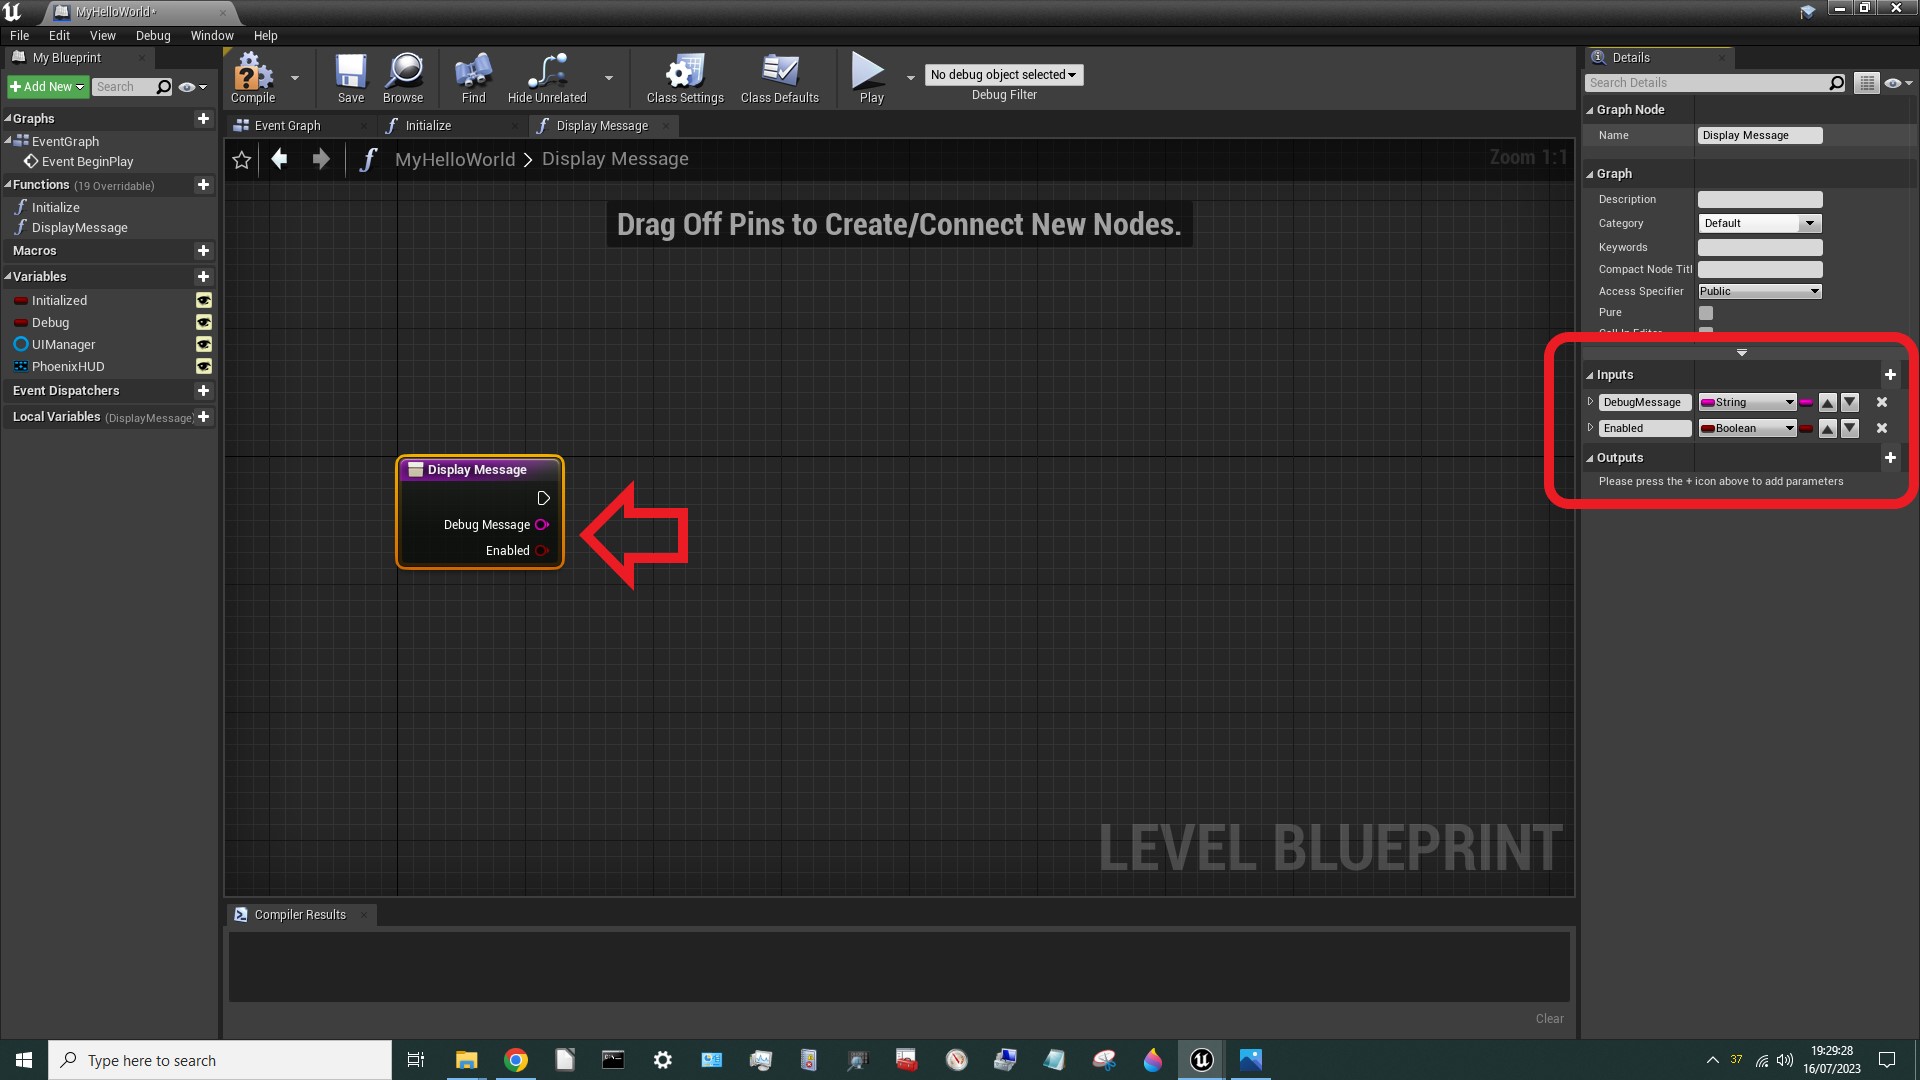
Next I want to display a message on-screen. Hogwarts Legacy has various low-level functions for that, but we'll need to define something that does things the way we want, so let's define a function called DisplayMessage. We want this function to take two input arguments: 1) the message we want to display, which we'll call DebugMessage and 2) a boolean flag which we can switch on & off to enable / disable all the debug messages, which we'll called Enabled. To add these input variables click on the purple DisplayMessage node. That will reveal the properties for that function (on the right). Now hit the + next to Inputs.
Change the new parameter name from NewParam to DebugMessage and change the type from Boolean to String. Hit the + again, change the name from NewParam to Enabled and the type from String back to Boolean. As you can see, the function will gain two new pins, representing these new inputs.
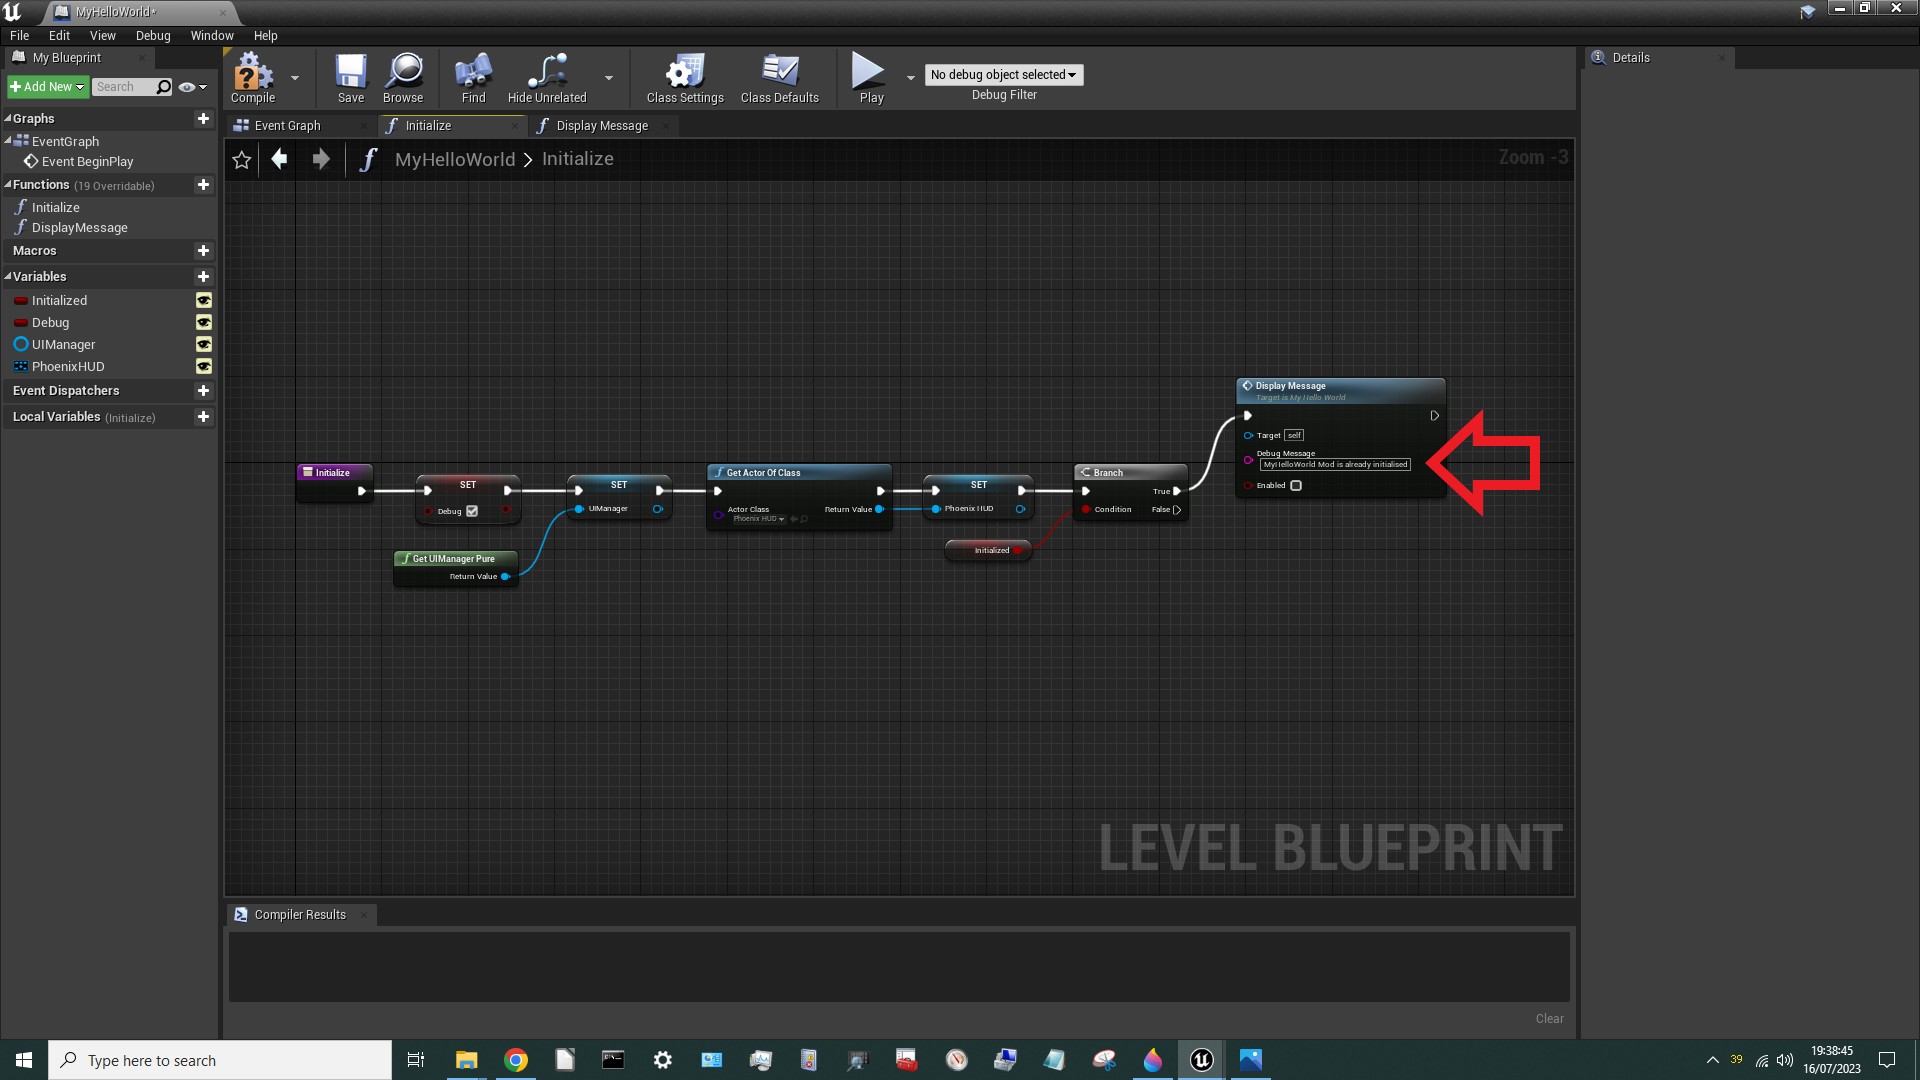
¶ Complete the Initialize Function
Before we get further into that let's finish off our Initialize function. Click on the Initialize function tab to go back to that, drag off the Branch node's white top execution pin (marked TRUE), drop it and search for the function we just created: DisplayMessage. Select it. A new node will appear. In the little box next to DebugMessage type the message we want to see if execution goes this way: MyHelloWorld Mod is already initialised:
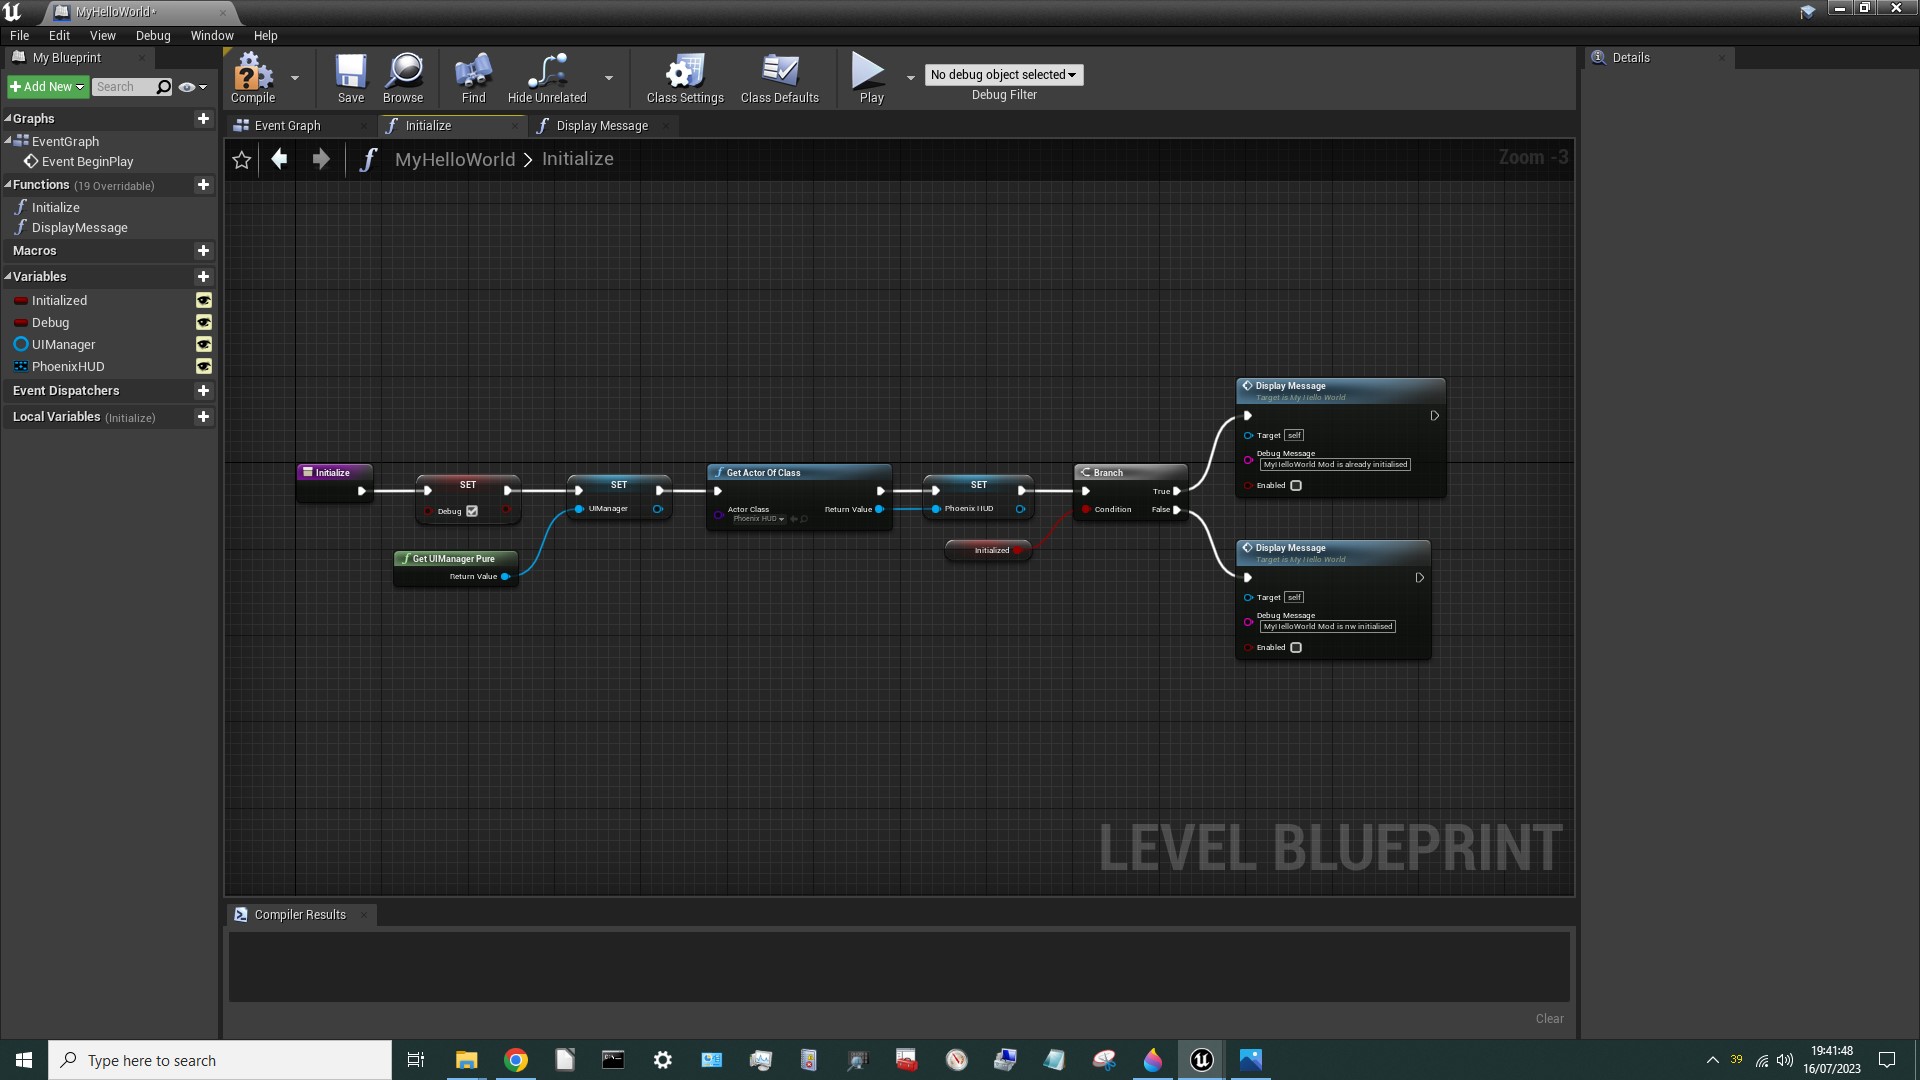
Next do the same thing for the FALSE branch and enter the message MyHelloWorld Mod is now initialised:
Drag the Debug variable into the blueprint, select Get, and connect it up as shown below. And finally, in the case where the mod was not initialised, we want to set the Initialized flag to TRUE. Drag the Initialized variable into the blueprint, select Set, tick the Initialized checkbox, connect it up as shown below, then hit Compile and Save.
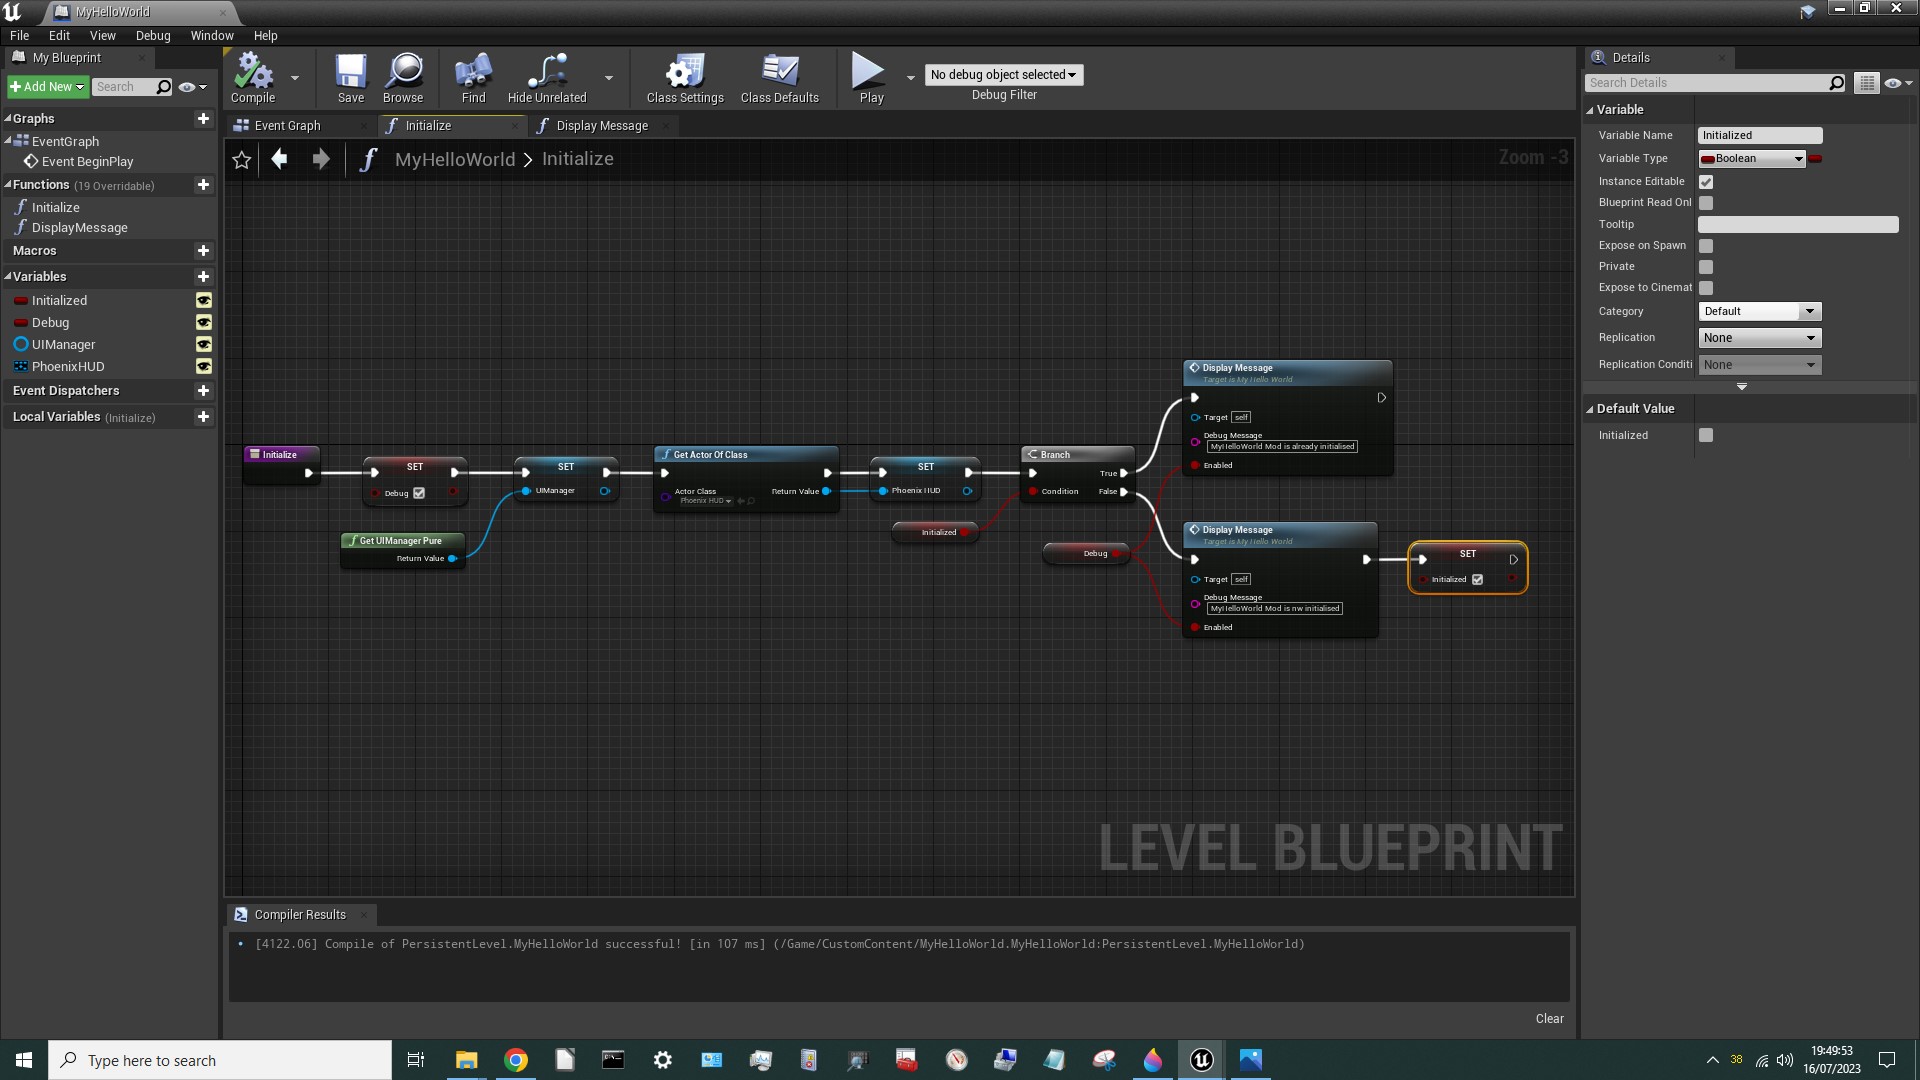
That's the Initialize function complete.
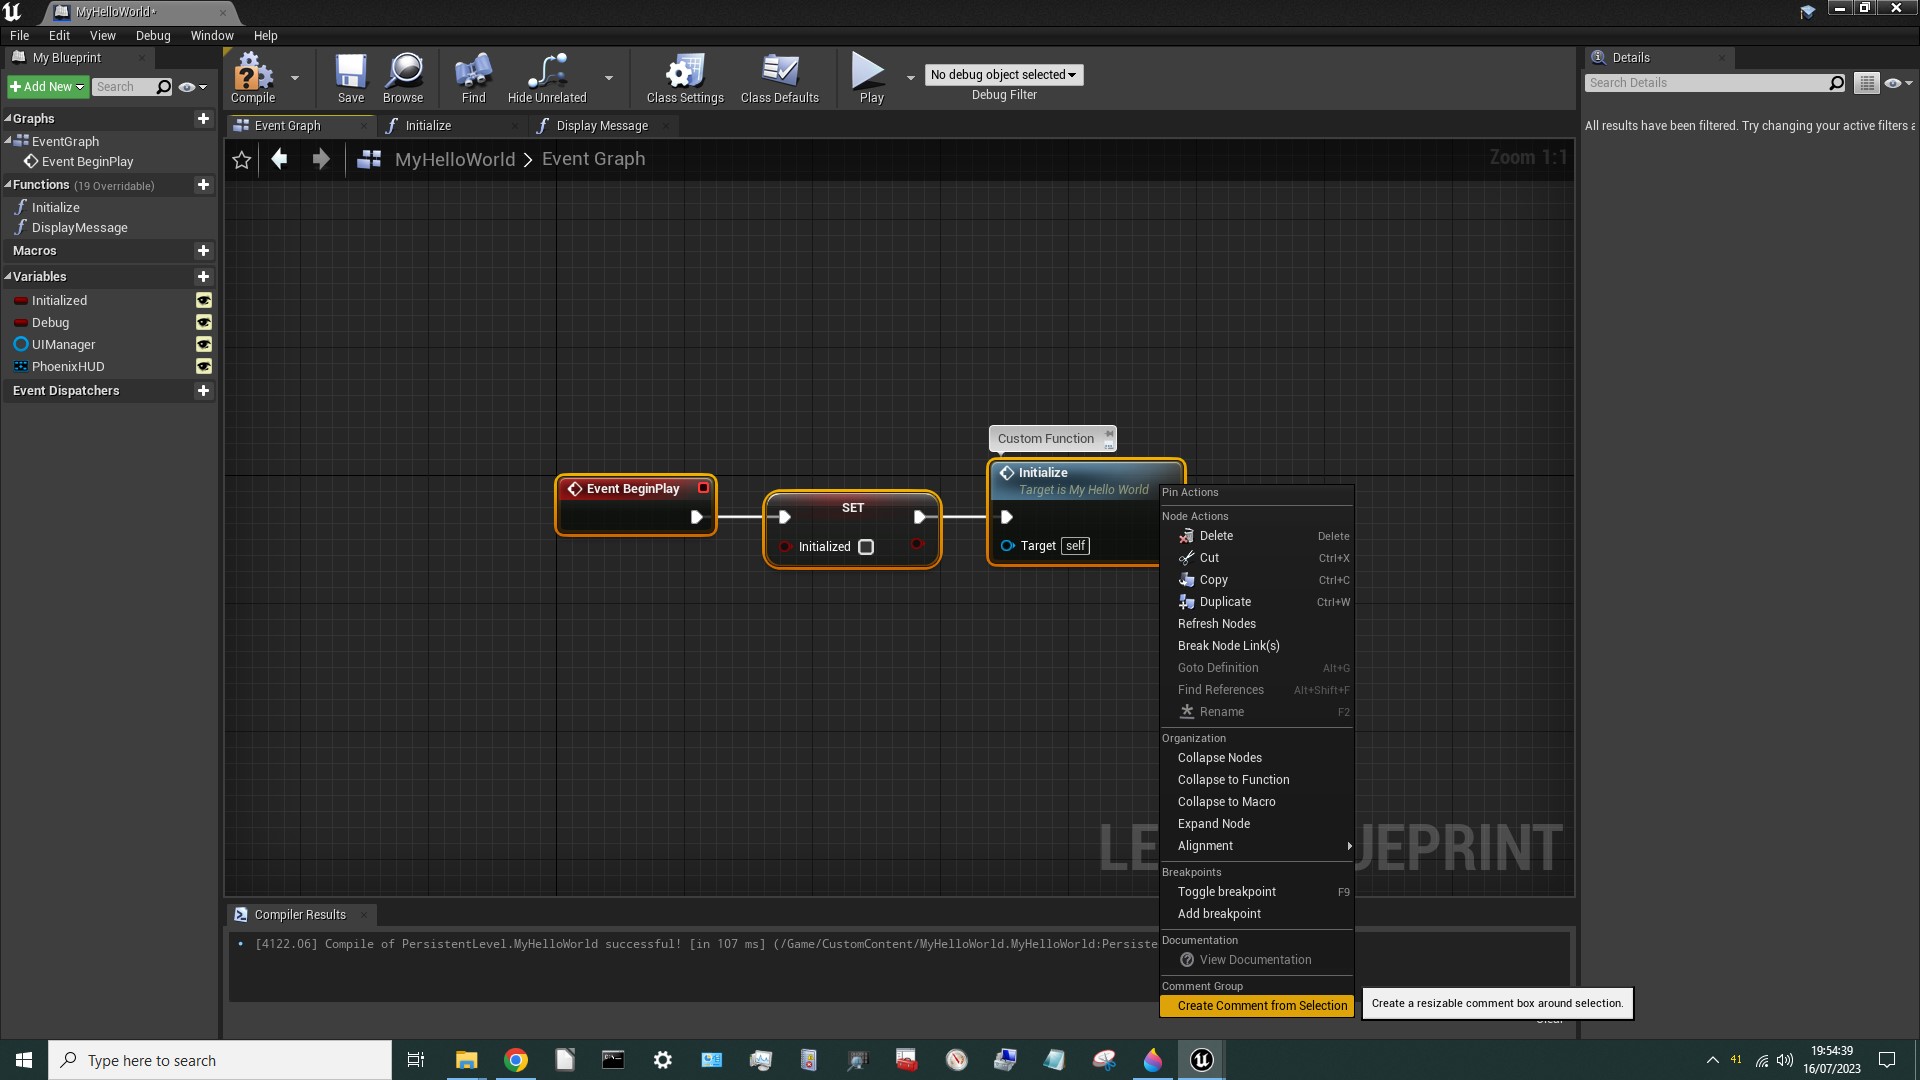
¶ Complete the Trigger Event
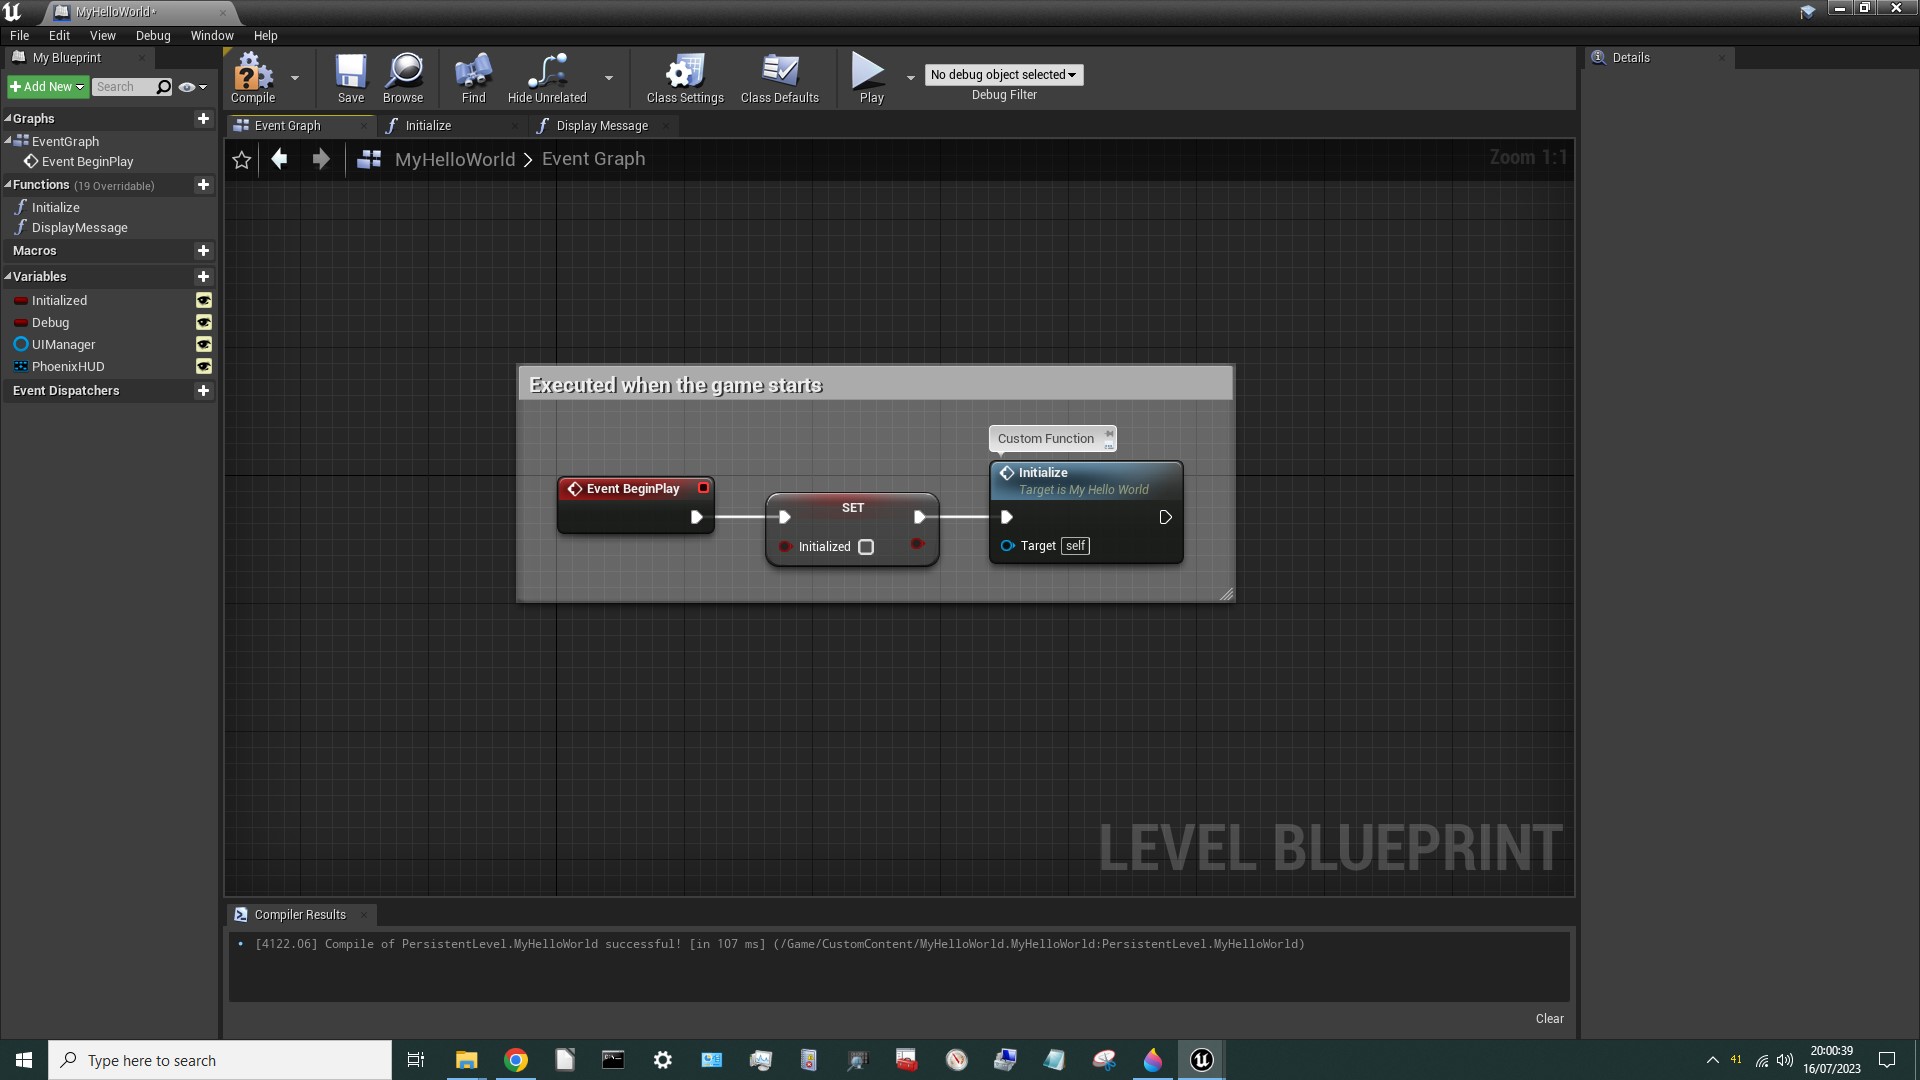
We can now go back to the Event Graph tab and complete the Event BeginPlay node chain by adding the Initialize function on the end. I have also annotated the function by adding a comment above it. To do that just hover over a node, when … appears click it, and type your comment. You can also comment a group of nodes by selecting them (use the left mouse button to drag a rectangle around them), then right click and select Create Comment From Selection, as shown below
The result will look something like this:
¶ Plan the DisplayMessage Function
Let's think about the DisplayMessage function some more. In a lot of UE4 tutorials you'll see the print node used to display information on the screen. Unfortunately we can't use that when modding Hogwarts Legacy. Mods are only accepted by the game if they're Shipping Builds, and the Unreal Engine specifically disables the print node in Shipping Builds. [**Note: It's possible that print could be enabled by changing some settings and rebuilding Phoenix.UProj but I haven't attempted it.] So we must use something else. We could create a widget, but unless you put in a lot of work these always look a bit amateurish. The best solution is to use something that's already built into the game and Darkstar came up with a clever way to use the built-in error display node called Hermes Display Error Message, so we'll use that.
To use the Hermes Display Error Message game function Darkstar figured out that we need to reference the following game assets:
/Game/UI/HUD/Notifications/UI_BP_ErrorMessage/Game/UI/HUD/UI_BP_PhoenixHUDWidget
(Don't worry if you're starting to get a bit lost. We'll cover this stuff in more detail in a future tutorial for now just accept that if this works we'll worry about how & why later.)
One quick note - you will often see the folder Game mentioned in connection with Hogwarts Legacy, but you will never see that folder anywhere in the game files. That's because it gets converted into Content somewhere inside Unreal Engine. So whenever you see Game just think of it as Content.
So where can we get these assets from? Well, if you browse through the game files (using FModel or UModel - more on that in Tutorial #102) you will find two assets called:
/Content/UI/HUD/Notifications/UI_BP_ErrorMessage.uasset/Content/UI/HUD/UI_BP_PhoenixHUDWidget.uasset
Perfect! So we just export those, put them into the corresponding folder inside our project and cook it right?
WRONG! Sadly that won't work.
The .uasset files inside the game have been cooked in IOSTORE format, which means they've been hashed (scrambled) in a way that can't be un-scrambled. They're no use to us. We can put them in the right place but we''ll just get an error when we try to cook our mod. (I know, because I tried it. The error is: .uasset contains unrecognizable data, check that it is of the expected type.)
Instead of exporting the assets from the game, we have to construct dummy assets to replace them. These are assets that have the same structure as the real asset (and hence the same “pins") but they don't actually do anything. If we're careful not to assign the dummy assets a pakchunk then our mod will get cooked with all the right connections… but the dummy assets won't be included in the mod. Once the mod is injected into the game it'll connect up with the real game assets instead of our dummy ones.
Clever eh? Yes! But also a major PITA!
¶ How to make Dummy Assets
How we make dummy assets is beyond the scope of this tutorial. We'll cover that in a Tutorial #102.
For now we'll just use some dummy assets that Darkstar made for us.
You can download them here. Copy the
UIfolder from inside that archive to theContentfolder of your project.
¶ Complete the DisplayMessage Function
Below is a cut-down and slightly amended version of Darkstar's function. See the notes below, then have a go at recreating it. In the case of the three blue nodes with Target on them, use what I've written in the node's comment to find those nodes. Alternatively, you can see if the Editor will supply some of them for you. For example, if you try to connect the Phoenix HUD node to the Cast to UI_BP_PhoenixHUDWidget node, the Editor will magically insert the HudWidget Ref node in the middle for you. It's always worth trying to connect nodes up even when you know they're not compatible, just to see if the Editor will insert some sort of converter node for you. This is particularly useful when you have a String or Text or Name node and the you need to connect it to one of the others – the Editor will convert it for you. Same for Integer and Float numbers. And various other things.
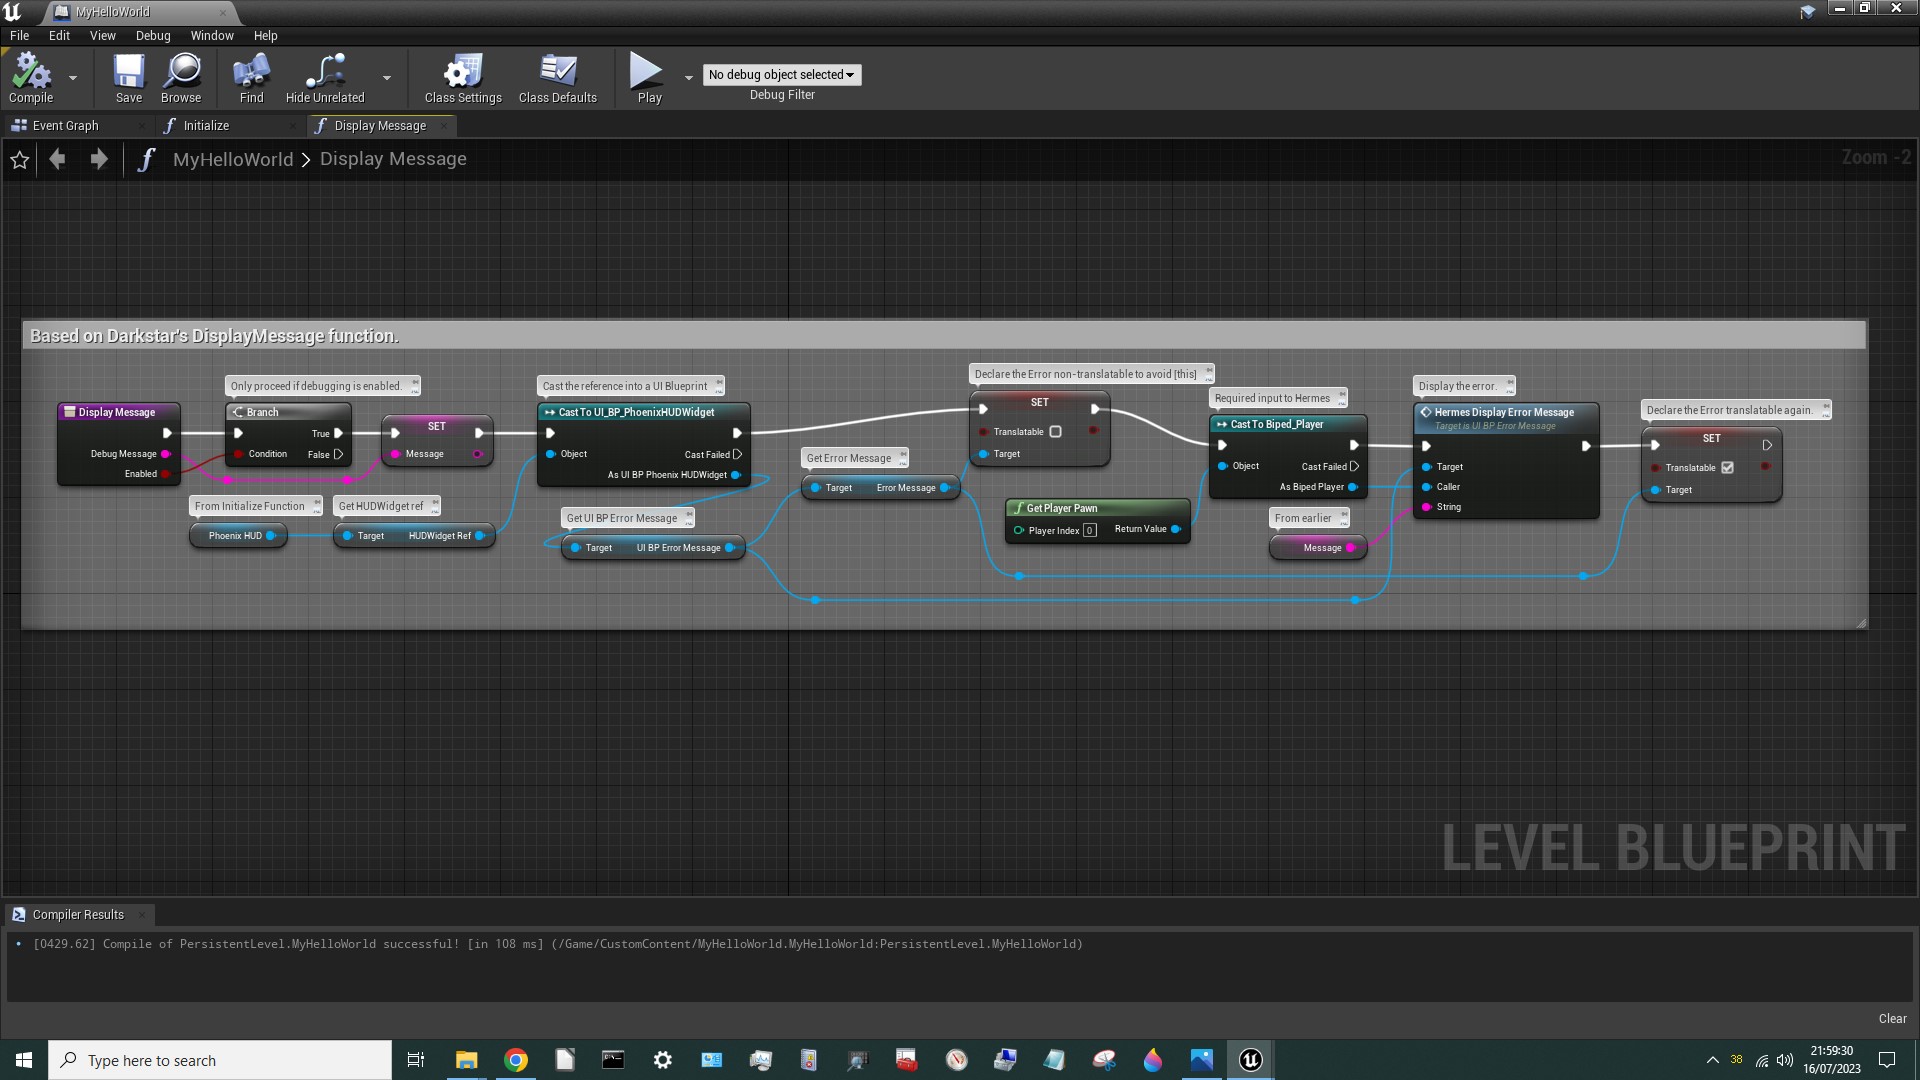
I know what you're thinking: it looks complicated! And it kind-of is. There's a lot going on in this function. But that's because we're using one of the game's built-in functions, so we need to jump through a few hoops to get it to work.
Here's a summary of what this Function is doing:
- Check whether the
Enabledinput parameter isTRUE. If not then debugging is disabled and no messages should be displayed. - If it's
TRUEthen store theDebugMessage(an input to thisFunction) in local variableMessage. [**Note: This isn't actually necessary, because theFunction's inputs are available as variables themselves. But I didn't discover that until later.] - Get the
HudWidgetReffrom thePhoenixHUD, cast it as aUI_BP_PhoenixHUDWidgetand then extract theUI BP Error MessageandError Messagerefs from that. Why? And what does all of that mean? Well, it will perhaps make more sense if we work backwards. We want to use theFunctionHermes Display Error Messagebut that requires aUI_BP_ErrorMessageas input, which we can only get from aUI_BP_PhoenixHUDWidget. But as search in UE Editor reveals that there is noFunctionto give us one of those. But our dummy asset contains a reference for one. So if we can find aFunctionthat gives us theParentof theHUDWidgetthen we can get theHUDWidget Referencefrom there. Fortunately there is a function to get the parent - it'sGet Actor of Class PhoenixHUD, which we already executed in theInitializeFunction. So we just need to pick up thePhoenixHUDVariable, extract theHUDWidget Reference, tell the mod that it's aUI_BP_PhoenixHUDWidgetand extract theUI_BP_ErrorMessage. Simple! Okay, not simple. But this is the sort of thing we have to do when the game doesn't provide us with aFunctionto get something. TheHermes Display Error Messagenode actually requires three inputs: aTarget, aCaller, and aString. TheStringis just the message we want to display, inStringformat. But to find out whatTargetandCallerare, hover your cursor over those pins. You'll see thatTargetis aUI BP Error Message Object ReferencewhileCallerjust saysObject Reference. It probably took Darkstar quite a while to figure out how to provide the function with the inputs it needs! Fortunately they were kind enough to tell the rest of us how they did it so we owe them a big thank you! It turns out thatCallerneeds to be theBiped_Player(that's one of the hierarchy of “classes” that describe the player). We don't really need to know why. We just need to know that it works. - The next thing to note is that Darkstar sets a
Text Blockvariable calledTranslatabletoFALSEat one point, thenTRUEagain later. This is a work-around for a peculiar feature of Unreal Engine - if you provide text to some UE functions without providing “localisation” support (i.e. translation into other languages) then UE will put square brackets around it like [this]. You may have seen this with some Hogwarts Legacy mods. Darkstar found a way around this by setting the value of theTranslatablevariable of theText BlocktoFALSEjust before displaying the message and resetting it afterwards. - You can see some little dots on some of the connectors, which I've used to make the graph look neater. These are called
Reroute Nodes. The easiest way to create aReroute Nodeis to double-click any line. - And that's basically it. Not so complicated really, but I bet it took ages for Darkstar to figure it out!
- If you feel a bit lost, don't worry about it. I've deliberately skipped over a lot of stuff here. We don't need to know how this function works in detail. You just need to know roughly what's going on. A deeper understanding will be achieved once we've covered more ground in future tutorials. For now it's enough to know that this function works and we can use it to display a brief message on-screen. The downside is that there's no obvious way to control how long it stays on screen. But we'll worry about that another time.
¶ Capture a Keypress
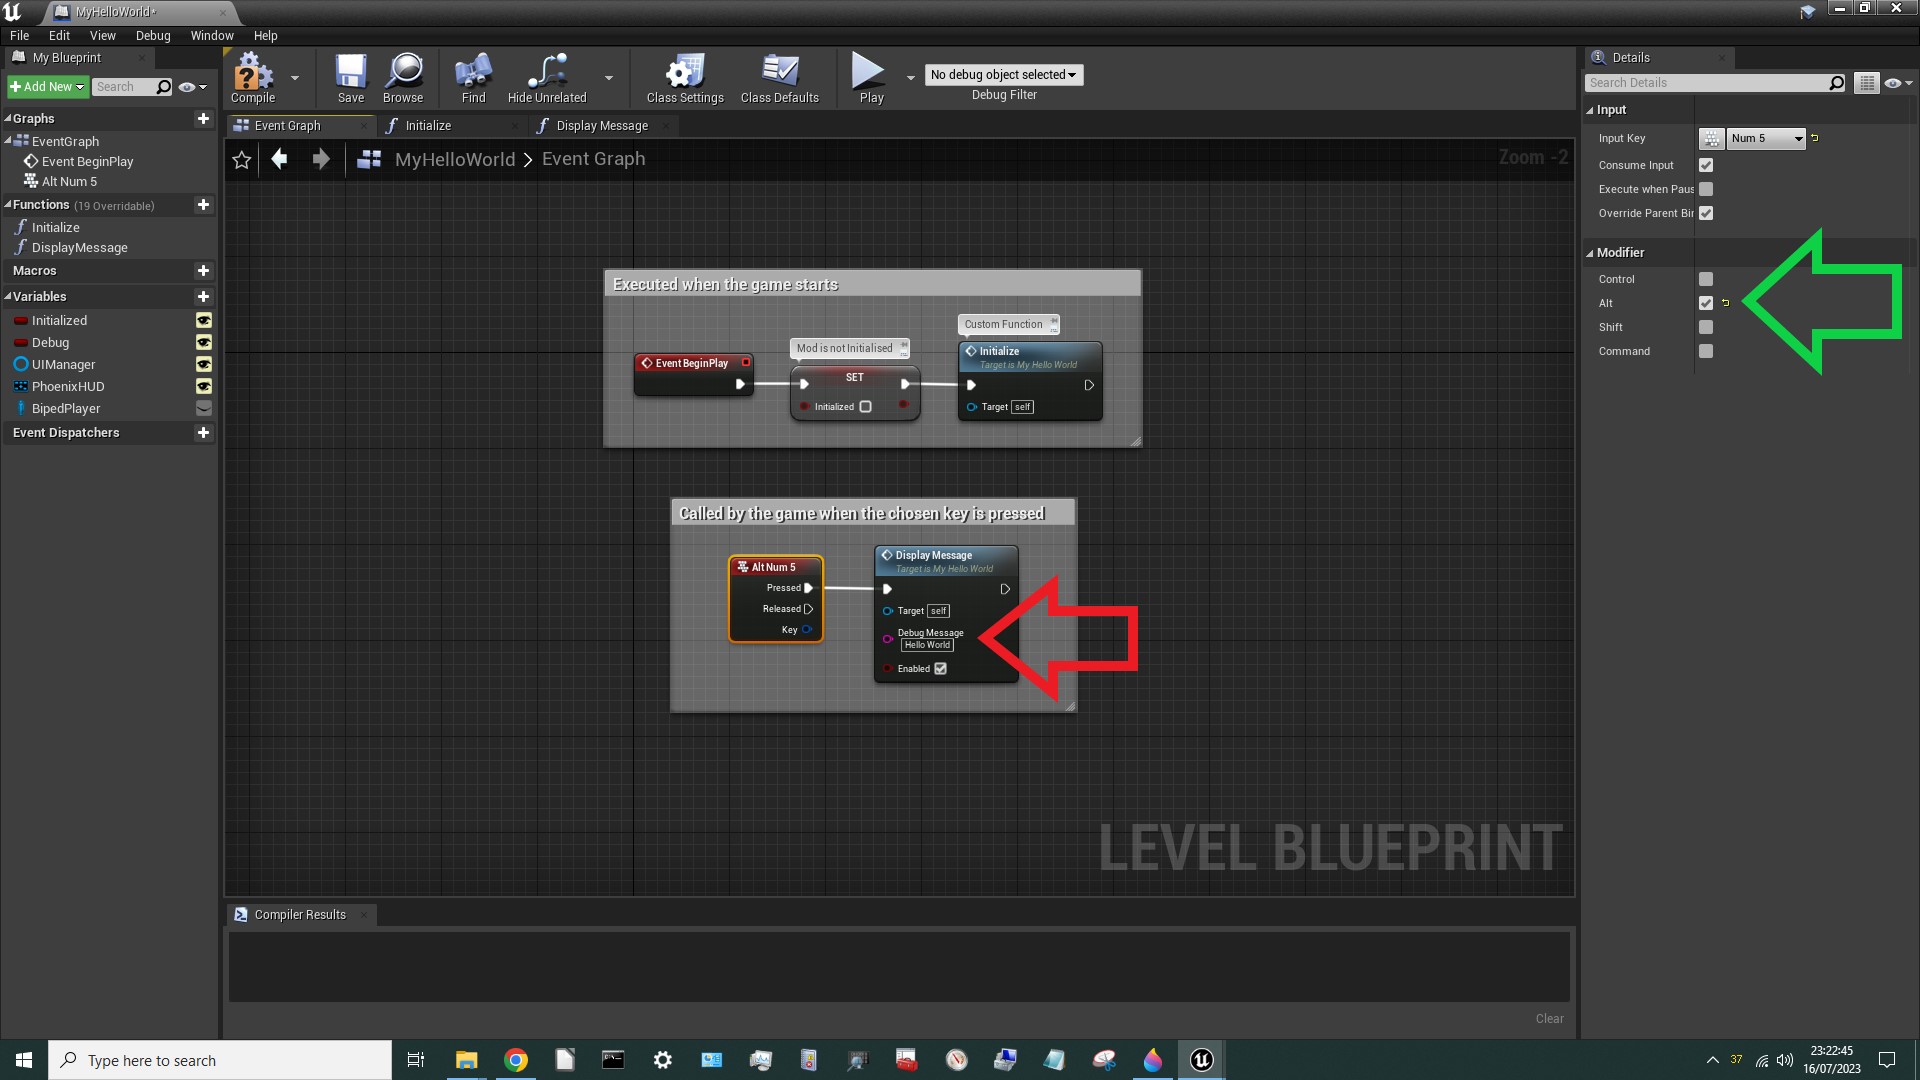
Okay, we only have one thing left to do - figure out how to display the phrase “Hello World” when a key is pressed. Fortunately that's actually really easy now that we have all the pieces in place. We just need to set up a "keyboard event" on our Event Graph. I'm going use ALT-NUMPAD5 as my input key, but you can choose whatever you like. Proceed as follows: right click on the background of the Event Graph and search for Keyboard Events. Select the key you want to use.

A new node will appear with the name of your selected key in the title. On the right you will see some options. If you want to use CTRL or ALT or whatever, tick the corresponding box. The name of your node will change accordingly. Next drag off the white execution pin of this node, search for DisplayMessage and select our function. On the new node tick the Enabled input and type Hello World into the DebugMessage input, as below, then annotate as you like:
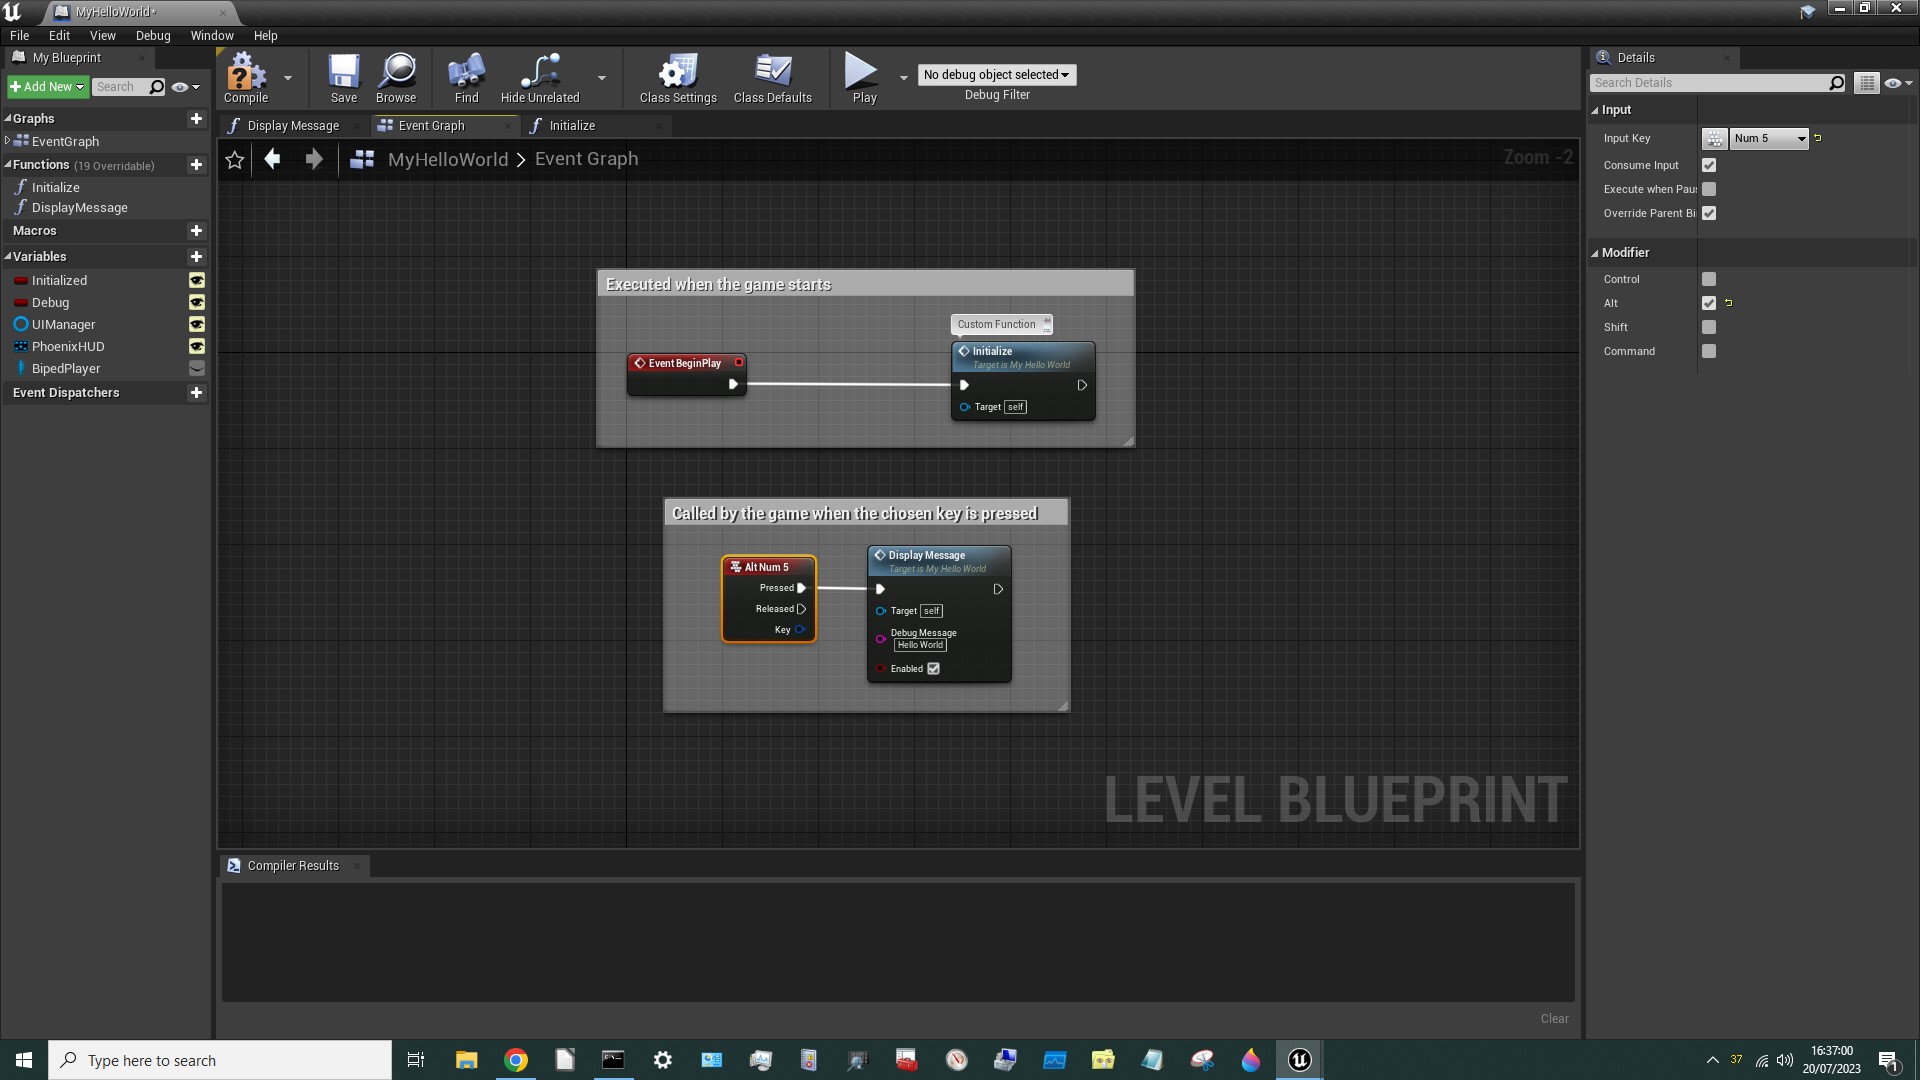
¶ Correct the mistake in Event BeginPlay
You may have already realised that there's a mistake in the Event BeginPlay logic - the Initialized flag should only be set inside the Initialize Function, otherwise duplicate instances of the mod (if any are ever created) won't be destroyed. We therefore need to delete that Set node. To do that select it and hit SHIFT-Delete. The SHIFT will result in the white connections being preserved after the node is gone, like this:
¶ Cook it!
That's it! We're done. Now we just have to cook it and see if it works! Proceed as follows:
- Hit
CompileandSave. - Hit
Xto close your Level Blueprint. - Right-click the
MyHelloWorldicon, selectAsset Actions>Assign to Chunkand enter101as the chunk number. - Hit
Save Current. - Select
File>Package Project>Windows (64-bit). - Choose an output folder. It doesn't matter where.
- Wait for the cook to complete. The first time can take 15-30mins. After that it'll be 30-60 seconds.
- Click
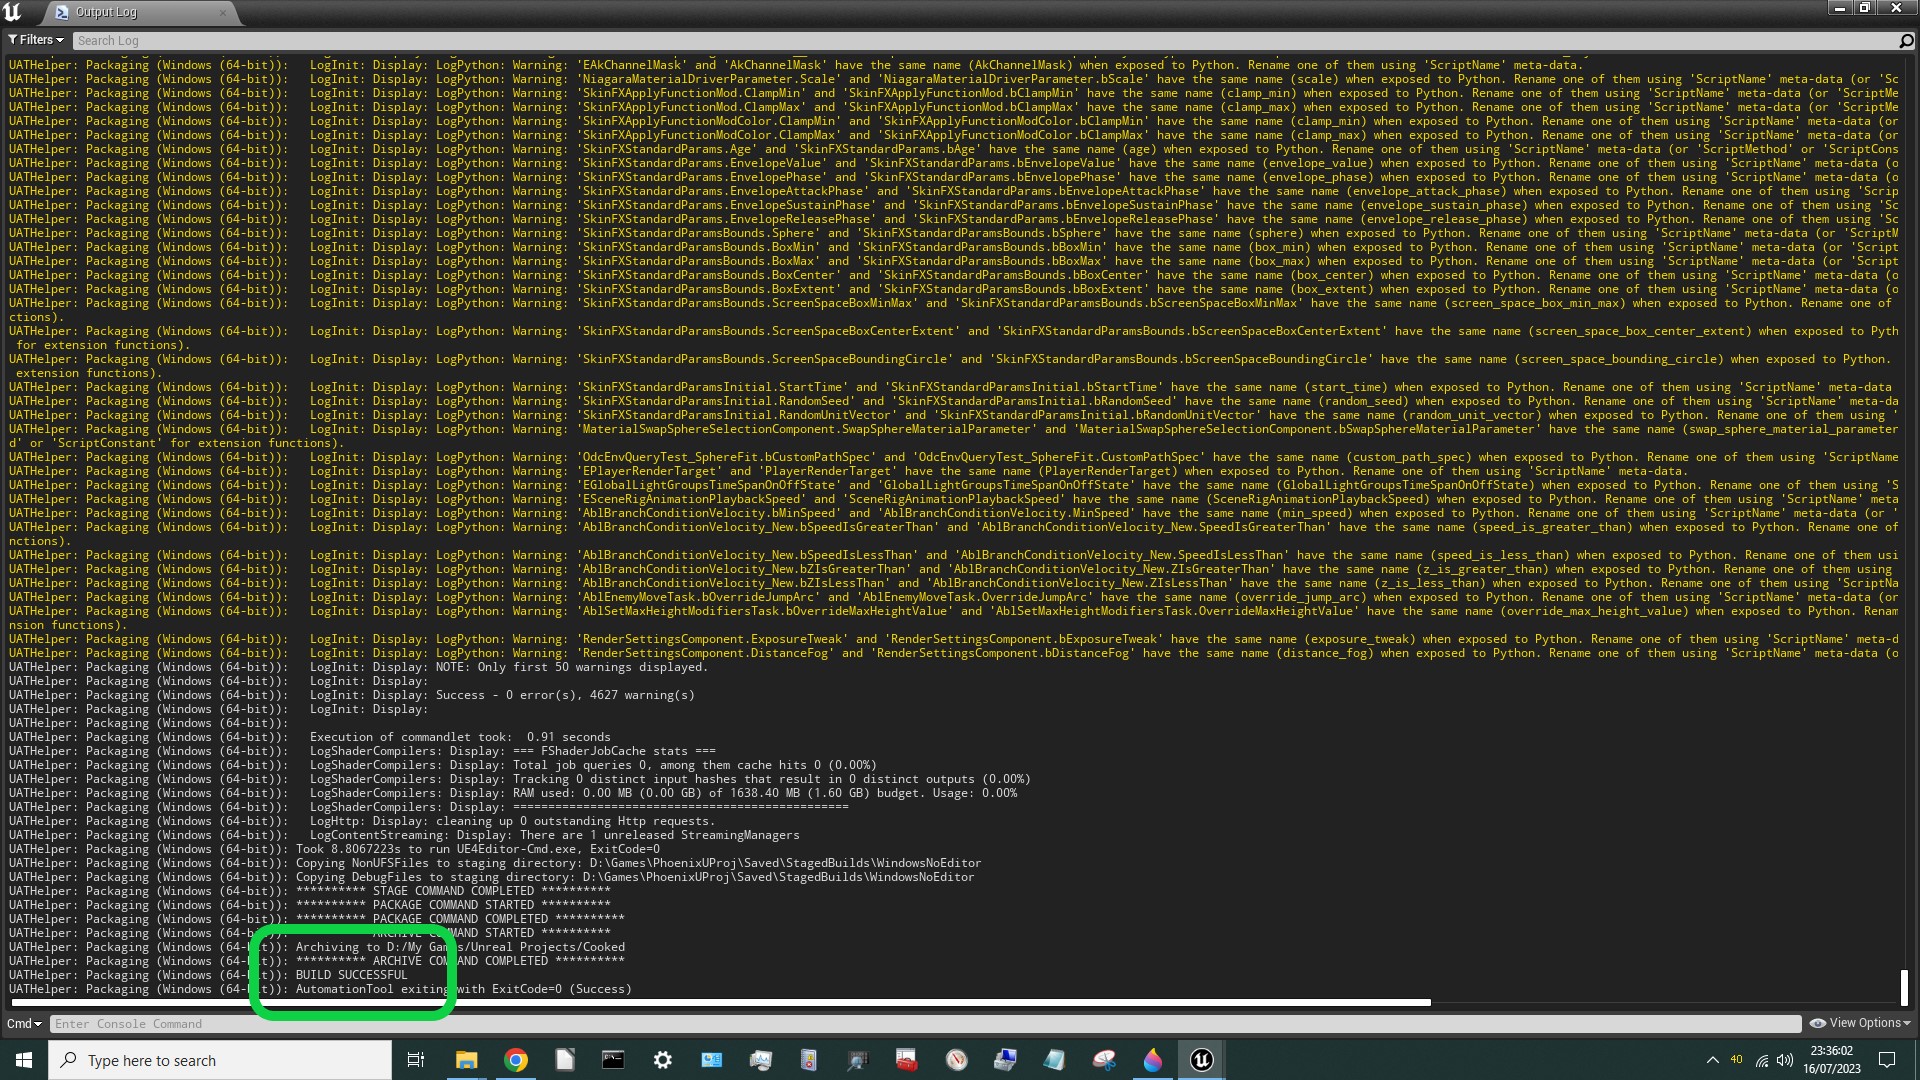
Show Output Logif you like. It will be full of warnings… - But hopefully it will end with
BUILD SUCCESFUL:
¶ Move the mod files to the right game folder
In Windows Explorer go to the output folder then navigate down the folder structure to WindowsNoEditor\Phoenix\Content\Paks. You should see a load of pakchunk files. Ignore all of them except the following:

Select all three and rename them to whatever you want (but it's best if the name starts with a z ends with _P and preserves the pakchunk number:

- Copy these three files to your
Steam\steamapps\common\Hogwarts Legacy\Phoenix\Content\Paks\~modsfolder. - Start Hogwarts Legacy
- Load a saved game.
¶ Load the mod into the game using the Mod Loader
We need to use Blueprint Apparate Mod Loader to load the mod. Hit F8 to reveal the modloader window.
Proceed as follows:
- Type
MyHelloWorld(the name of our Level Blueprint) then hitEnter. - The text
MyHelloWorldshould reappear in the lower part of the window with anxagainst it. If it doesn't something has gone wrong. Either you put the mod files in the wrong folder (they need to go in~mods), or you changed the name of the.umapfile, or you didn't save the.umapfile in theCustomContentfolder, or one of your other mods is using pakchunk 101. - To check for pakchunk conflicts, use the PakChunk Checker script (which I created for that purpose). If you find any conflicts with the mod you just built, assign it to another pakchunk and re-cook it. If you find any conflicts between your other mods (the ones you didn't build) you can resolve them using the Chunk ID Conflict Manager.
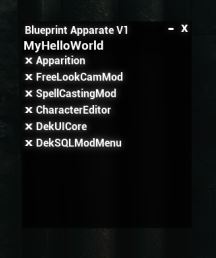
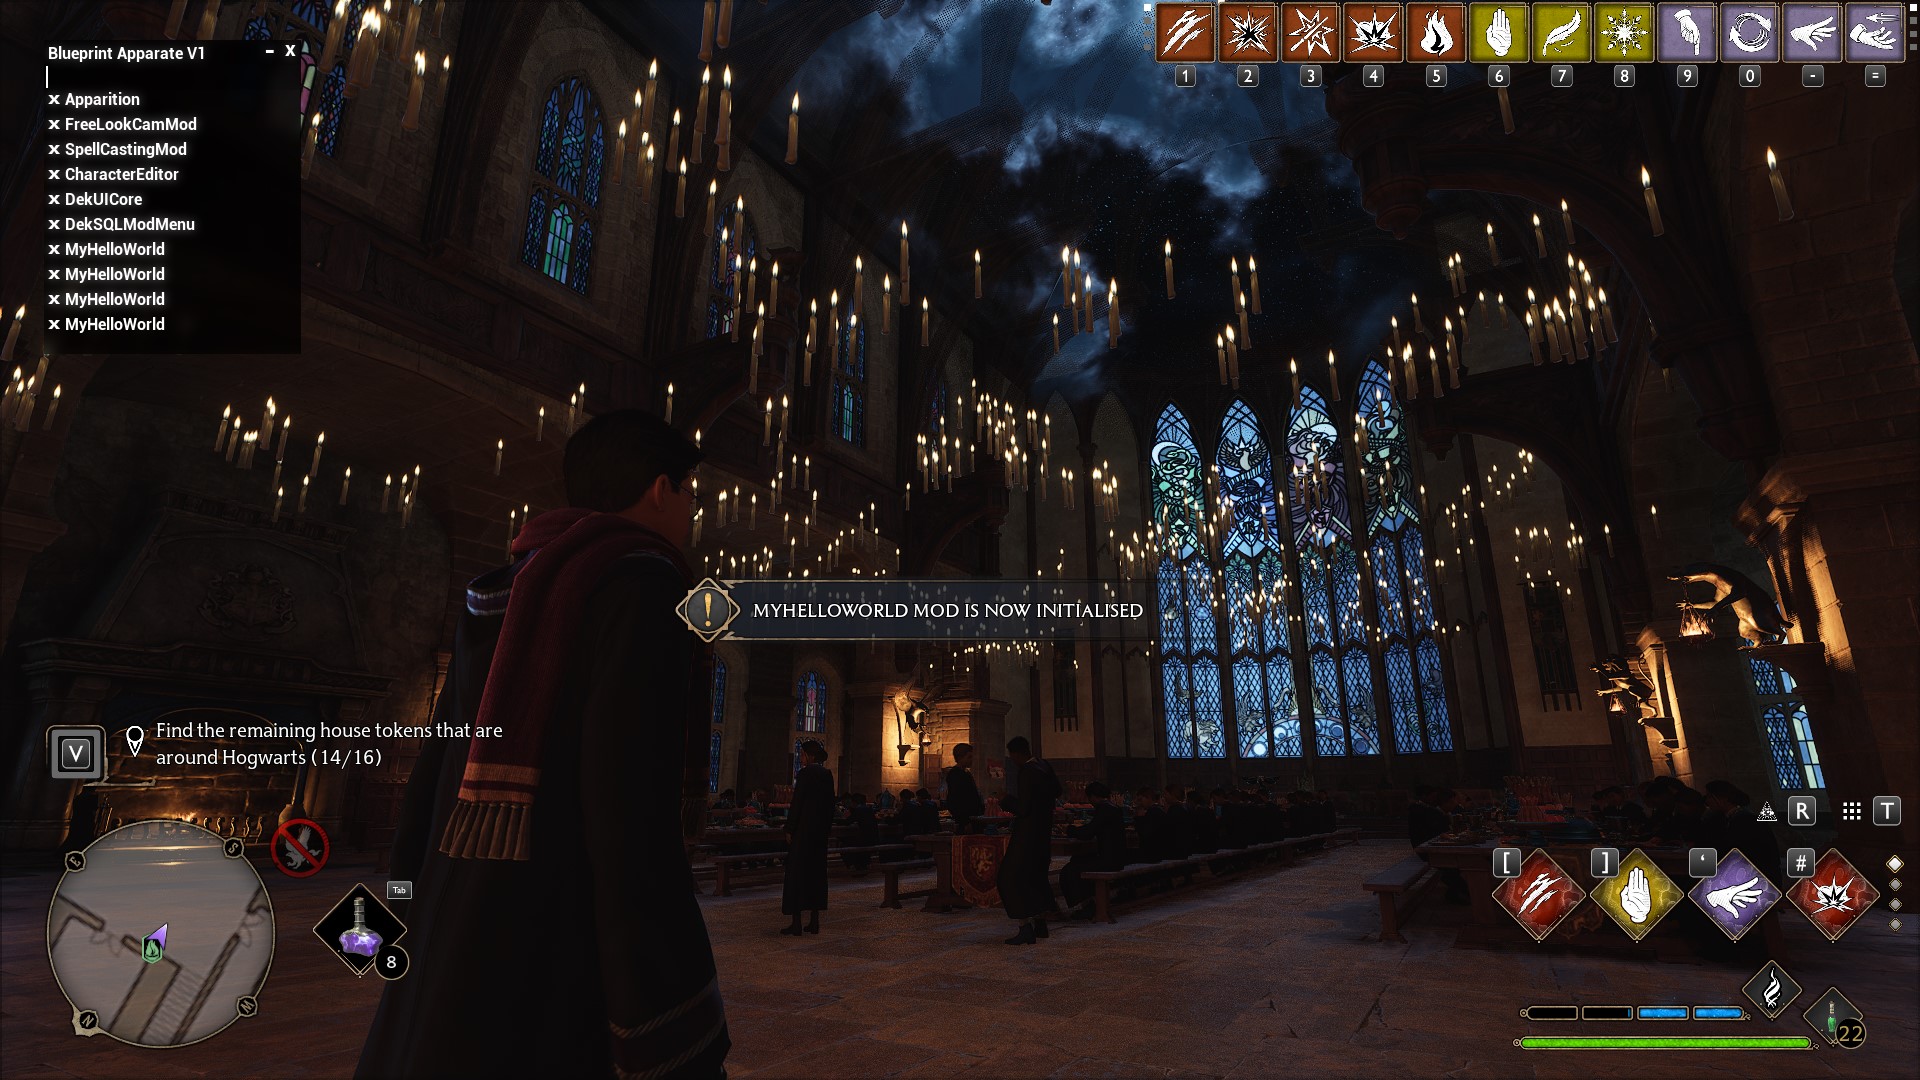
- If the mod loaded okay you should see something like the image below (but hopefully with only one
MyHelloWorldin theBlueprint Apparatewindow, because you didn't take four attempts to get it right like I did!). Note the message in the middle of the screen! That's theDebugMessagefrom ourInitializefunction! - Hit
F8to get rid of theBlueprint Apparatewindow.
¶ Test it!
Hit your chosen key (in my case ALT-NUMPAD5) and you should see something like the image below. [**Note: For ALT-NUMPAD5 to work, you must have NUMLOCK ON.]
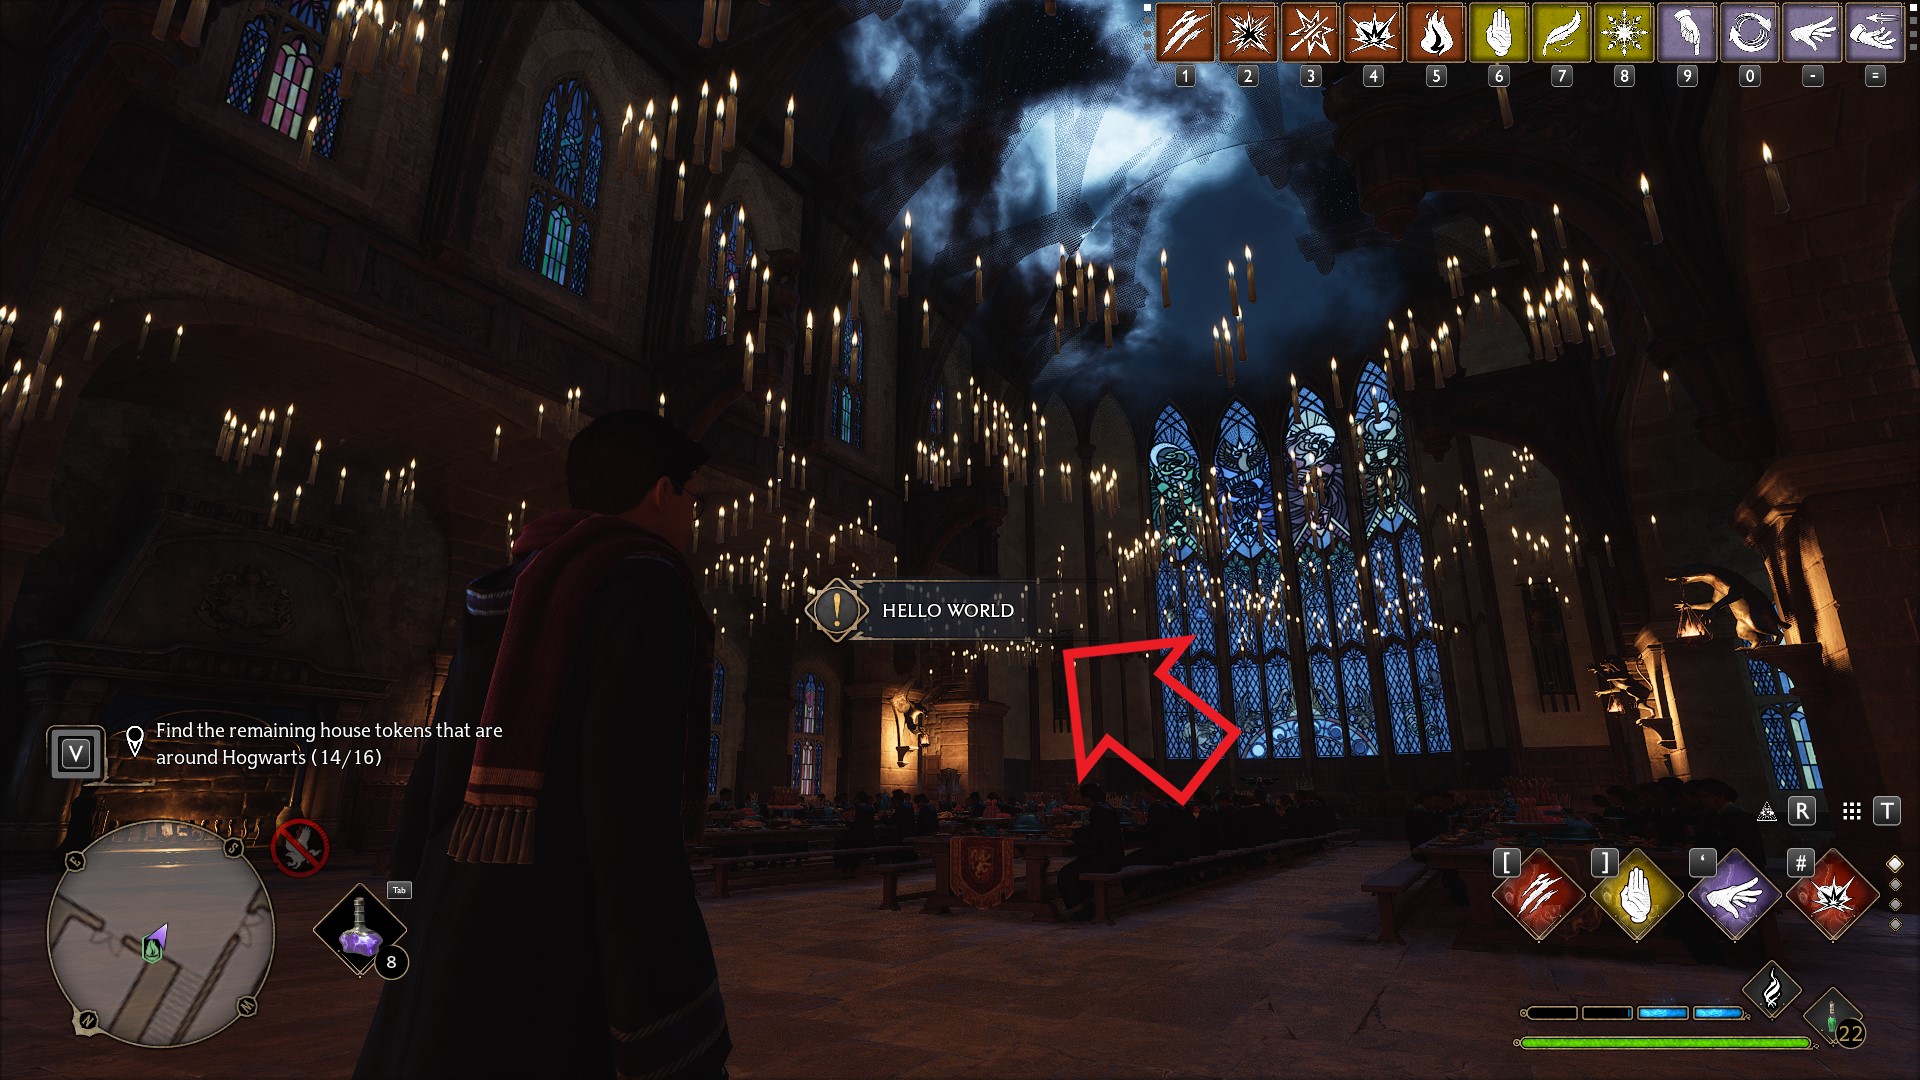
- It worked! Woohoo! 🥳
¶ Final Words
That's the end of this tutorial. I will post further tutorials as they occur to me. In future I'll concentrate more on content and less on the mechanics of drawing the blueprint graphs…
The next Tutorial is already up: Blueprint Example 102 - Dummying Game Assets.
¶ Download the umap
If you had any problems creating the blueprints in this tutorial just download the umap file from here, rename it to
MyHelloWorld.umap(noting the uppercase characters) and use Windows Explorer to drag & drop it into theCustomContentfolder of your PhoenixUProj.
[**Note: Bizarrely there is no way to import .umap files into Unreal Engine. You have to use Windows Explorer! ]
¶ Acknowledgements
Special thanks must go to Narknon, Tangerie, Dekita and Darkstar who all contributed example blueprints for the Hogwarts Legacy modding community to learn from. Darkstar went above-and-beyond by writing a detailed walk-through of their Lore Friendly Apparition mod for me, which helped tremendously. Special thanks must also go to Narknon without whom a significant fraction of what we can do with Hogwarts Legacy mods would not even be possible.