¶ Synopsis
In this tutorial I will attempt to explain how we can use "dummy assets" to provide access to (otherwise unavailable) game resources (Functions, Blueprints, etc).
¶ Prerequisites
If you haven't read the first article in this series (Blueprint Example 101 - Hello World) please do so now.
In particular, I'm going to assume that you:
- Have PhoenixUProj installed & working.
- Are familiar with how to create nodes & draw blueprint maps.
- Know how to cook a Level Blueprint.
¶ Introduction
Let's imagine that you want to display a message on the screen but you've never done that before. You could do it by creating a Widget (that's basically a canvas for putting stuff on-screen) together with supporting Blueprint logic… but unless you're a graphical artist the results won't look very professional. The style will also be different to the rest of the game. It would be much better to use a game Blueprint to do it. That way it'll look good and match the existing style.
Great! But how do we do that? Let's figure it out…
If you want to follow along, creating the Blueprints as you go (and I recommend that you do) then you'll need to delete the dummy files that were installed as part of Tutorial #101. In other words, delete:
/Content/UI/HUD/Notifications/UI_BP_ErrorMessage.uasset/Content/UI/HUD/UI_BP_PhoenixHUDWidget.uasset
¶ The CXXHeaders
First we need to know what game Blueprints are available. The good news is that since Unreal Engine is Open Source the functionality provided by the Engine itself is freely available. The bad news is that the same cannot be said of games built using the Engine, like Hogwarts Legacy ("HL"). Once a game has been “cooked” (especially if it's cooked into IOSTORE format, like HL is) everything inside will be hashed and converted into unreadable “byte code”.
Don't worry if you don't know what that means. The key point is that that game's internals have been scrambled in a way that we can neither reverse nor use. Not a great start!
Fortunately modders are an inventive bunch and have found ways to extract some of the information we need. We can then use a little deduction, educated guesswork, and trial-end-error to figure out the rest.
The first tool in our belt will be the CXXHeaders. As you may know, Unreal Engine games can be coded using Blueprints or C++. High-level functionality (like weapons, explosions, etc) are easiest to create in Blueprints, while lower-level stuff (handling inputs, memory allocation, etc) is easiest to create in C++. (Don't worry! We don't need to know any C++ to create Blueprint mods!) The good news is that if the game devs want to access any C++ stuff from their Blueprints, they have to provide enough information to the Blueprints that the Blueprints know how to use the C++ stuff. In technical parlance, the C++ stuff has to be “Reflected” in “Header Files”. These Header Files have to be embedded in the game, so modders have developed tools to extract them. Fortunately we don't need to know how to do that because Narknon (arguably the Godfather of HL modding) has already done it and posted the extracted CXXHeaders on the Hogwarts Legacy Modding Discord.
Head over to the Discord now and download the CXXHeaders from here.
So what's in this archive? About 1784 .hpp files.
What are they? We'll come to that in a minute…
¶ Finding a Blueprint
So we want to find a Blueprint to display a message on-screen. How do we do that? Well, different modders use different tools, but basically we need to search those 1784 .hpp files for stuff relevant to the task.
I'll tell you how I do that, but if you can think of a better way, go for it!
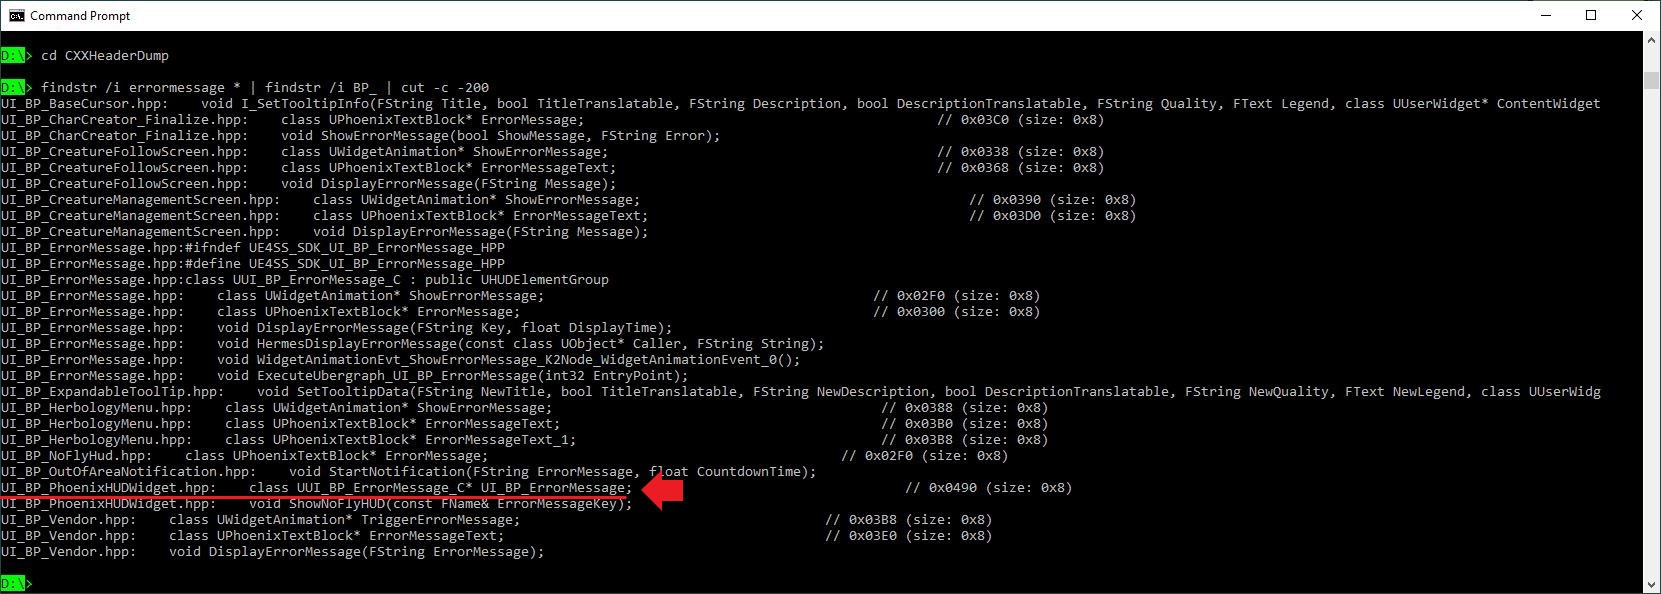
I use a cmd window and the findstr command. In this case I'd start by searching for a Blueprint (whose name will therefore start with BP_) that mentions ErrorMessage because a Blueprint that displays an ErrorMessage on screen would be perfect for our current needs. Hence:
findstr /i ErrorMessage * | findstr /i BP_ | cut -c -200
This commands has three parts:
findstr /i ErrorMessage *: a case-insensitive search forErrorMessagein all 1784 files.findstr /i BP_: among the matches, only print the ones withBP_in them.cut -c -200: only print the first 200 characters of each line. You can ignore this (you may not have the cut command installed). It's just to keep the output neat.
And here is the output:
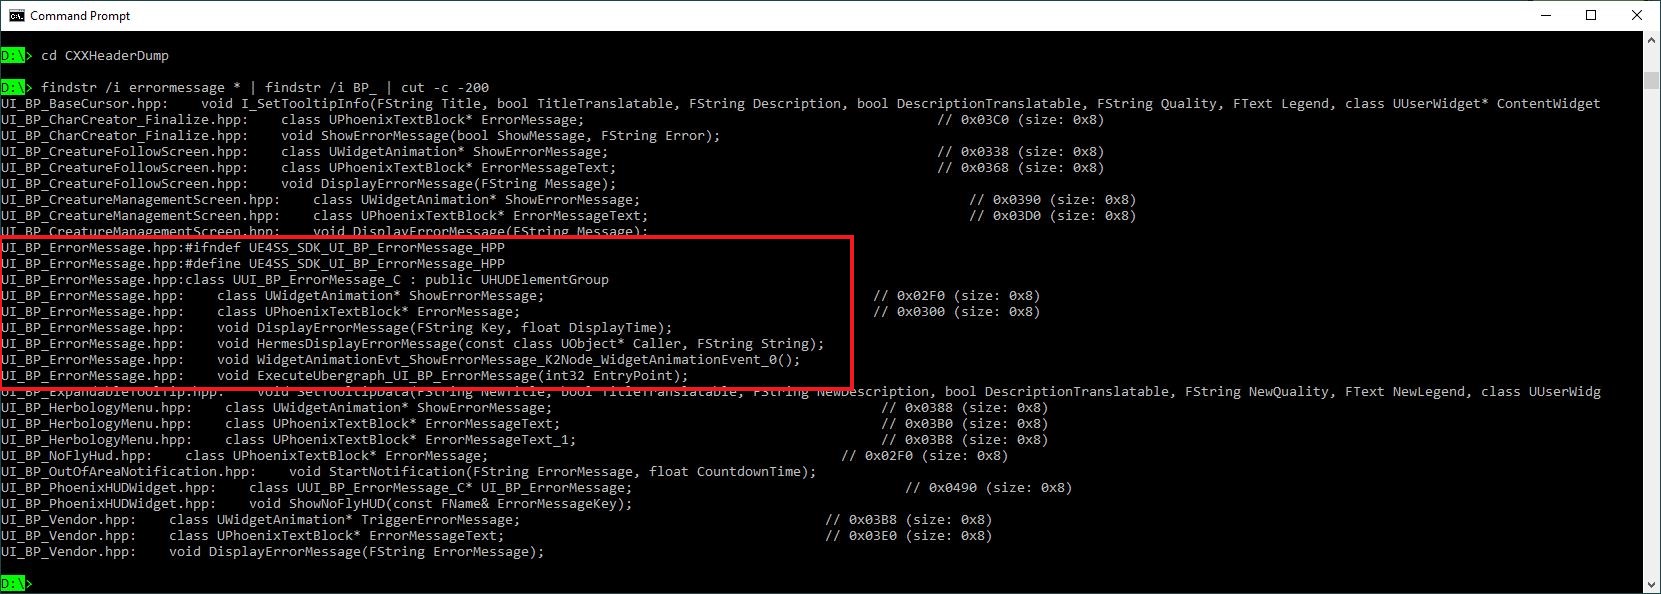
As you can see there are various different matches, most of which aren't relevant (the BaseCursor, Creature stuff, HerbologyMenu, Vendor, etc). But in the middle there is a whole section about a Blueprint called UI_BP_ErrorMessage in a file called UI_BP_ErrorMessage.hpp. That sounds very promising!
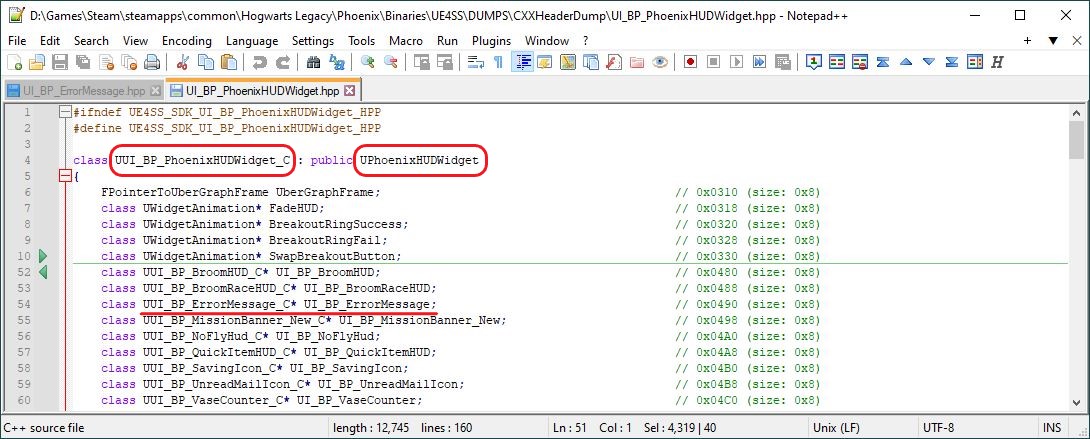
Let's take a look at that file. Some modders use Visual C++ applications for this, but I find that Notepad++ is fine. Here's the file in Notepad++:
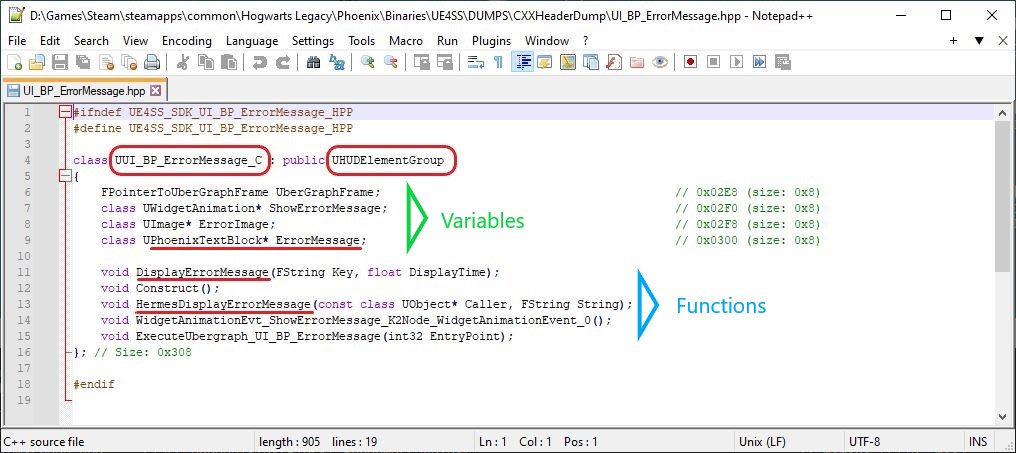
Not a very big file is it? But there's lots of useful stuff in here:
- The
Blueprint“class” isUI_BP_ErrorMessage. (Ignore the extraUadded onto the front and the_Cat the end.) - The parent class (the bit after the
:) isHUDElementGroup. (Again, ignore the extraUadded onto the front.) - A
VariablecalledErrorMessagethat's a reference (hence the*) to an object of classPhoenixTextBlock. (Ignore the extraU.) - An interesting-looking function called:
DisplayErrorMessage. - A second interesting function called:
HermesDisplayErrorMessage.
Don't worry too much about what all of that means. We just need to know how to use it, not what it is. But in simple terms:
- The “class” defines what something is and what it can do. (But none of that information is in the header files.)
- The “class” often inherits most of its properties from a “parent class”.
- The names of those two functions, what types of arguments they take, and what values they return, may be very useful.
To find out what those two functions do, we'll have to create a dummy of the UI_BP_ErrorMessage Blueprint, create some logic to use it, and test it in the game.
¶ Testing and Debugging
If you've watched any Youtube videos about Unreal Engine Blueprints, you'll have seen people testing their Blueprints inside the UE Editor. Unfortunately we can't do that when we're modding HL because the game's code is not available to us. We can only test and debug stuff by compiling it, cooking it, and loading it into the game. That can be a painful process, as you can imagine. Each time you make a mistake it can take several minutes to re-compile, re-cook, re-start the game and re-load the mod. But there's no other way I'm afraid. This is one of the things that makes modding HL (and all UE games) a bit of a challenge.
¶ FModel
In the following sections I describe how to use UModel to search for a folder name inside the game files. I used UModel for this because (at the time of writing) I didn't know that FModel has a search function. Now that I know it does, I would probably recommend FModel for this because it's much easier to use. For instructions on how to use FModel see the following sections of this guide:
Install FModel- which explains how to install it.Finding Data Assets- which explains how to search for something (in this caseData Asset's but you can adapt the procedure to search for other things).
¶ UModel
We need to create a dummy of the Blueprint, plus the Functions and Variables inside it that we intend to use. But first we need to know where to put the dummy Blueprint. It has to go in the exact same folder in our project as the real Blueprint file goes in the game. To discover what that folder is we need to run UModel (which used to be called “Unreal Engine Viewer” or UEViewer).
For our purposes any recent version of UModel will probably do, but if you ever want to browse through the game's animations you'll need a specific version, so you may as well install that one from the outset.
¶ Installing UModel
- Download
UModelfrom https://www.gildor.org/en/projects/umodel and unzip it somewhere convenient. - Download the Hogwarts Legacy special executable called
umodel_acl_2.1.exefrom here. - Put
umodel_acl_2.1.exeinto yourUmodeldirectory. - Delete
umodel.exe,umodel_64.exe,umodel_acl_2.0a.exeandumodel_acl_2.0b.exe. You won't need them.
¶ Using UModel
UModel can be a bit fiddly to use the first time, but it's okay once you get the hang of it. UModel also doesn't like mods for some reason, so if you're planning to do anything serious with it you should move your ~mods folder to your Desktop. But we're just looking for file paths so we probably don't need to bother on this occasion.
Open a cmd window, cd to your UModel folder and type the following (all on one line):
umodel_acl_2.1.exe -path="X:\WHEREVER\Steam\steamapps\common\Hogwarts Legacy\Phoenix\Content\Paks" -game=hog -gui
(where X:\WHEREVER is the drive and folder where you installed Steam).
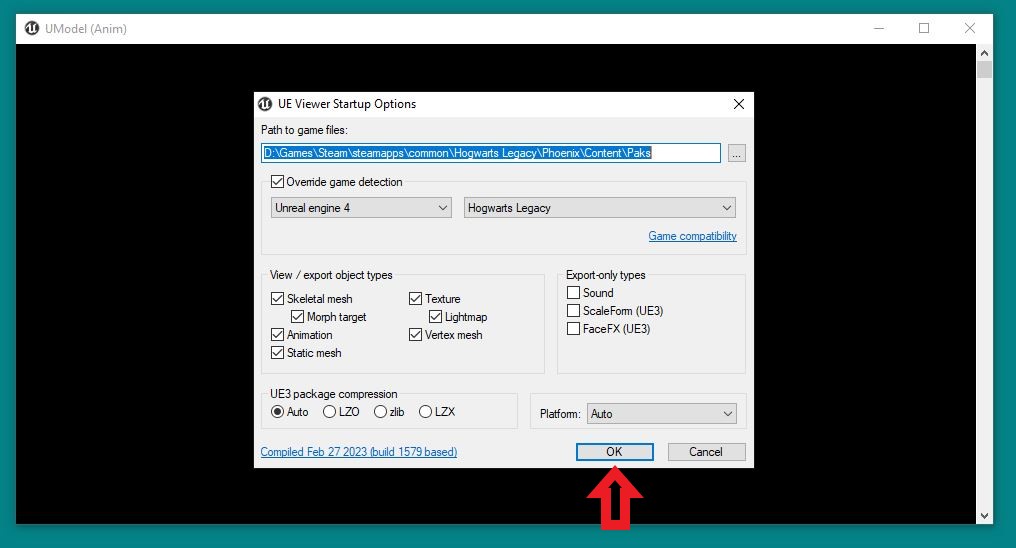
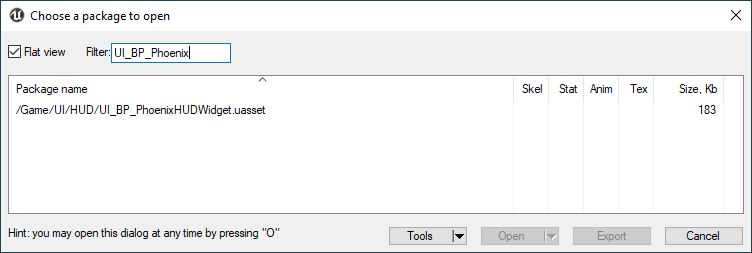
Hit "Okay" on the "Startup Options" window and UModel will load all your game files (plus a few mods on this occasion):
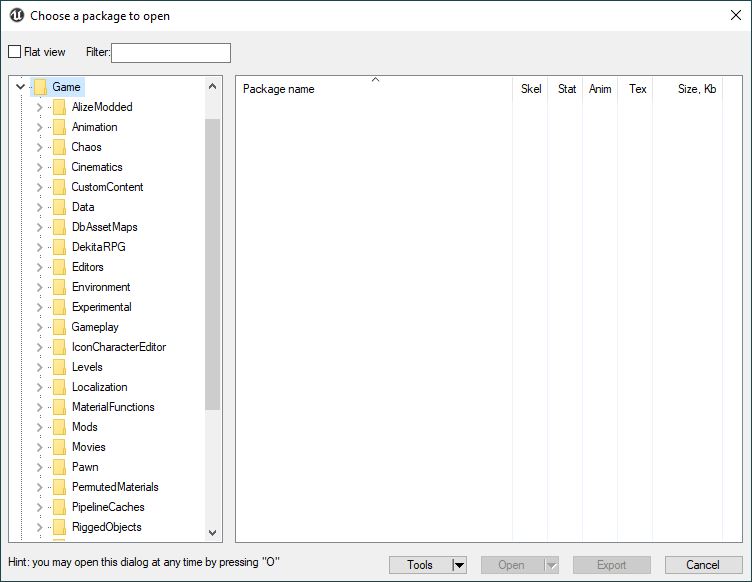
Tick “Flatview” and next to "Filter" type UI_BP_ErrorMessage:
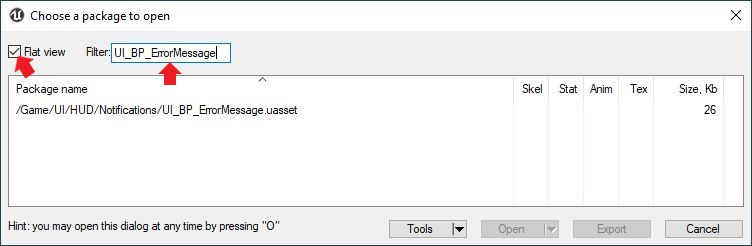
So that's our Blueprint's full path: /Content/UI/HUD/Notifications/UI_BP_ErrorMessage. (As I mentioned in Tutorial #103, which was actually published before this one, whenever you see /Game/ mentioned anywhere, replace it with /Content/.)
Back in the Unreal Editor Content Browser create the following folders:
/Content/UI//Content/UI/HUD//Content/UI/HUD/Notifications
¶ Creating the Dummy Blueprint
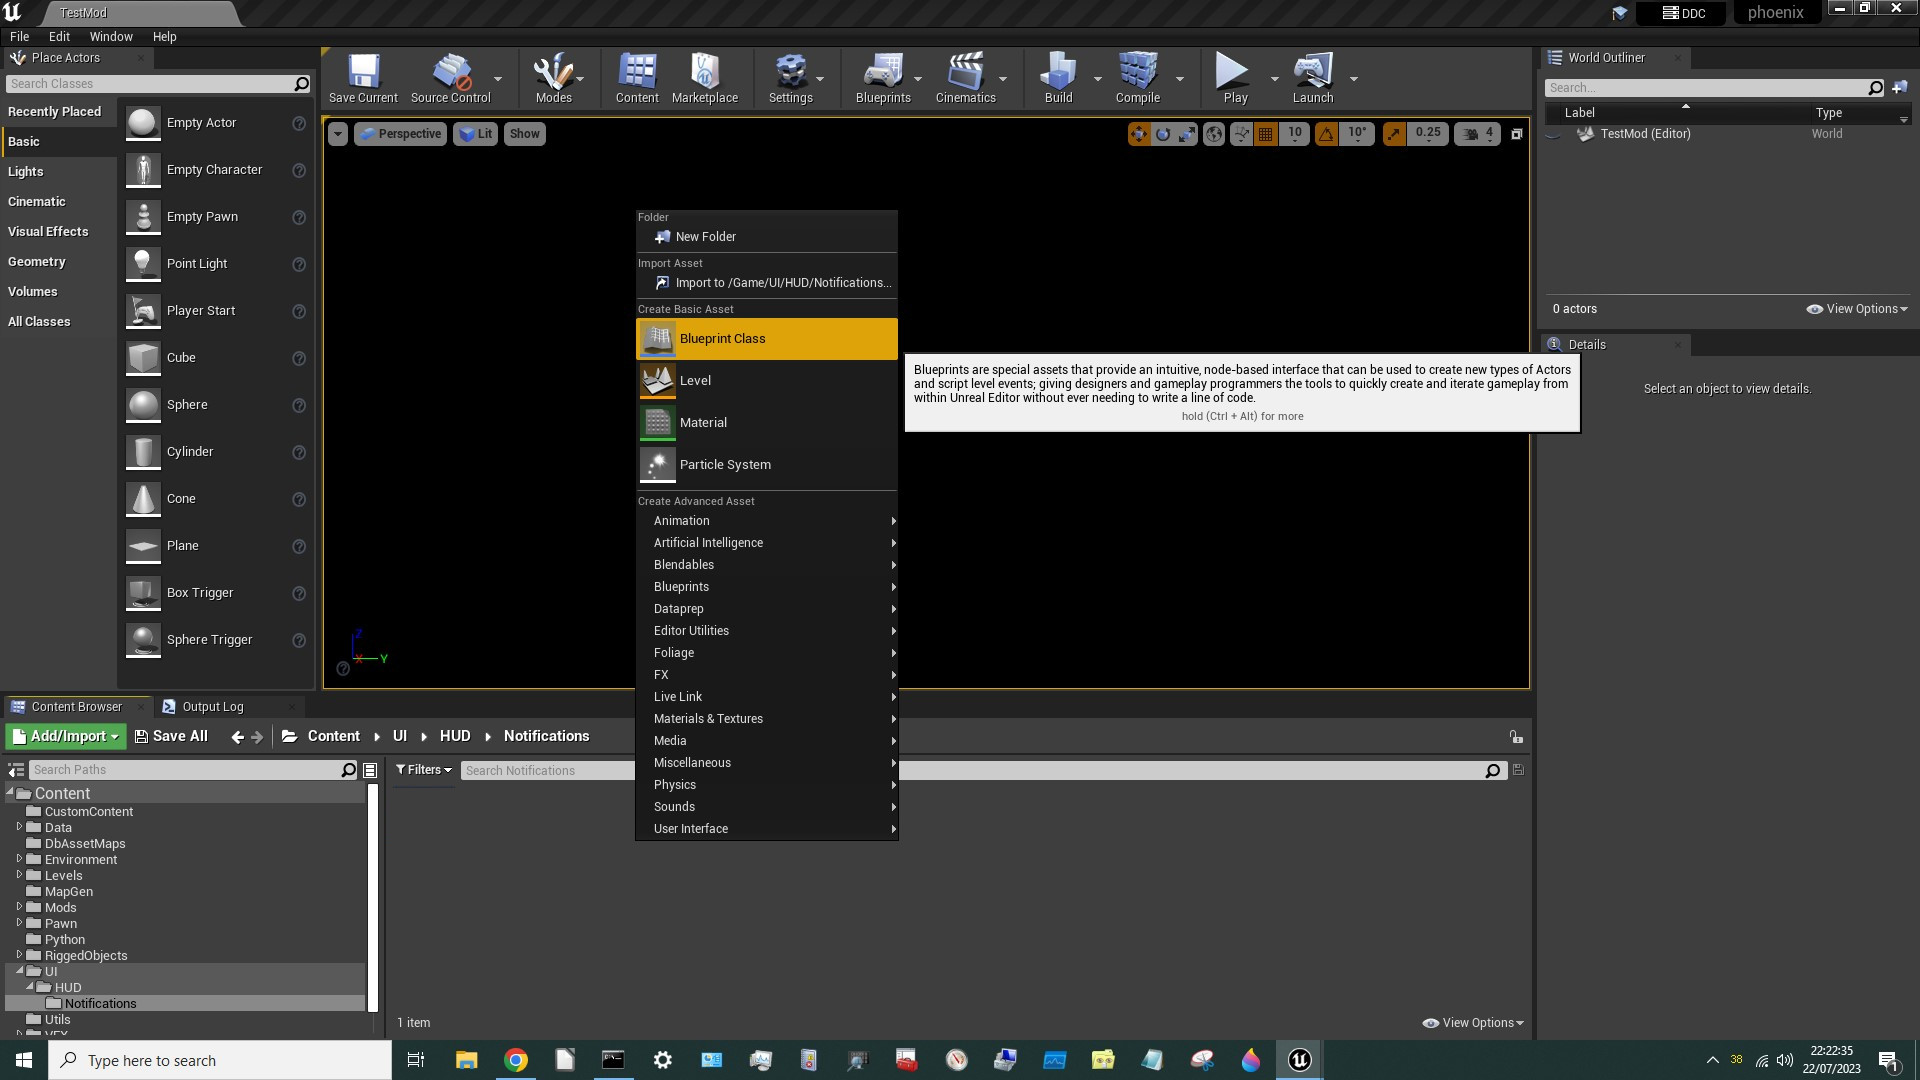
In the Content Browser, open the UI/HUD/Notifications folder. Right click it and select Blueprint Class:
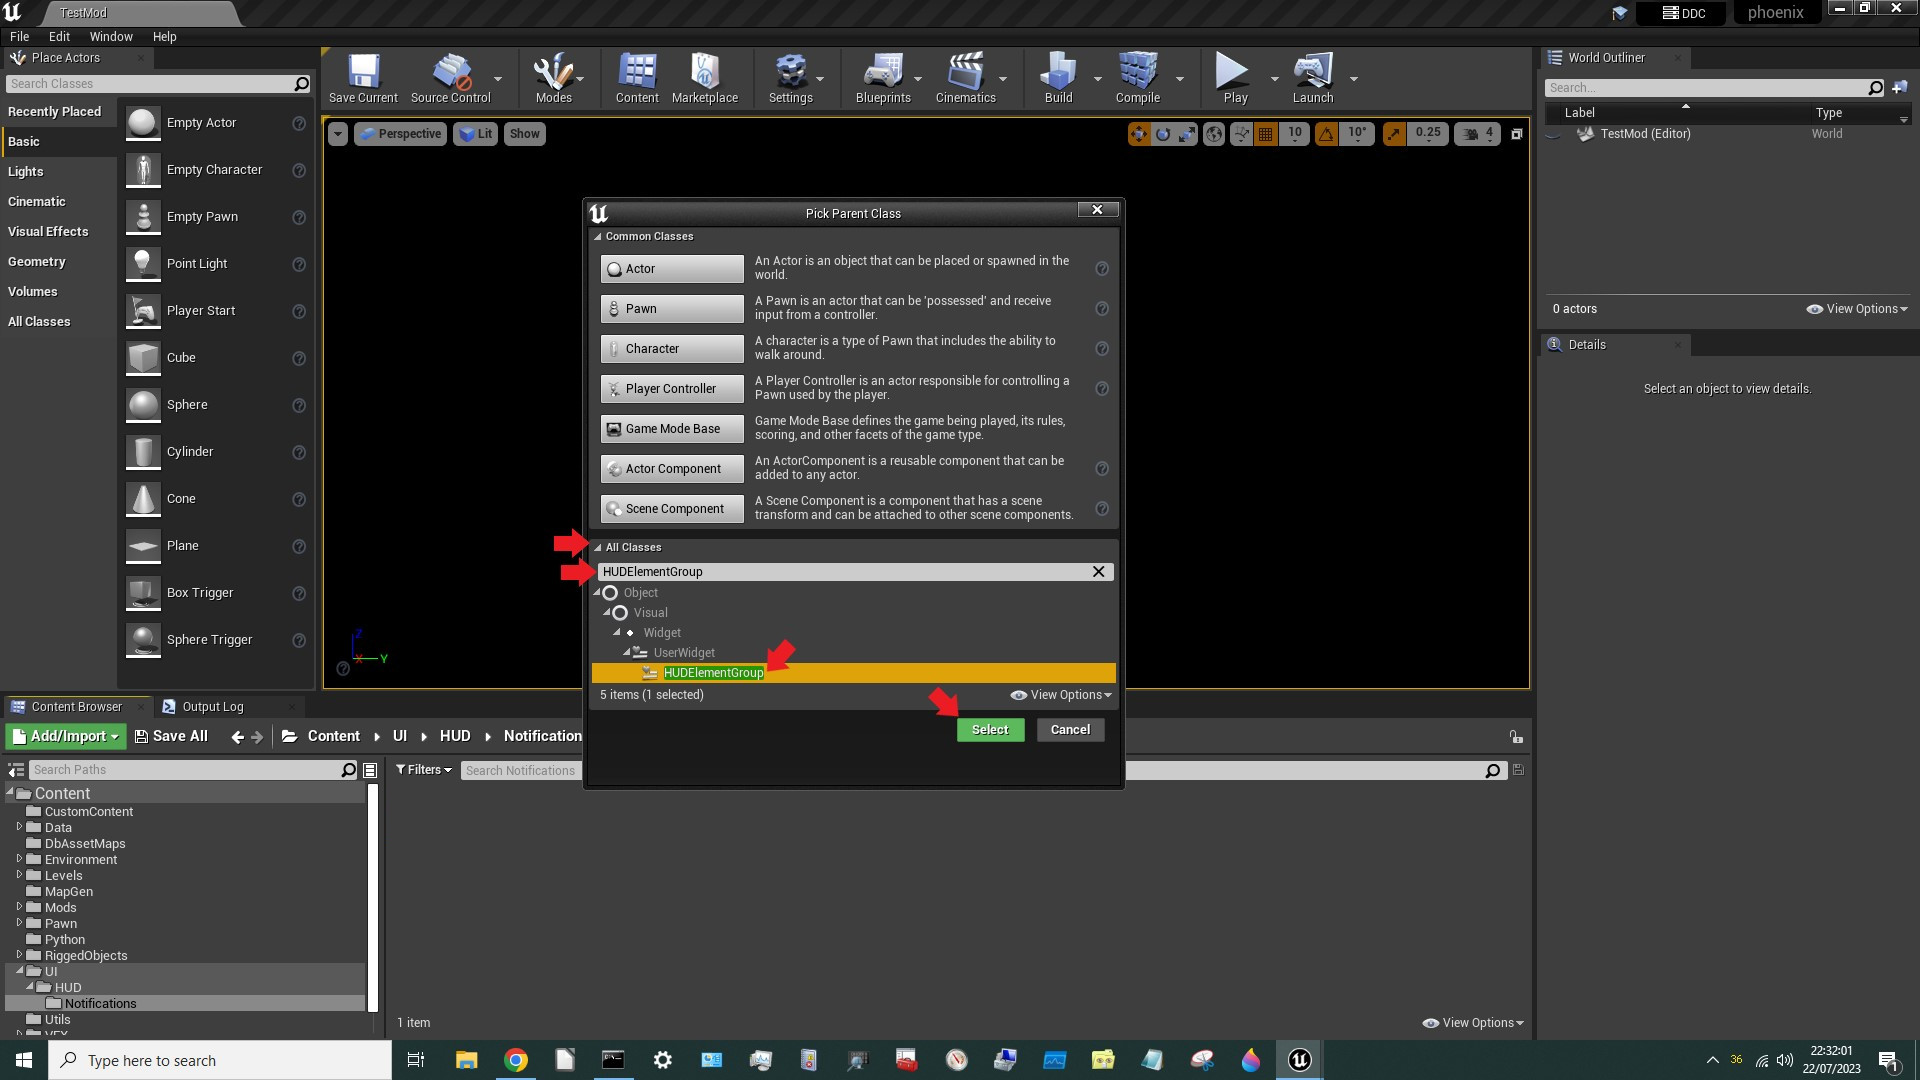
In the window that appears click “All Classes” and then search for the parent class of our Blueprint, which was HUDElementGroup, click it then hit Select.
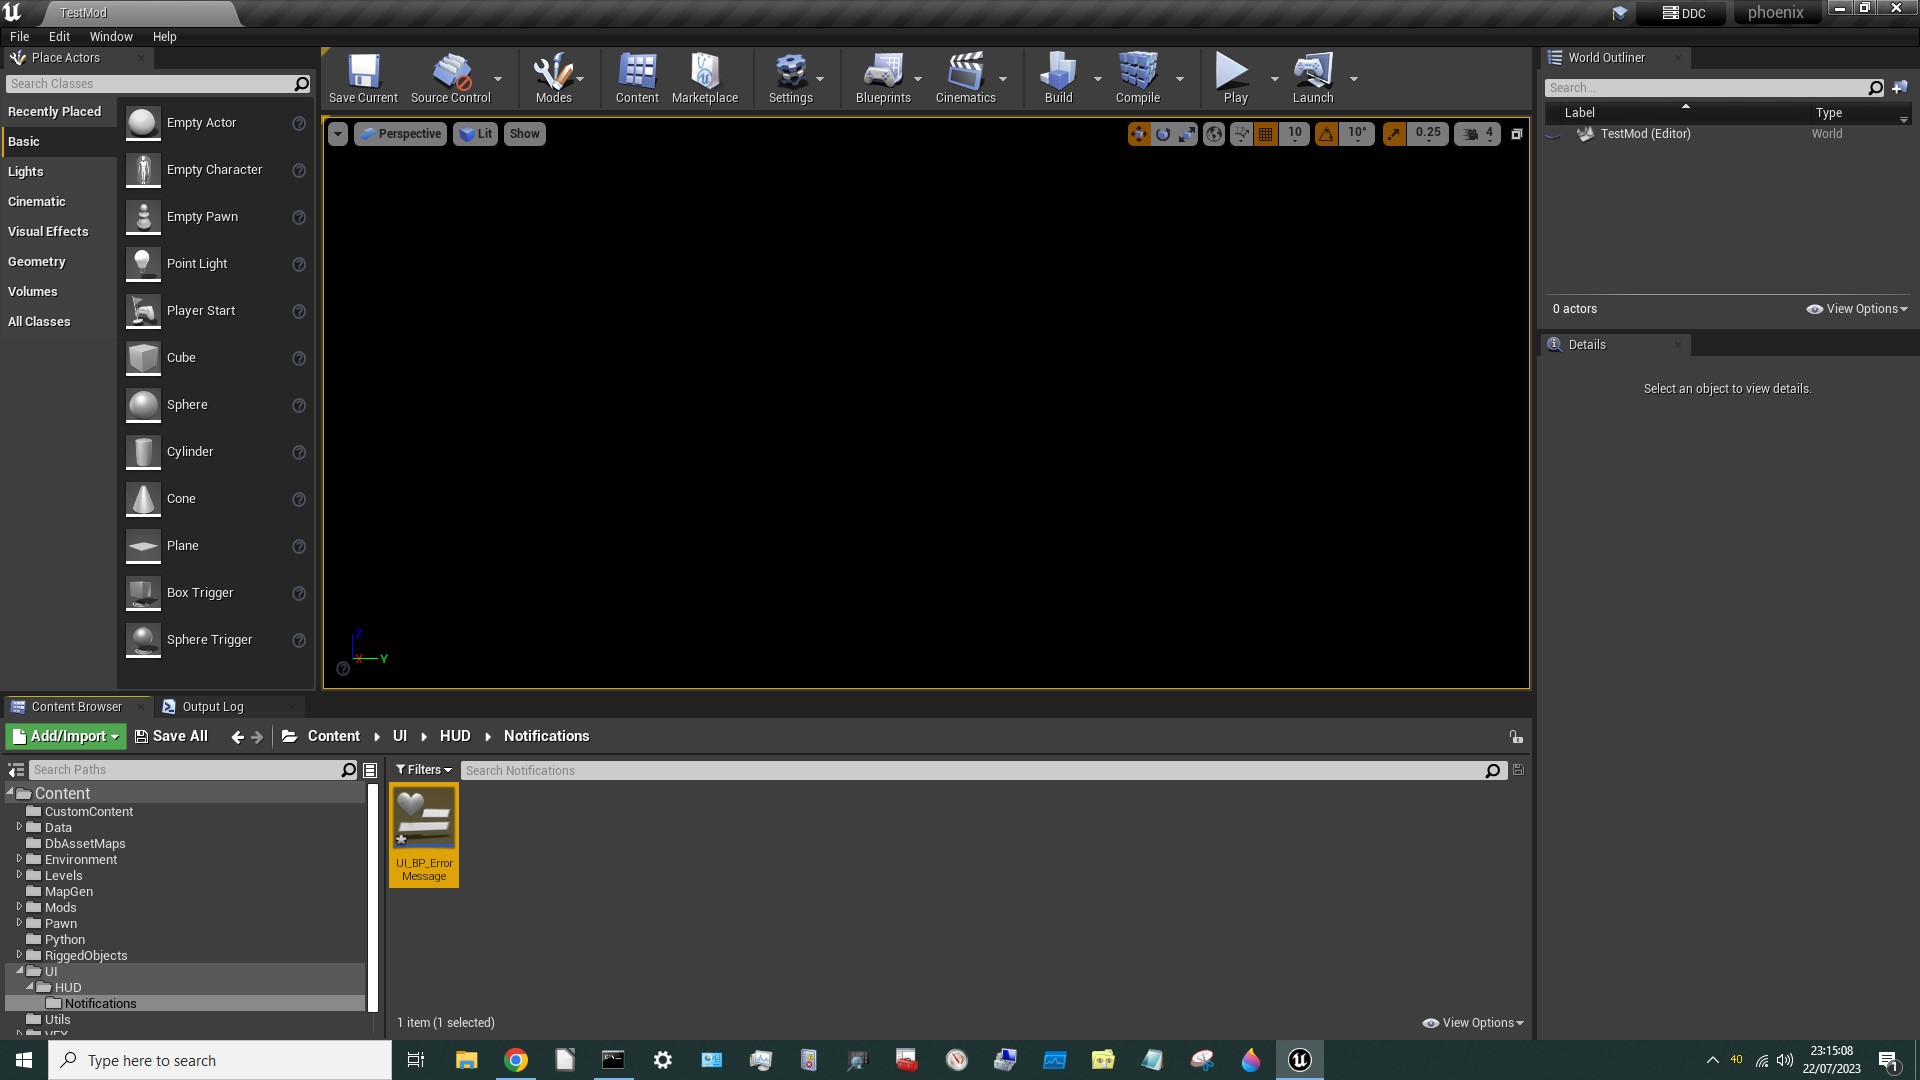
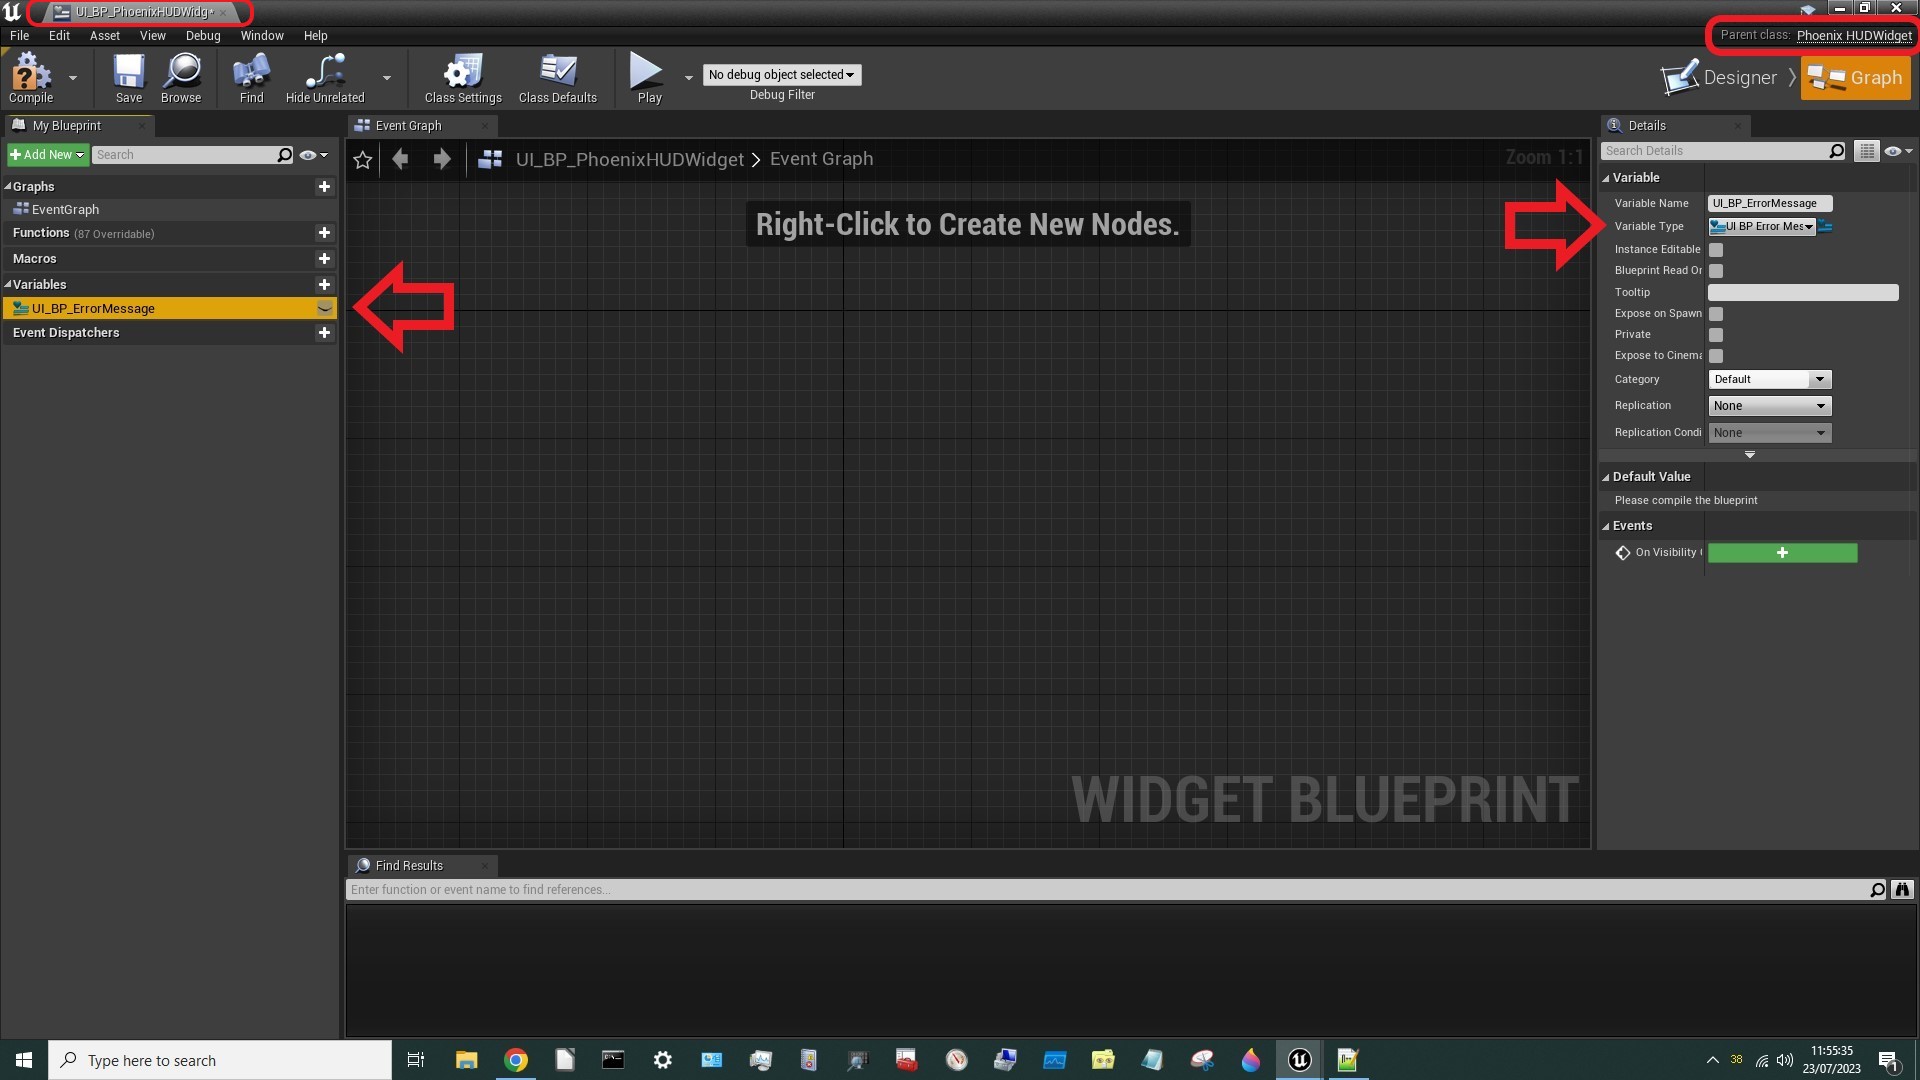
Rename the new Blueprint to UI_BP_ErrorMessage:
Double click it, then click [UI_BP_ErrorMessage] on the left:
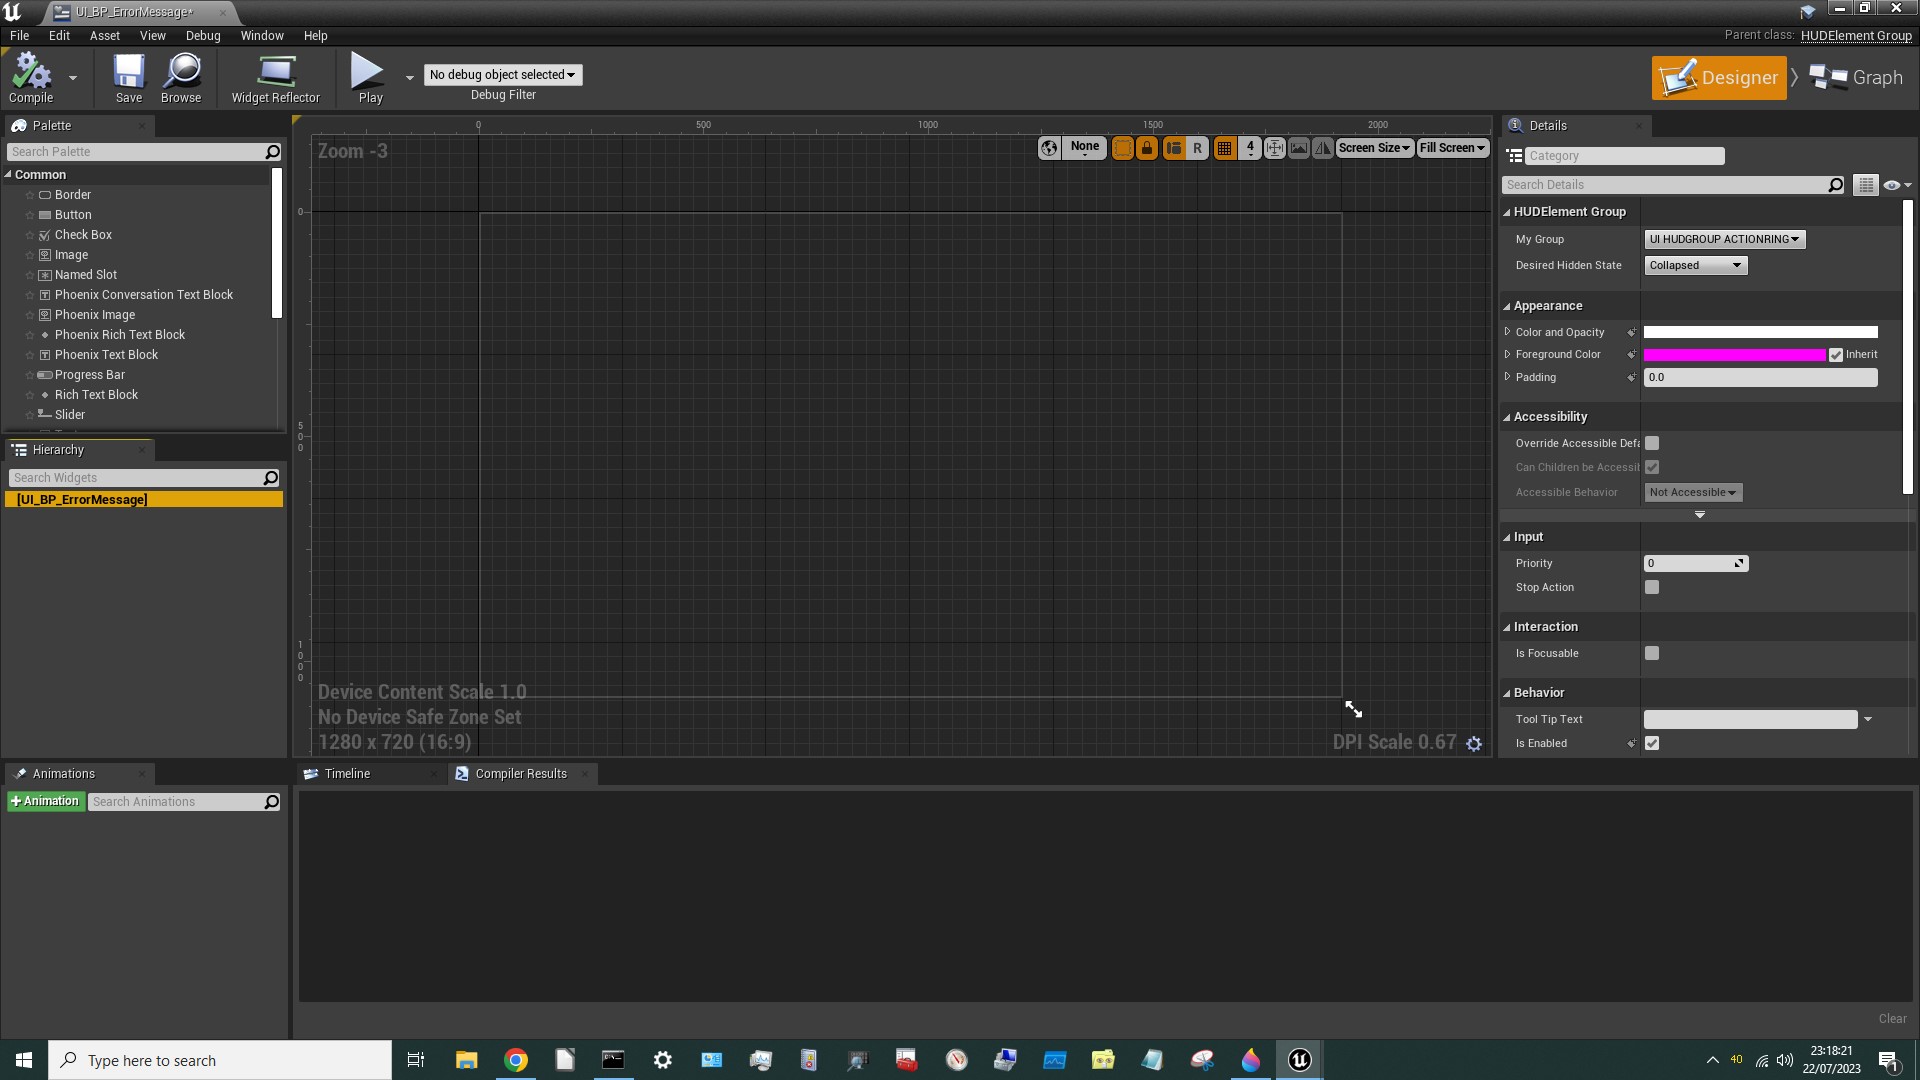
This is our raw Blueprint, but the real Blueprint had references to Functions and Variables. We need to add the ones that we might use:
- A
VariablecalledErrorMessagethat's a reference to aPhoenixTextBlock. - A Function called
HermesDisplayErrorMessagethat has 2 inputs:Caller(aReferenceto anObject) andString(aString).
¶ Dressing the Dummy Blueprint
Click on “Graph” (top right of the screen) to reveal the Blueprint 's Event Graph and properties. This is where we can add our Functions and Variables:
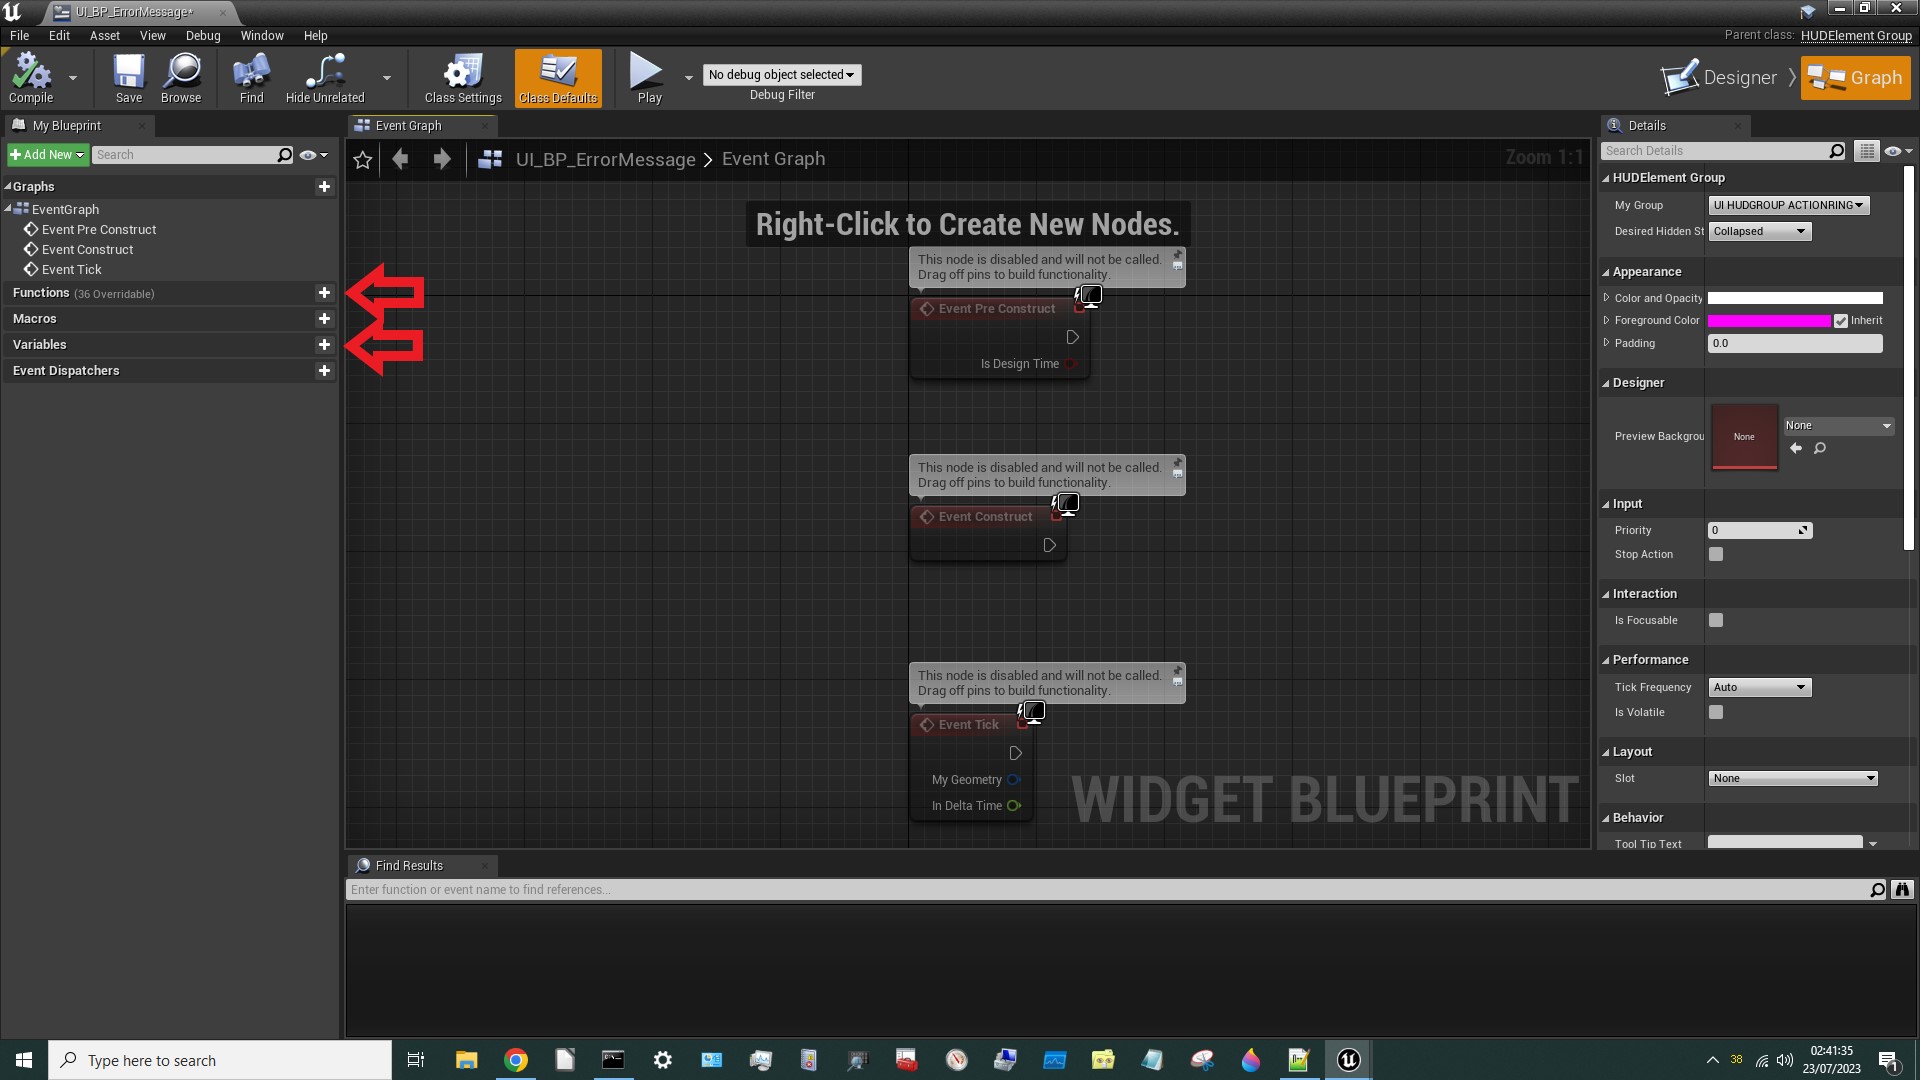
Add the ErrorMessage Variable and the HermesDisplayErrorMessage Function (with inputs as shown):
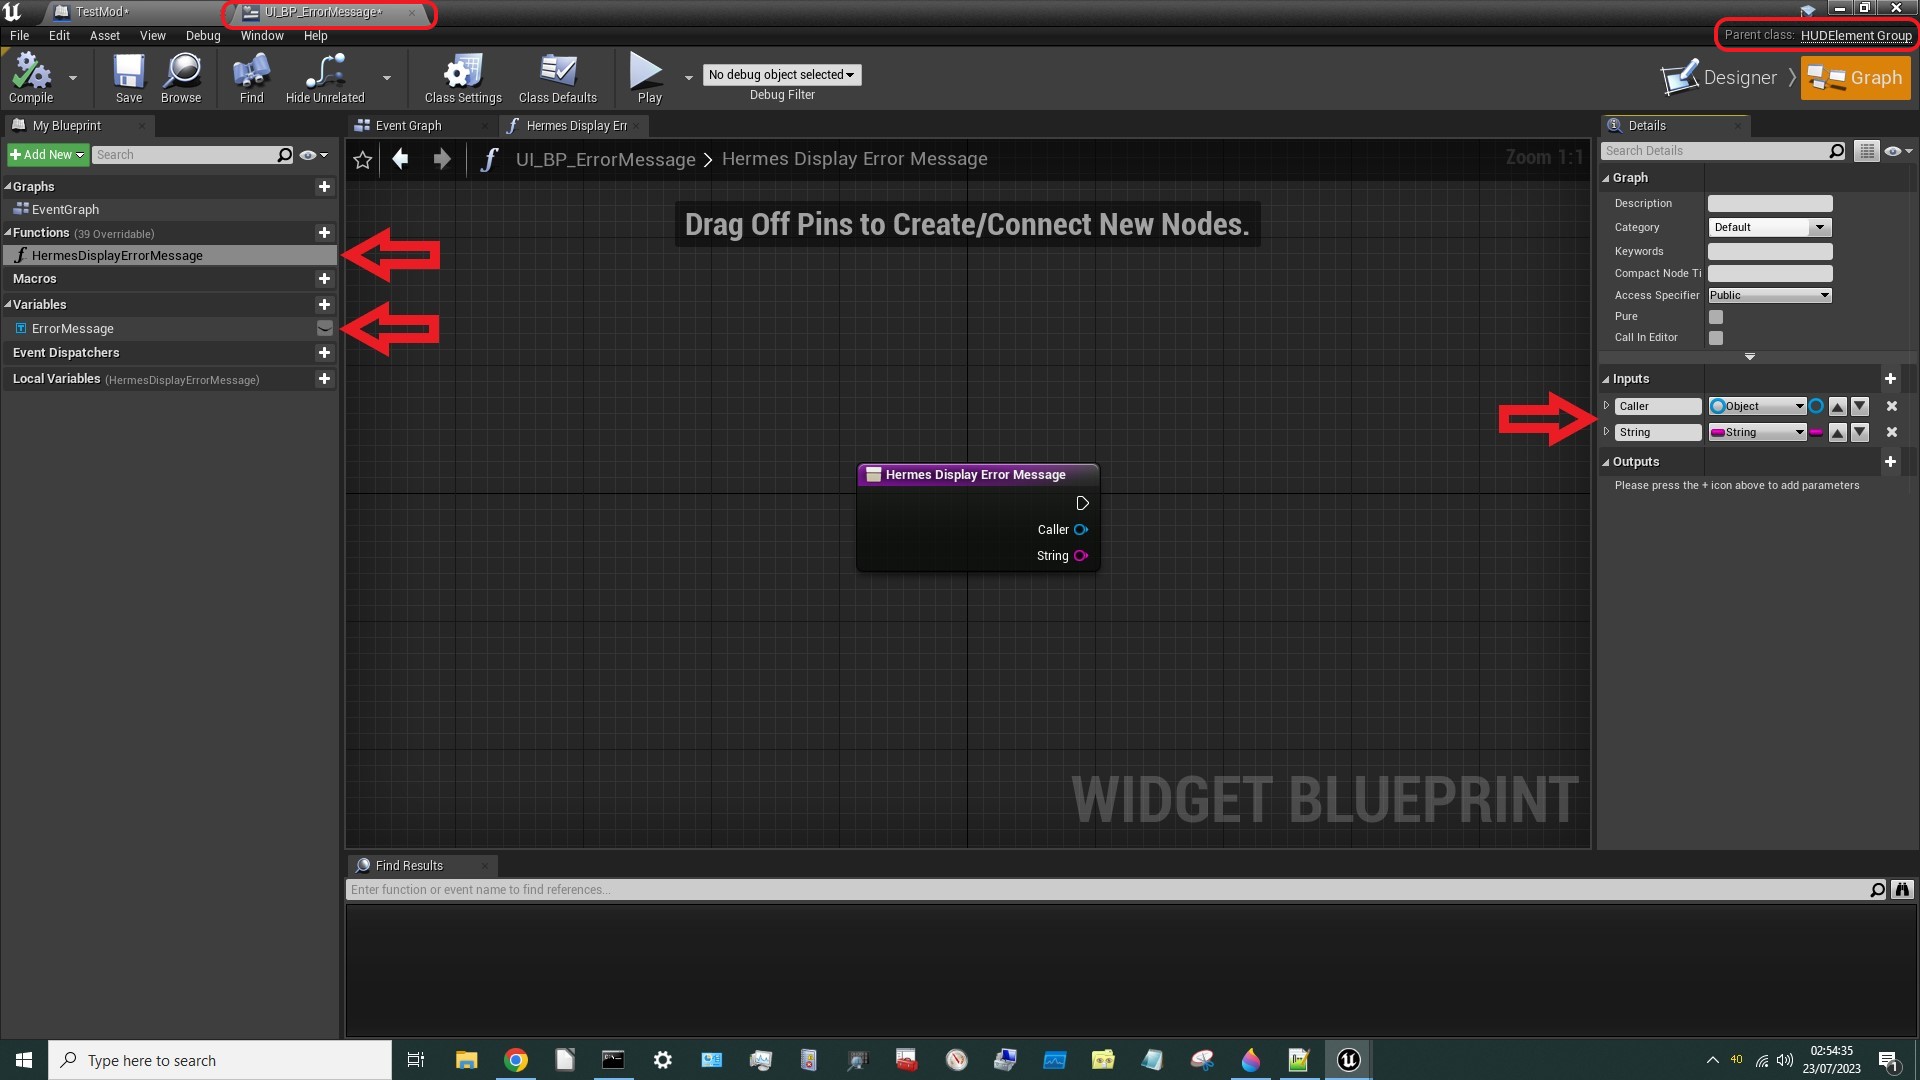
Compile and Save, then hit the X top right to exit that Blueprint.
¶ Using the Dummy Blueprint
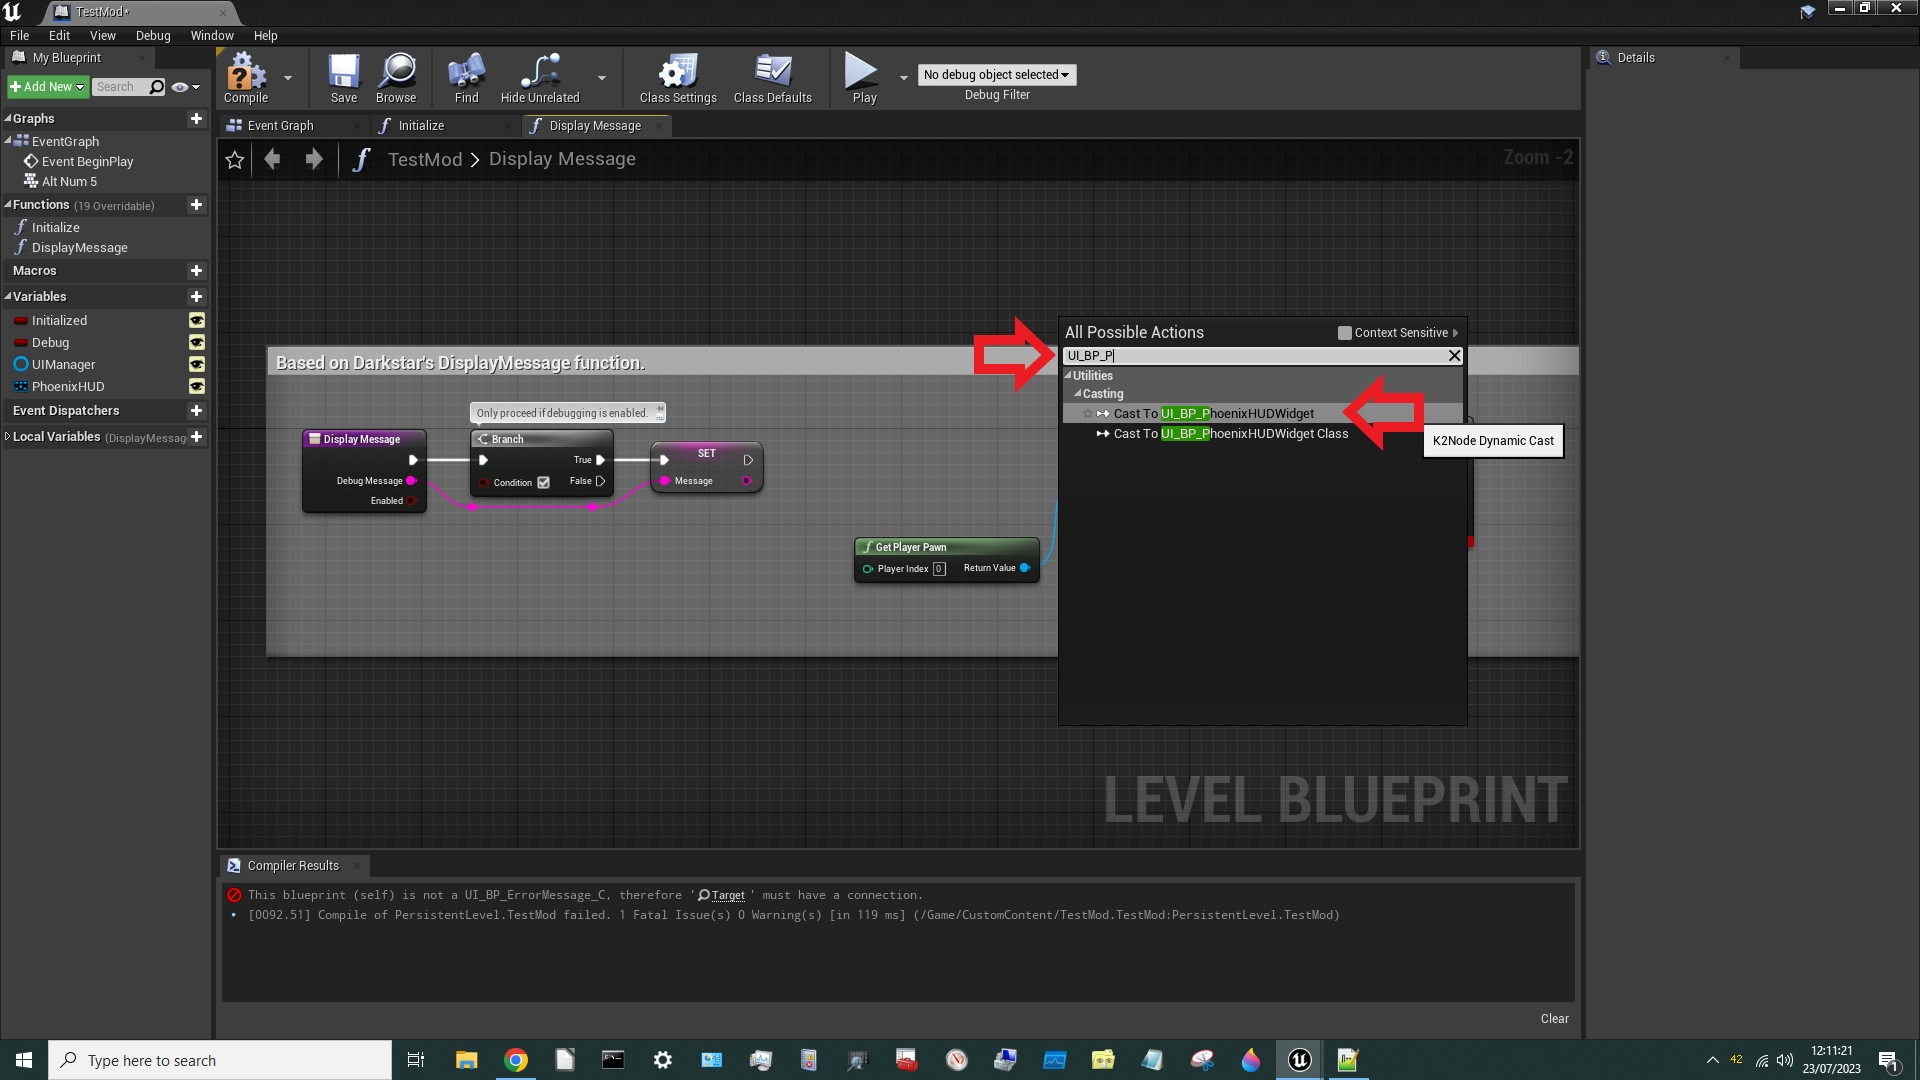
Bring up our Level Blueprint again and select the DisplayMessage Function.
Now we can right click, untick Context Sensitive and search for HermesDisplayErrorMessage:
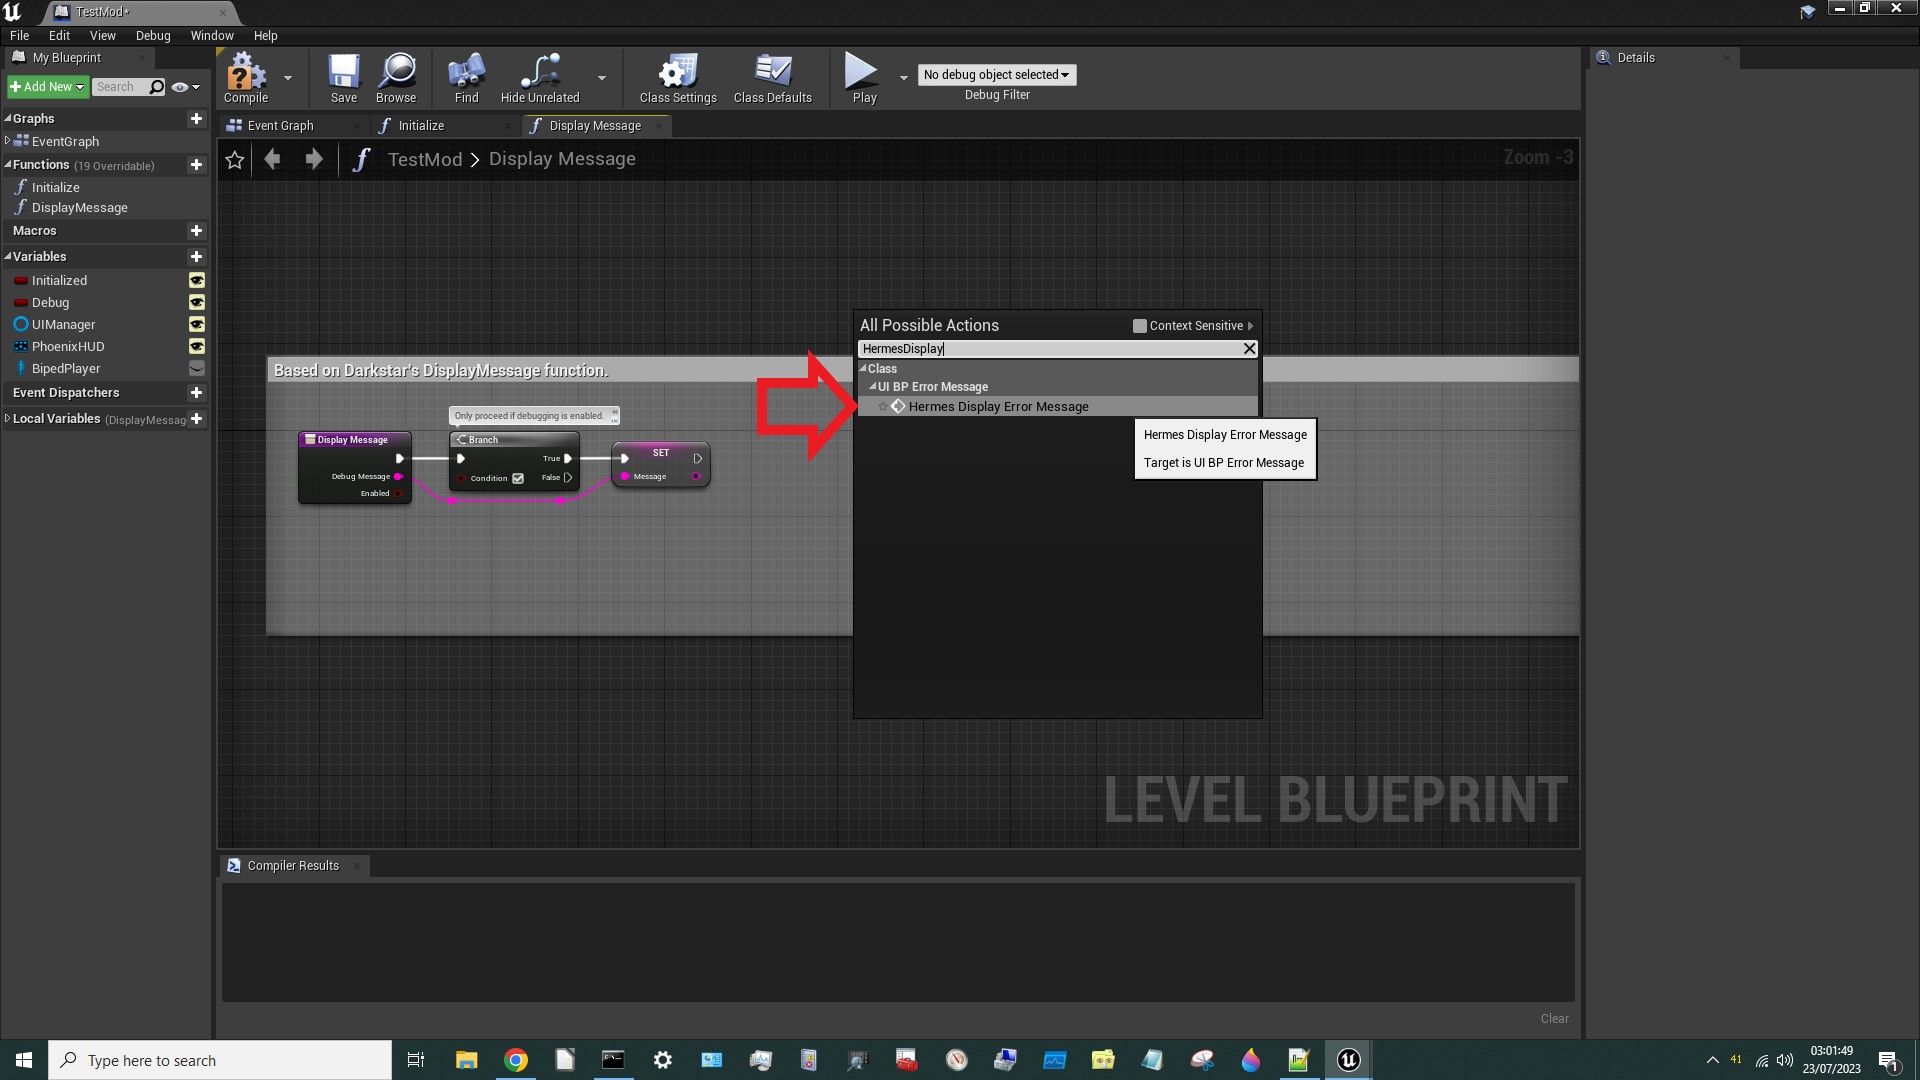
Select it and (as if by magic) a new node will appear:
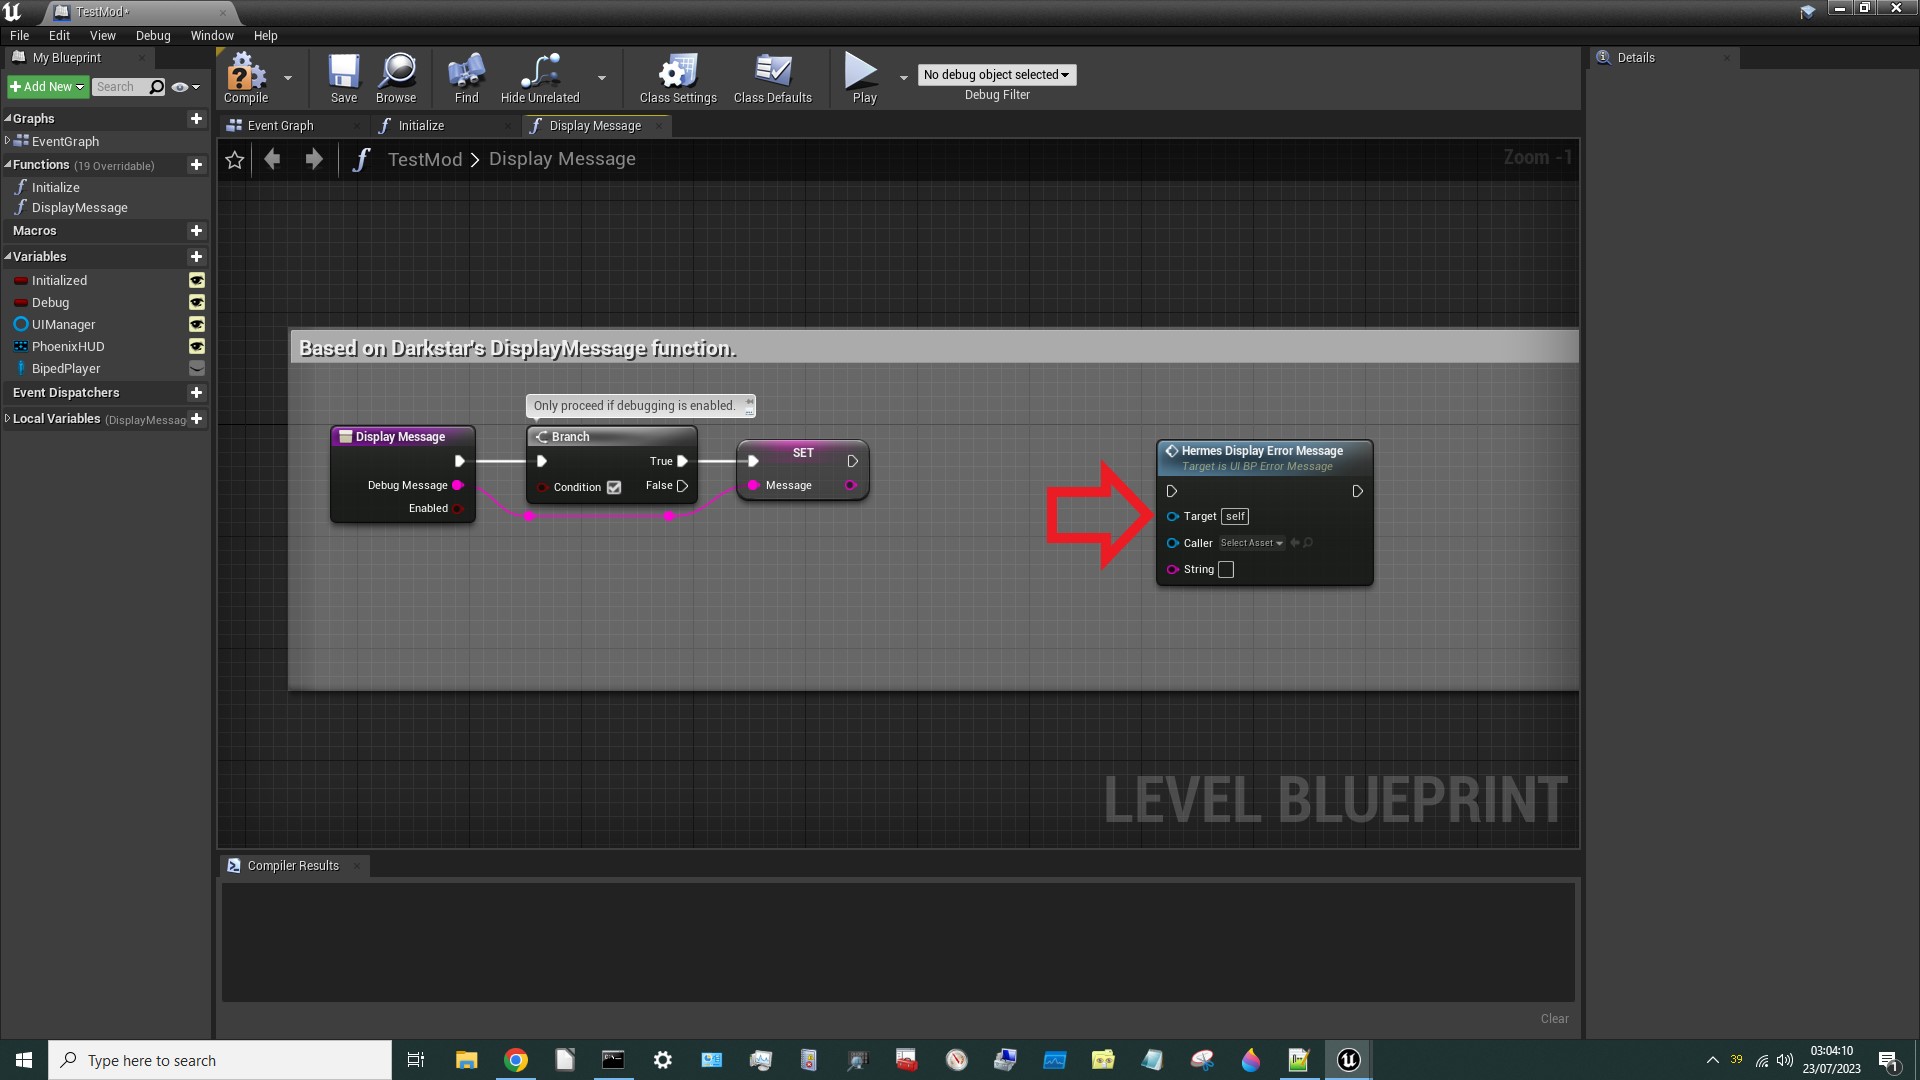
To connect this up:
Stringis obvious - that's the message we want to display.Calleris less obvious but we'll tryBiped_Playerand see what happens.Targetis least obvious (from the name), butTargetgenerally refers to the asset's parent. So what's the parent of theHermesDisplayErrorMessageFunction? Well, it'sUI_BP_ErrorMessageof course. It even says so right there on the node!
¶ Finding References to Blueprint Instances - the easy way
Where do we get UI_BP_ErrorMessage from? We've defined a dummy Blueprint with that name but we need to supply HermesDisplayErrorMessage with a Reference to the actual instance of the UI_BP_ErrorMessage Blueprint that's created in the game. How do we do that? Well, one way would be to find whatever creates UI_BP_ErrorMessage in the game and see if we can get a Reference from inside that. If not, we'd need to find whatever created that asset and check there… continuing up the tree until we found what we need. That process is described in the section after this one. But what if none of them contain the reference we're after?
In the section after this one I'm going to search up the parent tree to find a reference to
UI_BP_ErrorMessage.I have subsequently discovered a much easier way to do this (see point #4 below), so read this section then skip the next one unless you're interested in some of the more advanced details of Unreal Engine.
Usually one of the following will provide a reference for anything you need (and we've seen examples of some of these already):
- Built-in
GetNode's: Some things have aGetNodebuilt-in which will provide you with a reference. This is typically something for which there will only ever be one. For example there will only every be oneUIManagersoUIManagerincludes aGetNodeto provide a reference to it. Another example is theMap Subsystemfor which there is in fact only one node:Get MapSubsystem. GetAllActorsOfClass: Anything that's considered to be anActorby Unreal Engine can be found usingGetAllActorsOfClass. This will return an array of the theActor's of thatClass. You'll need to search through this array to find the one you need. If you're not sure if what you're after is anActorjust bring up the node and click the dropdown. If it's listed it's anActor. If not, it isn't. UNLESS the name starts withBP_in which case it's a blueprint class which you will need to dummy to make it appear in the list.GetActorOfClass: If you're confident that there is only oneActorof the type you're after, you can useGetActorOfClassinstead. This will return a single reference. We saw an example of this in tutorial #101 withPhoenixHUD.GetAllWidgetsOfClass: Anything that's considered to be aWidgetby Unreal Engine can be found usingGetAllWidgetsOfClass. This will return an array of the theWidget's of thatClass. You'll need to search through this array to find the one you need. If you're not sure if what you're after is aWidgetjust bring up the node and click the dropdown. If it's listed it's aWidget. If not, it isn't. UNLESS the name starts withUI_BP_in which case it's a blueprint class which you will need to dummy to make it appear in the list.UI_BP_ErrorMessageis an example of this.GetComponentsByClass: Anything that's considered to be aComponentby Unreal Engine can be found usingGetComponentsByClass. This will return an array of the theComponents's of thatClass. You'll need to search through this array to find the one you need. If you're not sure if what you're after is aComponentjust bring up the node and click the dropdown. If it's listed it's aComponent. If not, it isn't. Components are quite an advanced feature which I won't be covering in this tutorial.GetComponentByClass: If you're confident that there is only oneComponentof the type you're after, you can useGetComponentByClassinstead. This will return a single reference.
When I find myself looking for a Reference I generally proceed as follows:
- Check whether there is a built-in
GetNode(i.e. point #1 above). - If not, check whether it's parent has a
Nodeto provide a reference (i.e. the first step of “the hard way”, below). - If not, use the appropriate
Nodefrom points #2 to #6 in the list above.
It doesn't really matter which approach you use, as long as it works, but some methods are easier than others.
¶ Finding References to Blueprint Instances - the hard way
Most readers can skip this section – see the section before this one instead!
If we want to find a Reference to the actual instance of the Blueprint that's created in the game we could find whatever creates UI_BP_ErrorMessage in the game and see if we can get a Reference from that. If not, we we could find whatever created that asset and check there… continuing up the tree until we find what we need. If none of them contain the reference we're after, we'll need to use some other method (see the previous section).
What creates a UI_BP_ErrorMessage? We need to check our CXXHeaders again to look for clues:
The line I've marked looks promising. Let's take a look at that file (I've hidden some lines so we can see the important bits):
So UI_BP_ErrorMessage is a Blueprint that's created by the UI_BP_PhoenixHUDWidget Blueprint, whose parent class is PhoenixHUDWidget.
To get a reference to UI_BP_ErrorMessage we're going to have to create a dummy of UI_BP_PhoenixHUDWidget. None of the other Variables or Functions in the file look relevant so we only need to add the UI_BP_ErrorMessage Variable to our dummy.
First let's check UModel to find out what folder to put it in:
It's in /Content/UI/HUD/. To create the dummy asset /Content/UI/HUD/UI_BP_PhoenixHUDWidget, follow the same procedure as last time and you should produce this:
Compile and Save, then hit the X top right to exit the dummy Blueprint.
Now let's return to our Level Blueprint, right click and do a context-insensitive search for UI_BP_PhoenixHUDWidget:
We can now cast something as a UI_BP_PhoenixHUDWidget:
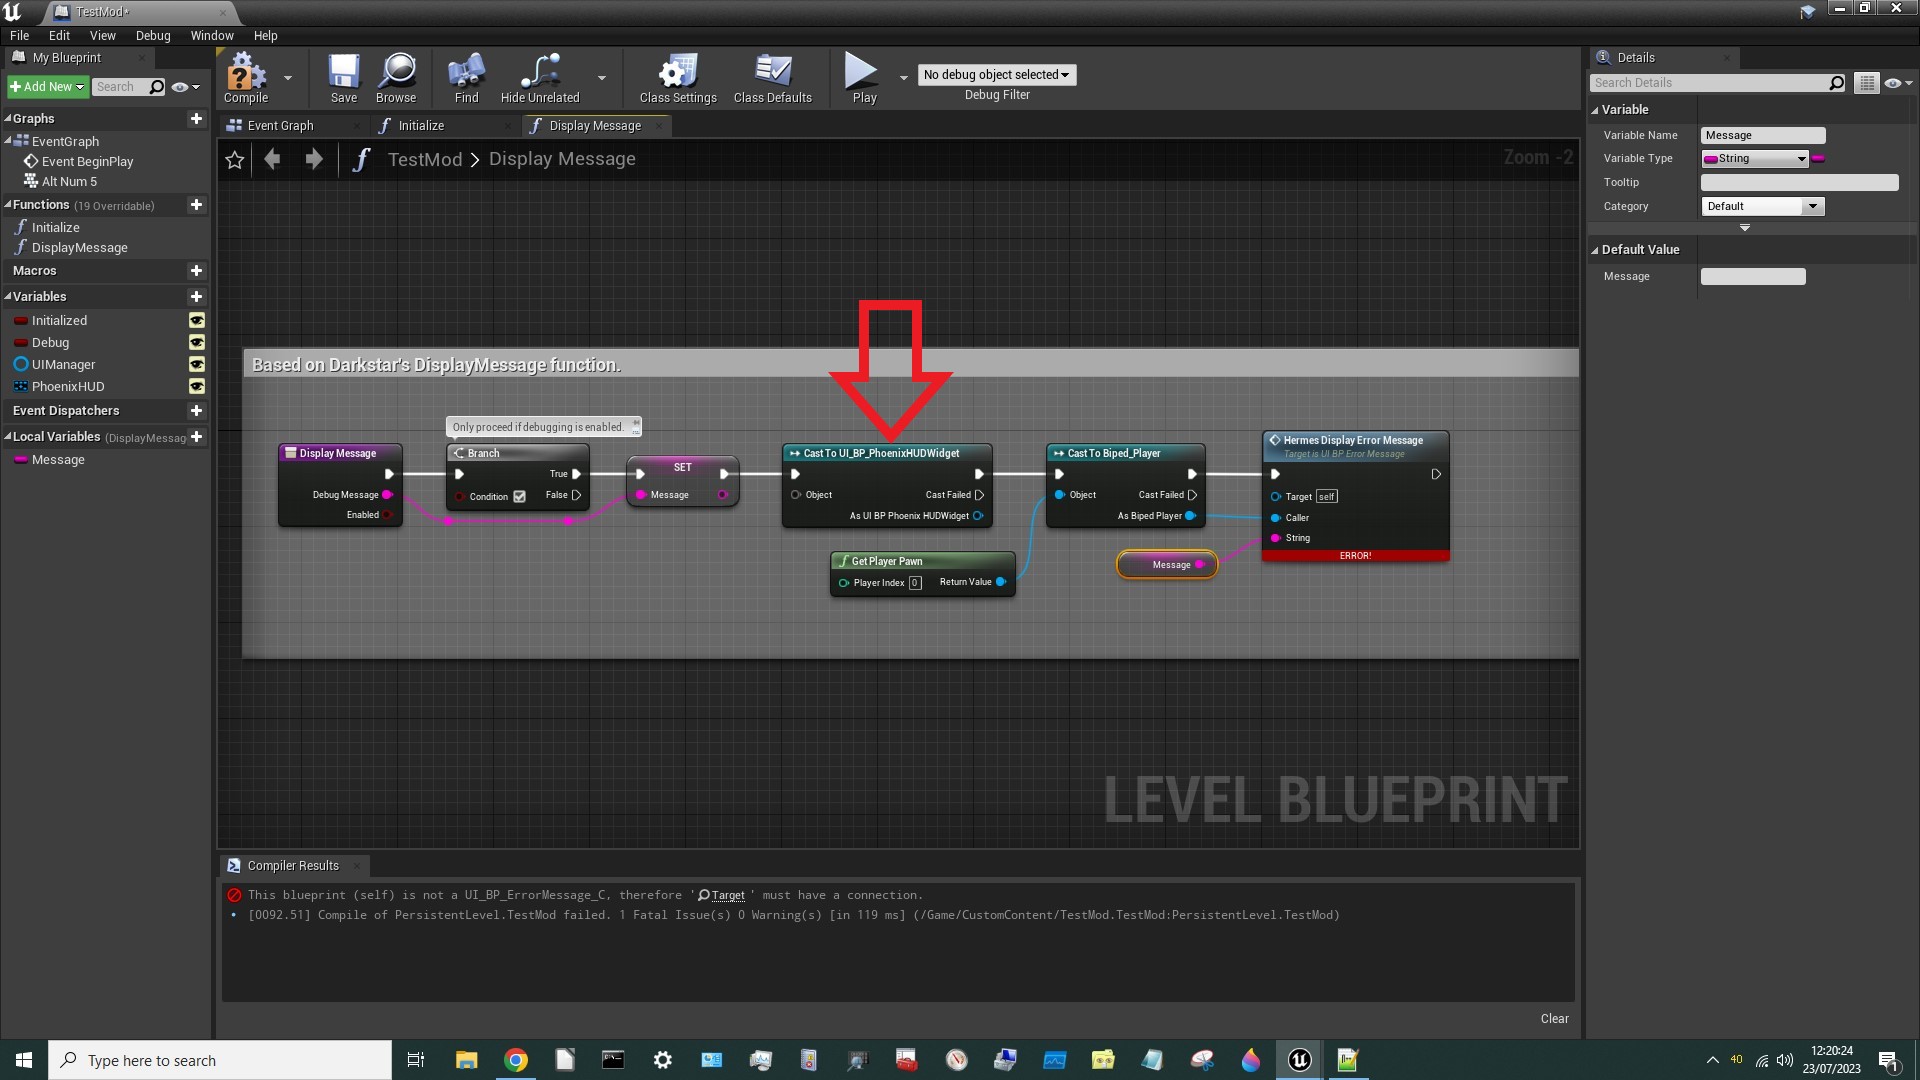
If we connect the output of that Cast to the input of HermesDisplayErrorMessage the editor automatically re-Casts the Reference, which is handy:
Okay, we're making progress, but now we need to find something to cast into a UI_BP_PhoenixHUDWidget.
¶ What is a Cast?
Whoa! Hold on a minute!
What the hell is a Cast , I hear you say?
Well, it goes like this. Let's imagine you create a Blueprint for a Goblin Assassin, which is special type of Goblin that has a crossbow. In technical parlance it's a Child of the Parent Blueprint Class for a Goblin. This Goblin Assassin Class inherits all the properties of a Goblin, but it also has crossbow so it has extra stuff.
Now let's imagine that a bunch of Goblins attack the Player, who casts Ancient Magic Throw at one of them. The Ancient Magic Throw 's Targetting Blueprint must now decide whether that spell disarms the Goblin or not. If the Goblin is a Goblin Assassin then it does, if not it doesn't. But the Blueprint isn't told that the target is a Goblin Assassin . In fact it doesn't even know that it's a Goblin. All it knows is that it's some sort of Enemy. The reason it doesn't know this stuff is because the Blueprint would require hundreds of inputs (one for each sub-type of Enemy) to achieve that. Instead it has a single input for Enemy and it must figure out what type of Enemy it is later. Once it's figured that out it can Cast the Enemy Blueprint into a Goblin Assassin Blueprint to gain access to the extra properties it needs to disarm the Goblin Assassin.
Does that make sense? Don't worry if not. All we need to know for now is that there's no Function to give us the UI_BP_PhoenixHUDWidget we're after (if there was we would have been offered it when we did the search) so we'll need to find a Reference to the UI_BP_PhoenixHUDWidget ‘s Parent Class, Cast that as a UI_BP_PhoenixHUDWidget and hope it's the one we're looking for.
Of course the fact that something has the right Parent Class doesn’t mean it's the right object, but we'll cross that bridge when we come to it. In this particular case we have reason to be optimistic, because there is probably only one HUD and hopefully only one PhoenixHUDWidget… so whatever we find with the right Parent Class will probably be the thing we're after.
Note: For technical reasons Casts are quite resource-expensive so are generally to be avoided. But on this occasion we have no choice.
¶ Using UI_BP_PhoenixHUDWidget
So we can now Cast something into a UI_BP_PhoenixHUDWidget. But what?
To answer that question we need to know more about UI_BP_PhoenixHUDWidget. Let's search our CXXHeaders for PhoenixHUDWidget and see what we find:

There are two promising entries: UserWidget and HUDWidgetRef. The second sounds more likely, but let's try UserWidget first. If we drag a line off the Object pin of the Cast to UI_BP_PhoenixHUDWidget node and search for UserWidget… there's nothing that looks particularly relevant. Now let's do the same for HUDWidgetRef:
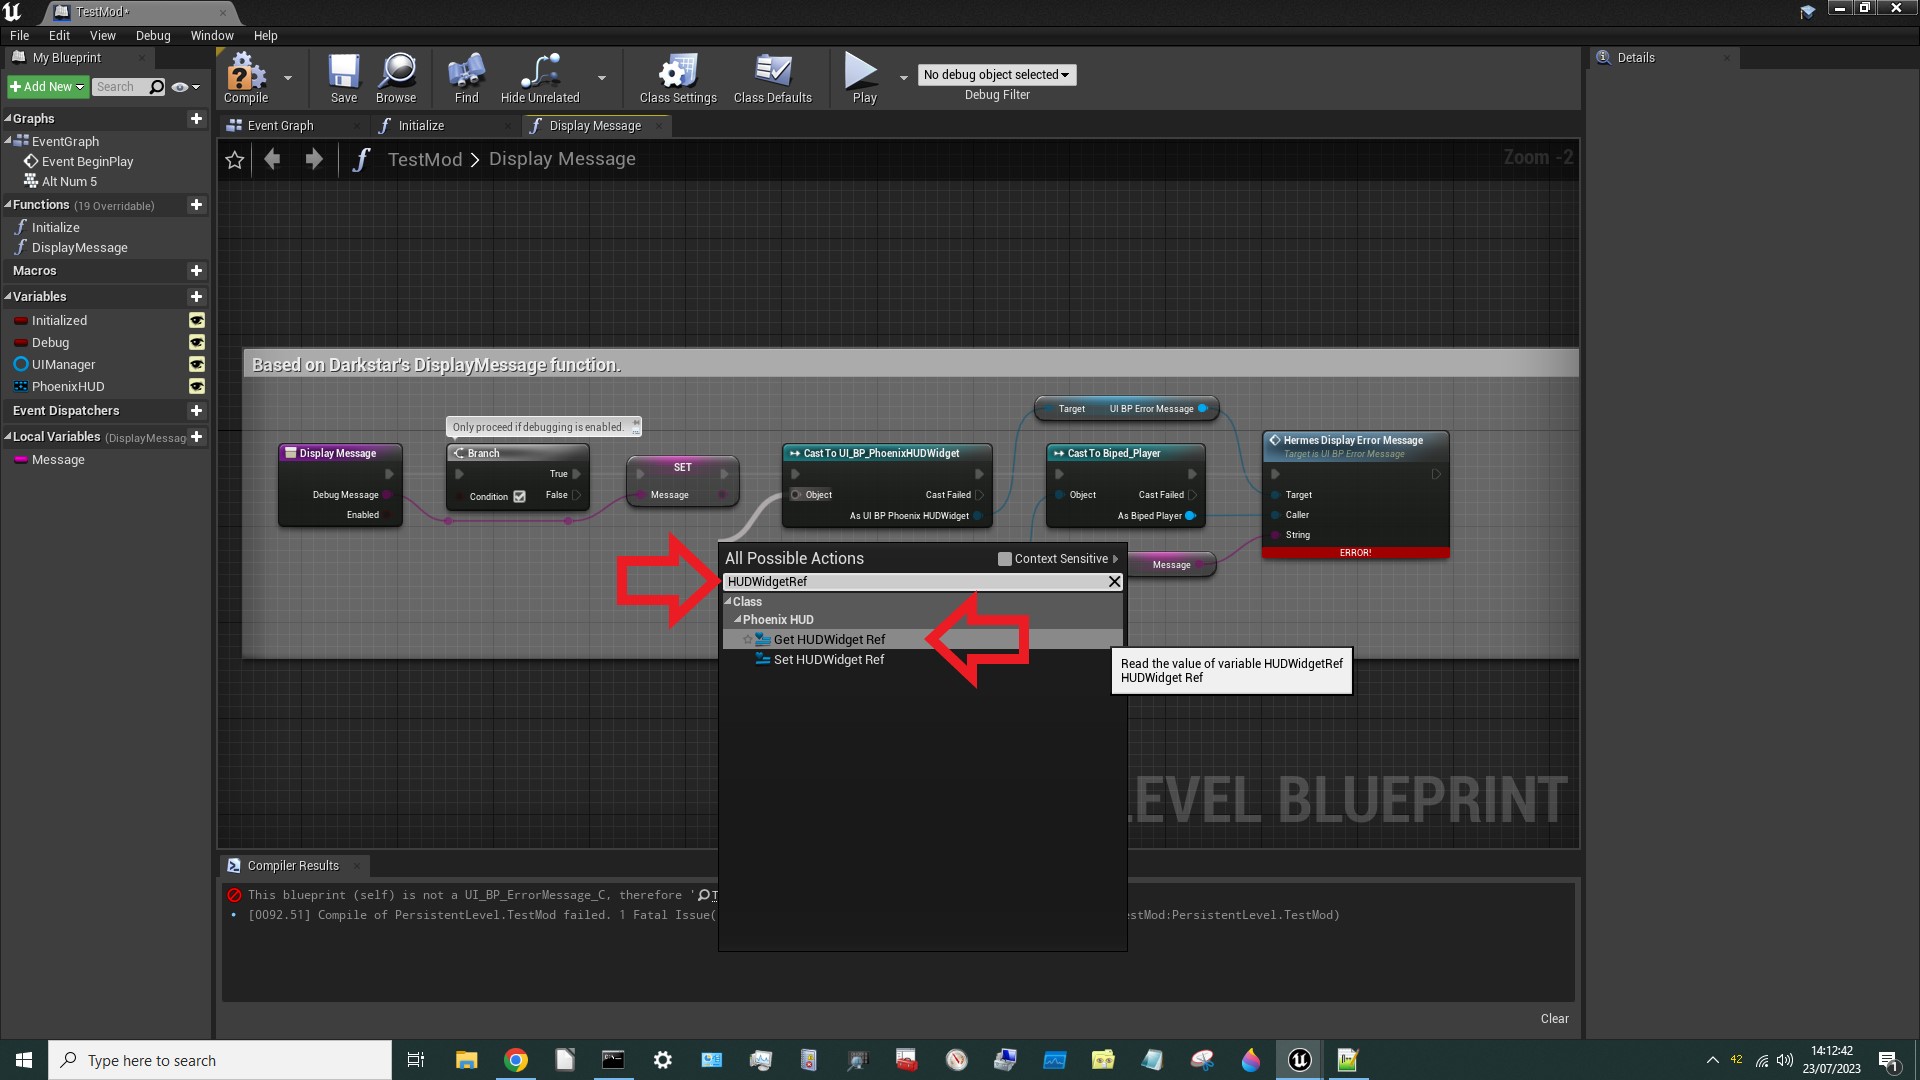
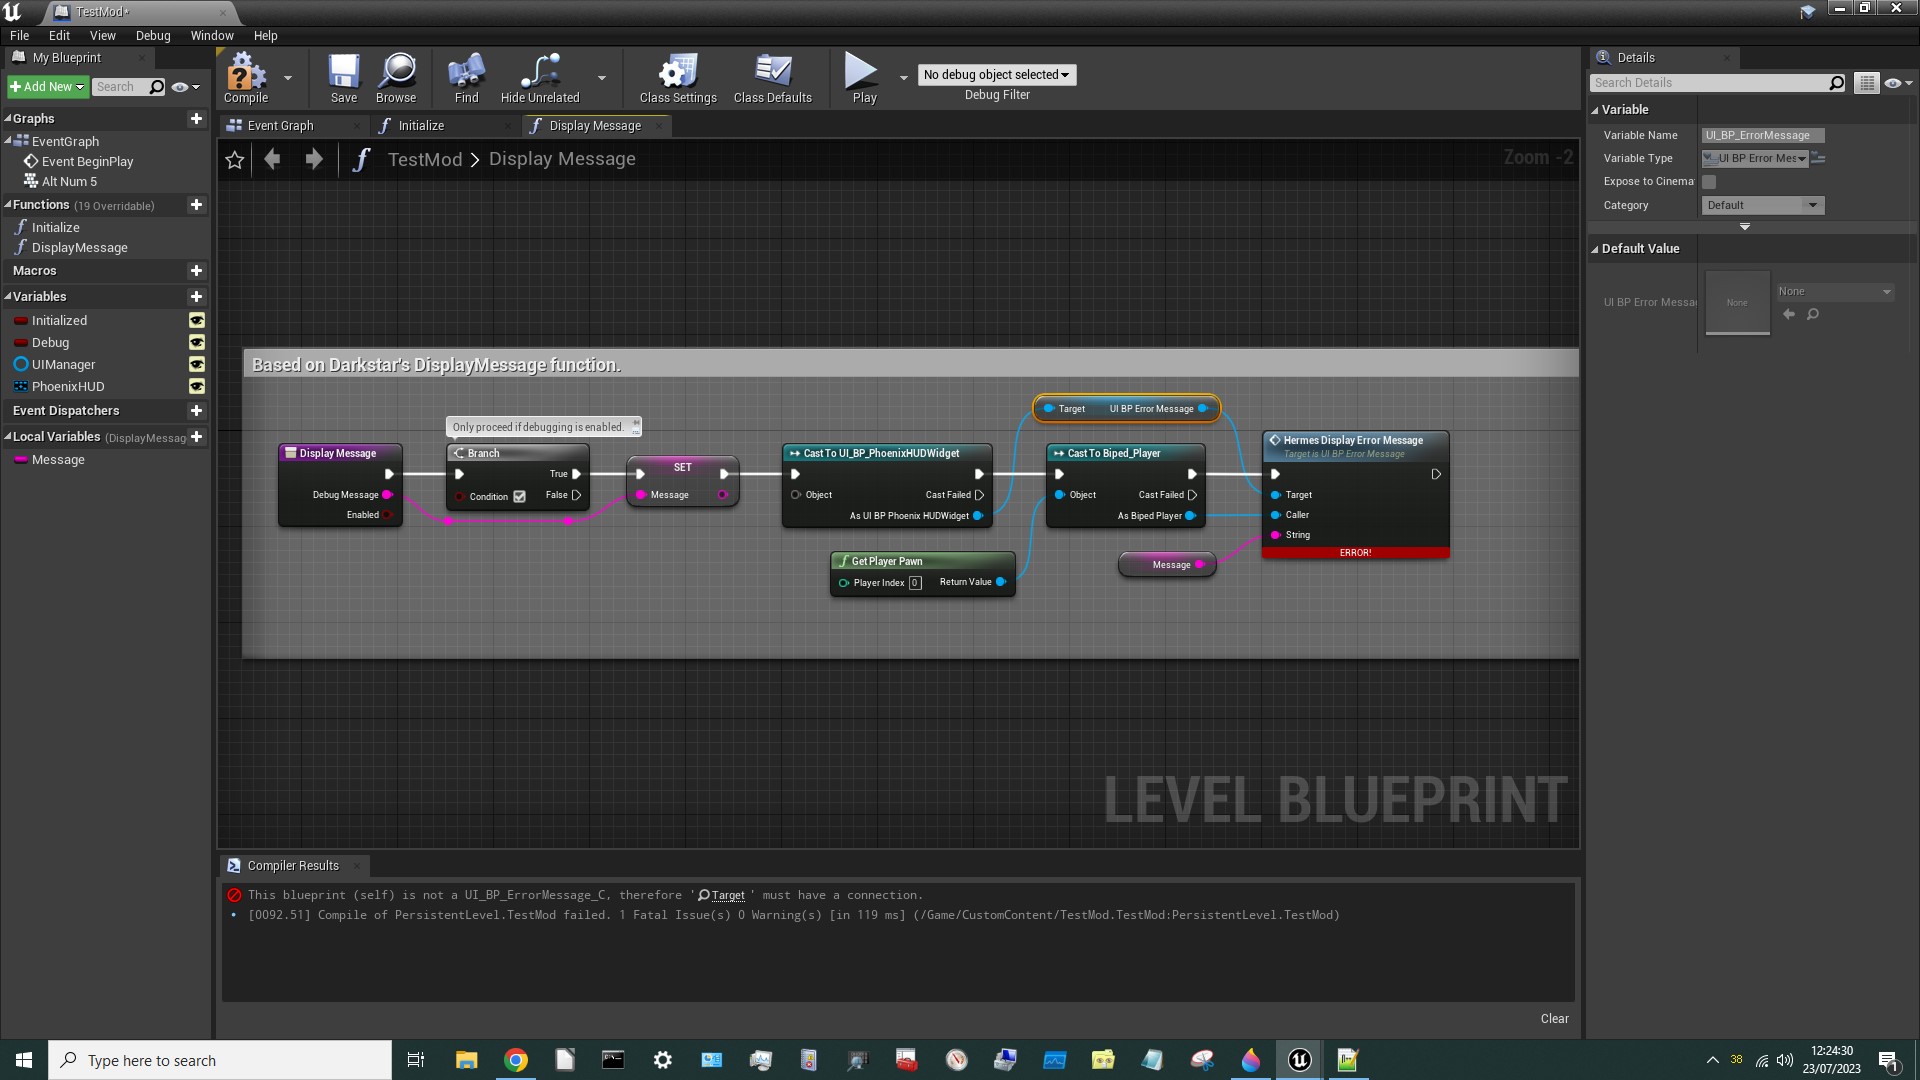
Get HudWidgetRef might be interesting! Let's give that a try:
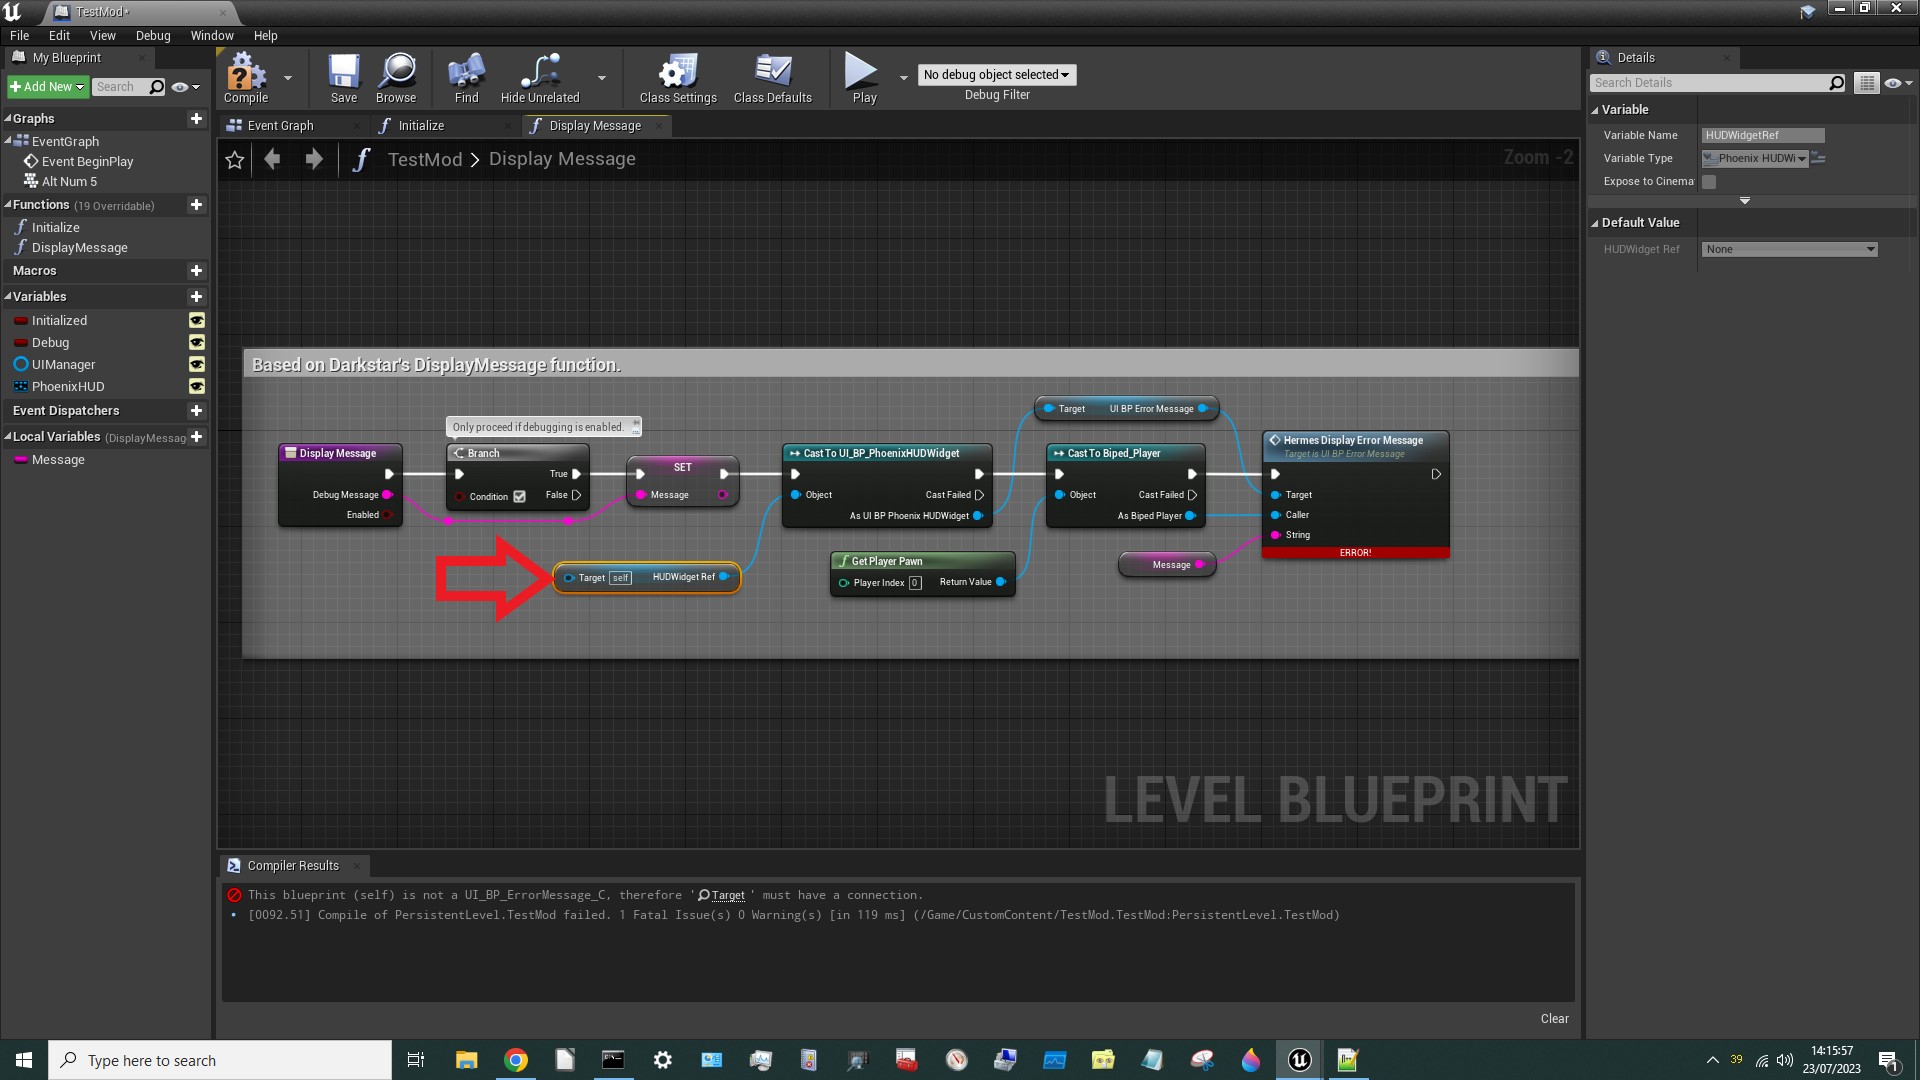
Okay, that Node is looking for a Target (which usually means Parent). What's the parent of HUDWidgetRef? Well, HUDWidgetRef was defined in Phoenix.hpp so let's have a look at that file:
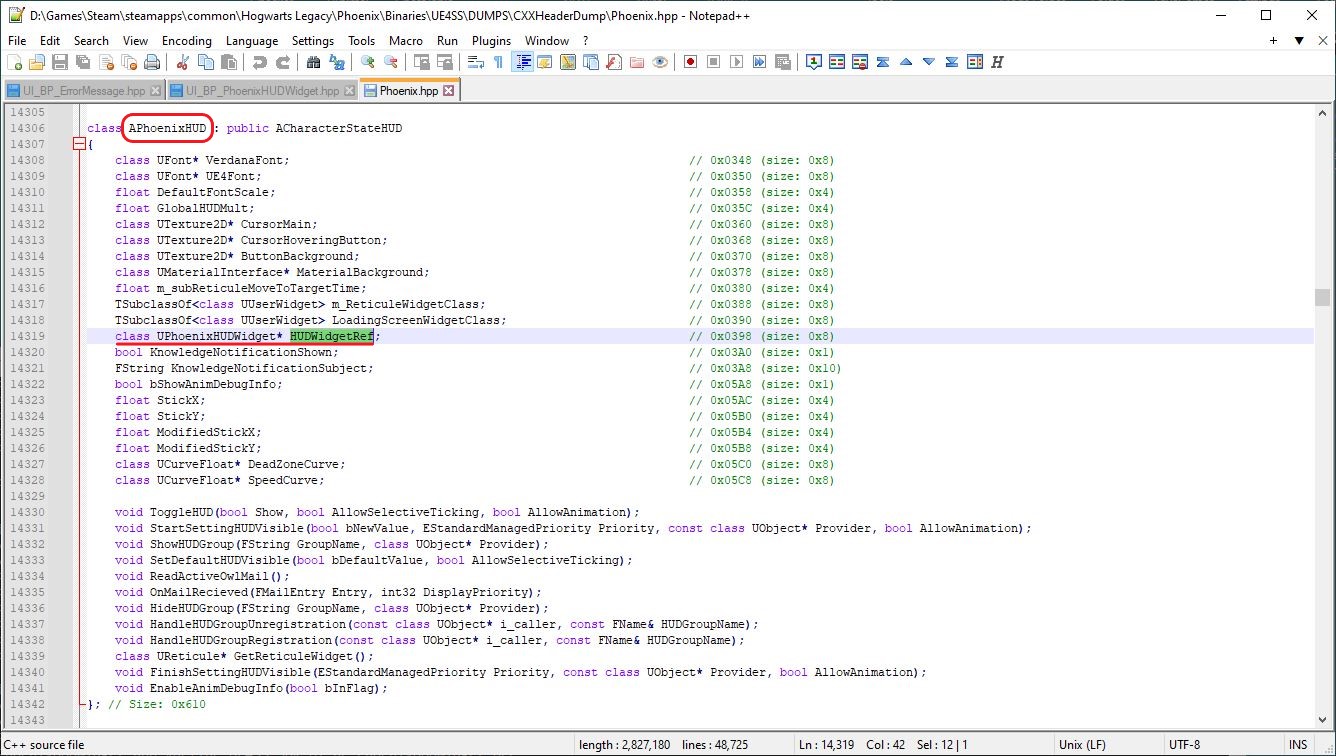
So HUDWidget is a Reference (pointer) to a PhoenixHUDWidget (but we knew that already) and is defined inside the PhoenixHUD Blueprint. So the Parent is PhoenixHUD, which is handy because we already have that as a Variable. Let's drag in a Get PhoenixHUD node:
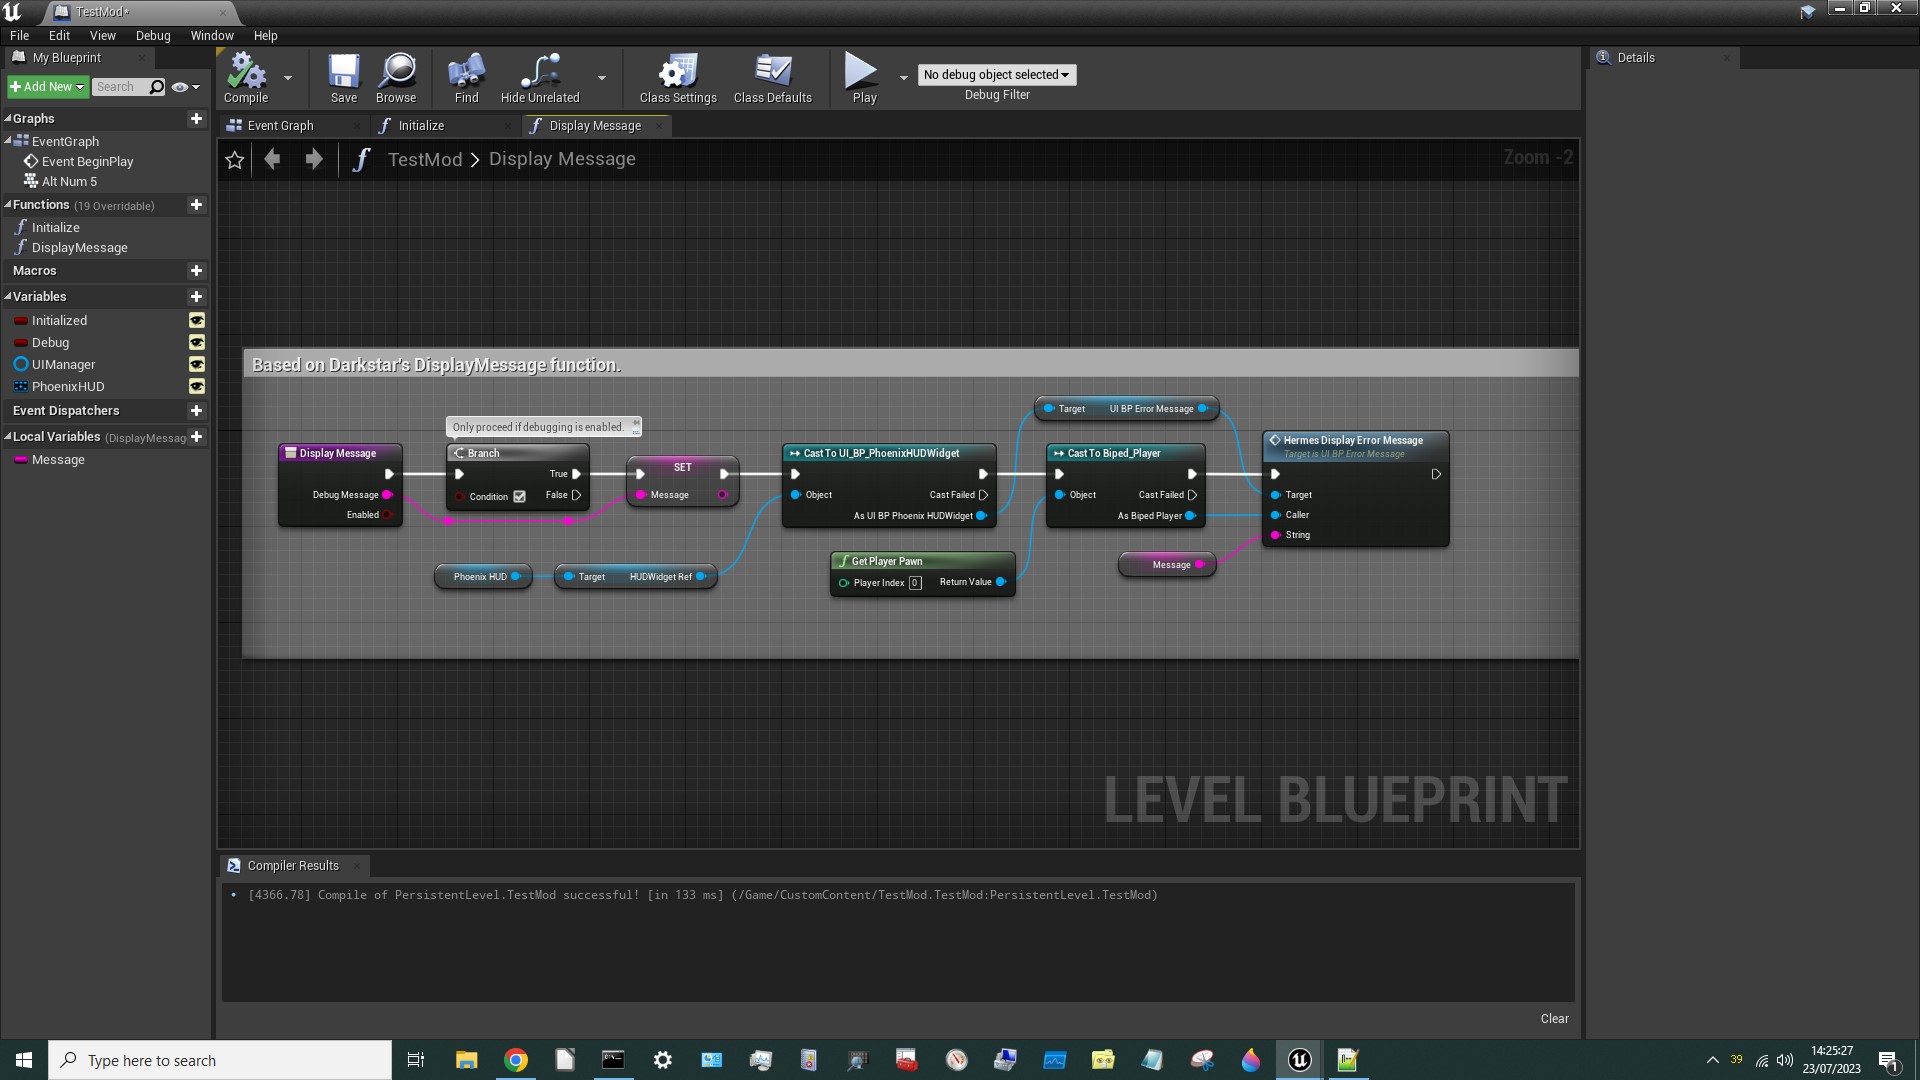
Perfect! Just one more thing to do…
¶ Add Events to the Event Graph
We need some Events to Initialise the mod and call our DisplayMessage Function:
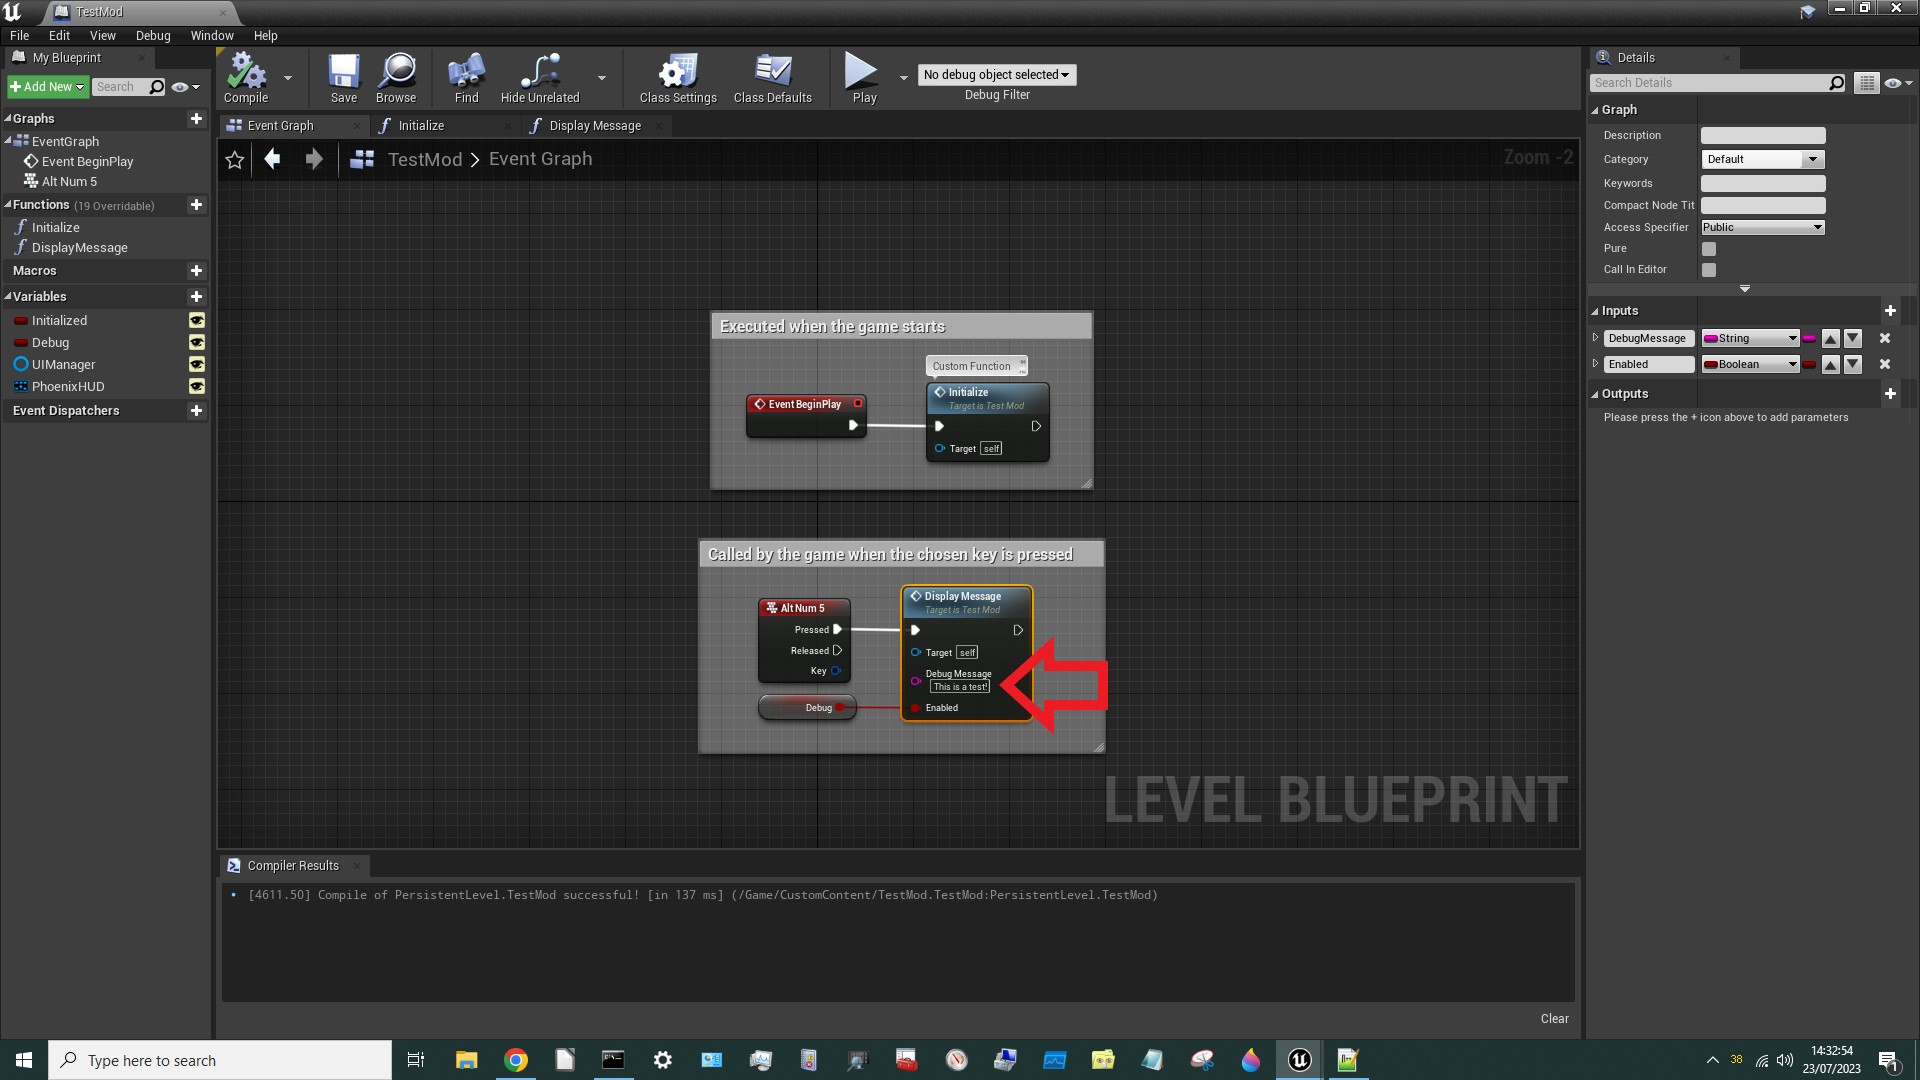
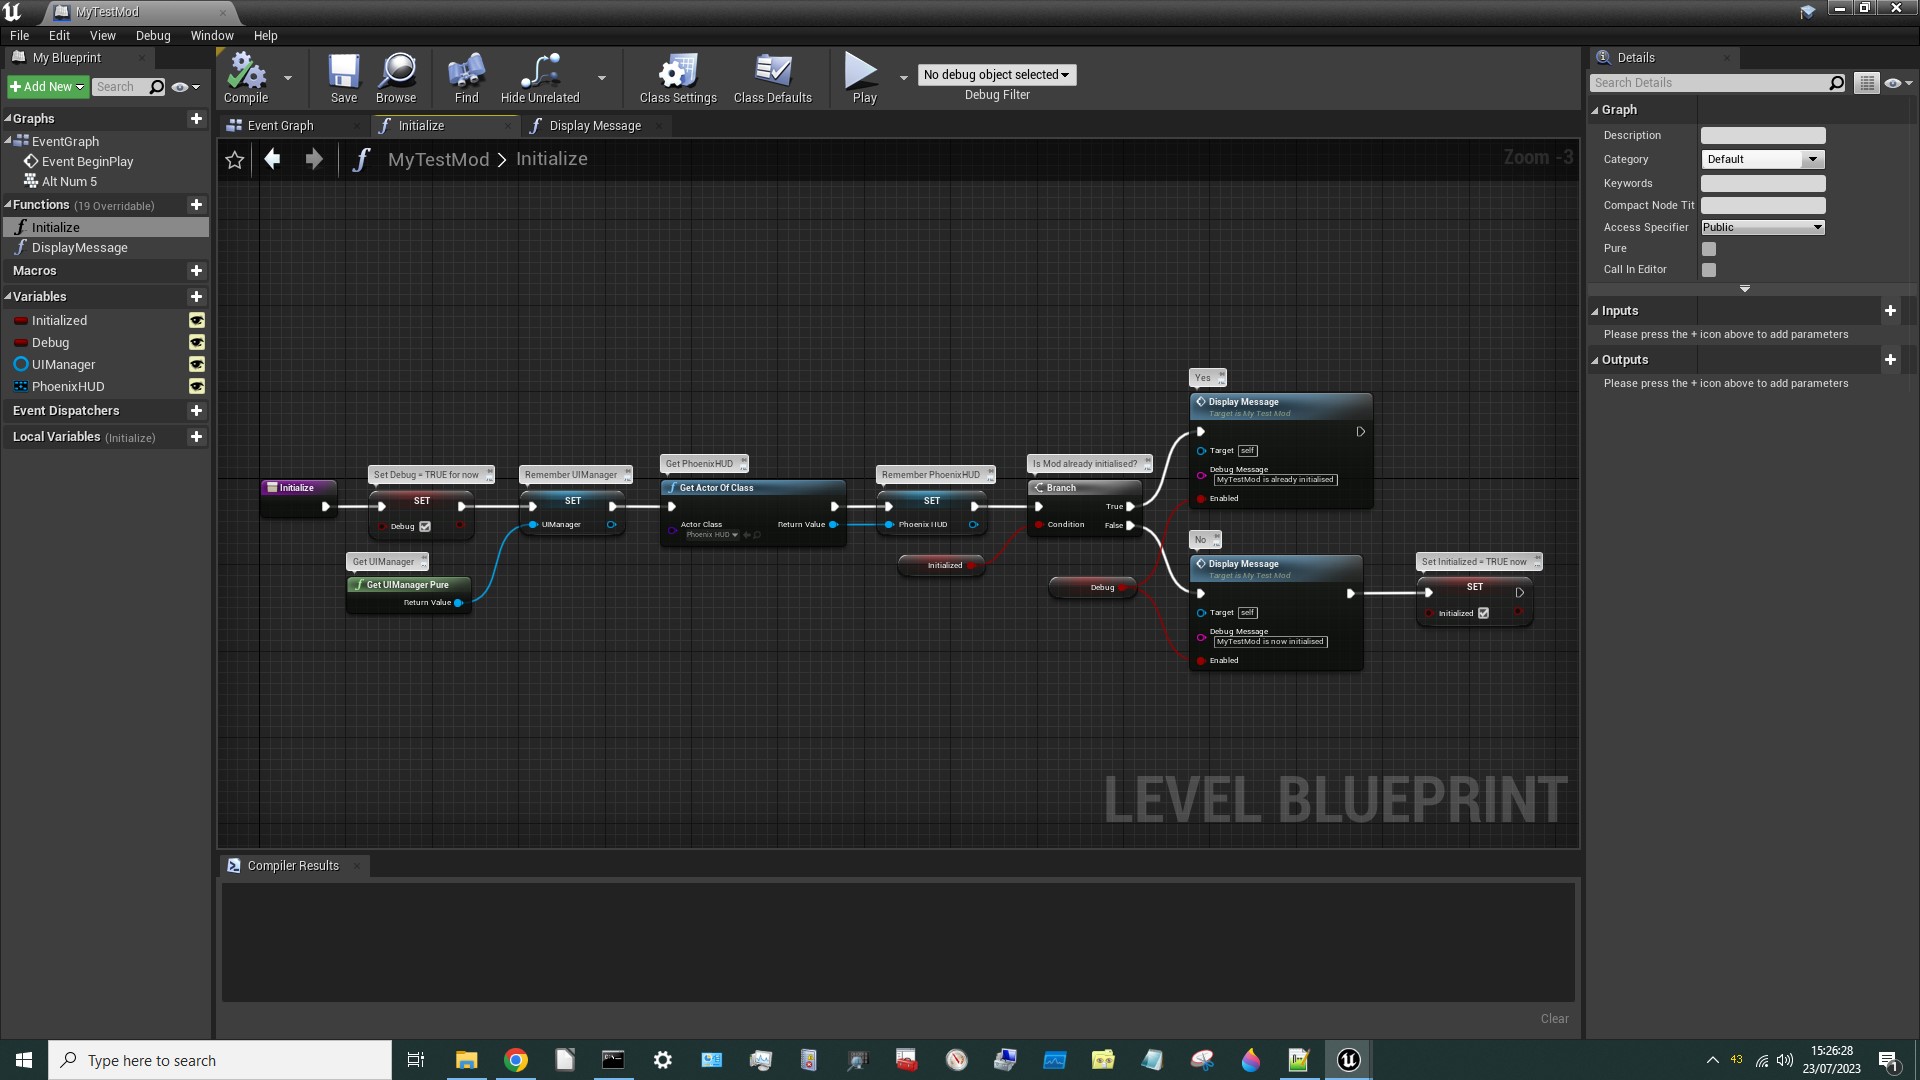
Note the DebugMessage text. We also need an Initialize Function:
Now Compile, Save, assign our Level Blueprint (i.e. our .umap file) a PakChunk, Cook it and test it!
¶ Test it!
Don't forget you'll need to use the Modloader to load the mod.
When you hit your chosen key (in my case ALT-NUMPAD5) you should see:
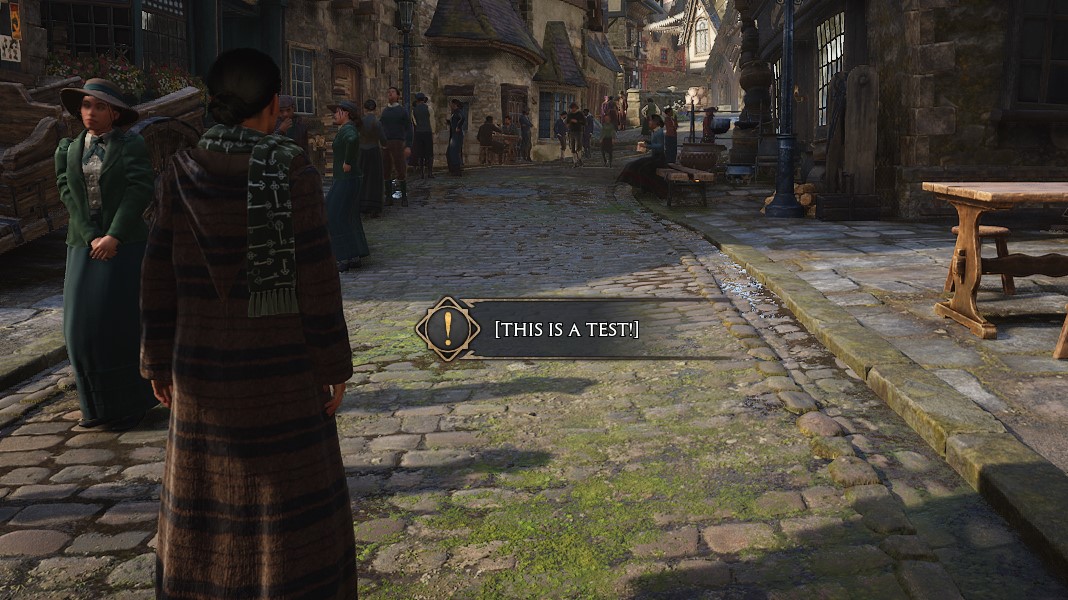
Don't worry about the square brackets around the [text]. We can get rid of those.
But more importantly…
OUR DUMMY ASSET WORKED!
Woohoo! 🥳
¶ Final Words
The DisplayMessage Function we've created here isn't quite the same as the one (by Darkstar) that we used in Tutorial #101. This one doesn't remove the [square brackets] yet and doesn't use Darkstar's GetPlayer Function. The version we used in Tutorial #101 is the one to use going forward.
The dummy assets we've created are also slightly different to Darkstar's, which include more Variables, but those variables aren't needed for this project so I omitted them.
The next Tutorial is already up: Blueprint Example 103 - Toggle Slow Motion.