¶ Synopsis
This guide will walk you through the process of creating your second blueprint mod for Hogwarts Legacy.
Beginners should read the previous tutorials before this one. They can be found here:
This tutorial was intended to provide more examples of the features and capabilities of the blueprint system… but the resultant mod is actually quite useful so I've published it on Nexus. 😁
¶ Prerequisites
If you haven't read the first article in this series (Blueprint Example 101 - Hello World) please do so now.
In particular, I'm going to assume that you:
- Have PhoenixUProj installed & working.
- Have installed the dummy assets from Darkstar's UI.rar.
- Are familiar with how to create nodes & draw blueprint maps.
- Know how to cook a Level Blueprint.
¶ PakChunk Conflicts
This tutorial was intended to be #102 but when I cooked the mod (using pakchunk 102 because that's how I roll) it wouldn't work. I couldn't see any obvious reason for that so I wondered if maybe one of my existing mods was already using pakchunk 102. But there was no tool to determine that. So I created one. It's on Nexus and is called the PakChunk Checker:
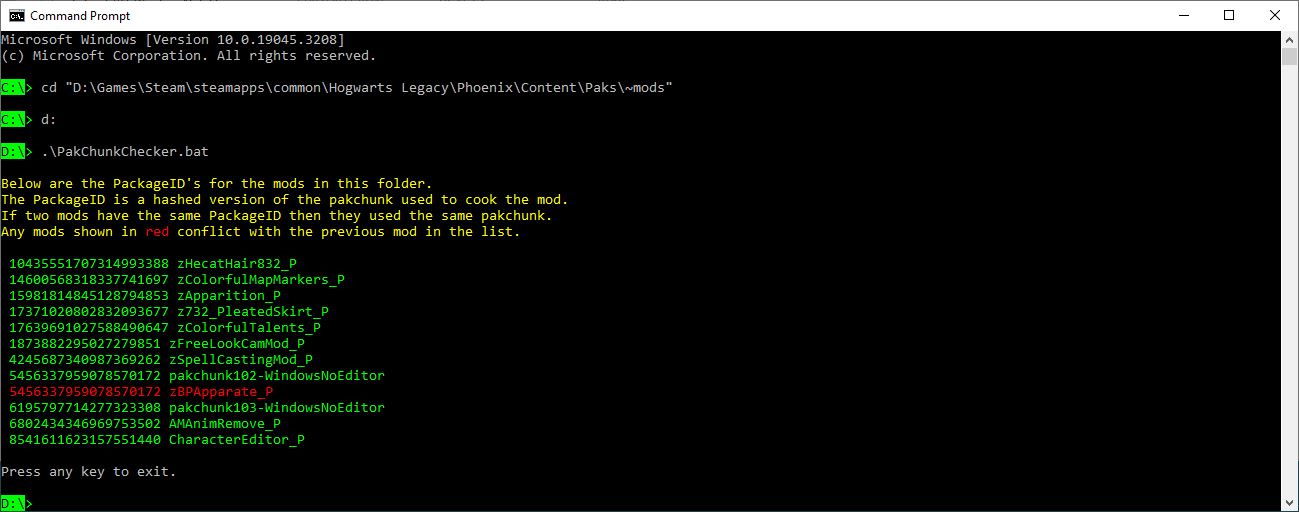
As you can see from the output above, my mod (which was called pakchunk102-WindowsNoEditor at the time) conflicts with zBPApparate_P (which is the Blueprint Apparate Modloader). So I've skipped pakchunk 102 and selected pakchunk 103 instead. This Tutorial will therefore use pakchunk 103 and be Tutorial #103. (However, when we get to the cooking stage you can cook the mod with whatever pakchunk you like.)
I will create a Tutorial #102 shortly which will explain all about Dummying Assets. Heady stuff! 😂
¶ Slow Motion Mods
There is already a slow motion mod on Nexus (here), so why bother creating a new one? Well, several reasons:
- The existing one has a bug which means that whenever the player uses Protego or Ancient Magic Throw the slow motion ends.
- When that happens you can't toggle slow-mo back on again.
- This is a long-standing bug, but it doesn't look like it will ever be fixed.
- It seemed like an easy mod to implement via blueprints so I took a shot at it.
¶ Plan the Mod
The first step is always to plan the mod. You can go into as much detail as you like, but the basic requirements for the plan are:
- What will the mod do?
- What tasks will we need to implement to accomplish that?
In this case the answers to those questions are:
- Trigger slow motion “on” when a key is pressed and “off” when another key is pressed.
- Initialise the mod, capture key presses, and turn slow-motion on or off.
Sounds pretty easy, right? Well, the devil is always in the detail but let's give it a go!
¶ Technical Requirements
Every mod you create will have some technical requirement at it's core. In this case we need to figure how to implement “slow-motion”.
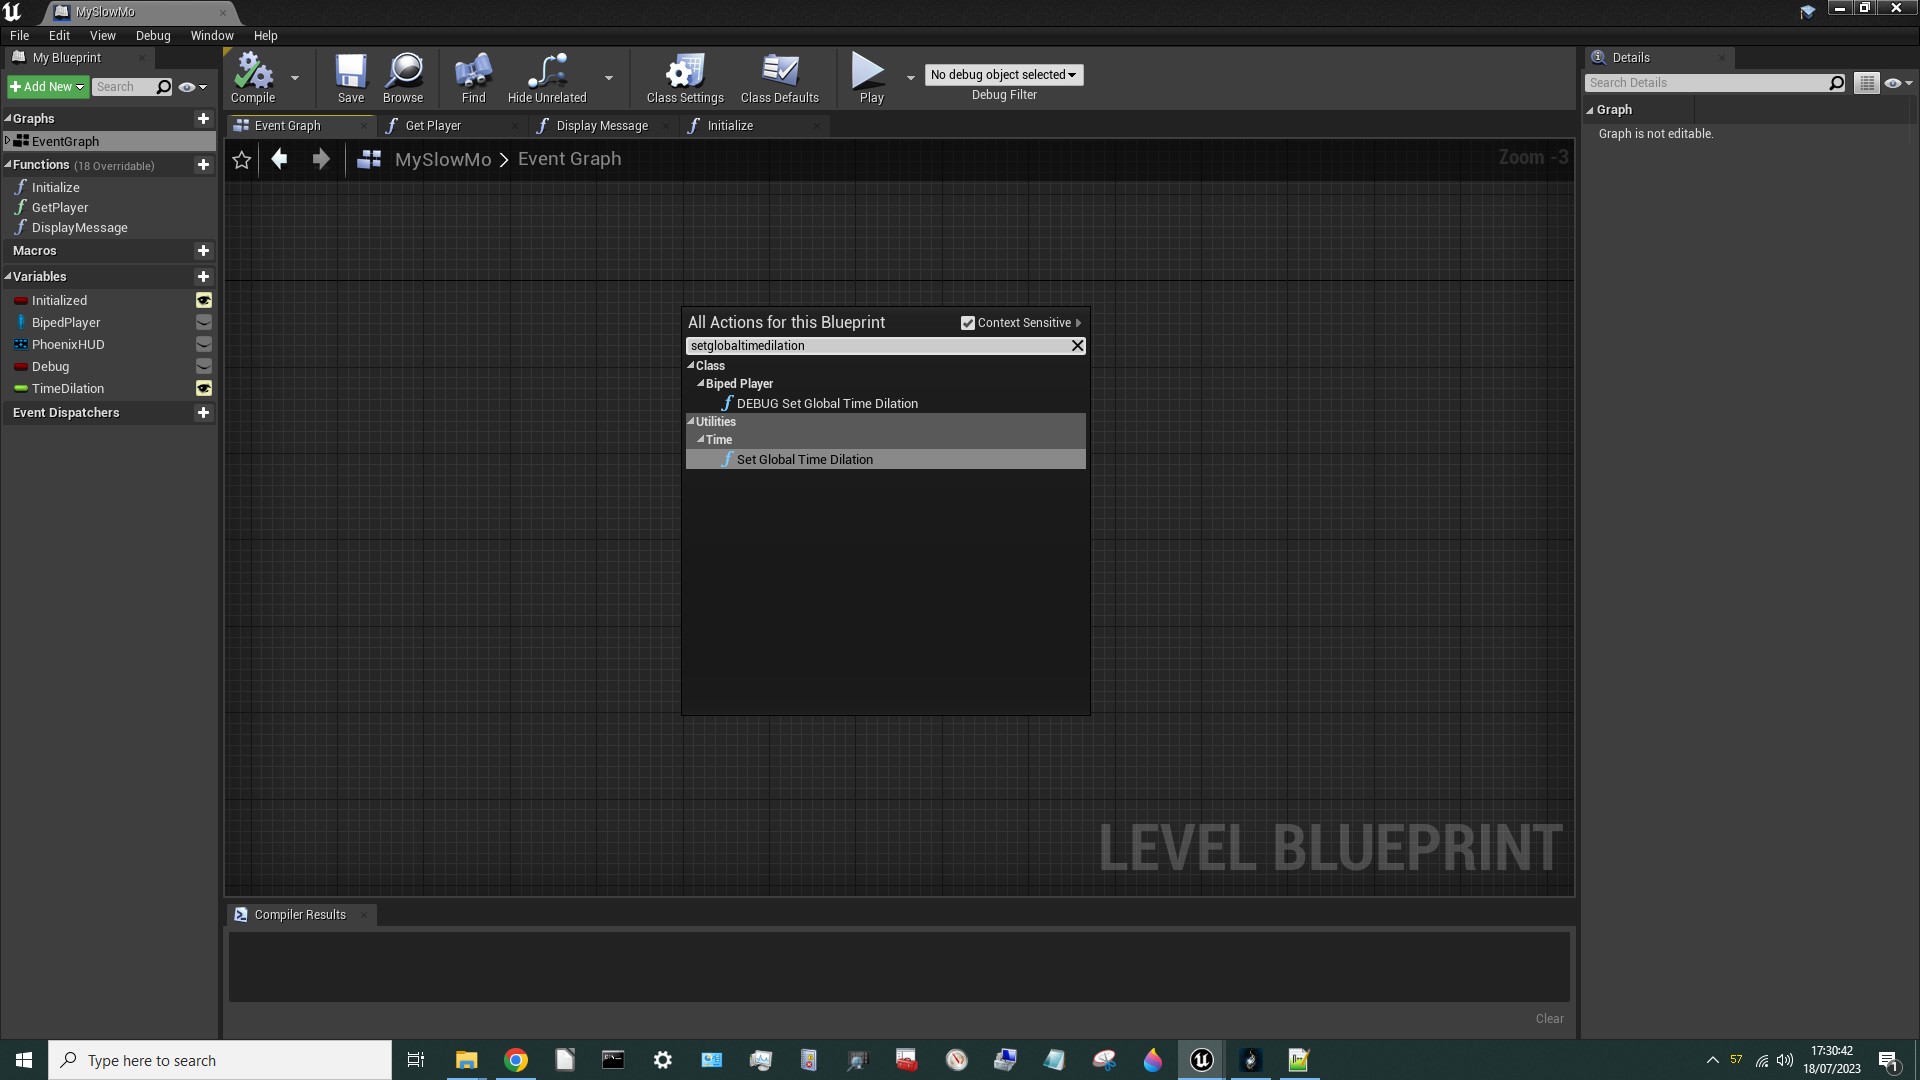
From playing the game we know that there's something already built into the game, because slow-motion happens at various times already. (For example, when you cast Protego or Ancient Magic Throw the game goes into slow-motion for a few seconds.) Fortunately we don't have to figure it out because the author of the LUA code for the mod mentioned earlier has already done it for us. They used a game function called SetGlobalTimeDilation. Right-clicking on our empty Level Blueprint and doing a search reveals that we can use the same function. Result!
¶ Create an Empty Level
First create an empty Level and rename it to MySlowMo. Refer back to the previous tutorial #101 if you can't remember how to do that. MySlowMo is the name of the .umap file we're creating, and is also what we'll type into the Blueprint Apparate Modloader to load the mod into the game.
¶ Create the Initialize Function
As with the Blueprint 101 tutorial, we're going to start by defining an Initialize function. So what do we want the Initialize function to do this time? Basically:
- Set up some variables:
Debug,Initialize, andPhoenixHUD(which is required to display messages onto the screen). - Print some debug information so we know that the mod is working.
There are lots of ways you could do that, but here's what I came up with (based on Darkstar's Initialize Function):
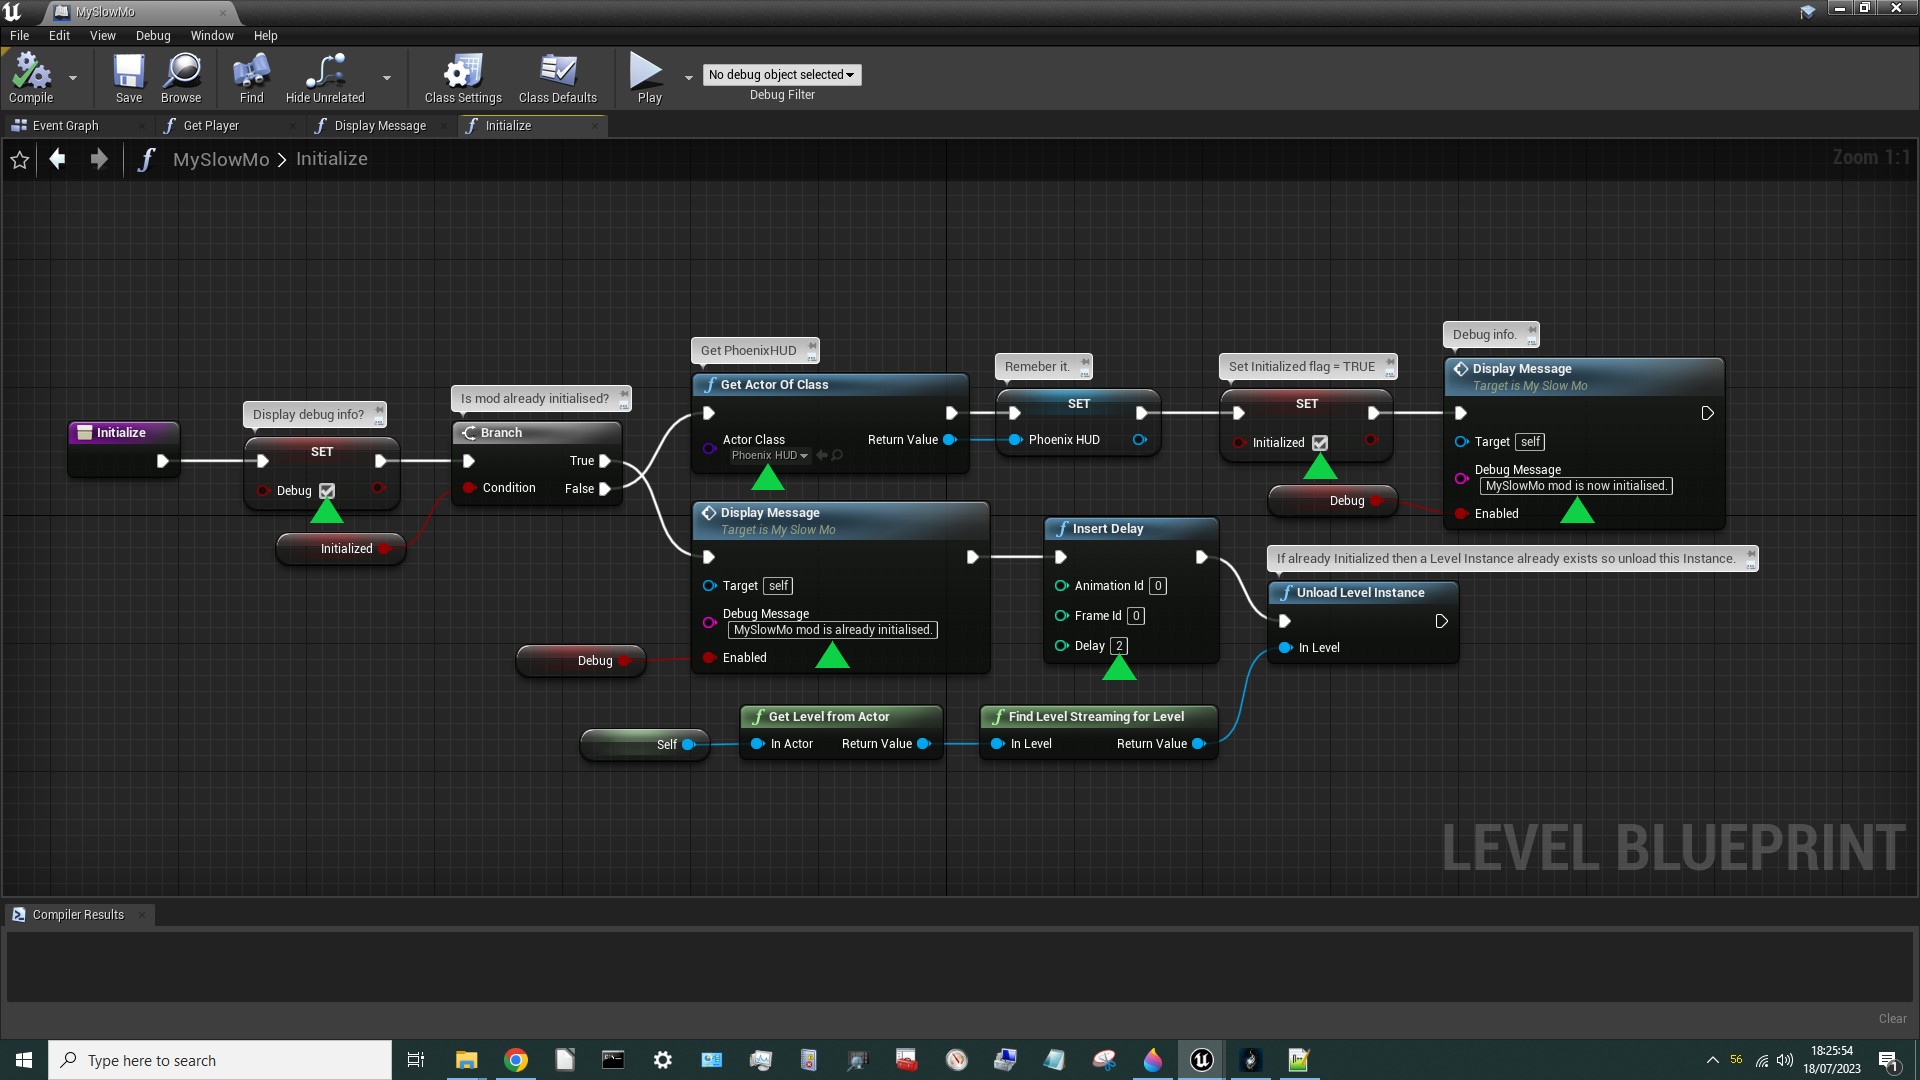
Note the default values (which I've marked with green triangles).
So what's going on here? Basically:
- The
Debugvariable is set toTRUE. - If the mod is already initialised then a) display a message “
MySlowMo Mod is already initialised.", b) wait 2 seconds for that message to appear & disappear, and c) unload the Level. That's because if the Initialize variable is already set then this must be a second Instance of the Level. I don't know how that would happen, but (just in case it does) Darkstar recommends unloading it like this. - If the mod is not initialised then a) get the PhoenixHUD and remember it, b) set
InitializedtoTRUE, and c) display a message “MySlowMo Mod is now initialised."
¶ Create the DisplayMessage Function
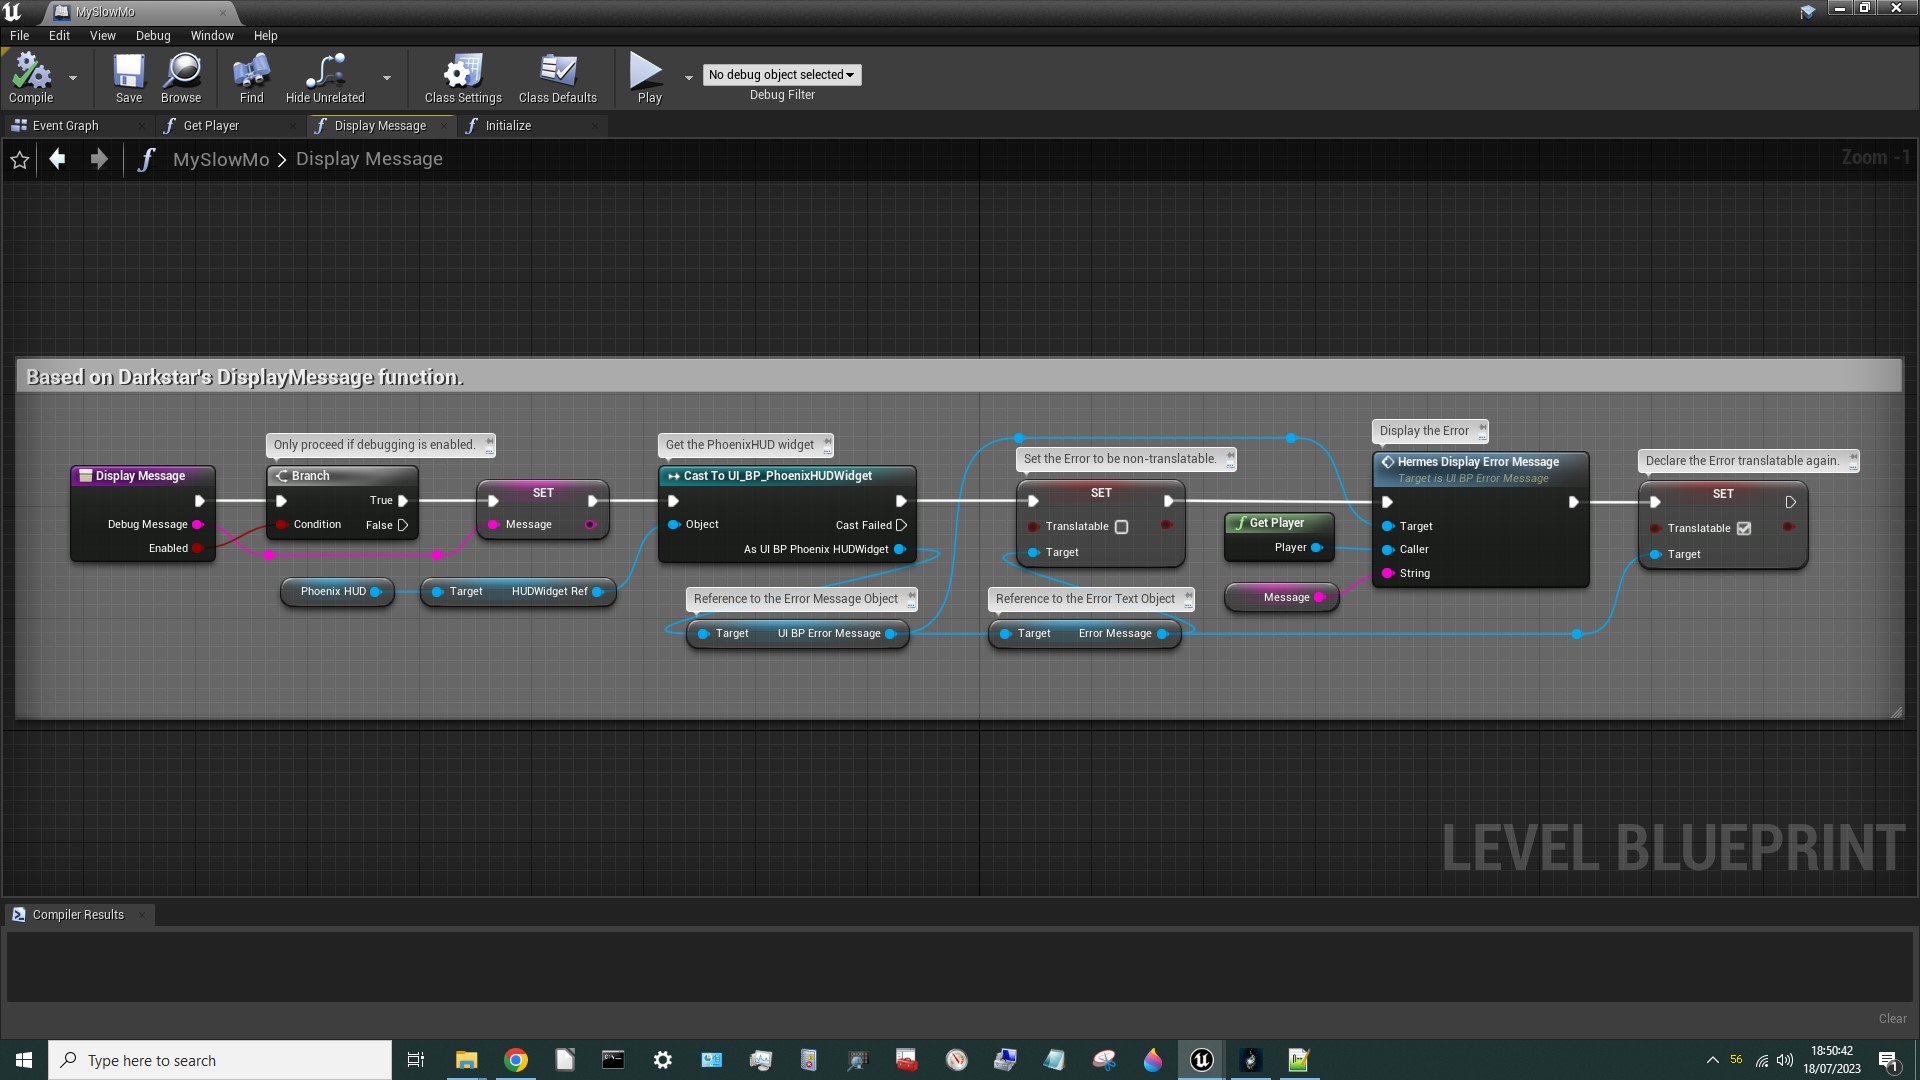
Next let's take a look at DisplayMessage I don't think that's changed since the last tutorial:
¶ Create the GetPlayer Function
Next we have the GetPlayer Function, courtesy of Darkstar (published in this message on the Hogwarts Legacy Modding Discord):
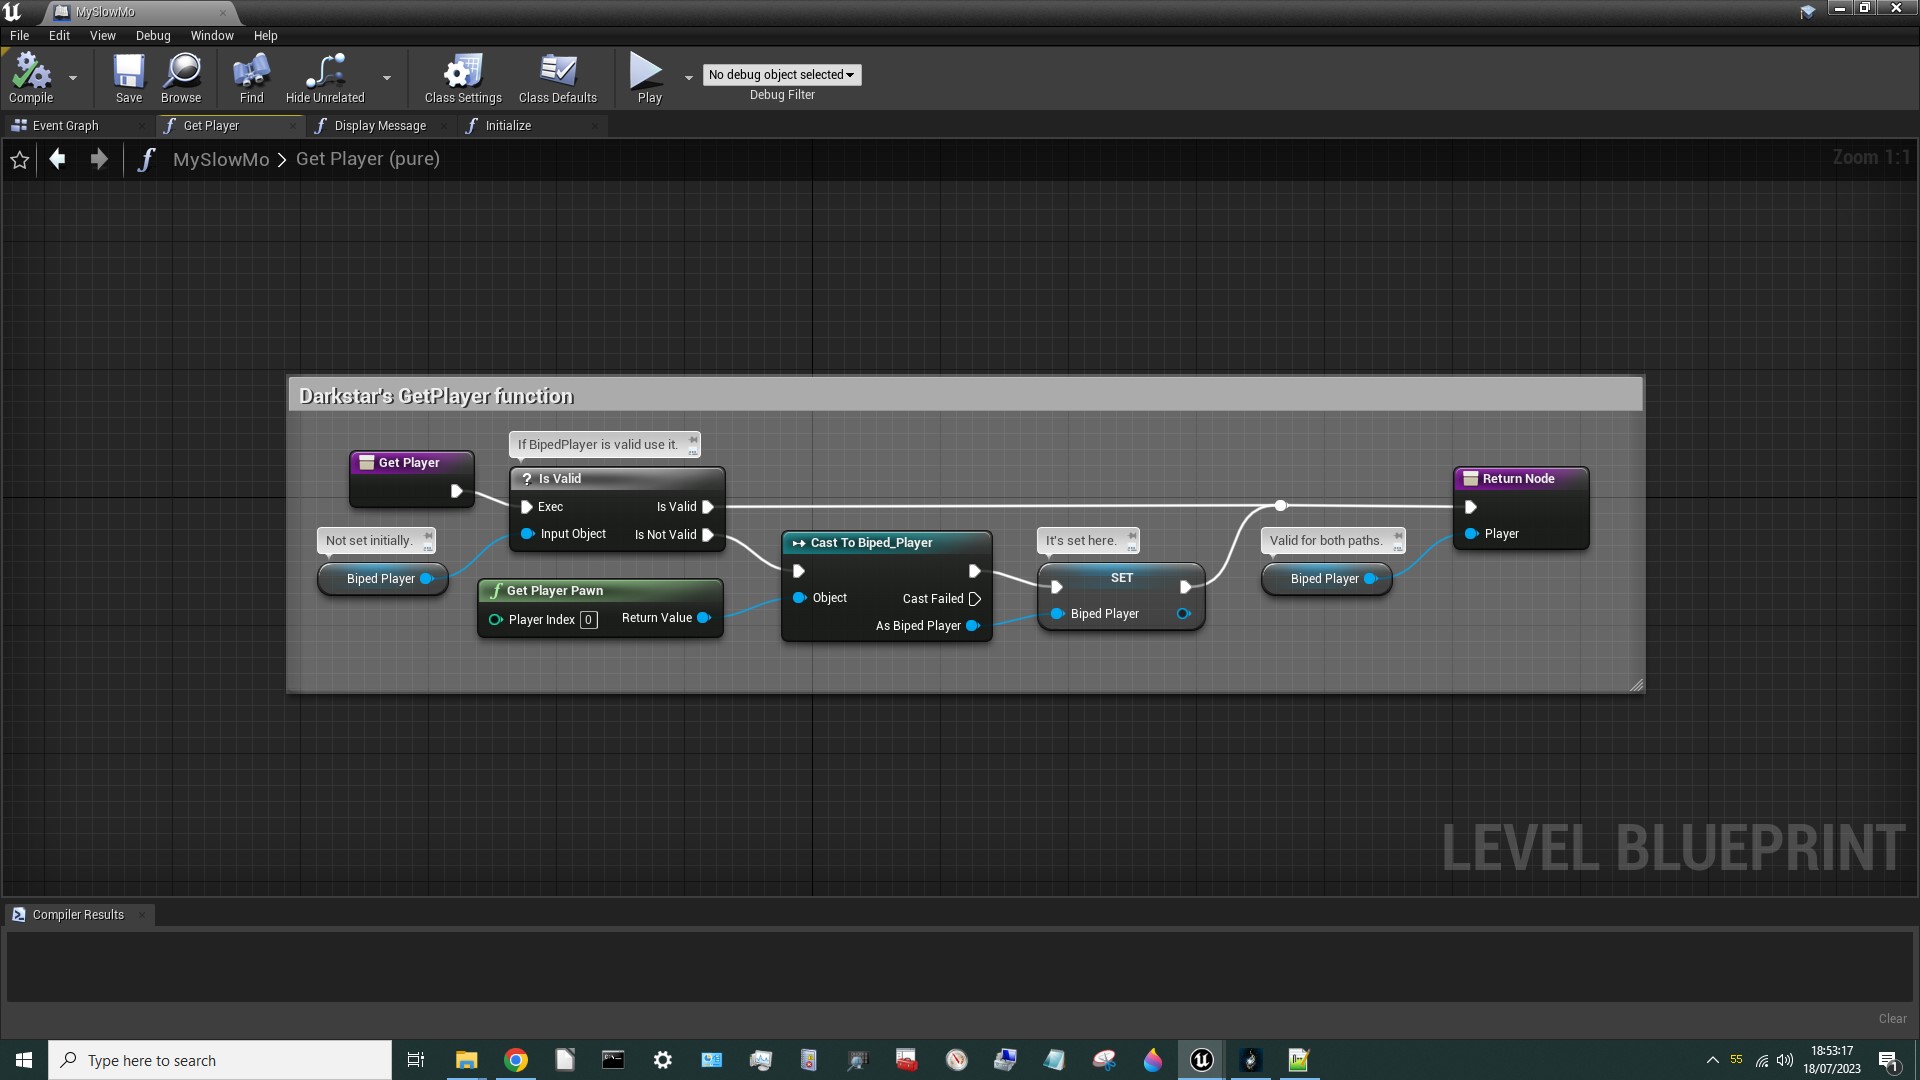
I don't think we used that in the last tutorial, but it's a handy little function and it's quite clever. We'll be using this structure for other things in future, because it's very efficient. If the variable being requested (in this case BipedPlayer) is already set, then that value is returned. But if it's not set then the function figures out what it is and saves that for future use. All future calls to the function will just return the saved value. But that's not all. If the stored value somehow becomes in-Valid then the value gets re-calculated. Simple but genius!
¶ Complete the Event Graph
Finally we have the Event Graph. I decided to offer four different options for the Time Dilation, as you can see:
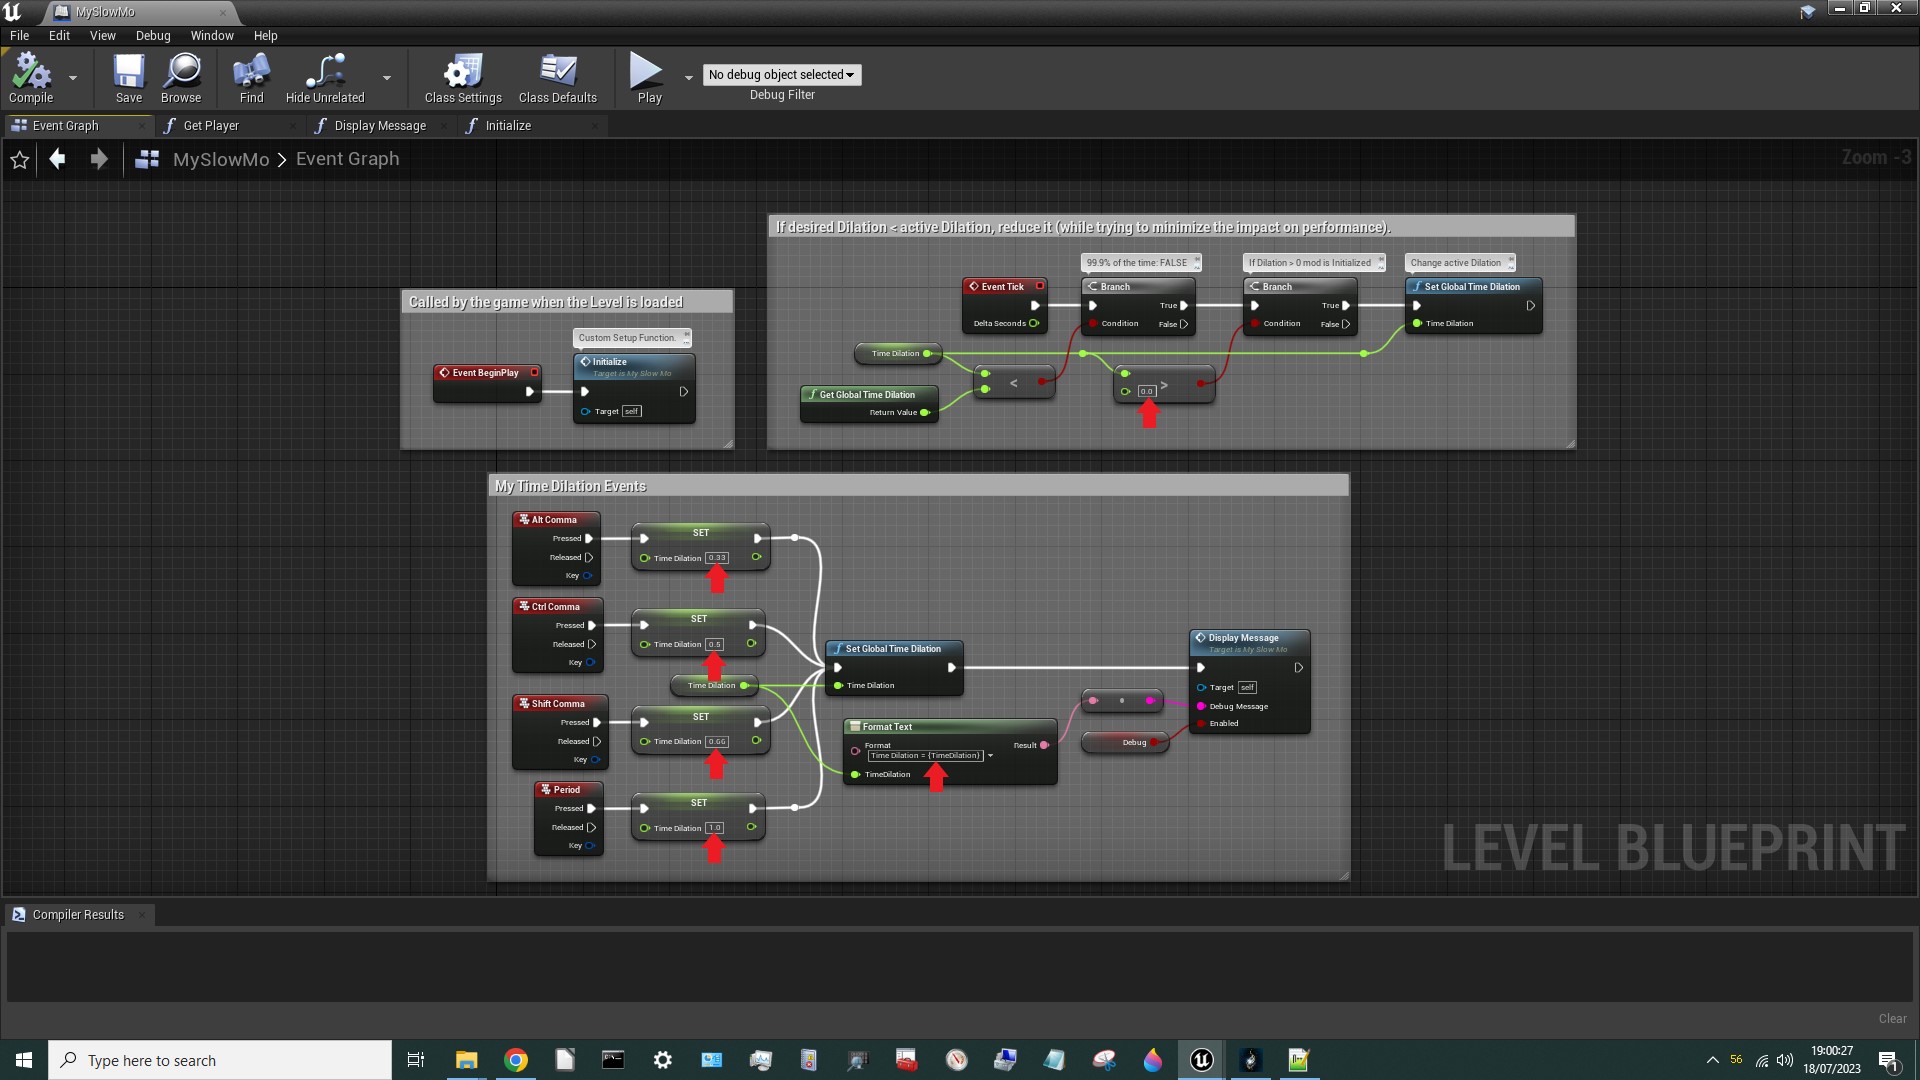
We discussed how to create these nodes in the last tutorial. Note the default numbers highlighted by red arrows.
¶ The Event Graph Explained
There are six Events on this Event Graph, arranged into three groups:
Event BeginPlaywhich is triggered when the mod is loaded by the modloader. This simply runs ourInitializeFunction.Alt Comma,Ctrl Comma,Shift CommaandPeriod. These are all KeyboardInput Events, triggered when those key combinations are pressed. As you can see, all each one does isSettheTime Dilationvariable (which is aFloat) to 0.33 or 0.50 or 0.66 or 1.0. TheTime Dilationvariable is then fed straight into theSet Global Time DilationFunction. TheFormat TextFunction is used to construct aText-format message, which is converted into aString, and fed toDisplayMessageto be displayed on-screen.Event Tickwhich is called every time the game finishes drawing a frame. If your game is running at 60 FPS then thisEventwill be called 60 times per second! That's a lot, which means you have to be very careful about what you execute viaEvent Tick. As a general rule you should avoid executing things onEvent Tickif at all possible. We'll do it this way for now, but if anyone knows of a better way please let me know. So why do we need to do something onTickfor this mod? Well it all goes back to the problem I mentioned earlier regarding Protego and Ancient Magic Throw. There are occasions when the game itself changes theGlobal Time Dilation. We need to find a way to change it back (to whatever we were using before the game intervened). This is my quick-and-dirty method of doing that, but I'm trying to be responsible about it. I've designed the logic executed onTickin such a way that it will hopefully have the least impact on FPS. I've done that by keeping calculations to a minimum, and executing them in an order which ensures that execution ends as soon as possible. For example, 99.9% of the time we'll be in a situation whereGlobal Time Dilationis 1.0 and neither we nor the game want to change that. So every time a tick happens in that circumstance we want execution to end immediately. The first check is therefore a branch on whether our desiredTime Dilationis less than the currentTime Dilation. When our desiredTime Dilationis 1.0 and currentTime Dilationis 1.0 execution will end on the first branch. But this will also happen when our desiredTime Dilationis 1.0 and currentTime Dilationis 0.5. In other words when the game has changed theTime Dilationfor some reason, we just leave it to do its thing. The only time we actually do something is if our desiredTime Dilationis less than the currentTime Dilation. This can only happen when we've initiated a slow-mo but the game has reset it (because an Ancient Magic Throw just ended, for example). In that case we setTime Dilationback to our desired value. Finally, the check for whetherTime Dilationis > 0 is just there as a safety measure. I made sure to set theTime Dilationvariable up with a default value of 1.0, so it should never have a value of 0.0 but if it ever did then the game would freeze… and we don't want that.
¶ Cook it!
That's it! That's the whole mod. Surprisingly simple isn't it? The only significantly new stuff is two extra groups of events on the Event Graph. Not much at all really. That's the beauty of blueprints. And that's what we should always be aiming for - to achieve a lot with the least effort. It also helps if we take a modular approach and re-use functions from other projects.
If you've been re-creating the Blueprint Graphs above as we go along then well done - that's the best way to learn blueprints.
Alternatively, you can download the blueprints from the link at the bottom of this page.
Now go ahead and cook the mod like we did in wiki #101.
¶ Events versus Functions
While that's cooking, let's talk about Events and Functions. What's the difference? They seem very similar…
To put it another way, when should we use an Event and when should we use a Function?
Well, as I understand it:
Functionsare designed to manipulateVariablesand quantities. To that end, aFunctioncan contain lots of internalLocal Variableswhich it can use for processing.Local Variablesare automatically deleted when theFunctionterminates, so they're very resource-efficient. (Conversely, anEventcannot useLocal Variables.) It is expected that any Blueprint Project will have lots of Functions, and each one can be quite large, so each Function has its own tab in the Level Blueprint Editor.Eventsare designed to deal with userActionsand other time-related stuff. AnEventcan contain aDelay, for example, whereas aFunctioncannot. It is expected that any Blueprint project will have relatively few Events, and they tend to be small, so allEventsare created on a single Event Graph.
¶ Test it!
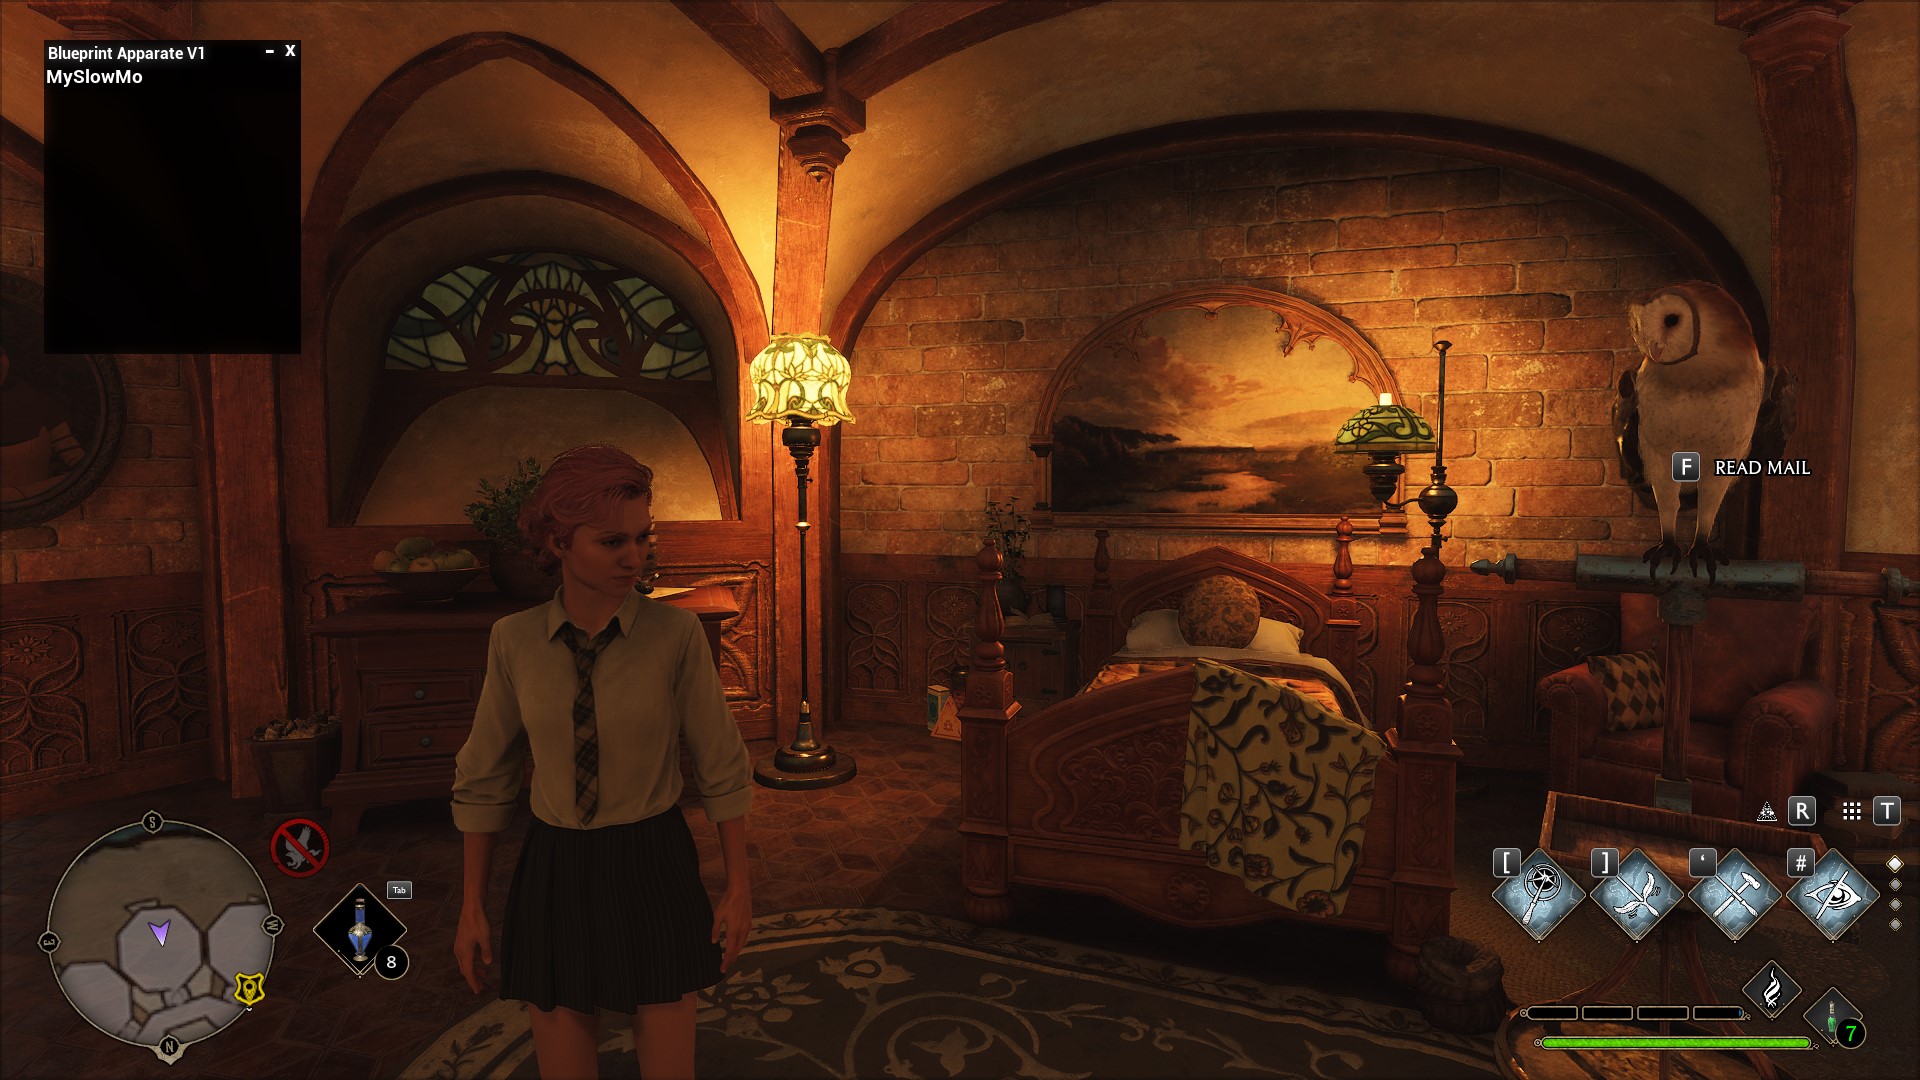
Below is a screenshot showing what should happen just before you load the mod via the Blueprint Apparate Modloader:
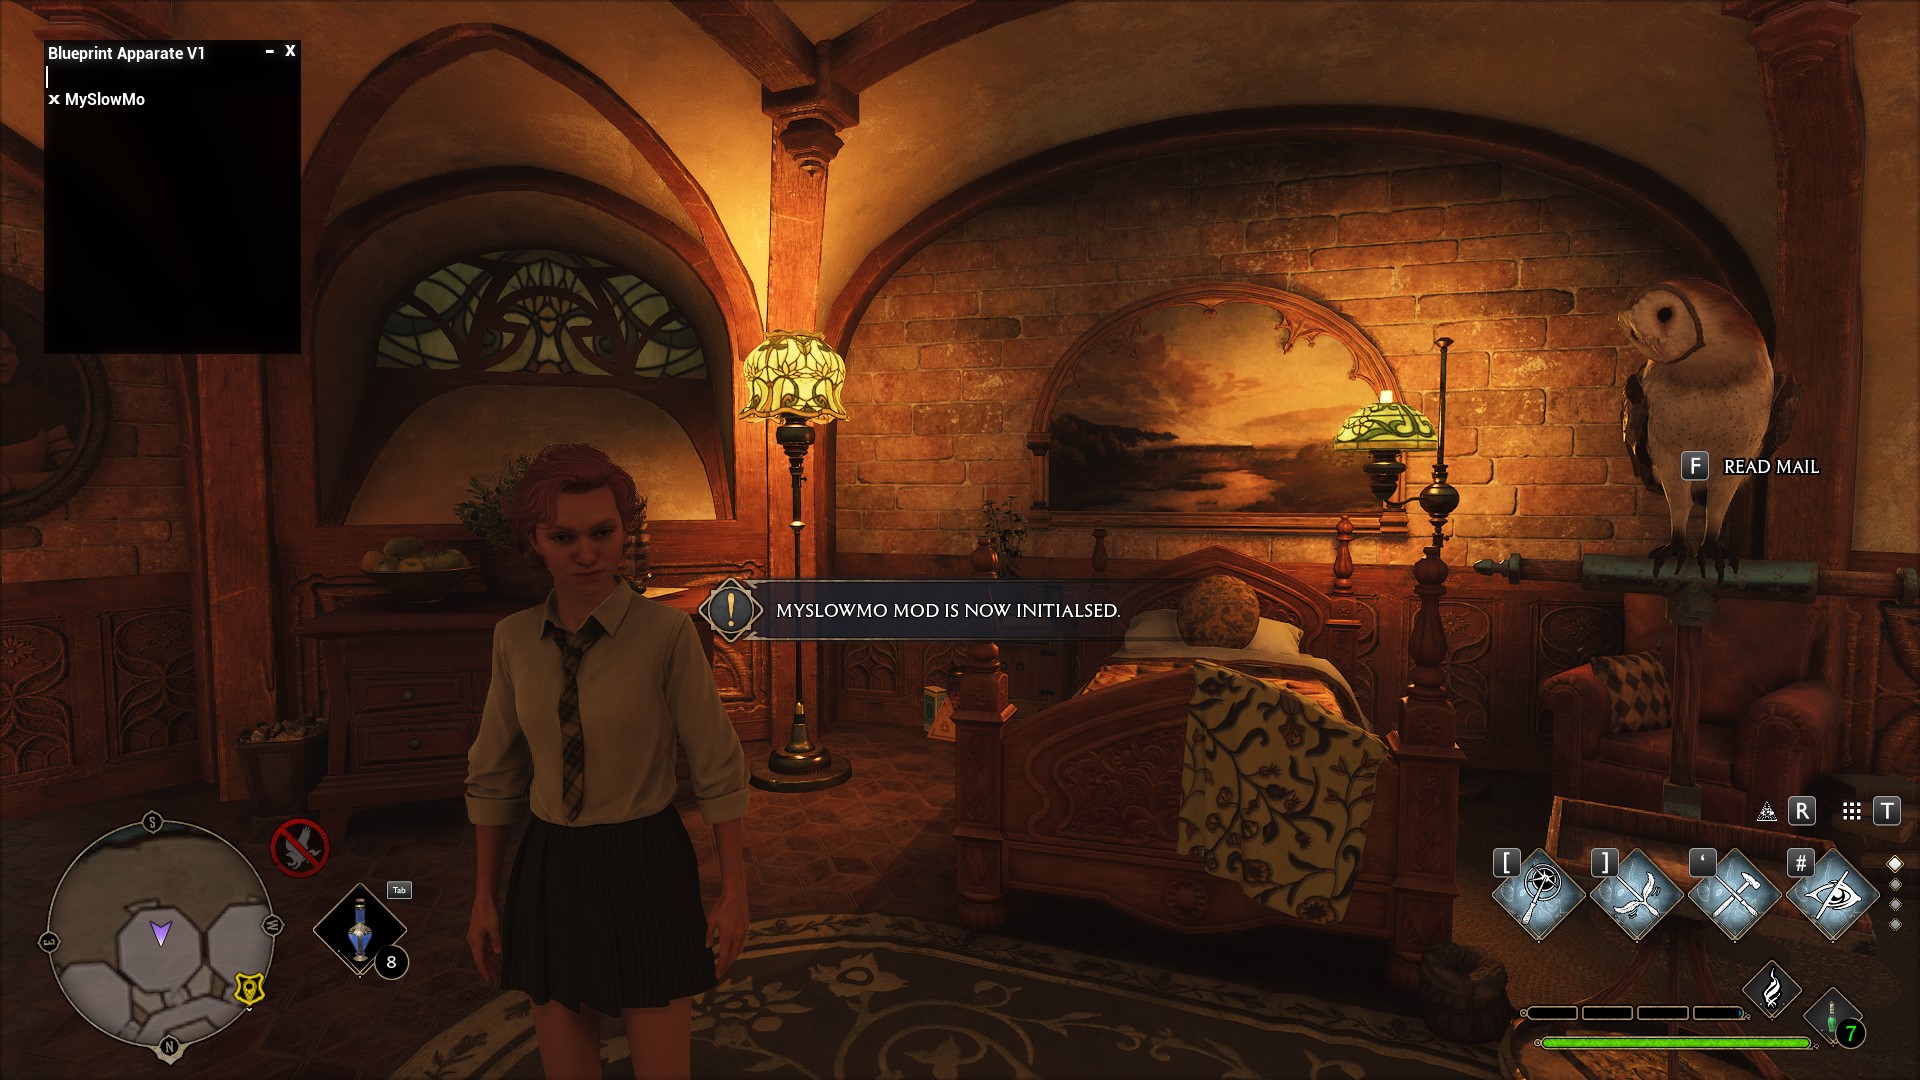
And here's what happens just after you load it. (Ignore the typo in the message - I fixed it.)
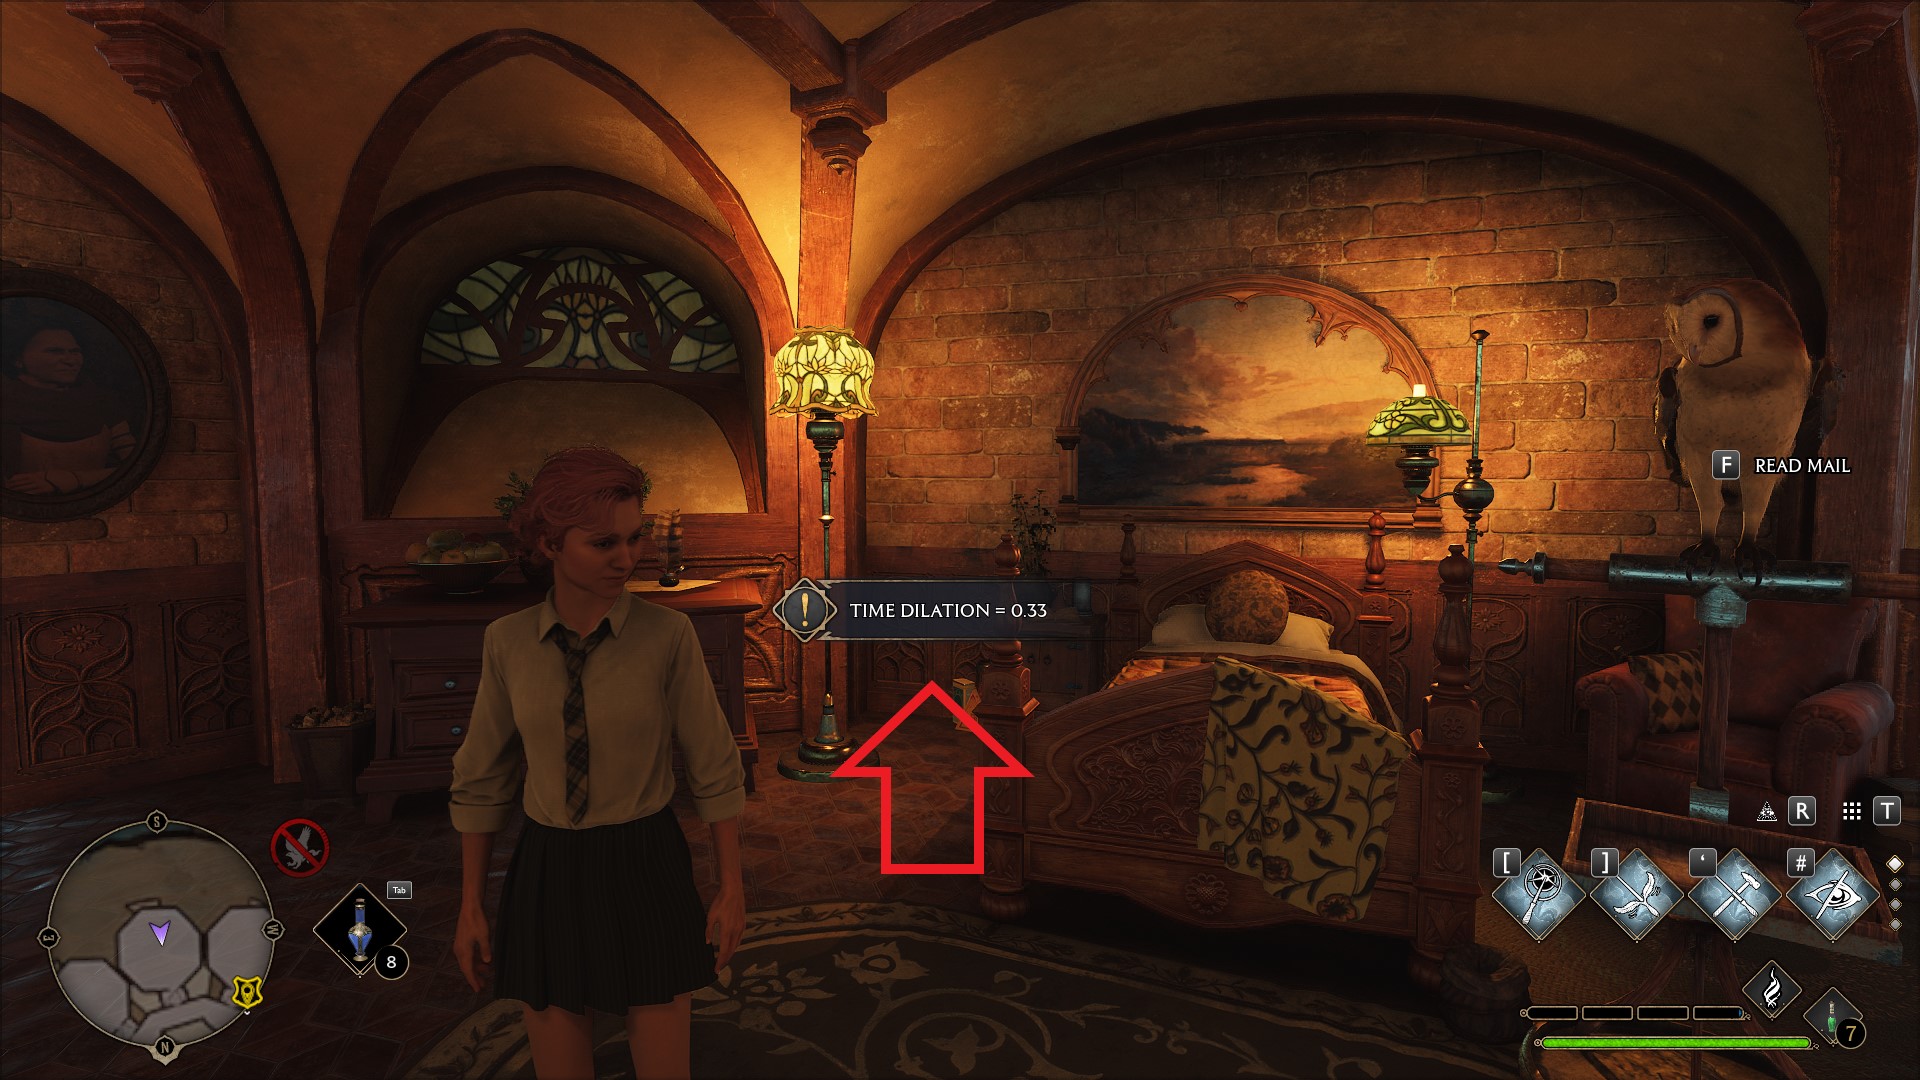
And here's what happens if you hit ALT-comma:
¶ Download the umap
If you had any problems creating the blueprints in this tutorial just download the umap file from here , rename it to MySlowMo.umap (noting the uppercase characters) and use Windows Explorer to drag & drop it into the CustomContent folder of your PhoenixUProj.
¶ Acknowledgements
Special thanks must once again go to Darkstar, whose functions I use in this mod and whose assistance was invaluable in helping me to understand how blueprints work.