¶ Vanilla Setup Guide
Welcome to the official Community Shaders User Wiki.
This page outlines the vanilla setup.
This wiki is powered by the Nexus Mods documentation system and maintained by the community.
For more advanced information, see the GitHub Developer Wiki.
Need help or want to chat with the community? Join us on Discord:

¶ Overview
This page is for people who already have a stable modded setup with the full Community Shader suite properly installed. For those that haven't, please first follow guides such as A Dragonborn's Fate or the Step Modifications Guide for Skyrim, as well as our Installation Guide for Community Shaders. For those migrating from ENB check out our ENB Migration Guide.
The provided FOMOD options are recommended settings only.
Please make sure to read the descriptions of the mods you download, it saves mod authors and support a lot of time and effort. ❤️
¶ Lighting
A lighting mod will allow you to get the most out of Community Shaders. Currently, the two most popular interior options are True Light and Lux CS. Both look fantastic so whichever one you pick is based purely on your preferred aesthetic.
Before installing anything, please install Light Placer and CS Light.
Lighting mods manually place lights in either interiors or exteriors. Because of this, authors often separate the edits into two seperate plugins, one for exteriors, one for interiors. This allows users to mix and match interior and exterior edits from different mods. Please note that your exterior lighting is also affected by your weather mod.
Only use one interior and one exterior lighting mod at a time.
Any mod utilizing ENB Light or ENB Particle Lights is incompatible with CS. If you do use them with CS, you won't have any light emitted by those objects. Please find patches utilizing CS Light or Light Placer instead.
¶ True Light
An extensive, modern lighting mod using po3's powerful Light Placer and Community Shaders Inverse Square Lighting feature.

 Pictures from the mod page
Installation instructions
- Install its requirements
- Main files - True Light
- You will be prompted with a FOMOD installer:
- Next
- Yes
- Yes (Recommended)
- Yes (Recommended)
- Regular
- True Light Exteriors (if you want to mix and match, do not choose this)
- Dwemer Swap BOS
- FX Glow Remover BOS
- Install
- You will be prompted with a FOMOD installer:
¶ Lux CS
Tonemapping and Image Space edit for Lux and Community Shaders with light placer support.
The Lux CS description has instructions for Lux FOMOD options. To get the exterior light edits you can use Lux Via and Lux Orbis.
Lux CS is incompatible with Ambient Templates for Lighting Mods or Windows Shadows Ultimate

 Pictures from the mod page
Installation instructions
- Install its requirements
- Main files - Lux CS
- You will be prompted with a FOMOD installer:
- LightPlacer addon
- Bright
- Install
- You will be prompted with a FOMOD installer:
¶ Other popular lighting mods
Generic lighting that mods work with CS but do not use the CS tonemapper or Light Placer.
Do not use EVLaS, Sky Sync fully replaces it.
Any version of Modern Lighting Overhaul 2 above 1.3.6 is incompatible with CS.
- Lux Via and Lux Orbis (exteriors only)
- ELFX (contains seperate plugins for interiors and exteriors)
- Luminosity Lighting Overhaul (interiors only)
- Relighting Skyrim (contains seperate plugins for interiors and exteriors)
- Skyrim is Luminous (light source edits, check for compatability in description)
- Lightened Skyrim (contains seperate plugins for interiors and exteriors)
¶ Weathers
Weather mods change exterior lighting and edit the vanilla Skyrim weathers to be more realistic and take full advantage of the Community Shaders suite. Be sure to read the descriptions on these mod pages as they often contain links to other visual mods. Check if your favorite weather mod has been ported to CS.
You are encouraged to try them all out as they all have their own unique aesthetic.
Only use one weather mod at a time.
Here is a non-exhaustive list of popular CS weather mods:
- NAT.CS III by dBottle
- Obsidian CS by dBottle
- Astralite Weathers by Laminin
- Azurite III CS by Dlizzio
- Vanilla CS by dBottle
- Real Weathers Remastered by PixelsSquared
- Nirn Whispers by CarbonDice
- etc.
¶ Other Visuals
¶ Windows
¶ Interiors
Window Shadows Ultimate is a highly recommended interior lighting mod which creates realistic window shadows. Be sure to also check out its Patch Hub.
WSU is incompatible with:
Window Shadows RT
Lux
ELFX Shadows
Enhanced Lights and FX
Relighting Skyrim (Interiors)
Skyrim is Luminous

 Pictures from the mod page
Installation instructions
- Install its requirements
- Main files - Window Shadows Ultimate
- You will be prompted with a FOMOD installer:
- (installl patches as required by your list)
- Brightest
- Normal
- Enable
- Install
- You will be prompted with a FOMOD installer:
¶ Exteriors
Window Emittance Consistency fixes inconsistencies in window brightness in worldspaces so you don't get overly bright or overly dark windows at night.
Installation instructions
- Install its requirements
- Main files - Window Emittance Consistency (WEC)
- You will be prompted with a FOMOD installer:
- WEC - Mid [CS with Faultier]
- Install
- You will be prompted with a FOMOD installer:
¶ CS Particle Patch
CS Particle Patch fixes lighting on countless vanilla meshes and is highly recommended. CS Particle Patch is compatible with ENB Particle Patch, but make sure CS Particle Patch overwrites it.
When installing, be sure to check the requirements as not all are hard requirements.
¶ DIAL
Dynamic Interior Ambient Lighting adjusts the brightness of interiors according to time of day, highly recommended.
¶ KreatE
KreatE allows you to edit Skyrim's visuals through a user-friendly interface. Presets can be found on Nexus.
¶ Lighting Brightness
For interior lighting, please check your brightness options in the FOMOD for Ambient Templates for Lighting Mods (higher percentage = brighter).
Exterior lighting is affected by your weather mod plugin, so you can try to tweak the brightness values in KreatE and then copy the edited values into the plugin in xEdit.
¶ Remove Fake FX
To remove the 2D fake glow around vanilla light sources, the True Light FOMOD provides a Base Object Swapper config to remove them.
¶ Cubemaps
Seamless Dynamic Cubemaps provides dynamic cubemap textures as well as fixes for various modded and vanilla cubemaps. Pairs well with PBR textures.
¶ PBR Textures
Community Shaders supports Physically Based Rendering or simply "PBR" textures in the form of True PBR. By utilizing advanced rendering techniques, PBR textures achieve visuals that closely match with real life. To get started, you can try Faultier's PBR Skyrim as it features a comprehensive remake of vanilla textures. Other options include Skyland PBR, Cathedral Landscapes PBR and Vanaheimer Landscapes (pick the PBR option in main files). Be sure to check for PBR patches for any texture mods you have, a good place to start would be PBR Hub. For those looking to create PBR textures please look at our True PBR page and True PBR for Authors.
When adding PBR textures you must use the PGPatcher tool to properly patch meshes to use PBR textures. As good practice, please also create an output mod for the PGPatcher output, and make sure to carefully follow the conflict management instructions in PGPatcher. For more information visit our PGPatcher page.
To ensure that there are no missing textures, please use Asset Doctor.
PBR textures also benefit from not-broken meshes, try Mesh Improvement Compilation for a start, there is an endless sea of mesh fix mods out there...
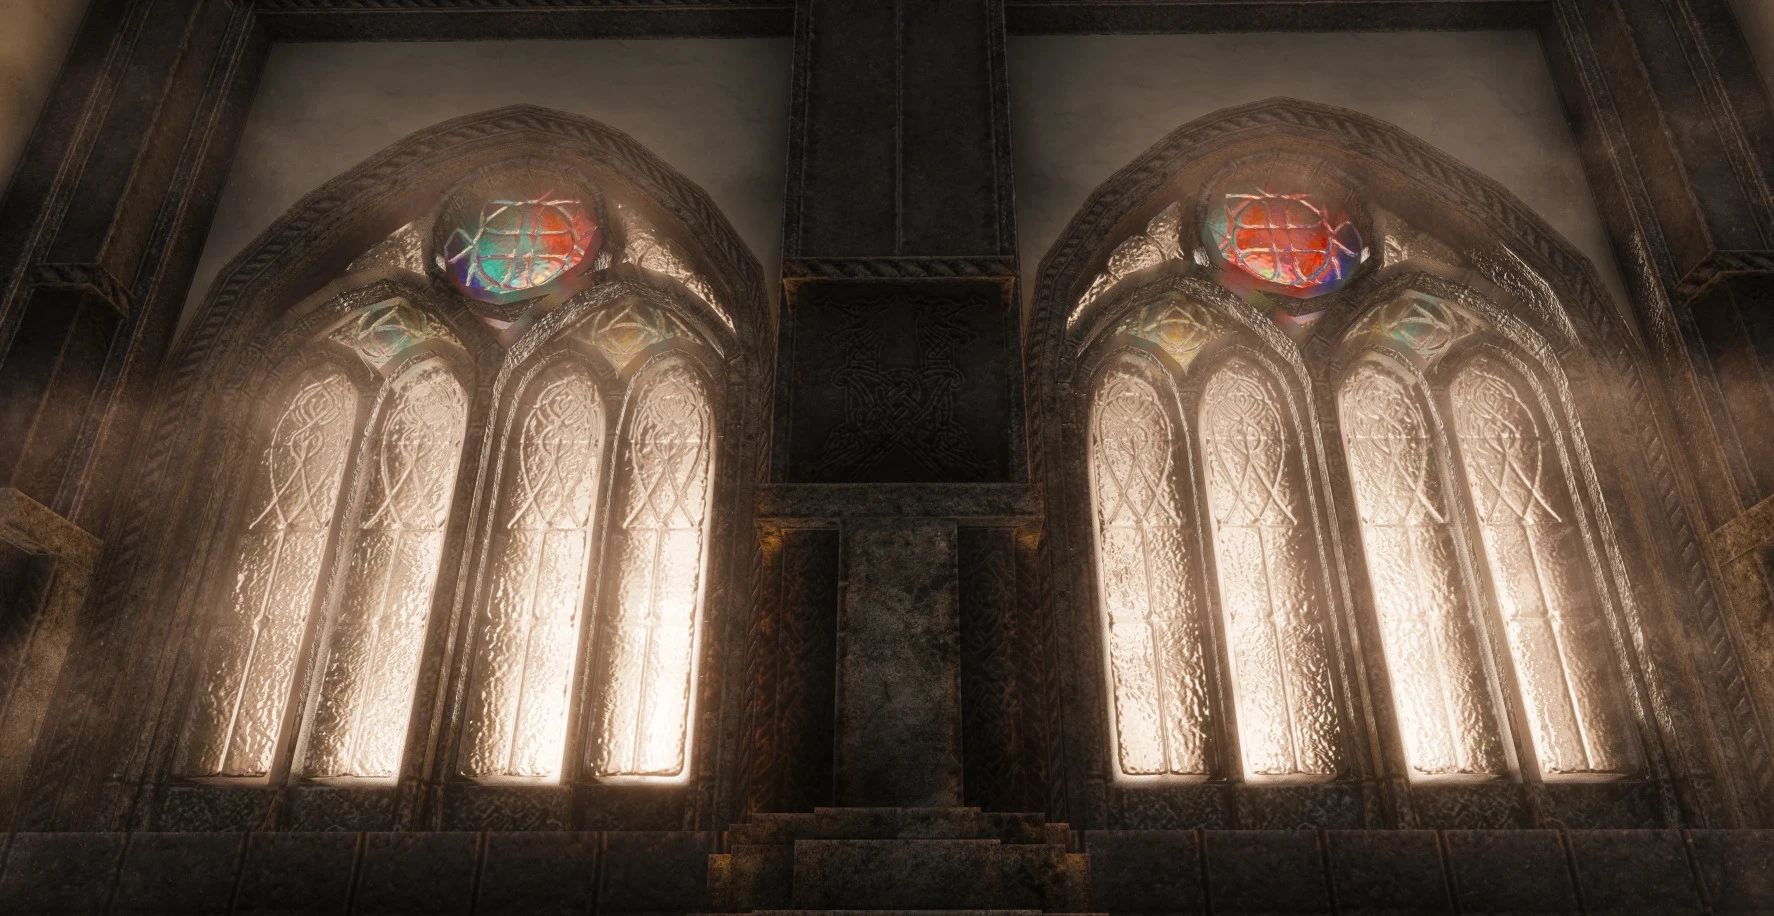
 Pictures from the Faultier's PBR Skyrim
¶ Recommended settings for PGPatcher
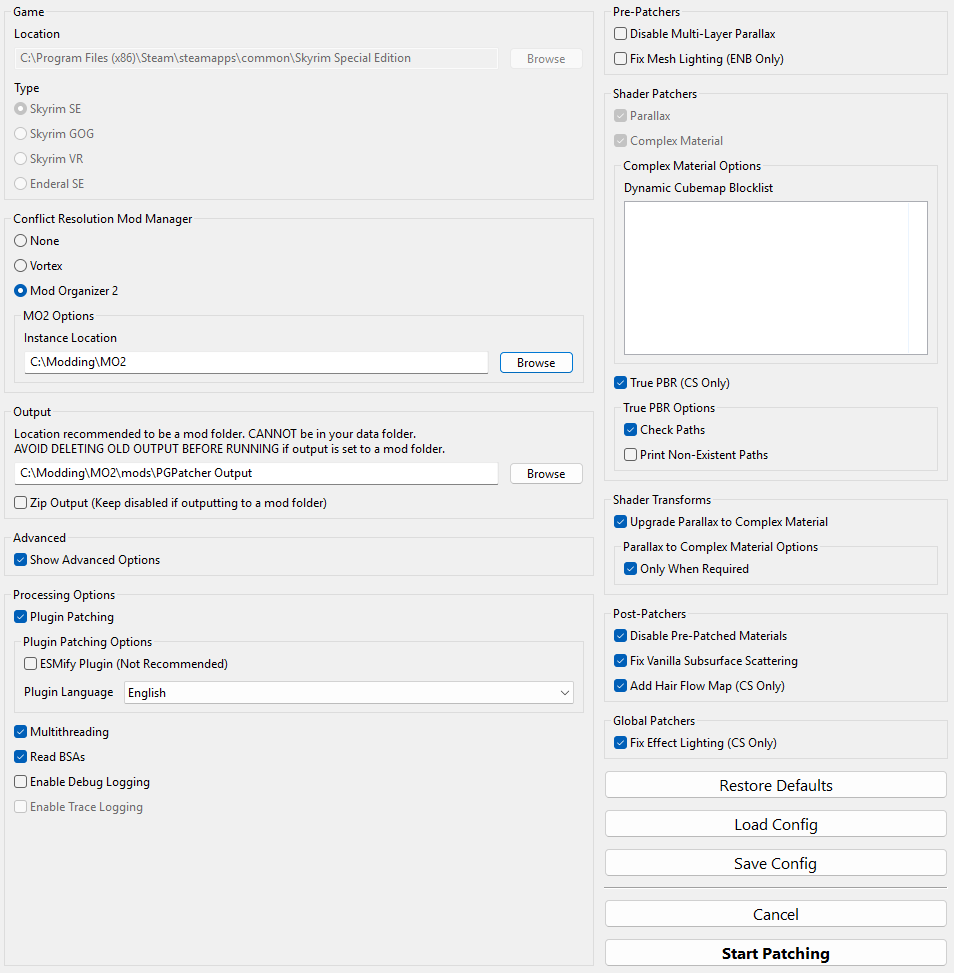
Please note that the Instance Location and Output paths here will differ according to your setup
To find your MO2 instance location, click on the folder icon in MO2 and select
Open Instance folder
¶ Running PGPatcher with other patch tools
This is the order in which tools should be run if you choose to use them.
We do not recommend using tools which automatically generate heightmaps or normal maps. Running these tools can result in incorrect looking results. Parallax and normal textures need to be tweaked by a human being to make sure they look correct.
- Synthesis
- Bodyslide*
- PGPatcher
- VRAMr**
- xLODGen
- Texgen
- Dyndolod
*PGPatcher output should overwrite Bodyslide output
**VRAMr can cause visual issues with textures, use with caution
¶ Acronyms
A list of common acronyms when discussing CS.
- SSS - Screen Space Shadows
- SSS - Subsurface Scattering
- SSGI - Screen Space Global Illumination
- AO - Ambient Occlusion
- IBL - Image Based Lighting
- IL - Indirect Lighting
- FG - Frame Generation
- LL - Linear Lighting
- PBR - Physically Based Rendering
- PP - Post Processing
- DoF - Depth of Field
- CA - Chromatic Abberation
¶ Performance
As a general rule of thumb the more mods you add will mean worse performance. Unless you have a strong computer, adding these mods and textures will result in an FPS drop.
¶ Presets
Currently, settings presets are only available for an experimental build of Community Shaders which can be found in the our Discord server.
¶ Finishing
If you have any questions please check our FAQ or reach out in the appropriate channel on our Discord server
Happy modding!