¶ Synopsis
This guide presents a Demiguise Finder blueprint mod for Hogwarts Legacy and describes how it works.
(You will also find a link to the Level Blueprint for my Field Guide Page Finder which is very similar.)
Beginners should read the previous tutorials before this one. They can be found here:
- Blueprint Example 101 - Hello World
- Blueprint Example 102 - Dummying Game Assets
- Blueprint Example 103 - Toggle Slow Motion
- Blueprint Example 104 - Game Pauser
- Blueprint Example 105 - HUD Toggler
¶ Prerequisites
I assume that you:
- Have PhoenixUProj installed & working.
- Have installed the dummy assets from Darkstar's UI.rar.
- Are familiar with how to create nodes & draw blueprint maps.
- Know the basics of how blueprints work.
- Know how to cook a Level Blueprint.
¶ Plan the Mod
The idea is to somehow indicate where the nearest demiguise is located to allow users to collect it without hunting all over the map trying to remember where they saw one. The steps to do this will be:
- Initialise the mod (to set up the variables we'll need).
- Set up some Keyboard Input Events.
- Find and implement functions to a) find demiguises, b) figure out the closest, and c) lead users to it.
¶ Technical Requirements
Quite a bit of research and trial-and-error (or trail-and-error) went into creating this mod. Locating the demiguises turned out to be relatively easy: searching the nodes available in the Custom Editor revealed that there are three Arrays in memory that contain all the demiguise co-ordinates (one for Hogwarts, one for Hogsmead and one for the rest of the world). Figuring out the closest demiguise was also relatively easy. But leading users to the location in question proved to be much harder than it should have been. I tried and abandoned several ideas before settling on the one that worked. Here are some ideas that didn't work:
- Hijack a pre-existing user-placed purple “waymarker” by simply changing it's co-ordinates. Sadly this didn't work because the game would just change it back if the user opened the map. It's a shame because I was able to change the icon on the HUD and the minimap into a demiguise, which looked awesome. But when the game changed the location back the demiguise icon would end up attached to the wrong thing (like a Merlin trial or whatever location had been hijacked).
- Use whatever function the game executes when the user selects a point on the map, but provide the demiguise coordinates instead. Sadly this didn't work because that function has no inputs and no outputs. Everything is done via global variables, to which we do not have access.
- Add an icon and path to the HUD manually, essentially rebuilding the locator system from the ground up. Couldn't get that to work. Some parts of the process just don't seem to be available, so it would always break the existing system.
- Use a game
FunctioncalledSetLocatorBeaconUsingType(Type,NameOrLocation)withTypeasBEACONTPE_DEMIGUISE. Doesn't work. It turns outTypemeans literallyNameorLocation, whereNamemeans the name of a Student andLocationmeans something stored in theLocationsSQL data table. Sadly the locations stored in the latter are all junk and changing the co-ordinates of the former tends to crash the game.
The solution I settled-on in the end was to use the game Function SetLocatorBeaconUsingDBLocation(LocationID) and use some SQL commands to add the location of the demiguise in question to the SQL database. That, it turned out, was relatively easy!
As part of this “research and debugging” process I needed to see what was going on inside the game. But the Print String Function that's usually used to see in-game info doesn't work with Shipping builds like Hogwarts Legacy. So I had to create my own (using a Widget). You'll see that in the screenshots. But I'll describe all that debug stuff in a separate wiki article. As you can see, it turned-out to be quite a lot of work. On the plus side, it forced me to learn about Widgets.
A “quick and dirty” alternative (with thanks to Dekita for this suggestion):
- Install
UE4SS. - Create a dummy
Custom EventcalledPrintToModloader. - Use that instead of
Print String.
This works because the UE4SS modloader has been designed to listen for calls to a Function with that name. Anything you print using that command will appear on the UE4SS console screen. You don't even have to use UE4SS as your modloader. You can use Blueprint Apparate Modloader to load your mod and PrintToModloader will still work. But of course you do need UE4SS to be installed. My Debug Widget does not require UE4SS.
¶ Download the Level Blueprint
You can download the Level Blueprint (.umap file) and Debug Widget (.uasset file) using the links below. Download both.
Download the Level Blueprint for the Demiguise Finder from here. and the Debug Widget from here.
PLEASE NOTE THAT BOTH OF THESE HAVE BEEN UPDATED SINCE I WROTE THIS TUTORIAL, SO THE VARIABLES AND FUNCTIONS YOU SEE ON THE LEFT OF YOUR PROJECT EDITOR MAY BE DIFFERENT TO WHAT YOU SEE IN THE SCREENSHOTS OF THIS TUTORIAL. SOME OF THE BLUEPRINT MAPS I PRESENT IN THIS TUTORIAL MAY ALSO HAVE CHANGED SLIGHTLY. BUT THE MAIN FUNCTIONALITY DESCRIBED HEREIN IS UNCHANGED SO YOU SHOULD BE ABLE TO FOLLOW IT WITHOUT DIFFICULTY. IF NOT, DROP ME A MESSAGE ON THE DISCORD AND I'LL BE HAPPY TO CLARIFY ANYTHING.
Download the Level Blueprint for the Field Guide Page Finder from here.
Download the Level Blueprint for the Collection Chest Finder from here.
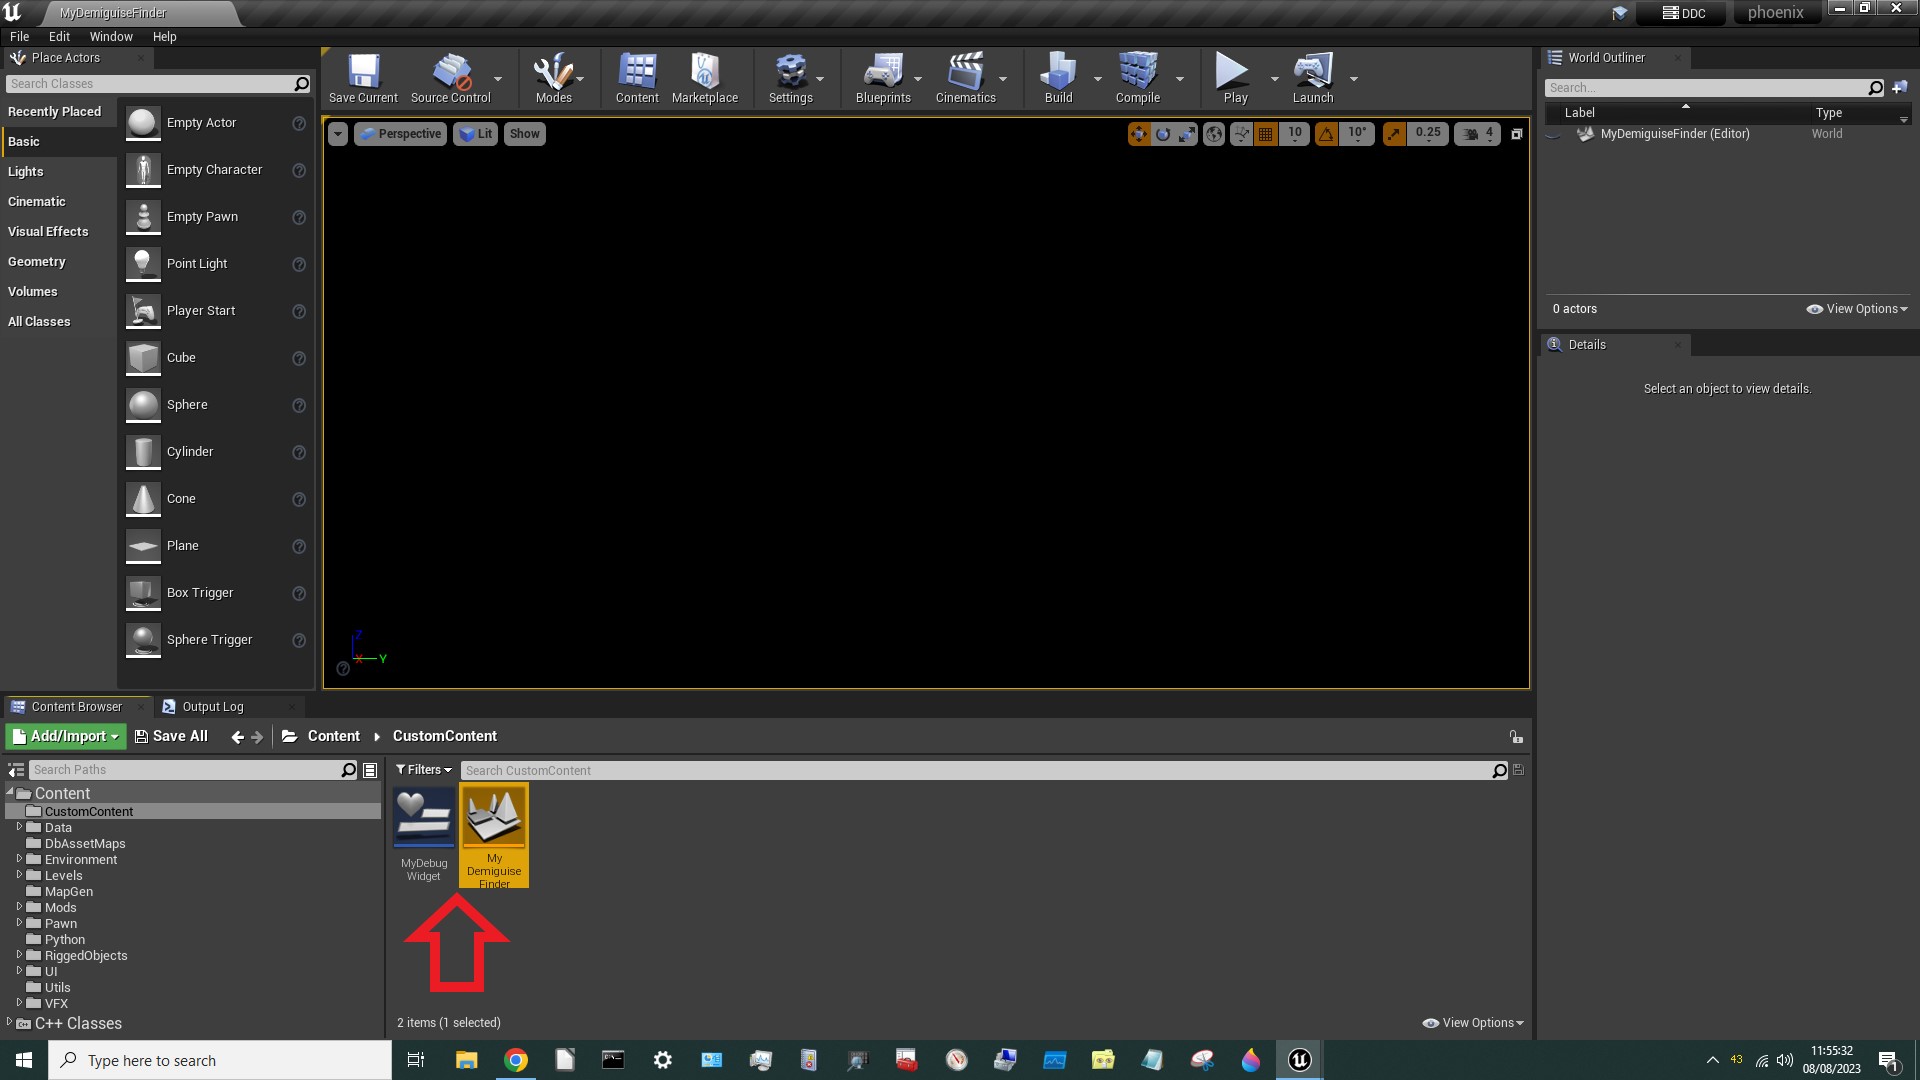
Remember to rename them to MyDemiguiseFinder.umap and MyDebugWidget.uasset (noting the uppercase letters) and use Windows Explorer to drop them them in PhoenixUProj\Content\CustomContent\. Once you've done that they'll appear as MyDemiguiseFinder and MyDebugWidget in the Editor:
¶ Event Graph
There's quite a lot going on here but most of it is related to the Debug Widget which I'll discuss in a later tutorial. Only the bits circled in red are relevant right now:
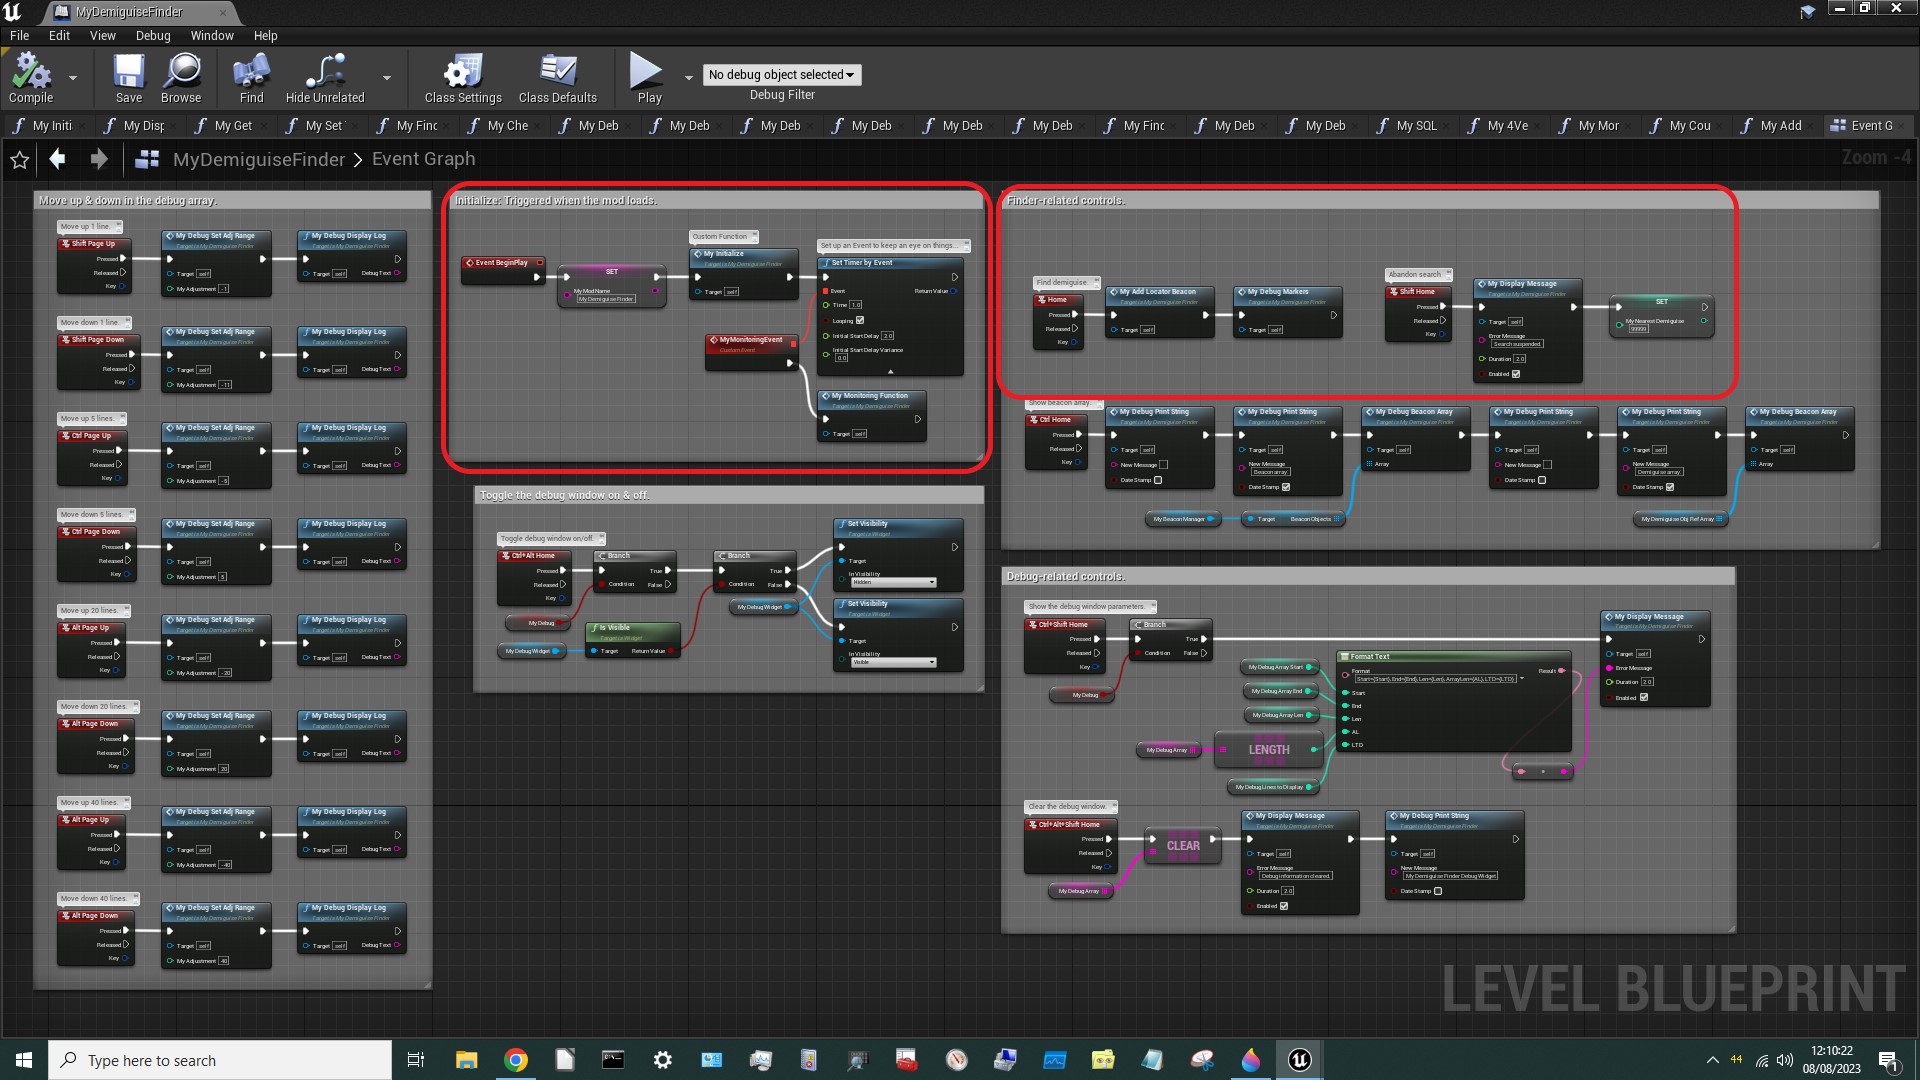
Here's what they do:
Event BeginPlayis triggered when the mod is loaded. It calls theMyInitializeFunctionand then usesSet Timer by Eventto trigger aCustom EventcalledMyMonitoringEvent. All that does is call myFunctionMyMonitoringFunction. Why do we need this? Because when the user collects a demiguise we need to delete the path from the map. (I also use thisFunctionto delete the path if the user hitsSHIFT-Hometo cancel the search).- On the right a
Keyboard Input Eventis set for when the user presses theHomekey. We'll discuss this below. - Another is set-up for
SHIFT-Home. All this does is setMyNearestDemiguiseto99999. This is a magic number that theMyMonitoringFunctionwatches out for. When it sees it, it knows that the user wants to cancel the search, so it deletes the path from the map.
¶ MyInitialize Function
This is largely the same as before, but with some extra stuff, circled in red.
I have used a Sequence node but that is a mistake. Please make this one long chain in your version!
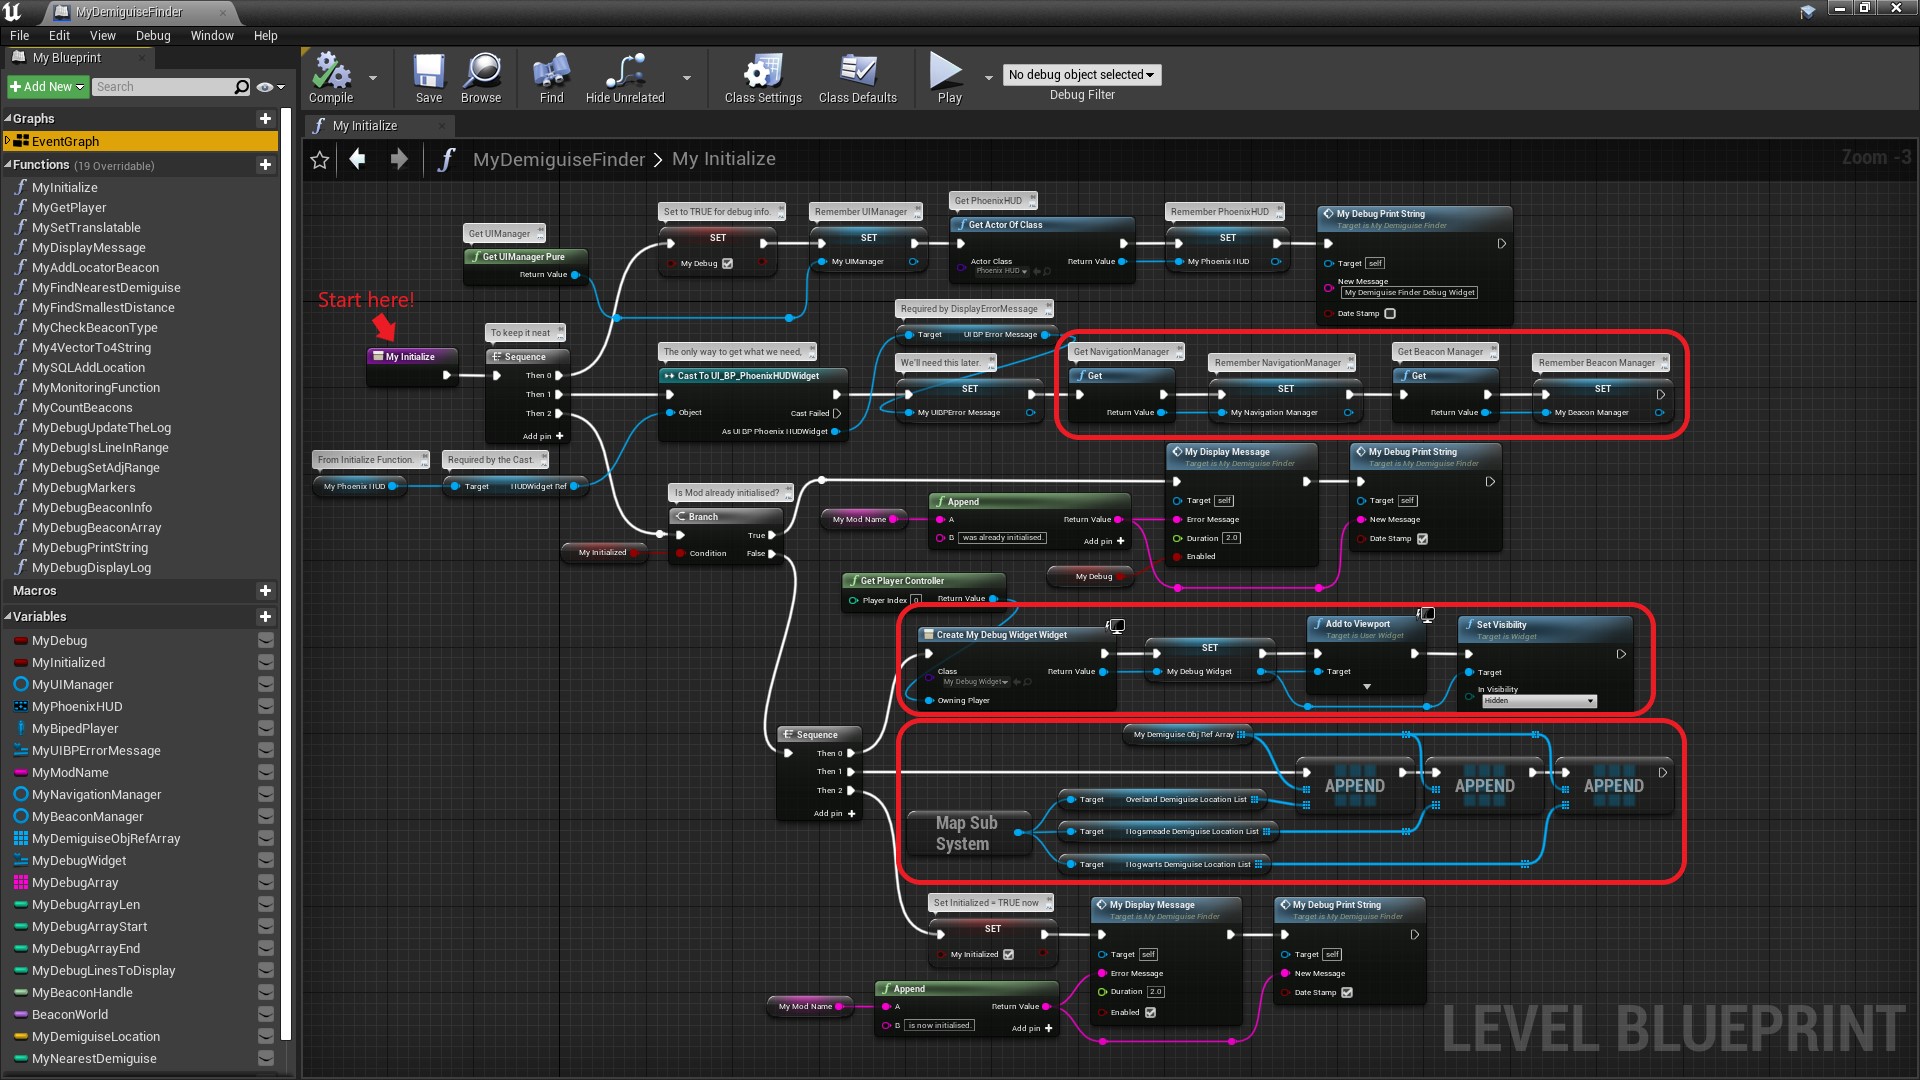
Here's what the extra bits do (we'll ignore the MyDebugPrintString nodes for now):
- Get and remember the
NavigationManagerandBeaconManager. These will be needed later. - Create the
Debug Widget, create aReferenceto it (so we can use it later), add it to theViewport(i.e. screen) and make itInvisiblefor now. - Create an array of
Beacon Info Object Refs calledMyDemiguiseObjRefArraythat combines (byAppending them to itself) the three arrays containing the locations of the demiguises.
¶ MyAddLocatorBeacon
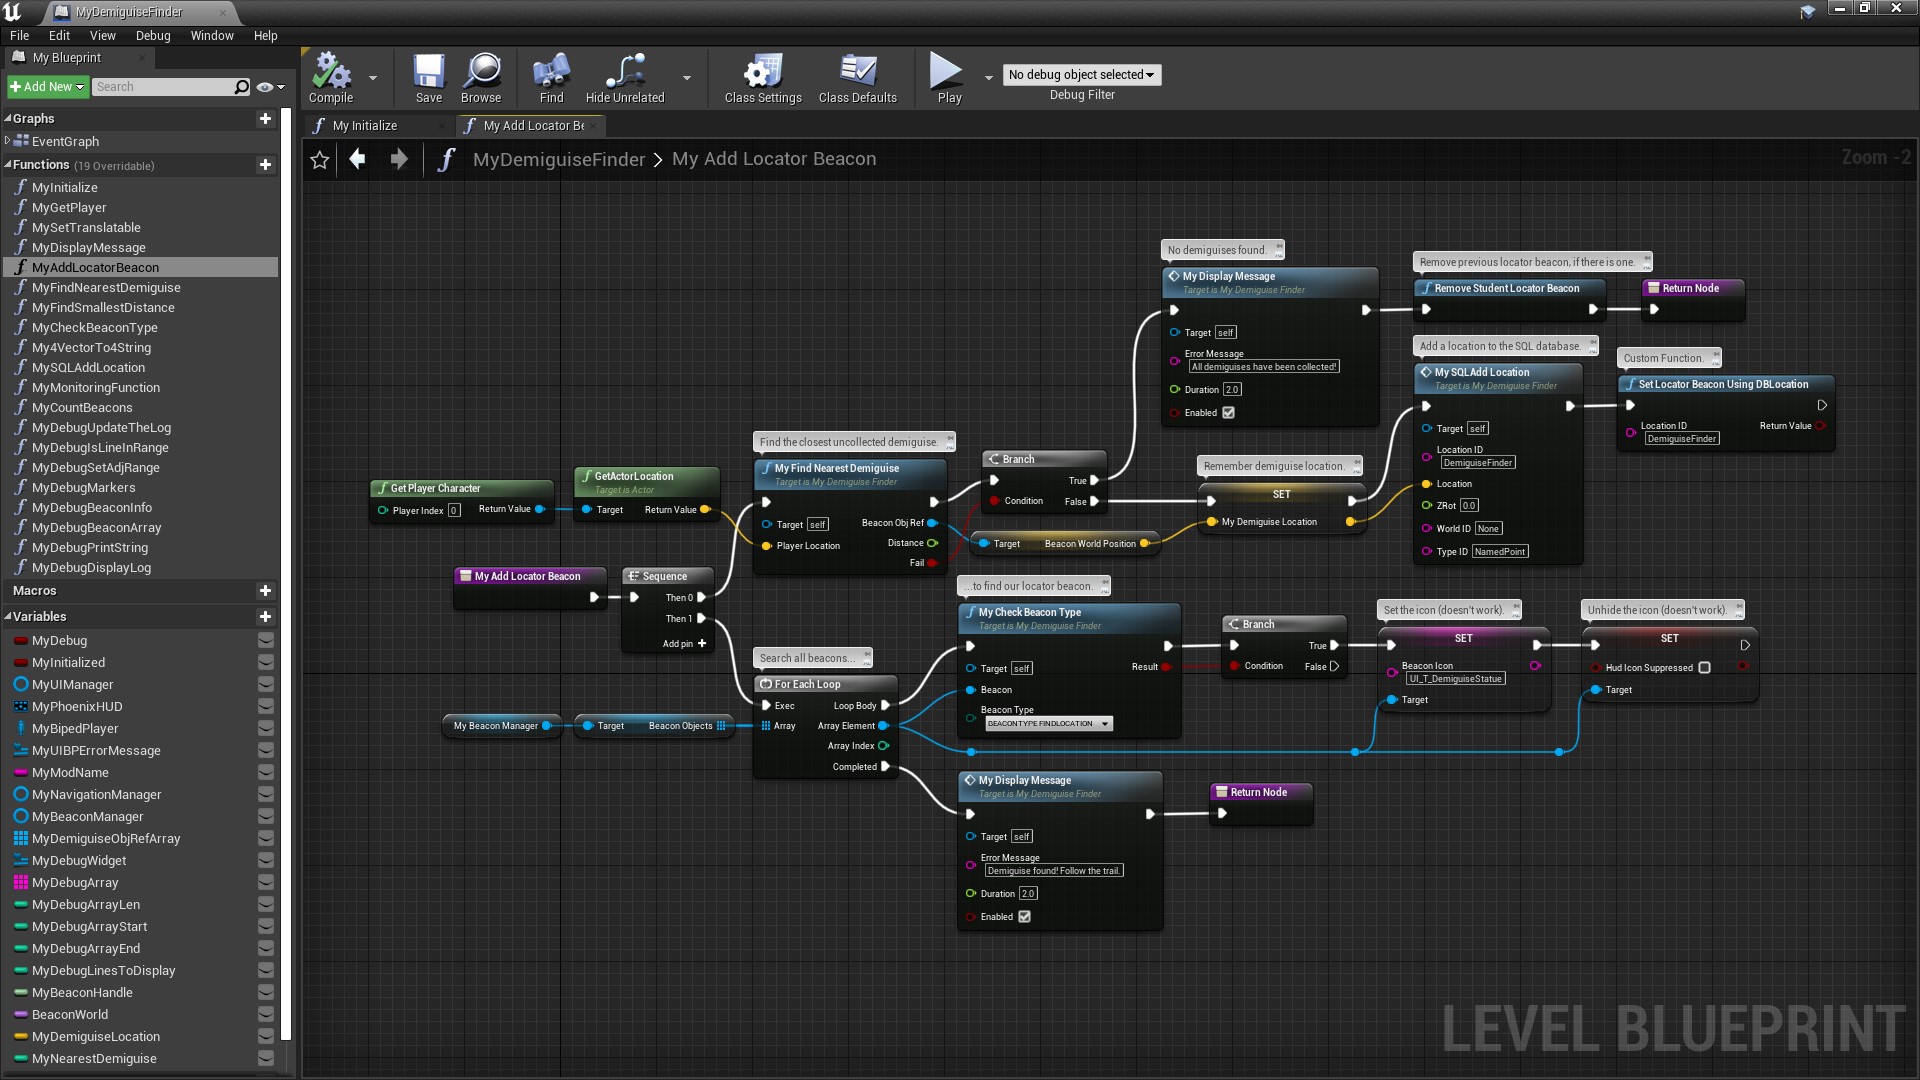
This is where all the action takes place. It works like this:
- Call
MyFindNearestDemiguiseto find the nearest uncollected demiguise. If there aren't any display a message and delete any old paths from the map. - If there is one, set a
VariablecalledMyDemiguiseLocationto theVectorlocation of that demiguise then callMySQLAddLocationto add that location to theLocationstable in the SQL database. Don't worry if you don't know what SQL is. You don't need to. Next it calls a gameFunctioncalledSetLocatorBeaconUsingDBLocation. Well discuss all of that below. - Once that's done, it executes a
For Each Loopto search through all the items in an array calledBeacon Objectslooking for any whoseBeacon Typeis listed asBEACON_FINDLOCATION. That's theBeaconwe just added withSetLocatorBeaconUsingDBLocation. When it finds it, it sets the icon to a demiguise icon and marks it asNot Suppressed. Sadly this doesn't actually work because (for some reason) none of theSetLocatorFunctions(there are four) have an icon, and adding one had no effect. This wholeLoopcould actually be deleted, but I left it in to show you how it could be done (if you ever need to). - And that's it. At that point the path is displayed on-screen for the user to follow so a message is displayed to that effect.
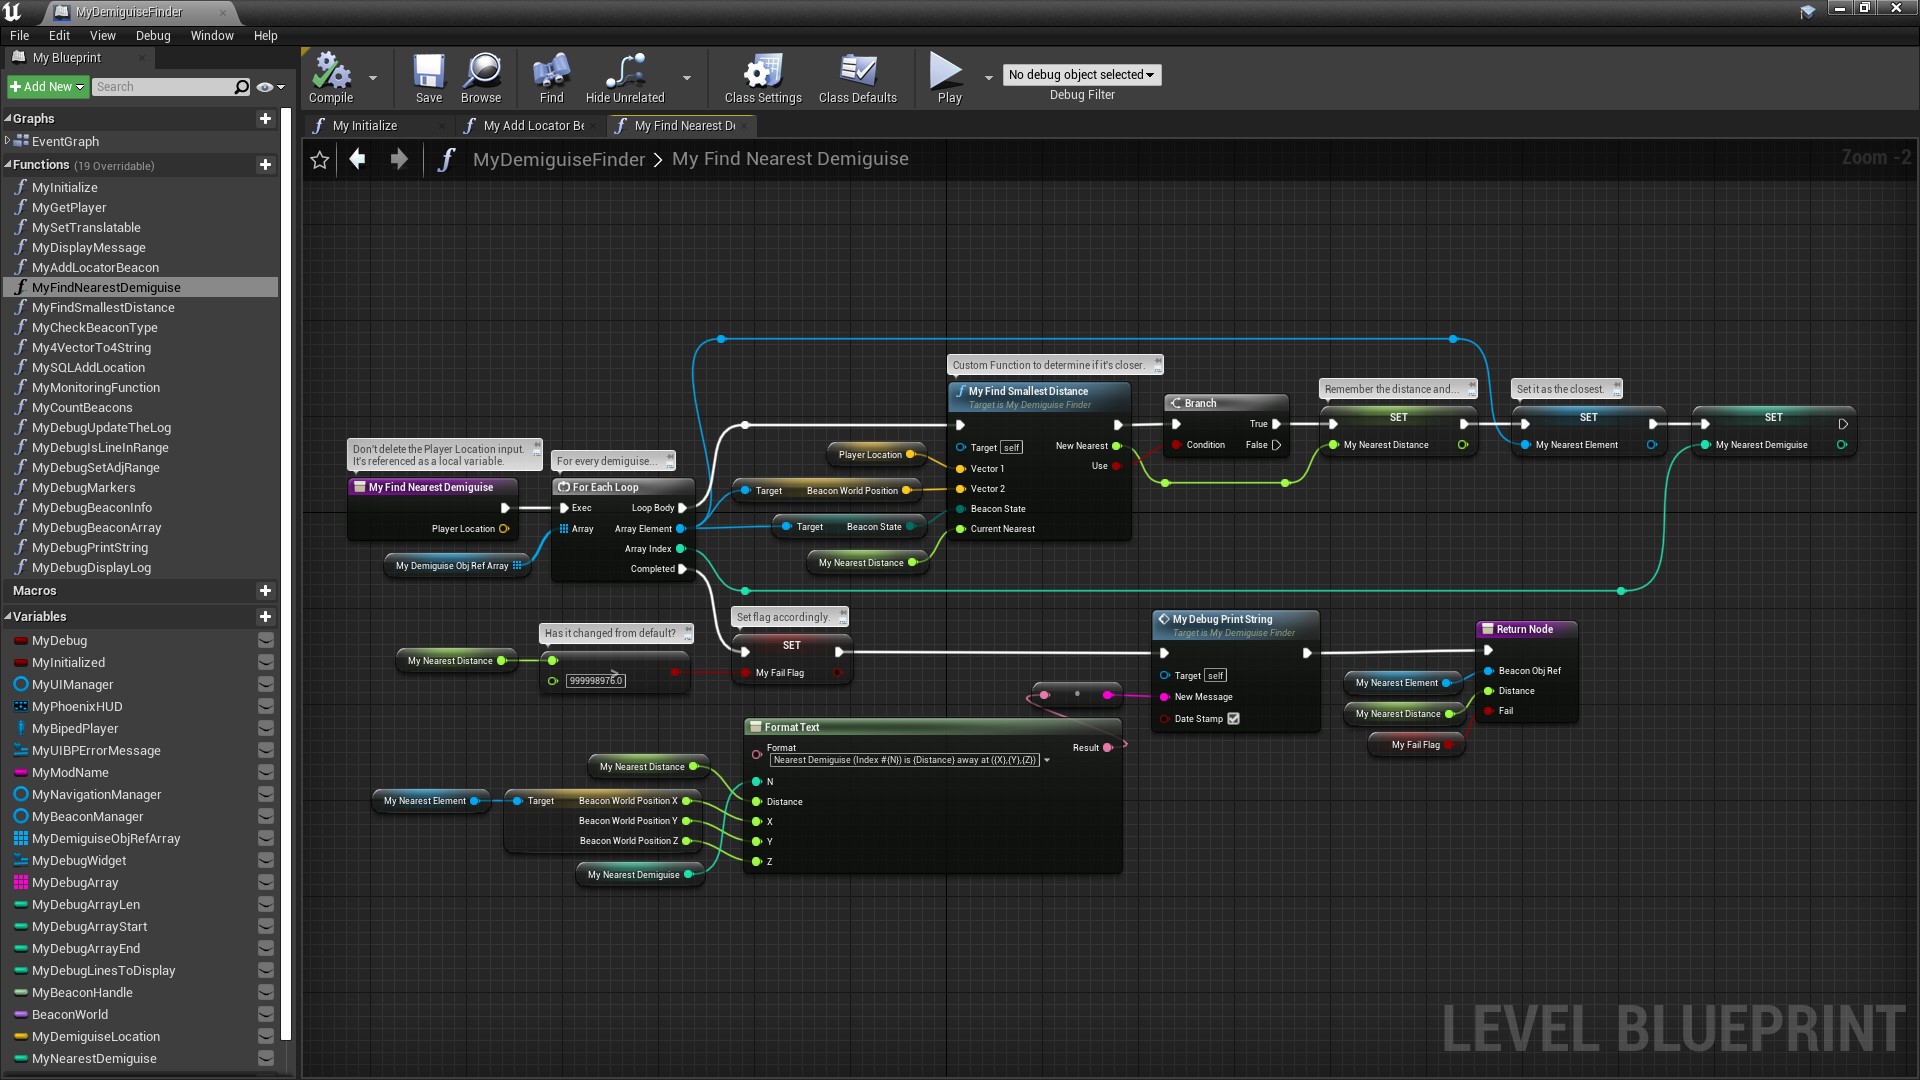
¶ MyFindNearestDemiguise
This is pretty simple. All it does is:
Loopthrough all the demiguises in theMyDemiguiseObjRefArrayexecuting a customFunctioncalledMyFindSmallestDistanceeach time. All that does is check whether the distance to that demiguise is less than the distance currently stored in aVariablecalledMyNearestDistance. ThatVariableis set up with an initial value of100000000. Any demiguises found will be nearer than that, so they'll get remembered (inVariableMyNearestElement). Finally,VariableMyNearestDemiguiseis set to theIndexnumber of the closest demiguise. So if the 5th demiguise inMyDemiguiseObjRefArrayis the closest,MyNearestDemiguisewill be set to 4 (because elements of an array are numbered starting with 0 not 1).- Once the
Loopis complete, it checks whetherMyNearestDistanceis>99998976(which is the closest you can get to100000000without theEditorrounding up). I didn't want to use100000000because when there are rounding errors unexpected things can happen. If it is then no uncollected demiguise was found, so the user must have collected them all. - Finally, it prints some debug info to the
Debug Widget. - One thing to note - it looks like I don't use the
PlayerLocationinput here. But I do. TheFunction's input pin isn't linked to anything, butFunctioninputs are available inside theFunctionasLocal Variablesso I used aGet Player Locationrather than have a long twisting link from the starting node to the node where I needed it. 😎
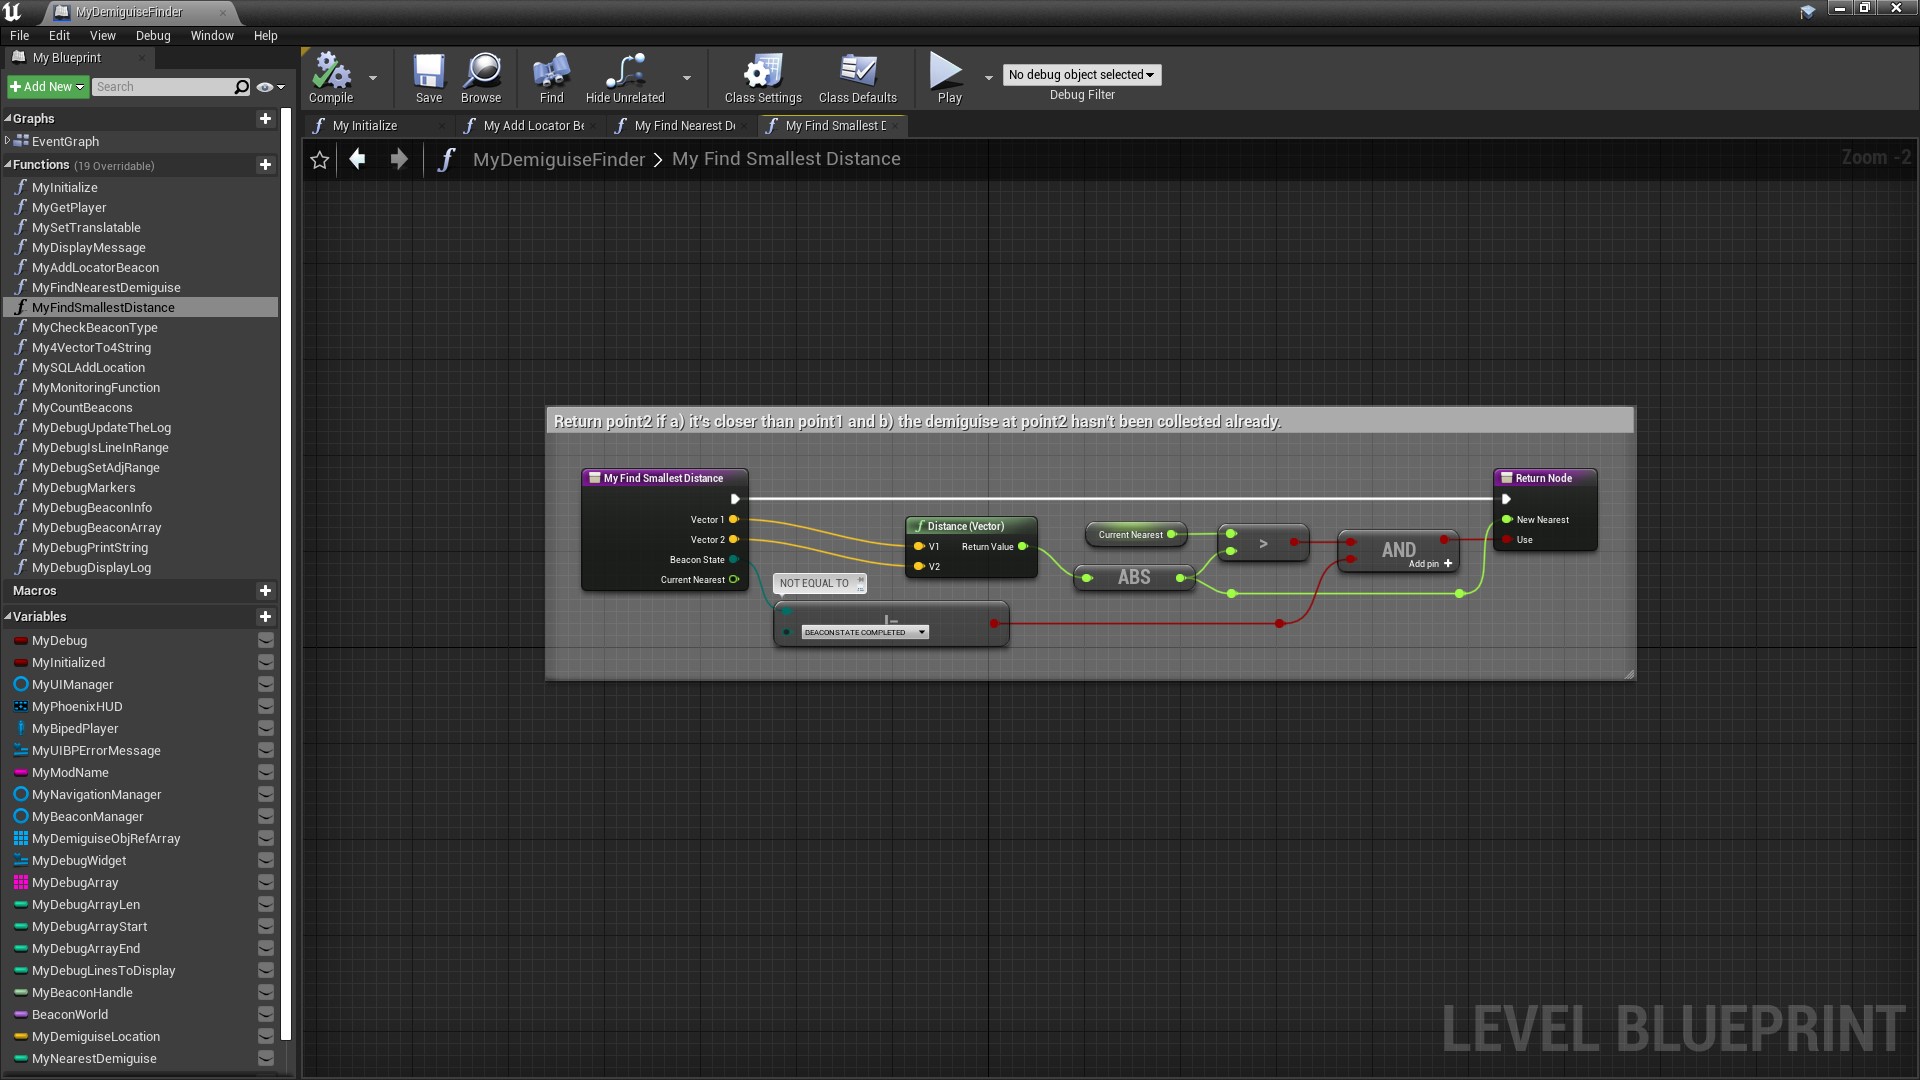
¶ MyFindSmallestDistance
This is even simpler. It uses the Engine's Distance (Vector) node to calculate the distance between two Vectors. Don't worry about why it's called a Vector. It just means position. In other words, the (x,y,z) coordinates. We wouldn't really need to do this inside our own Function except that we need to exclude Vectors for demiguises that have already been collected. Note the use of the ABS node as well. This just converts negative numbers to positive, because it doesn't matter whether Vector2 has larger or smaller coordinates than Vector1 (which would cause the distance between them to be positive or negative, respectively). All we care about is the distance between them.
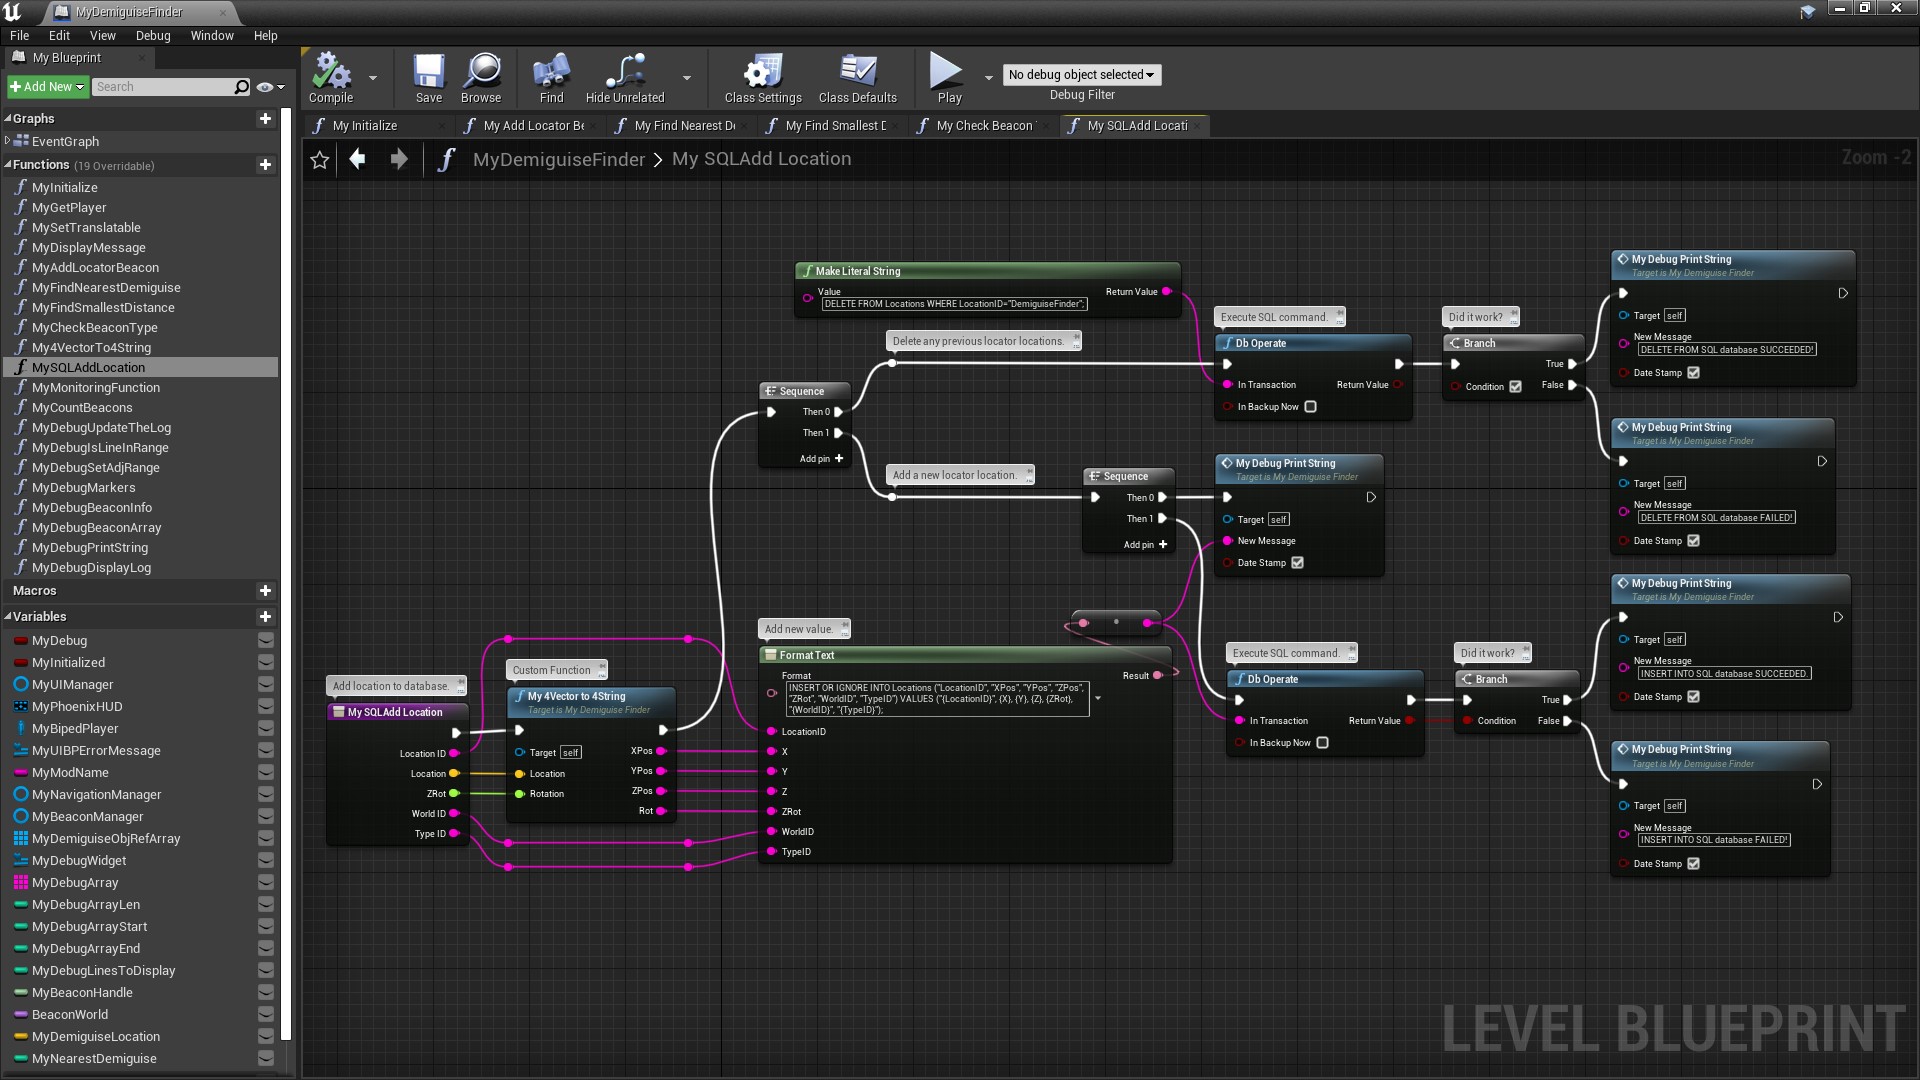
¶ MySQLAddLocation
Don't worry too much about what this node does. Basically the only reliable way I could find to draw a path to a destination was using the SetLocatorBeaconUsingDBLocation(LocationID) node, and the LocationID is an entry in the SQL database. So I had to find a way to create an entry in the database. This is the node that does that. But it's extremely unlikely you'll ever need to do this. Still, in case you're interested, here's how it works:
- The
Locationinput is theVectorposition of the demiguise we're after, and theZRotis its rotation (which isn't important so we'll assume it's always zero). I convert this toXpos,YPos,ZPosandRotStringvalues because if I just plugged them straight into theFormat textnode they'd be formatted with commas signifying thousands, which messes up the SQL command. - The
Format Textnode formats the SQL command we'll need. - Execution then passes up to the
SequenceNodeabove, which: 1) UsesMake Literal Stringto construct another SQL command to delete any previous entries we created. TheDb OperateNodethen executes that SQL command. A debug message is printed to the debug widget indicating success or failure. 2) Passes execution to anotherSequenceNode(which is just there to stop the blueprint map getting too wide). This prints the SQL command created earlier to theDebug Widgetand then callsDb Operateto execute it. Again, success or failure is reported to theDebug Widget.
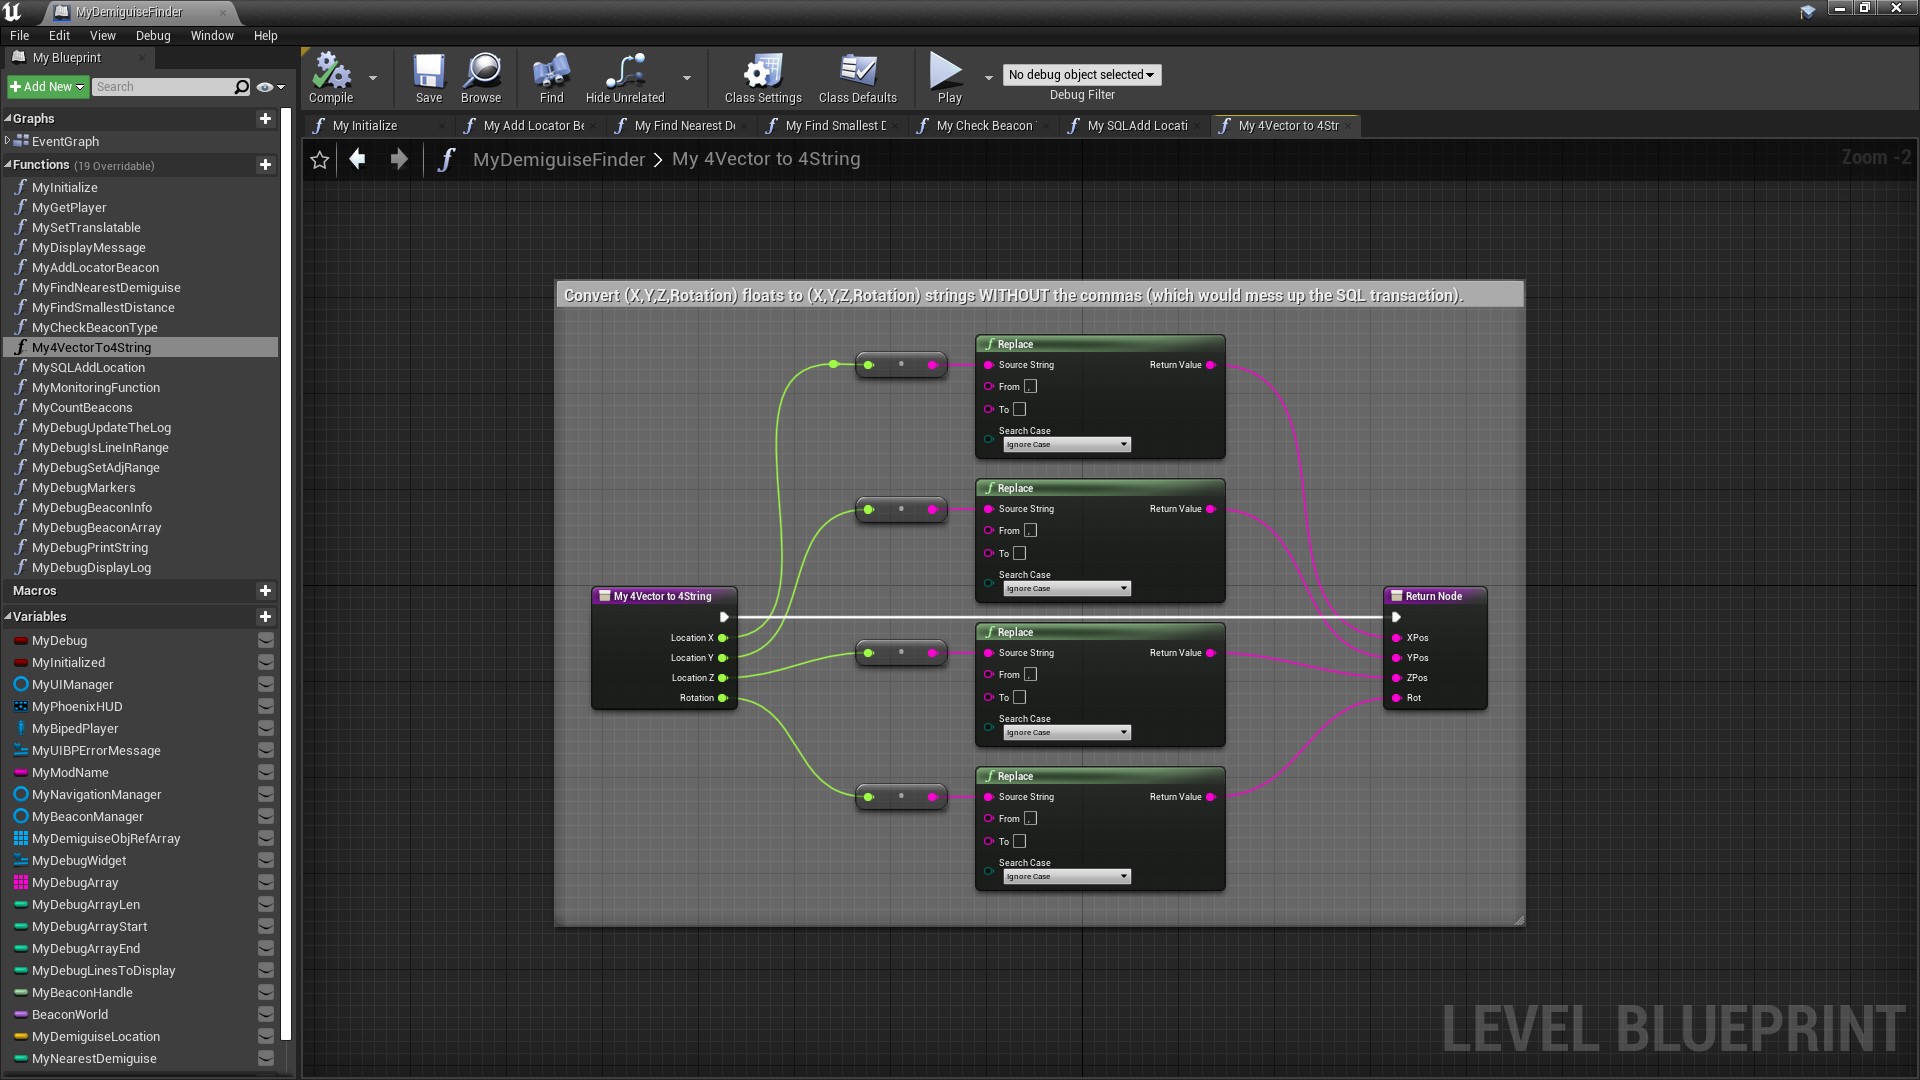
¶ My4Vectorto4String
Apart from the stupid name, this Function is largely self-explanatory. it just converts floats to strings and removes the commas:
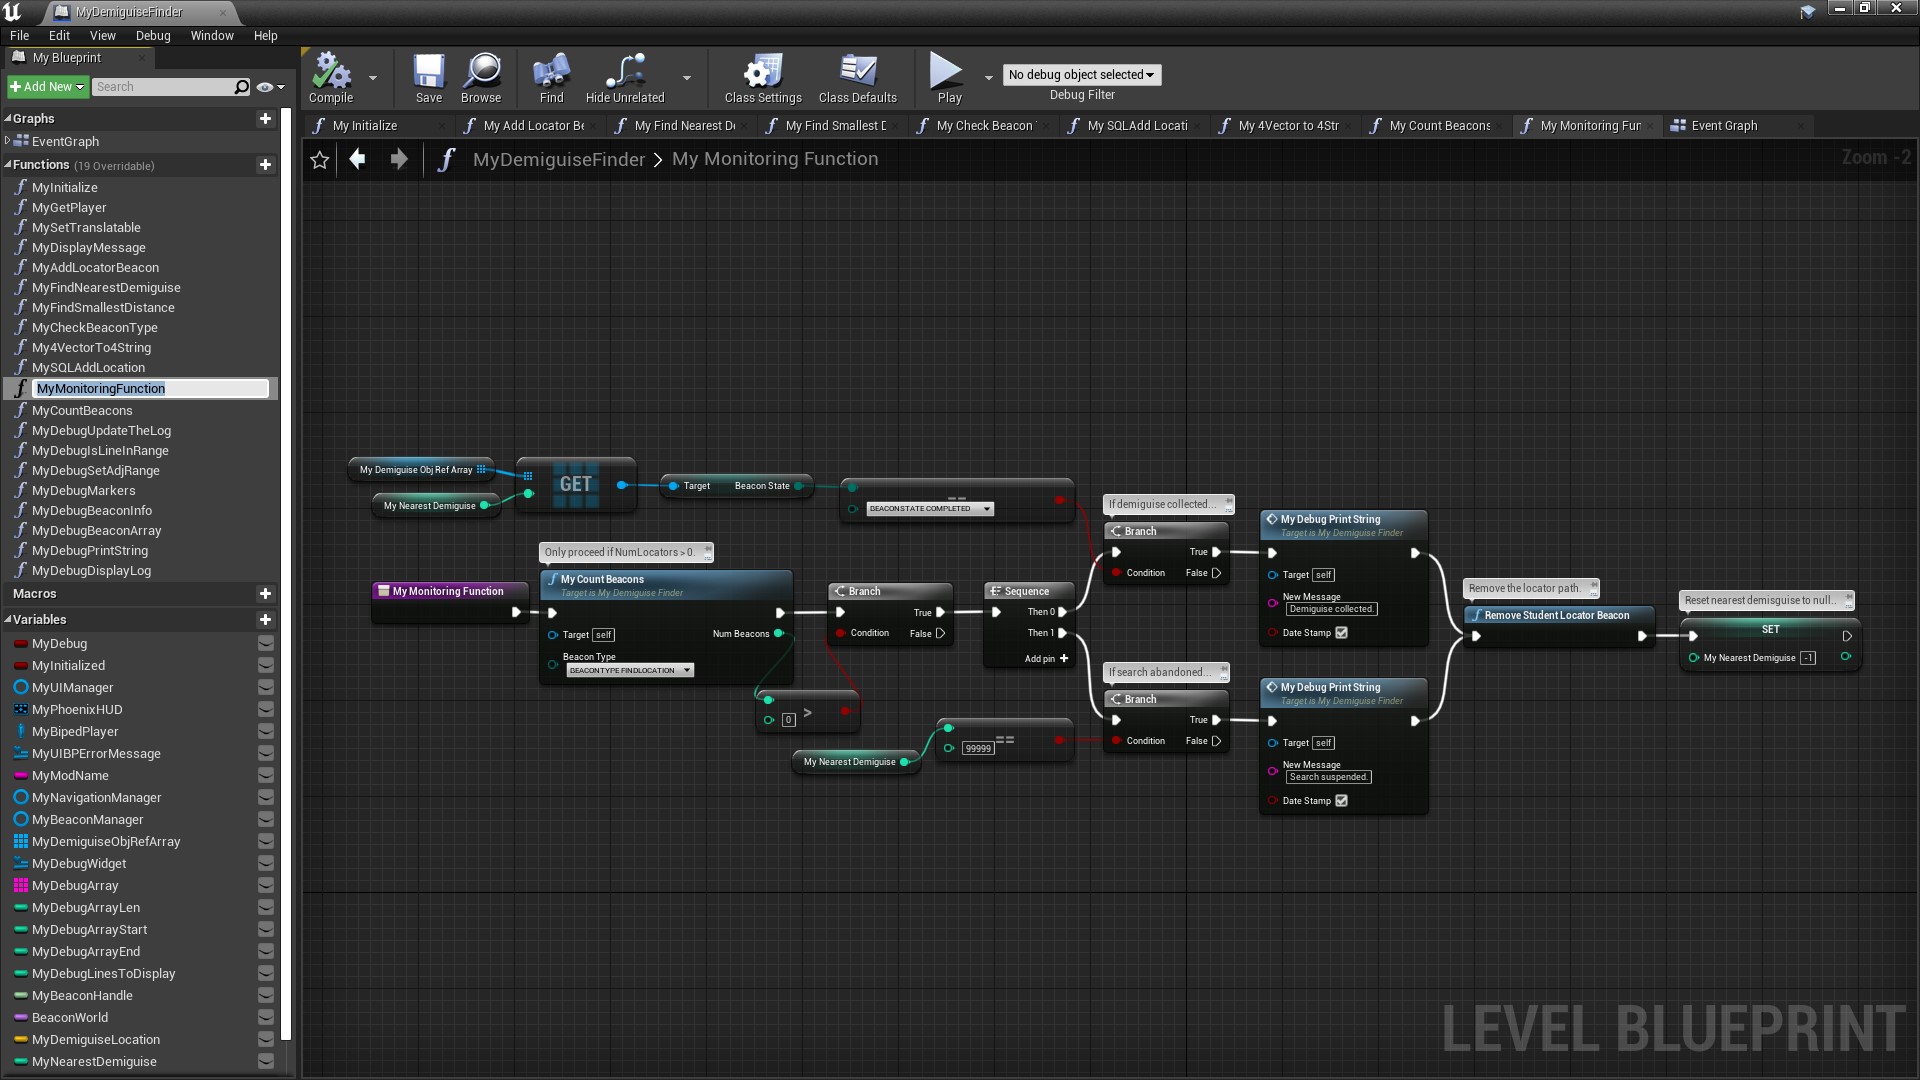
¶ MyMonitoringFunction
Once the path is displayed on-screen we need to watch for the user actually collecting the demiguise. When that happens we need to delete the path from the map. We also need to delete the path if the user decides to abandon the search for now. This Function is called every 1 second by the SetTimeByEvent Node in the Event Graph and does both of those things, as follows:
- It counts how many
Locator Beaconsthere are (BeaconType=BEACONTYPE_FINDLOCATION). - If that's not
>0stop immediately. (This is important to reduce performance impact. With anything that's constantly executing you need to terminate it ASAP.) - If it is
>0then continue because we are (or were) searching for a demiguise. - Next it
Gets theNth item in theMydemiguiseObjRefArraywhereNis theMyNearestDemisguiseIntegerwe calculated earlier. - It checks whether this demiguise has been collected (
BeaconState=BEACONSTATE_COMPLETED). - If so it says so, executes
RemoveStudentLocatorBeaconto delete the path (which works even though this isn't aStudent), and setsMyNearestDemiguiseto-1. - If not it checks whether
MyNearestDemiguise=99999. If so, the user must have hitSHIFT-Hometo abandon the search, so delete the path, etc.
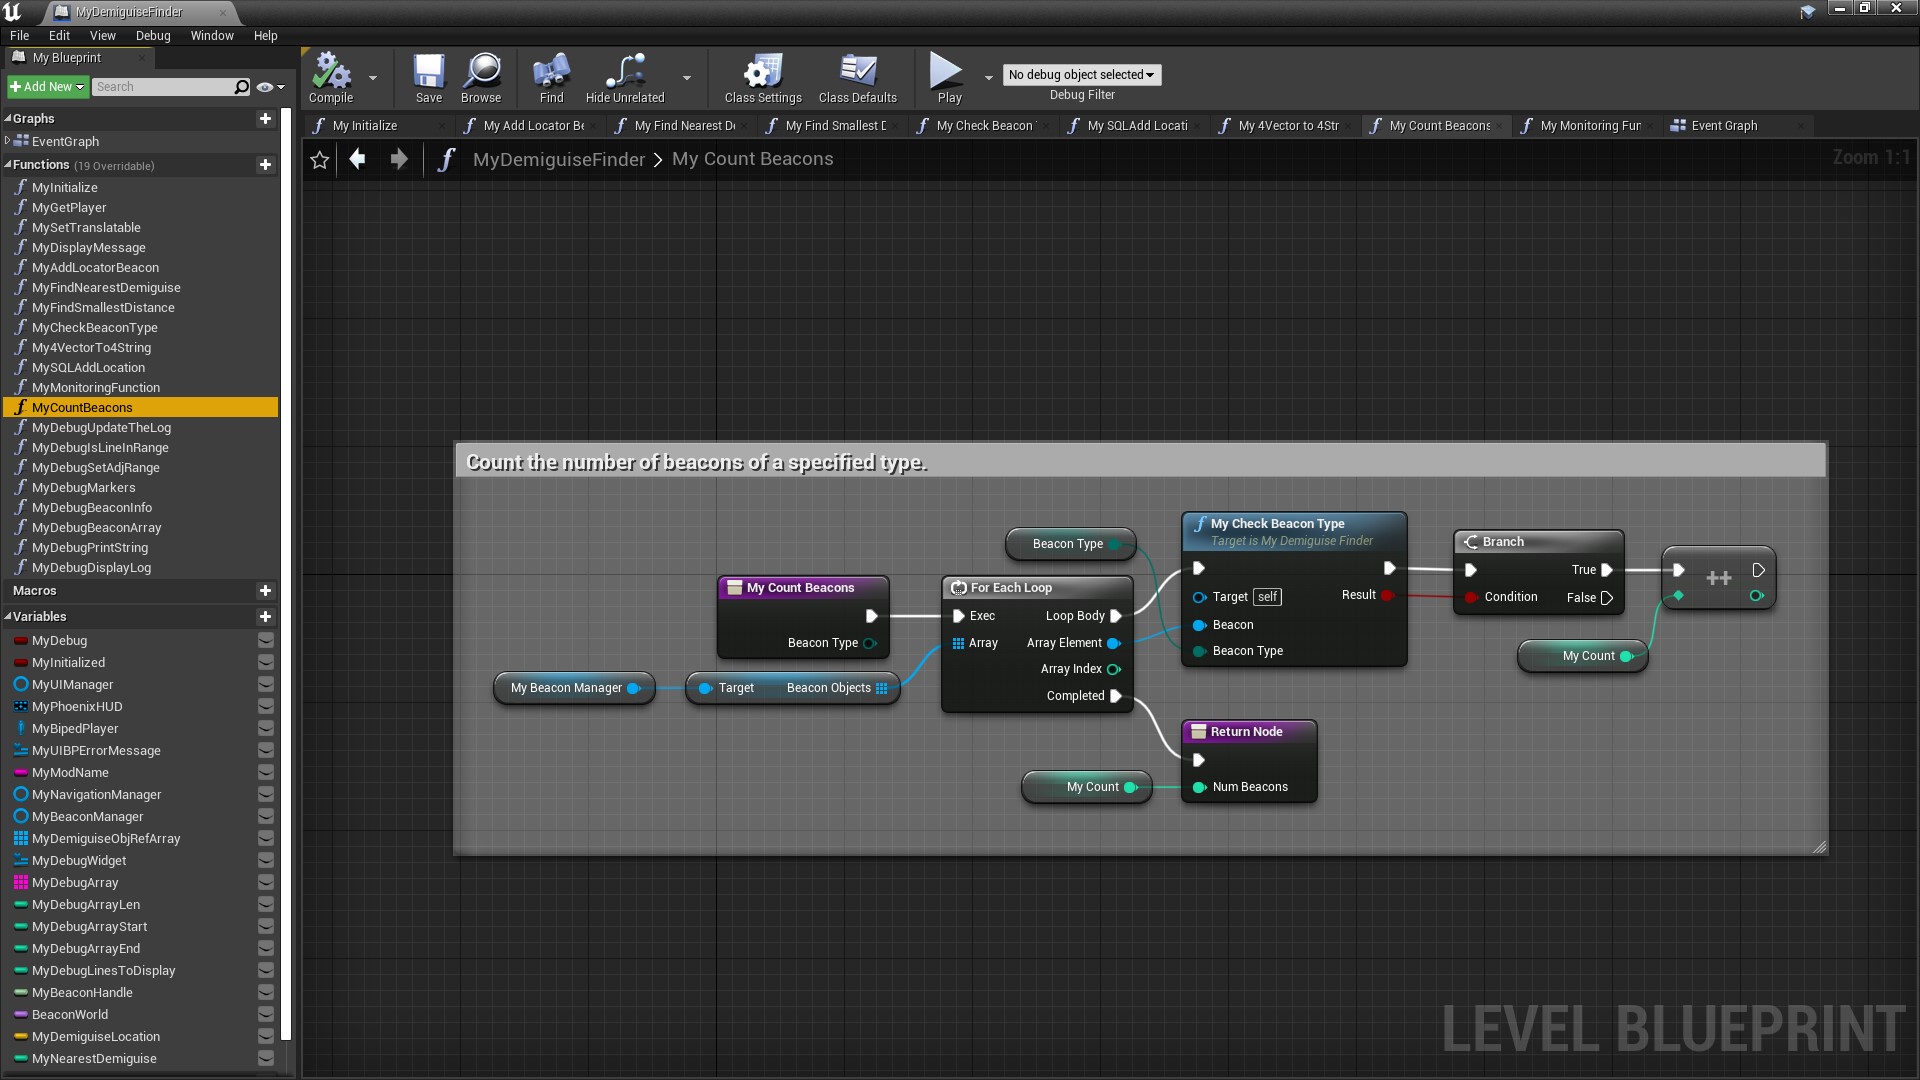
¶ MyCountBeacons
A simple Function to count the number of Beacons of a specified type. Note the use of the ++ Increment Node which adds 1 to MyCount and then sets MyCount to this new value.
¶ Conclusions
And that's it (apart from the Debug Widget stuff). Not so complicated really. 😁
¶ Acknowledgments
Many thanks to Darkstar for their invaluable help and advice during the creation of this mod.