When editing a Collection, curators are presented with a number of different options to help users replicate their setup. Many of these settings can be set in batched by selecting multiple mods and using the controls that appear at the bottom of the table.

¶ Required status
The toggle in the "Required" column decides whether a mod is essential part of a collection and will be downloaded and installed automatically, or whether the mod is presented as an optional download at the end of the collection installation. Mods should be marked as optional when they are not required for the collection to function but offer an optional enhancement.
Optional mods can also be used for other purposes such as:
- Accommodation for different setups (you can include a mod that is needed for ultra wide screen users as an optional mod)
- DLC ownership (For example for Skyrim, you can put mods that require creation club content from Anniversary Edition DLC as optional mods, this way people who do not own it won't need to download optional mods)
- Gameplay tweaks that are not mandatory (IE: survival elements)
- Graphical enchantments that may not be suitable for lower end PCs.
¶ Mod source
The source allows users to understand where the mod can be downloaded from and allows the mod manager fetch the file or provide the user instructions on how to download it. There are some options at your disposal here, but it is fair to say that Vortex will work best when mods sourced from Nexus Mods are used.
- Nexus Mods
- Direct Download
- Browse a Website
- Bundle with Collection
We will now cover all these in depth, but moving forward this wiki will always assume you are using Mods from Nexus Mods unless otherwise specified.
¶ Nexus Mods
This is the recommended and easiest option for a mod source if you are curating a collection. If a mod was downloaded from Nexus Mods, Vortex will have recorded the required game, mod and file IDs. This allows the collection to point to a specific file on Nexus Mods which can be downloaded automatically for Premium users and directs non-Premium users to the exact download link.
¶ External Sources
When setting up your Collections, you may find that some mods or tools that users will need are not hosted on Nexus Mods. It is possible to include mods from other sources in a Collection either by pulling a file from a direct link, or by having the user visit a website and follow instructions to retrieve the file. The downloaded file will be checked against the file hash collected when your revision is uploaded to ensure they have selected the correct file.
Always make sure you are compliant with Guidelines For Collections and File Submission Guidelines when using external resources.
Before including non-Nexus Mods content in your collection, there are a few things that you should be aware of:
- User intervention may be required: To download a non-Nexus Mods file the user is often required to take some kind of action, which may hold up the download of other files until completed.
- The mod can't be checked for updates: The user will not be able to update the file without you pushing a new revision. When using an off-site mod you should try and point to an exact version of a mod.
- Links to off-site mods can be unreliable: It's possible that the link or instructions provided may quickly become out of date, so you should ensure you "future proof" any instructions. Be aware that files can be deleted, links can expire, web pages can be moved, or entire websites shut down.
- Some websites may not allow direct links: When providing a direct link, you should consider if this is a fair thing to do. For small, independant websites they may generate revenue required to keep the site online from advertising so you should link to the page where the download is located rather than to the file itself. For larger websites (e.g. GitHub) this is less of a concern.
- Downloads may require an account: Some websites require the user to register or log in before they can download the file. It is not recommended to include files from websites that require the user to enter a their username and password as the resulting session data can potentially be accessed by other parts of the downloading application.
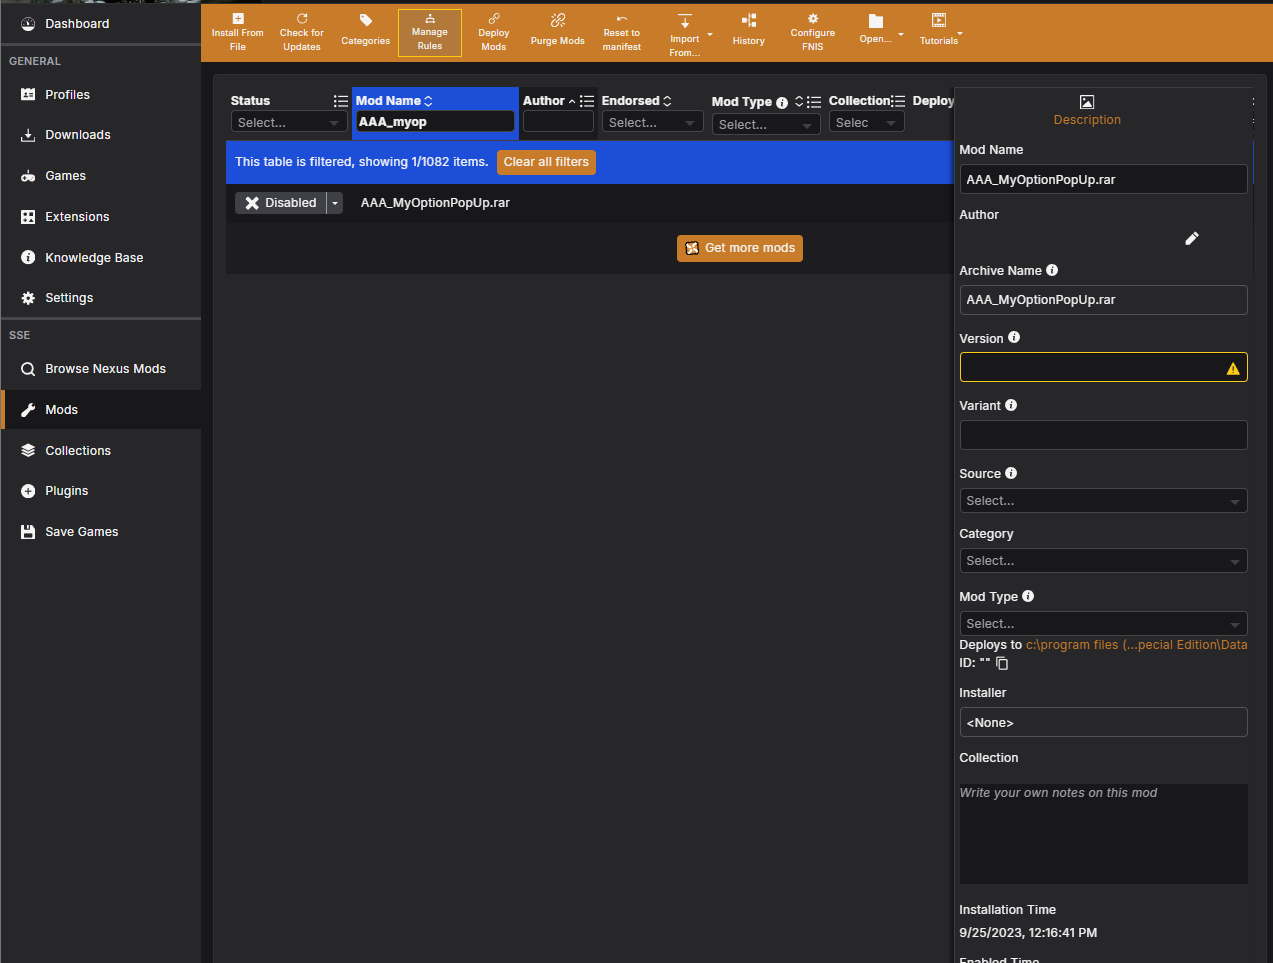
As with any mod, it must be installed in Vortex before it can be added to a Collection. The specifics won't be covered here, but you can either drop the zipped archive into the dropzone at the botton of the Mods page or using the "Install from File" button on the toolbar in the mods tab. Once the mod is installed, you can double-click it to open the details sidebar. This is where we can add important metadata for use in the Collection. For this example, I created a dummy mod that we are simply going to call AAA_MyOptionPopUp. You can use any other mod that is not hosted on Nexus instead of this example.
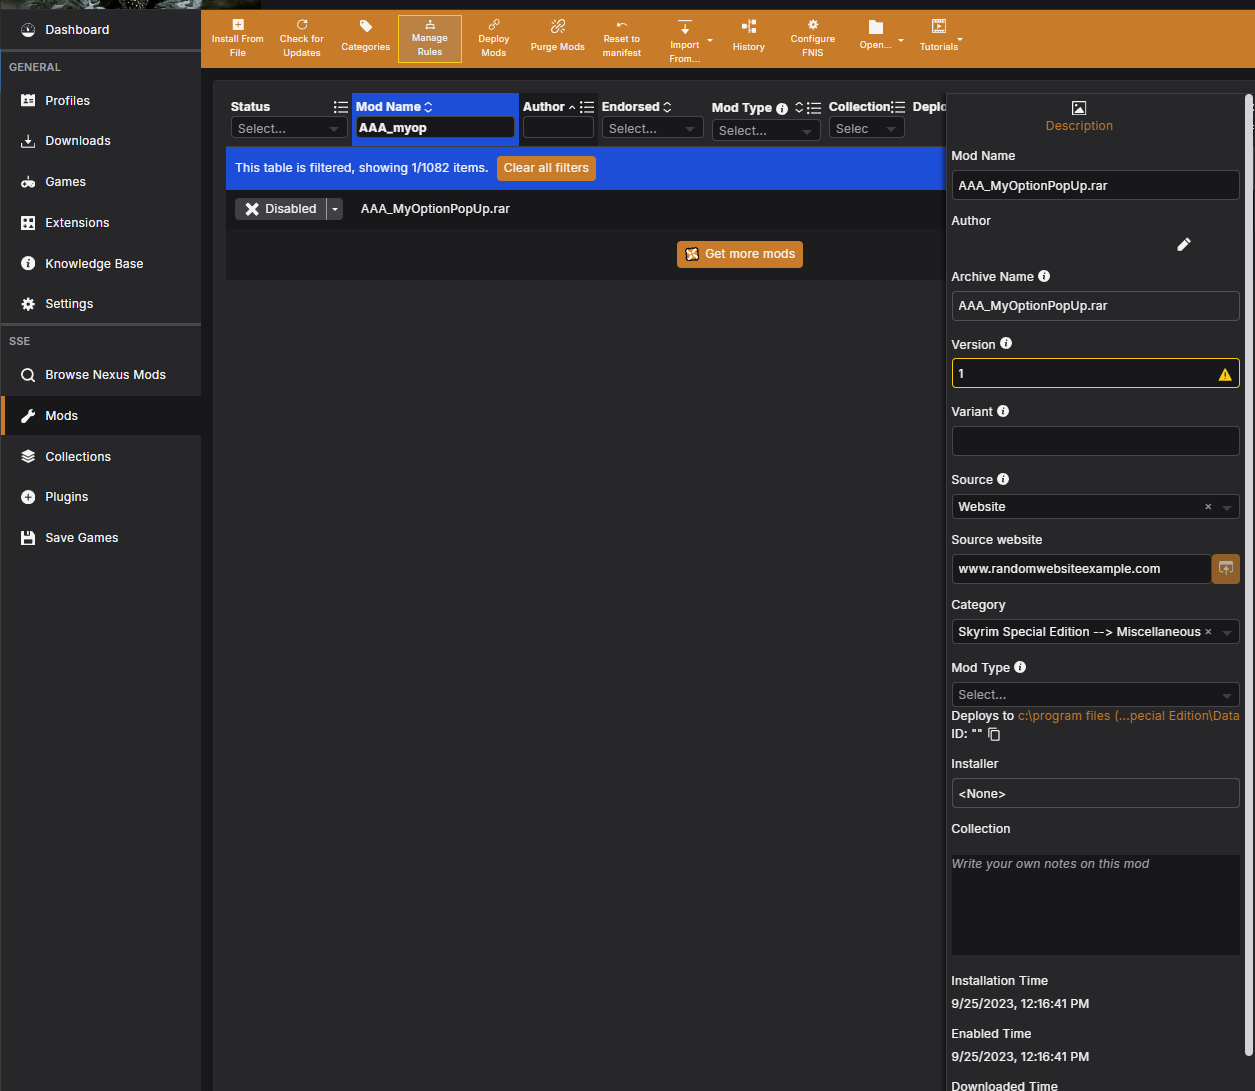
The following attributes can be filled in and saved to the mod when it is exported with a Collection:
| Attribute | Guidance |
|---|---|
| Mod Name | Give this mod a suitable name as this will show both on the website and in Vortex. |
| Author | Include the name of the author of this file. |
| Version | Add a version. If the mod doesn't appear to have one, use 1.0.0. |
| Source | This needs to be set to "Website" to indicate the file came from the internet. You can choose user-generated if you want to include this mod as a bundled asset on your collection. |
| Source Website | Enter the URL of the web page where this file can be found or the direct download link |
| Category | (Optional) Give the mod a category for easy organisation. |
| Mod Type | Ensure the mod type is set so that the mod files are deployed to the correct folder when the mod is installed. |
Now that we've added this metadata, the mod can be added to your Collection like any other.
Once the mod has been added to a Collection, it will need some additional metadata in the edit view to help users to download it correctly.

If you have provided the direct download link for a file you will need to change the "Source" drop-down to "Direct Download" and save the link. Alternatively, if the user will be required to browse a website you can click the pencil icon next to "Browse a website" and include some instructions to be shown alongside the web page.
In both cases you will also be able to mark the mod as Adult Content, if appropriate.
Some mods from external sites may not be properly formatted for installing with a mod manager. See Adding badly packaged mods to a Collection for advice on how to handle these cases.
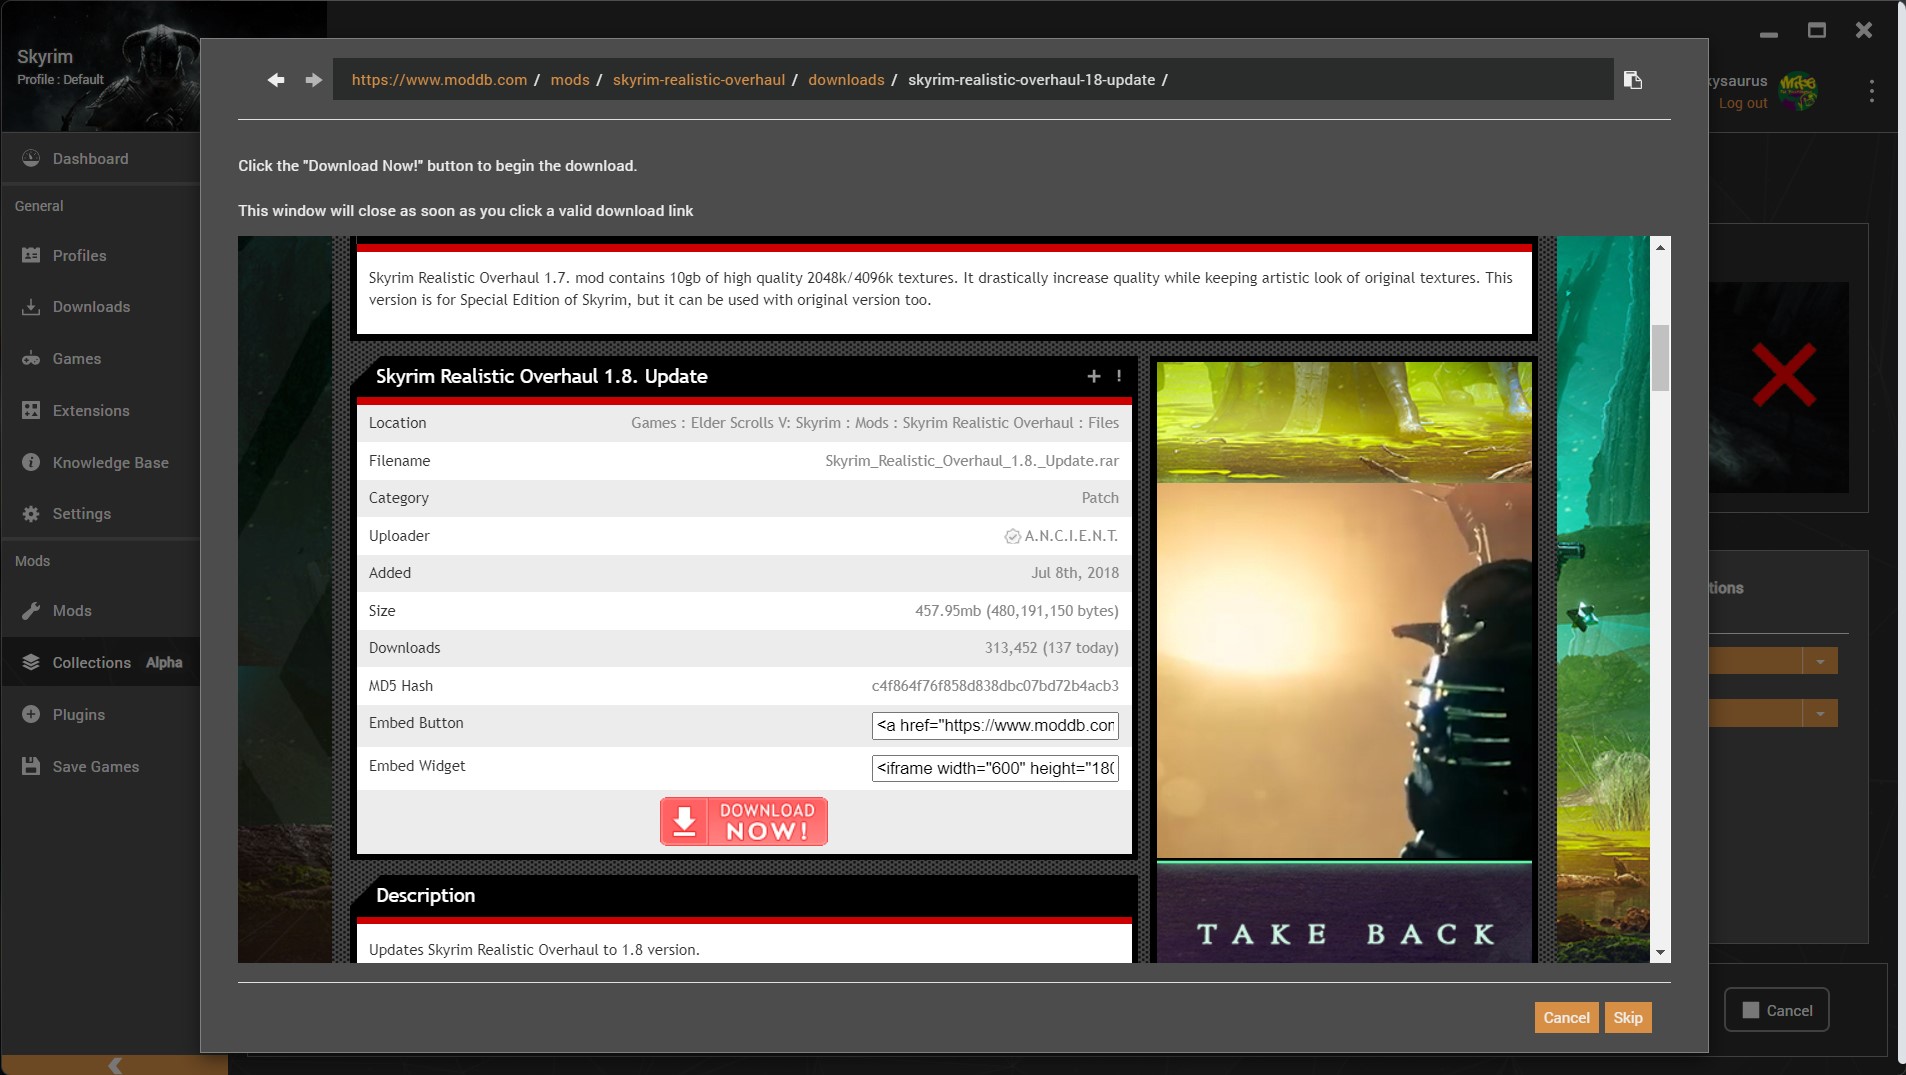
When a user downloads a mod with a "Direct Download" link, the file will be pulled in automatically. For "Browse a website" downloads a web page will open inside Vortex with your instructions above it as shown below. We are going to explore "Direct Download" and "Browse Website" options in depth further down the guide.
¶ Direct download
Some mods can be downloaded by simply providing a direct link to the file. Vortex will attempt to directly pull the file without any user intervention. Files downloaded directly must be marked as "Adult" if they contain content that covered by the Adult Content Guidelines.
This option is the fastest option for including a mod from external websites, but use it carefully and be considerate and follow Guidelines For Collections and File Submission Guidelines.
This option will not work well if the website requires signing in, or if the website changes its structure a lot, causing your direct download link to be unavailable or unusable.
¶ Browse website
Certain mods may require the user to open a webpage and select a file to download. In this instance, Vortex will open up the web page and show the user the instructions provided by the curator to help guide them to the correct file. Files acquired from websites must be marked as "Adult" if they contain content that covered by the Adult Content Guidelines.
This option should be chosen majority of the time if the website requires a signing up, or layout changes often, or if there are multiple versions to choose from for this mod in question for whatever reason. You can click the pencil icon next to "Browse a website" and include some instructions to be shown alongside the web page so your users click on the right thing when they are browsing.
¶ Bundle with collection
The bundle option should only be used for content curators have created themselves or have permission from the original creator to share as per the File Submission Guidelines.
For configuration files or the outputs from tools, it can help the user to match your setup if these files are included as part of the collection. This allows the curator to provide useful files without going through the process of creating a mod page or finding somewhere to host them.
During installation, bundled mods are imported and installed along with the metadata provided (such as name, version, author, etc).
This is considered a good option if the mod / file itself won't be of use to anyone else than the users of this collection. Here are some things to consider before using bundled assets:
- Bundled assets will always be installed first before all other mods.
- Bundled assets will get installed the same way for both Nexus Premium and free users.
- Bundled assets will still be hosted on Nexus, but not as regular mods and all the bundled assets will be installed in one big package from user end.
- If the size of the bundled asset is too big and users connection gets interrupted, this can cause bigger troubles for your users as these assets won't be available to install from any other sources than your own collection
- You can also consider creating a regular mod page for your bundled assets on Nexus Mods and call it something like "resources" and host your files there, as long as you are in line with file submission guidelines. You can consider hiding this mod so only people with the link can access it, practically turning your bundled assets into a more easily reachable file if anything goes wrong.
¶ Version selection
The Version column allows curators to choose between different policies in regards to the version of the selected file.
- Exact only (Default): The mod manager will be instructed to pull the exact version of the file used by the curator. This is required for the "Replicate" installation option or for any file where the version history cannot be programatically accessed.
- Prefer exact: The mod manager will be instructed to use the current version, if it still available. If the file has been archived or deleted, the newest version of the file should be used.
- Latest: The mod manager will be instructed to use the newest version of the file the curator had installed. This option is incompatible with the "Same Installer Options" and "Replicate" install options. It also cannot be used for mods where the version history cannot be accessed programmatically.
Generally, a good and stable all-in-one collection should use the "exact only" feature as much as possible to prevent users from having unexpected problems on their ends. For example, different versions of the same mod can have conflictions with different mods, and if your users install a version that you do not use on your collection, they won't be able to get these confliction resolutions automatically.
Latest option is also useful in some cases, where the mod in question is a simple mod that won't cause any conflictions with anything else. Alternatively, this option also works well if you are the author of the mod and can control the updates yourself.
Prefer exact version can be used in smaller collections that you are not going to be maintaining as much in future. This way, your users can get what they need without you needing to babysit for your collection throughout the years. For example, this is a good option if you are curating a player houses collection that will include only about 10 mods, that updating the collection often does not make sense. Even if one of the mods gets taken down or replaced with a newer version by the author, your users will be able to get the newer version. If there is no such a case, then your users will still get the exact version you were using.
In summary:
- When unsure, use exact only.
- When you have control over the mods, use latest
- When you are managing a small list with low maintenance, use prefer exact.
¶ Install options
The Install column allows curators to select the method of installing the mod to best match what they currently have installed. This may involve including options selected from a mod installer with the collection. This is mainly used in Bethesda games and known as FOMOD options.
Important note:
If the installation / download of a mod with install options gets interrupted for whatever reason, Vortex will try to use the "fresh install" option for that mod in question going forward to solve the problem. Removing a mod and then re - getting from a collection will fix this and users will end up with your preferred install options if you have chosen any.
Mods that show the magic wand icon in this column have been installed using a mod installer (such as a FOMOD) and these options can be included as part of the collection. All mods with installer options can be shown by using the column filter.

¶ Fresh install
The mod manager will be instructed to install this mod as if the user had downloaded it themselves, without any special treatment. If the mod has an installer, it will be shown to the user who can pick the options they require.
If there are different installation options and you are still choosing "fresh install", consider putting an instruction for the mod so your users know what to choose without your interruption.
This option should be used mostly if the mod in question that has installer options is important for different hardware / requirement options. For example, a mod that offers different resolution options or a mod that offers compatibility for an optional paid DLC that your users may not have purchased.
¶ Same install options
If the mod has installer options saved, this option will instruct the mod manager to use the selected options as a preset for the user. The mod installer will not be shown the user but the same choices will be selected.
This option should be preferred as much as possible, if the mod allows it. This way you can limit the number of manual user interractions as much as possible. However, do not choose this option for mods that feature different options for different setups (like different resolution settings, different hardware related options etc.) so your users can choose which option really suits their setup the best.
¶ Replicate
On export of a Collection, this will include a manifest of the files with the checksum values of each. When the user installs this mod, the files inside the archive will be compared to the checksum values saved in Collection and the matching files will be installed to the same paths. This is useful when a mod is packaged improperly or if files need to be deleted or renamed.
For example, if a mod comes without any "installer options" but feauture different files that you may not want your users to use, you can delete some of these files on your end, and then choose the replicate option so your users end up with the same setup.
Note that using the replicate feature will make the collection installation slower, and using it way too often should not be the norm.
Here are some things to keep in mind when using the replicate function:
- Only use it if you want users to have the same folder structure of their mods.
- Do not use it to change some files content.
- It is a reorganization tool, not a change tool for files.
- Try to not use in tandem with binary patching. Will cover this in future sections of this page.
For more information on this feature and an example, see Adding badly packaged mods to a Collection
¶ Instructions
¶ Mod Instructions
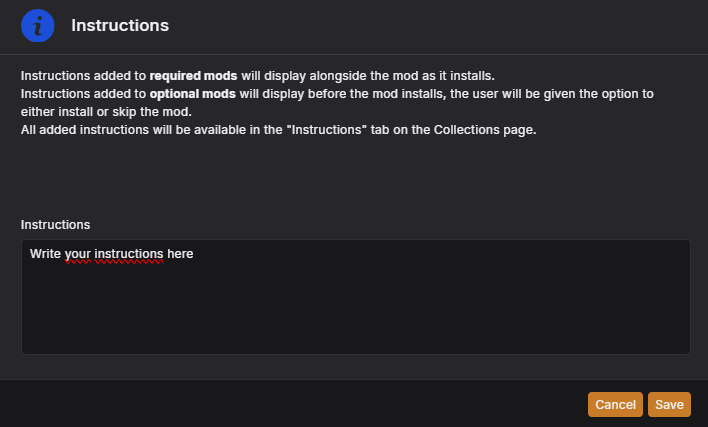
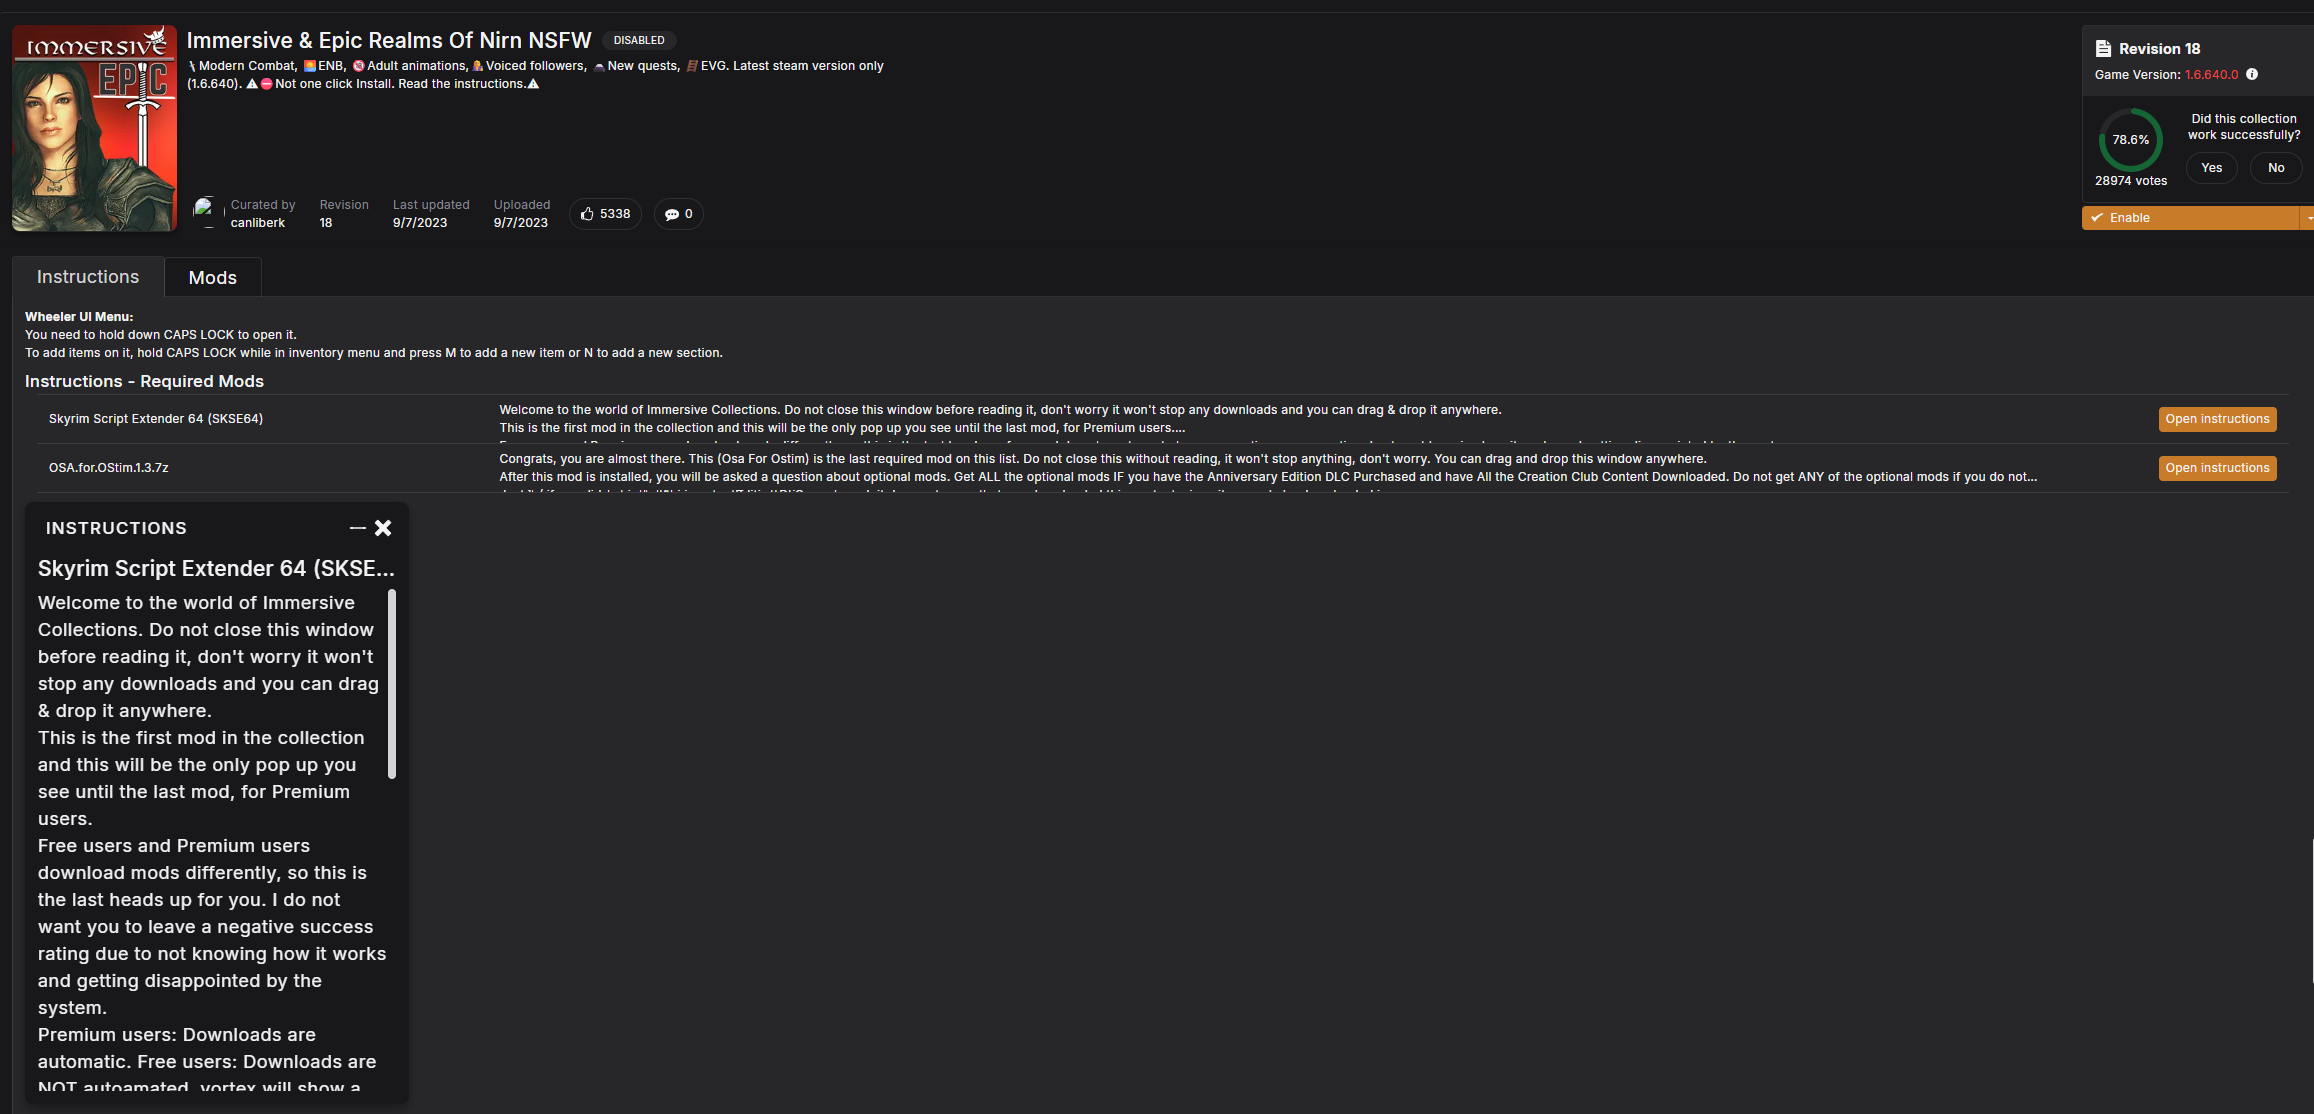
The instructions column includes a button to add or update additional mod-specific instructions to the collection. During the installation, the installation notes will be presented to the user in the form of a floating dialogue box on top of all other windows.
Some things to consider when using instructions:
- Instruction will be shown first, before the mod in question gets installed.
- Users will see a pop up, saying there is an instruction put in place by the curator and they will have the option to see the instruction or skip it, and even have the option to skipp all the future instructions. After this pop up is closed, installation will continue as is.
- Instruction window can be moved around and closed freely by the user, even when the installation is still in progress.
- Instructions can be viewed later at any time on under Collections-> (collection's name) -> Instructions section if you scroll down.
Here are some useful scenarios where you can use instructions for:
- Installing some mods that feature different installer options that you won't be automatically filling for different hardware / software compatibility.
- Explaining what your optional mods are supposed to do and why they should / shouldn't install these.
- Welcoming users and showing everything you want users to read in one place before any installation ever starts by putting an instruction on the first mod that gets downloaded.
- Farewelling users by showing what they need to do to launch the collection by putting an instruction on the last mod that gets downloaded.
We'll show how you can set which mod gets installed the first and last later down this page.
This is how you add an instruction to a mod:
- Click on "Add" button under instructions section on Collections Workshop
- You will be taken to a panel where you'll be writing your instructions.

This is how your users can view your instructions at any time later under Collection Instructions section. Once a user clicks on "open instructions" button, they will be able to see the same black instruction pop up.
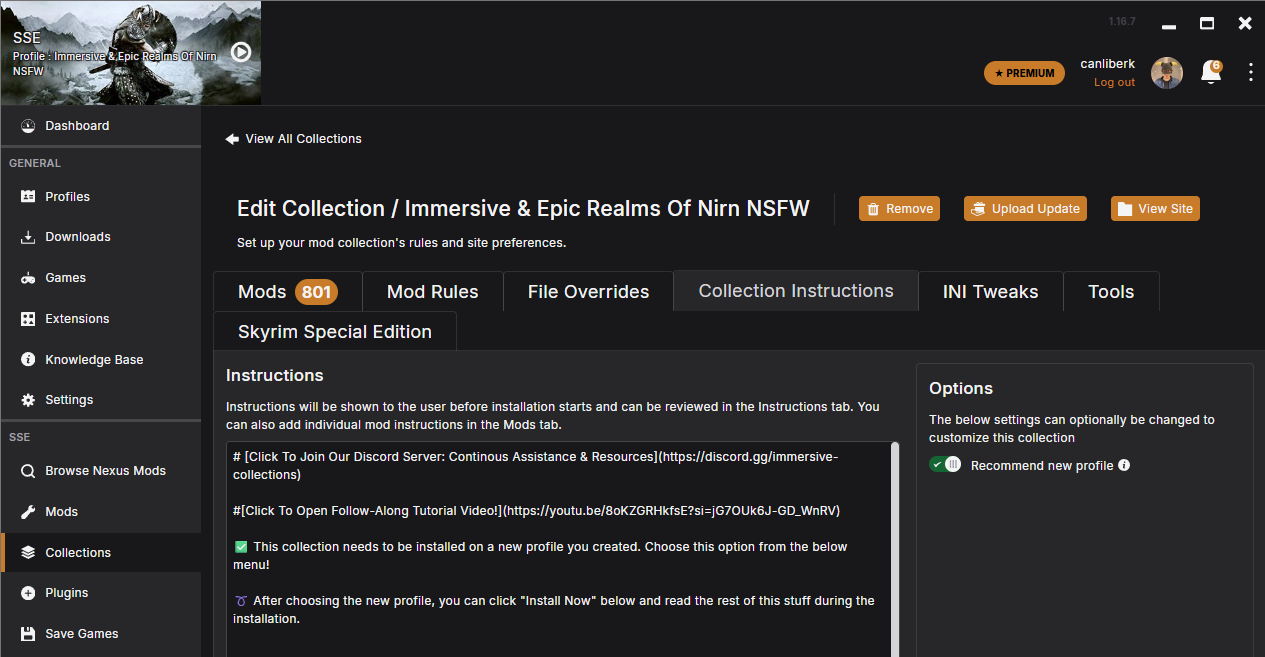
¶ Collection Instructions
Even though this is technically not a "mod option" so it should not be featured here, I figured it would be a good idea to mention it here as well just in case. This is a newer feature of collections, that let's you write collection - wide instructions for your collection. Users will see this section first when they view your collection on Vortex, so it is a good idea to use this place as best as possible. What you write here is also going to be shown to users as the first thing on Vortex once they add your collection, in a small pop up.
Things to consider when writing collection instructions:
- If there are any additional setup instructions, this is the place you need to mention
- If this collection is a stand alone one, always click the "recommend new profile" option so users do not install your collection on top of another one.
- If this collection is an add - on or a small thematic one, do not click the "recommend new profile" option so users can enjoy your collection on top of their own setup.
- This section is the first one that gets read by the users, so it is a good section to mention any collection requirements like system requirements, important links, or even ways to reach out to you.
- Even though users should usually know it by this point, this is also a good spot to mention how free and premium Nexus memberships work for collections. Some users will be obvious to the differences and if you do not want them to take their frustration out of you, you can usually mention how the installation works in general here.
- You can include links, emojis and edit your instruction using markdown styling. More info about markdown can be found here: Markdown guide for collections
¶ Binary patching
When enabled, this option will export changes the curator has made to the files contained in a mod. See Binary Patches in Collections for full details.
This is a very useful, yet situational tool at your disposal that you can use to just pack minor changes in an otherwise major mod, without having to repack the entire mod that can be problematic due to many reasons.
For example, you may just want to change which texture gets applied on a mod, or you may just want to change the damage multiplier of a weapon without changing the entire mod. In such cases, you may not always have the option to change the original mod, as you are not the author, and you may not have the option to just overwrite only that small part of the mod, as the files may be packed in such a way that let's you either use the entire mod as-is or nothing else.
In short, binary patching is a modification for a mod that you can use.
You should not use binary patching in these conditions however:
- Removing entire files and file structures in a mod
- Ensuring which version users use for a specific mod
- Adding extra files to a mod
Here are some things that you need to keep in mind when using binary patching:
- Only use "exact only" version for your mods, since the mod version being different can cause the entire binary patching to be obsolete.
- Try to stay away from using it in combination with "replicate" function if you can. If you can't avoid it, binary patching and replicate functions can still be used in tandem, but i have yet to see an instance where this was needed. Theoretically, you can remove some unnecessary files from a mod and then edit the remaining parts of it with binary editing.
- Use "same installer options" for binary patching, as choosing different options can cause the entire mod folder and files to be different, causing problems.
- By default, binary patching allows for limiting customization over a mod, which is around 20% of the entire mod. If you need even bigger customization options, it may be a good idea to get in touch with the author.
- Binary patching will cause the collection upload times to get increased. It can also increase the installation time of collections for end users.
- If the size of the mod is big, binary patching will take even longer. Try to avoid it for big mod files if you can.
In summary:
- Binary patching is a complex tool at your disposal that you should not overuse for every single mod.
- Do not try to combine binary patching with other tools at your disposal.
- Use it in cases where it may not be possible to contact the mod author.
¶ Installation Phases
This column is hidden by default but can be shown by using the settings icon in the top-right corner of the table.
The Phase column determines the installation phase that a mod is a part of. Installation phases are groups of mods that are installed together before running a deployment and moving on to the next phase. This feature is useful if you wish to include mods that check for the presence of files for other mods or content during the installation. For example, a mod installer (FOMOD) may include patches based on the presence of plugins in the data folder.
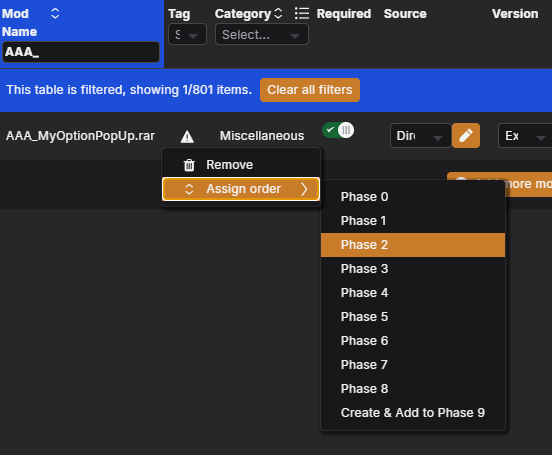
By default all mods are assigned to Phase 0 - meaning that they will be installed in a quase random order and Vortex will deploy the installed mods at the end of the collection install. If there are multiple phases, let's say with mods assigned to Phase 0, 1 and 2, then this is the installation and processing order that Vortex will follow:
- All mods assigned to Phase 0 are installed, once that is done, Vortex will deploy all installed files before proceeding.
- Now all mods from Phase 1 are installed, at the end of this phase, Vortex rund another deployment.
- Finally, Vortex moves on to Phase 2 and install those mods, before running a final deployment.
Phases can be assigned using the right-click menu as shown below.
¶ Here are some practical cases which you can use Installation Phases:
- Choose which mod gets downloaded first and last and put an instruction along with these mods to design a good installation process for your users.
- To avoid users seeing missing dependency errors in case of a download / installation process interruption. Vortex will supress these kind of errors during a normal installation, but if the users stops / interrupts the installation for any reason this supression's effect will go away, leaving your users confused. It is a good idea to use first phases for fundamental mods and tools that are required by others and not the other way around.
- Group mods that are relevant to each other for your curating purposes. For example, you can group all player house mods in one phase.
Please note that installation phases have a specific purpose and are not intended as a tool to arbitrarily control the installation order, especially given the fact that, because there is a deployment at the end of each phase, the more phases you add, the more the download/installation process of your collection will be slowed down. Especially for users using external drives with ExFat Formatting, which Vortex can not apply its original deployment method "Hardlink Deployment". In these cases, each deployment will move ALL mod files from scracth since Vortex will revert to "Move Deployment" method and every deployment can add 20-30 minutes on top of the installation time in these cases.